How Long Does It Take to Fix an Oil Leak? (Labor Estimates)

Most oil leak repairs take between 1 and 4 hours, though intensive jobs like rear main seals can require up to 10 hours of labor. The total duration depends heavily on component accessibility and whether the repair is handled by a professional or a DIYer.
🎯 Key Takeaways
Recommended Best Deal Products


- Takeaway 1:Valve cover gasket repairs are the fastest, typically taking 1-2 hours.
- Takeaway 2:Oil pan gasket replacements generally require 2-4 hours of shop time.
- Takeaway 3:Rear main seal repairs are major jobs taking 6-10 hours on average.
- Takeaway 4:European and luxury vehicles often take 30% longer due to engine complexity.
- Takeaway 5:Always account for an additional 60 minutes for diagnostic and cleanup phases.
Fixing an oil leak typically takes anywhere from 1 hour to a full 10-hour day, depending entirely on where the oil is escaping. If you are dealing with a simple valve cover gasket, you can expect to be back on the road in about 90 minutes. However, if your mechanic mentions a rear main seal, you are looking at a multi-day shop visit because the labor alone often exceeds 8 hours. The hardware is rarely the expensive part; the clock is what drives your total cost.
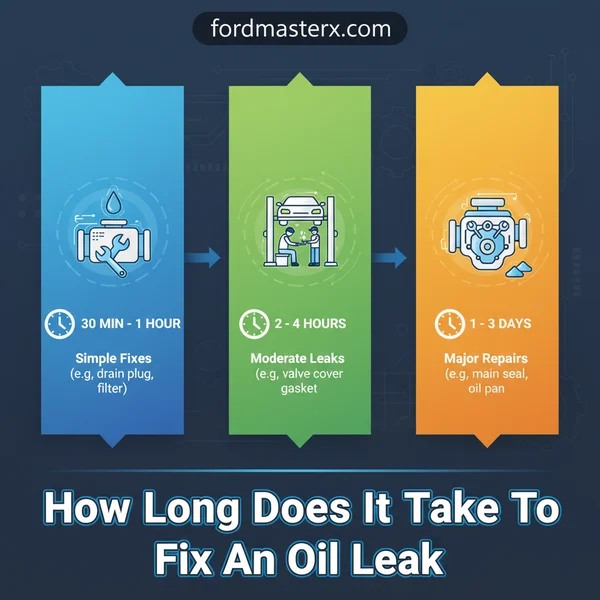
Understanding these labor estimates is critical for budgeting and scheduling. Labor costs usually make up 70% to 90% of an oil leak repair bill, as the parts—like rubber gaskets or silicone seals—are often relatively inexpensive. By knowing the standard time requirements for specific components, you can accurately gauge whether a service quote is fair and how long your vehicle will be out of commission.

Prime for Young Adults — 6 Months Free
Students and 18–24s get six months of Prime free, then half price.
Start 6 Months Free As an Amazon Associate I earn from qualifying purchases.Average Labor Hours for Common Oil Leak Locations
The location of the leak is the primary driver of the clock. Generally, the higher up the leak is on the engine, the faster it is to fix. Mechanics use “flat-rate” manuals to estimate these times, but the following ranges represent what you will actually see on a service invoice for most modern vehicles.

Upper Engine and Surface Seals (1 to 3 Hours)
Valve cover gaskets are the most common leak point and usually the fastest to repair. Since these sit at the very top of the engine, a mechanic only needs to remove a few peripheral components, such as spark plug wires or plastic vanity covers, to access them. These are high-reward repairs that stop the smell of burning oil quickly.
- Valve Cover Gasket: 1 to 2 hours. This is a straightforward “bolt-off, bolt-on” procedure.
- Oil Pressure Sensor/Switch: 1 hour. These often leak through the electrical connector and are usually easy to reach.
- Camshaft Seals: 2 to 4 hours. These take longer because the timing belt or chain components usually need to be partially disassembled.
Lower Engine and Internal Seals (4 to 10+ Hours)
As you move toward the bottom of the engine, the labor time increases significantly. Gravity makes these leaks messy, and structural components often stand in the way of the fix. For example, oil pan gaskets are often blocked by subframes or suspension components, requiring the mechanic to lift the engine slightly or remove the crossmember entirely.
- Oil Pan Gasket: 2 to 6 hours. The wide range depends on whether the technician has clear access or must drop the exhaust and subframe.
- Timing Cover Gasket: 4 to 8 hours. This requires removing all front-end belt-driven accessories, like the alternator and AC compressor.
- Rear Main Seal: 6 to 10 hours. This is the most intensive repair possible. The transmission must be completely disconnected and lowered from the vehicle to reach the seal where the engine meets the gearbox.
From Start to Finish: Oil Leak Repair Timelines and Processes Explained
Determining how long it takes to fix an oil leak is not a one-size-fits-all calculation. The timeline can range from a quick thirty-minute tightening of a bolt to a multi-day engine teardown depending on the source of the leak and your mechanical experience. This guide provides a comprehensive breakdown of the repair process, helping you estimate the time investment required for various scenarios while ensuring the job is done correctly. Understanding these stages is critical because rushing an oil leak repair often leads to improper gasket seating, which results in the leak returning within a few hundred miles.
Step 1: Identifying the Source and Severity
What you need: Engine degreaser, a flashlight, a shop rag, and potentially a UV leak detection kit (dye and specialized light).
Instructions: Before you can estimate repair time, you must find the “highest and furthest forward” point of the leak. Oil travels down and back due to gravity and wind while driving. Spend 30 to 60 minutes cleaning the engine bay with degreaser and a low-pressure hose. Once dry, run the engine for 15 minutes or take a short drive. Use your flashlight to trace the fresh oil trail. If the leak is slow, you may need to add UV dye to the oil and check it after 24 hours of driving. Pinpointing the exact component—whether it is a simple valve cover gasket or a complex rear main seal—is the only way to accurately predict your timeline.
Pro Tip: Never assume the lowest drip point is the source; a leaking valve cover at the top of the engine can make it look like your oil pan at the bottom is failing.
Step 2: Preparation and Parts Acquisition
What you need: Your vehicle’s VIN, a service manual or repair database access, and the specific replacement gaskets or seals.
Instructions: This stage typically takes 1 to 2 hours of research and shopping, plus potential delivery time. Use your VIN to ensure you are buying the exact gasket revision for your engine model, as mid-year production changes are common. Collect all necessary tools, including a torque wrench (essential for oil-tight seals), socket sets, and scrapers. If you are using RTV (Room Temperature Vulcanizing) silicone instead of a pre-cut gasket, ensure you have the correct type (usually “Ultra Grey” or “High-Temp Red”). Having everything staged before you drain the oil prevents your car from being stuck on jack stands for days while you wait for a $5 O-ring.

Audible — Listen Free for 30 Days
One free credit a month and thousands of titles included.
Listen Free for 30 Days As an Amazon Associate I earn from qualifying purchases.Pro Tip: Buy extra plastic upholstery clips and a few spare bolts; engine plastics and old fasteners often break during disassembly, adding hours to your project if you aren’t prepared.
Step 3: Gaining Access to the Component
What you need: Basic hand tools, a labeled organizer for bolts, and masking tape to label disconnected electrical connectors.
Instructions: Access time varies wildly. For a valve cover, you may spend 45 minutes removing air intake tubes, spark plug wires, and wiring harnesses. For an oil pan leak, you might spend 2 hours removing skid plates or even loosening engine mounts to jack the engine up for clearance. Be methodical and take photos of the engine bay before and during disassembly. Labeling every wire and hose you disconnect will save you hours of frustration during the reassembly phase. This stage is where many “quick” 2-hour jobs turn into 6-hour marathons because of rusted bolts or obstructed access.
Pro Tip: Use a piece of cardboard with a rough drawing of the engine component to poke your bolts through; this keeps bolts of different lengths in their correct relative positions.
Step 4: Removing the Old Seal and Surface Preparation
What you need: Plastic or brass scrapers, brake cleaner, and lint-free shop towels.
Instructions: This is the most critical step for a permanent fix and takes roughly 30 to 90 minutes. Once the component is removed, you must eliminate every trace of the old gasket or silicone. Use a scraper carefully to avoid gouging aluminum surfaces, which creates permanent leak paths. Follow up with a lint-free towel soaked in brake cleaner to remove all oil residue. The mating surfaces must be “squeaky clean” and bone dry. If you are replacing a press-fit seal (like a camshaft seal), use a specialized seal puller to avoid scratching the metal shaft, which would require a much more expensive repair.
Pro Tip: Avoid using “Scotch-Brite” pads or abrasive “cookies” on a drill; the grit can fall into the engine oil passages and cause catastrophic bearing failure later.
Step 5: Installing the New Gasket or Seal
What you need: The new gasket, a torque wrench, and potentially a gasket adhesive or RTV silicone.
Instructions: Installation usually takes 1 to 3 hours depending on complexity. Position the new gasket carefully. If the service manual calls for RTV in specific corners (common where the timing cover meets the engine block), apply a small 1/8-inch bead only in those spots. Lay the component back in place, being careful not to smear the RTV. Start all bolts by hand to avoid cross-threading. Look up the specific torque sequence for your vehicle—usually, you start from the middle and work outward in a “criss-cross” pattern. Tighten the bolts in two or three stages (e.g., 5 ft-lbs, then 10 ft-lbs, then final spec) to ensure even pressure.
Pro Tip: If using RTV, “finger-tighten” the bolts and wait one hour for the silicone to skin over before performing the final torque to prevent squeezing all the sealant out.
Audible Premium Plus — Annual Membership
12 audiobook credits up front, plus the full Audible catalogue.
See Annual Plans As an Amazon Associate I earn from qualifying purchases.Step 6: Reassembly and Fluid Management
What you need: New engine oil, a new oil filter, and your previously removed components.
Instructions: Reinstall all the peripherals you removed in Step 3, which typically takes about 60 to 90 minutes. Refer to your photos and labels to ensure every vacuum line and electrical sensor is clicked back into place. If you had to drain the oil to fix an oil pan or timing cover leak, now is the time to refill it with the manufacturer-recommended grade. Check your coolant levels as well if you had to remove any water hoses. Double-check that no tools are left in the engine bay and that all wires are routed away from hot exhaust manifolds or moving belts.
Pro Tip: While the oil is drained, always replace the crush washer on your oil drain plug; it is a common $1 part that causes many “mystery” leaks.
Step 7: Curing and Final Leak Verification
What you need: Patience and a clean piece of cardboard.
Instructions: This final stage is often overlooked but takes 2 to 24 hours of “waiting” time. If you used RTV silicone, you must let it cure for at least 24 hours before driving the vehicle to ensure the seal can withstand oil pressure. Once cured, start the engine and let it idle for 15 minutes. Place a clean piece of cardboard under the engine to catch any immediate drips. After the idle test, take a 20-minute test drive to get the oil up to operating temperature. Return home and inspect the repair area with your flashlight. If the cardboard remains dry after a night of sitting, the repair is successful.
Pro Tip: Do not “rev” the engine immediately after a repair; high oil pressure on a fresh seal that hasn’t fully seated can cause a blowout.
✅ Final Checklist
- Mating surfaces were cleaned with brake cleaner and are free of old gasket debris.
- All bolts were tightened using a torque wrench to the specific manufacturer’s foot-pound or inch-pound rating.
- Electrical connectors and vacuum lines have been reattached and “clicked” into place.
- Engine oil has been refilled to the “Full” mark on the dipstick.
- The vehicle sat long enough for any liquid sealants (RTV) to fully cure before the engine was started.
Important Notes:
- Safety Warning: Always use jack stands—never rely on a floor jack alone when working under a vehicle. Wear eye protection to prevent oil and degreaser from entering your eyes.
- When to Seek Help: If the leak is coming from the Rear Main Seal or the Timing Chain Cover on a front-wheel-drive car, these often require specialized tools and engine support bars. Consult a professional if the repair requires removing the transmission or subframe.
- Estimated Time and Cost:
- Valve Cover Gasket: 2-4 hours | $40 – $150 (DIY)
- Oil Pan Gasket: 3-6 hours | $50 – $200 (DIY)
- Rear Main Seal: 8-12 hours | $100 – $300 (DIY / High Difficulty)
Factors That Impact Repair Duration and Complexity
Not every engine is built the same, and two different cars with the same “oil pan leak” can have vastly different repair times. Your vehicle’s architecture dictates how much “pre-work” a mechanic must do before they even see the leaking seal.

Vehicle Make and Origin
Domestic and Japanese economy cars are usually designed with serviceability in mind. A four-cylinder Honda or Ford often has plenty of “elbow room” in the engine bay. Conversely, European luxury brands like BMW, Audi, or Mercedes-Benz often utilize tightly packed engine compartments. On these vehicles, even a simple gasket replacement might require a specialized “service position” where the entire front bumper and radiator assembly are moved forward, adding 2 to 3 hours of labor before the actual repair begins.
Engine Configuration and Drive Type
The layout of your engine significantly dictates how long a mechanic spends navigating the engine bay. A more complex drivetrain adds layers of components that must be removed.
- Inline 4-Cylinder: Generally the fastest to repair due to fewer parts and better tool clearance.
- V6 or V8 Engines: These have two valve covers instead of one, which can double the labor time for upper-end leaks.
- All-Wheel Drive (AWD): AWD vehicles have transfer cases and extra drive shafts that often block the oil pan. Removing these components can add 2 or more hours to a standard oil pan job.
- Turbocharged Engines: Turbo oil return lines and heat shielding add complexity and more potential leak points that are difficult to reach.
Professional Mechanic vs. DIY Time Comparison
Deciding whether to tackle an oil leak yourself or take it to a shop involves more than just a cost calculation; it is a significant time commitment. A professional mechanic working in a fully equipped service bay will almost always outpace a hobbyist working in a driveway or home garage.
The Professional Edge: Speed and Specialized Tools
Mechanics have access to hydraulic lifts, pneumatic tools, and vehicle-specific service manuals that streamline the repair process. What might take you twenty minutes to reach with a standard hand wrench often takes a pro thirty seconds with a power tool. On average, a professional can complete a standard gasket replacement in 50% to 70% less time than an amateur.
- Expertise: Pros know exactly which components need to be removed to access the leak without the “trial and error” phase.
- Tool Accessibility: No time is lost running to the hardware store for a deep-well socket or a specialized torque wrench.
- Cleanup Efficiency: Shops use industrial parts washers and professional-grade degreasers, making the “messy” part of the job much faster.
The DIY “Learning Curve” Factor
If you are fixing a specific leak for the first time, expect to double or even triple the “book time” labor estimate found online. You will likely spend a significant portion of your afternoon watching tutorial videos, identifying parts, and triple-checking your work to ensure the leak is truly gone. For example, while a pro might swap an oil pan gasket in 90 minutes, a DIYer should budget 4 to 5 hours to account for cleaning the mating surfaces and waiting for sealants to set.
Understanding Diagnostic and Testing Time Requirements
The actual “wrenching” is only one part of the total timeline. Before a technician can turn a single bolt, they have to pinpoint the exact source of the fluid, which can be surprisingly time-consuming in a crowded, modern engine bay.
The “Clean and Observe” Phase
Oil travels. A leak at the very top of the engine can drip down and coat the bottom, making it look like a much more expensive rear main seal leak. To be accurate, mechanics often perform a “degrease and drive.” This involves cleaning the engine thoroughly to remove old sludge, running it for 15–30 minutes, and then inspecting it with a high-powered light to see where the fresh oil first emerges.
- Visual Inspection: Usually takes 30 to 60 minutes of active labor.
- UV Dye Testing: If a leak is very slow, a fluorescent dye is added to the oil. You may be asked to drive the car for a day and return for a quick 10-minute inspection under a UV blacklight.
Post-Repair Verification
A reputable shop won’t hand back your keys the second the last bolt is tightened. They must verify the fix to ensure the vehicle is safe. This adds roughly 30 to 45 minutes to the total service time. The technician will top off the fluids, bring the engine to operating temperature, and check for any “weeping” around the new seal. This verification step is crucial; it prevents the frustration of a “fixed” leak reappearing the next morning.
Final Thoughts on Oil Leak Repair Times
While a simple valve cover gasket might only keep your car in the shop for a morning, complex internal seals can easily turn into a multi-day project. The key to a fast turnaround is a proper, early diagnosis. Knowing exactly where the oil is escaping prevents wasted hours on unnecessary repairs and helps you plan your schedule. If you notice dark spots on your driveway, don’t wait for the “Low Oil” light to flash. Your first step should be to check your oil level and clean the engine to spot the source. Contact a trusted technician today for a diagnostic quote—catching a leak early is the best way to save both time and money.
❓ Frequently Asked Questions
Why do some oil leaks take much longer to fix than others?
The duration depends entirely on component accessibility. While a valve cover sits on top of the engine, a rear main seal requires removing the entire transmission to access, significantly increasing labor hours.
How much extra time should I plan for a DIY oil leak repair?
Generally, you should triple the professional labor time for a DIY project. This accounts for setup, limited tool access, and the learning curve associated with your specific vehicle’s layout.
Will a shop finish my oil leak repair in a single day?
Most common leaks like oil pans, gaskets, or sensors are finished same-day, provided the shop has the parts in stock and does not encounter snapped bolts or hidden damage.
How long does it take for engine sealants to dry after a repair?
While the physical repair is quick, RTV silicone sealants often used in gaskets require 2 to 24 hours to fully cure before the engine can be safely pressurized.
Is diagnostic time typically included in the total repair hours?
Usually not. Most shops charge a separate 0.5 to 1.0 hour diagnostic fee to confirm the leak’s origin before beginning the actual repair labor clock.
Does a turbocharger increase the time needed to fix an oil leak?
Yes, turbo-related oil lines are often located in cramped spaces and may require the removal of heat shields or intake components, adding 1-3 hours to the job.