
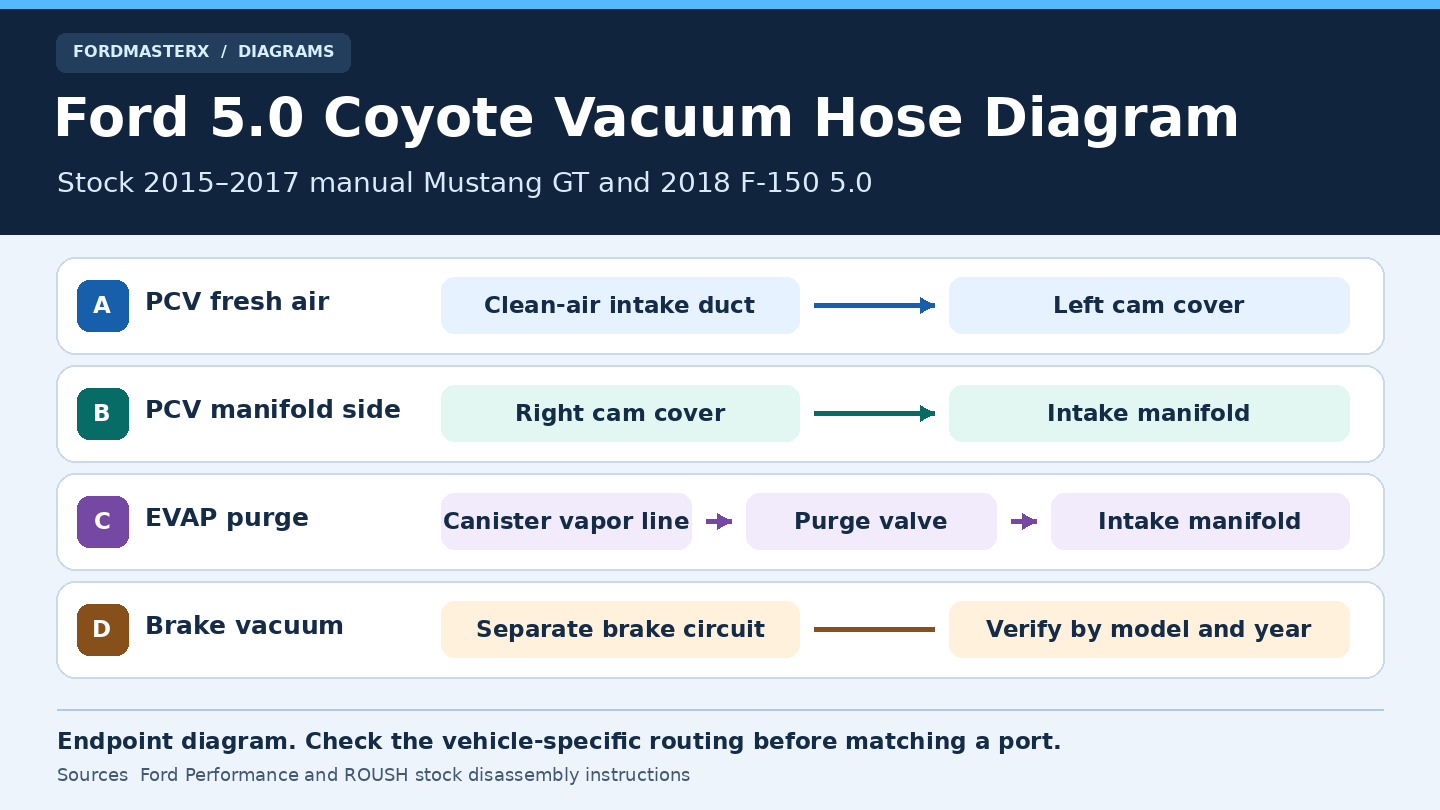
Ford 5.0 Coyote Vacuum Hose Diagram 2026 | Essential Guide

On a stock 2015–2017 Mustang GT with manual transmission or a 2018 F‑150 5.0, the clean-air duct connects to the left cam cover through the fresh-air hose. The right cam cover connects to the intake manifold through the positive crankcase ventilation (PCV) hose. The evaporative emissions (EVAP) purge line is a separate circuit, and the brake booster has its own vacuum plumbing on these examples.
Use this Ford 5.0 Coyote vacuum hose diagram to match a hose by its two endpoints. The diagrams cover documented stock configurations. For a different model year or an intake swap, match the hardware before using any port location shown here.


Ford 5.0 Coyote vacuum hose diagram by circuit
Check Ford workshop information for the specific model and year.
Ford Performance’s stock disassembly photos are the reference for the cam-cover and intake connections. The kit instructions later show replacement plumbing, which applies to the kit. Use the stock sections for comparison with an unmodified engine. 2015–2017 Mustang GT stock disassembly · 2018 F‑150 5.0 stock disassembly
Which Coyote hose layout matches your Ford?


Start with the model year, the vehicle, and the intake that is actually installed. A Mustang GT manifold can be fitted to a different year of Mustang, and a swap may leave the original cam covers in place. You need a reference that matches the hardware at both ends.
| Configuration | What you can match | Where to verify |
|---|---|---|
| 2011 Mustang GT with manual transmission | Left cover to clean-air duct, right cover to manifold, separate EVAP tube and valve connector. | Ford Racing’s 2011 Mustang GT manual-transmission instructions, stock disassembly pp. 12–13 |
| 2015–2017 Mustang GT with manual transmission | Left cover to clean-air duct, right cover to manifold, separate EVAP tube, and a separate brake vacuum assembly. | Ford Performance stock photos, pp. 13–16 |
| 2018 Mustang GT example | PCV cover and intake connections, brake aspirator at the clean-air duct, and a separate purge-valve tube and electrical plug. | Ford Performance/ROUSH stock photos, pp. 11–14 |
| 2018 F‑150 5.0 | Left cover to clean-air duct, right cover to manifold, plus a separate brake vacuum assembly. Some stock assemblies differ. | Ford Performance/ROUSH stock photos, pp. 9–12 |
| 2021–2024 F‑150 5.0 | Crankcase make-up air at the clean-air duct, right-side PCV hose to the manifold, separate EVAP solenoid and manifold hose. Use model-specific brake information. | Ford Performance stock photos, pp. 9–11 |
For an earlier Coyote, an unlisted year, a different brake configuration, or a modified engine, use the workshop information for that specific truck or Mustang. Match the VIN for factory fitment and the intake part identification for an engine with swapped hardware. The broad Ford F‑150 vacuum-line overview can help you orient yourself if you are still identifying the engine family.
Where the 5.0 Coyote PCV hoses connect


Fresh-air hose at the intake duct
Find the clean-air duct between the air filter box and the throttle body. On the documented stock layouts, the crankcase fresh-air hose attaches to this duct and runs to the left cam cover. The cam cover is also called the valve cover.
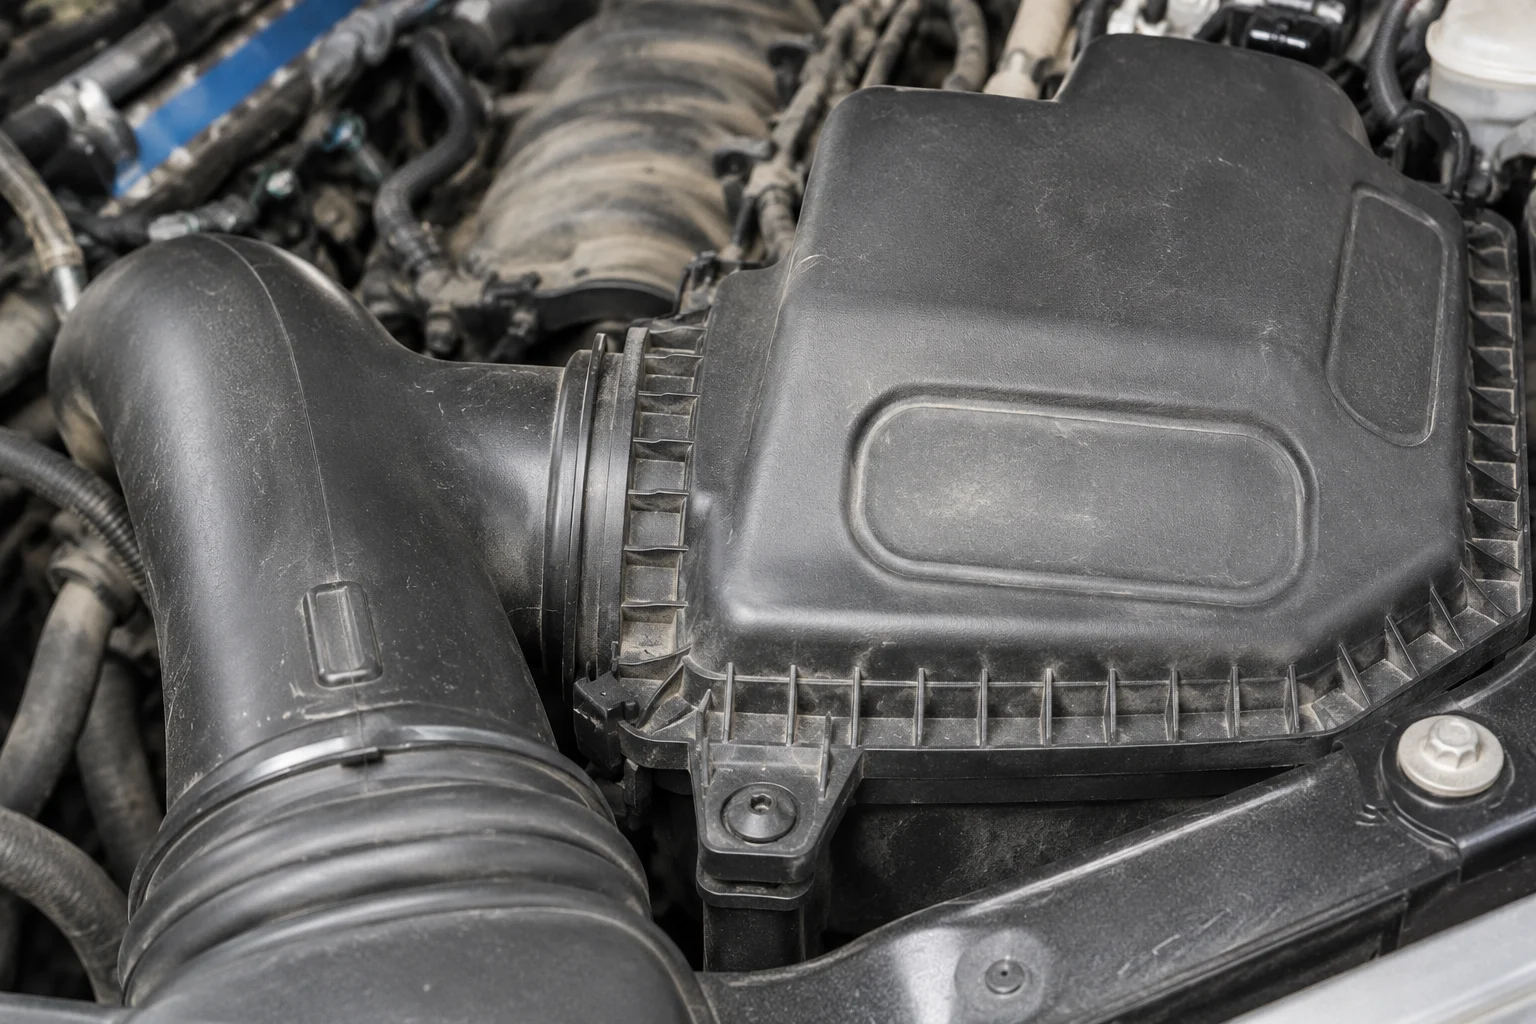
The duct is an easy place to mix up hoses after work on the air box. The 2018 F‑150 stock disassembly instructions show both the fresh-air hose and a brake vacuum connection there. Follow the loose hose back before judging it by where it happens to sit next to the duct. A line that terminates at the cam cover belongs to the crankcase ventilation path shown above. Ford Performance/ROUSH 2018 F‑150 stock intake duct photo
On the later F‑150 example, Ford Performance refers to the duct connection as the make-up air tube. That wording describes the fresh-air side of crankcase ventilation. Look for the picture of the stock air intake before the kit replaces it. Ford Performance 2021–2024 F‑150 stock intake removal
Manifold-side PCV hose at the right cam cover


On the layouts above, trace the other PCV hose from the right cam cover to the intake manifold. Ford Performance sometimes calls this the PCV purge line. In that wording, it means the crankcase hose. The EVAP purge valve is a different component.


If the right-side hose is already in your hand, identify the cam-cover end first. Then look for the matching manifold fitting in the stock photo for your year. On a used manifold, compare the fitting location and connector style with the old manifold before assuming the hose reached the same port on both. The molded shape can help you identify the correct hose once you know the endpoints. Ford Performance GT350 manifold upgrade stock removal, pp. 6–8


How to identify the EVAP purge hose
Look for a purge valve with an electrical connector and a vapor-line connection. The valve meters fuel vapor from the charcoal canister into the intake. A hose that follows the purge valve toward the vapor line belongs to the EVAP circuit, even if it sits next to a PCV connector.
The stock 2015–2017 manual Mustang GT photos show a green lock at the purge tube connection. Treat that color as a clue for the photographed setup. Identify the valve, confirm the electrical plug, and follow both sides of the vapor path. Use the same endpoint check if a replacement connector is a different color. Ford Performance Mustang EVAP purge tube photo
The 2021–2024 F‑150 kit guide makes the distinction especially clear. The stock removal shows the right valve-cover PCV line, then shows the EVAP solenoid and its hose as separate pieces. When an intake has been off, compare those two connections before trying to diagnose a code. Ford Performance’s 2021–2024 F‑150 5.0 instructions, stock PCV connection p. 10 and EVAP connection p. 11


How to recognize the brake booster vacuum branch
The brake-assist plumbing is a separate system on the stock examples discussed here. The 2018 Mustang document uses the term brake aspirator. The 2018 F‑150 instructions identify a separate brake vacuum hose near the fresh-air hose at the duct. Ford Performance Mustang stock brake hose identification · Ford Performance/ROUSH Mustang aspirator identification
The shape of the full hose assembly can differ within the same truck application. ProCharger’s 2018 F‑150 kit instructions illustrate factory assemblies with one or two check valves and separate their instructions by the assembly present. Use those photos as a comparison for the original parts. ProCharger stock check-valve comparison, printed p. 25
Ford’s recall filing documents electronic brake boosters on certain 2021 F‑150 trucks. Verify the brake system on a newer F‑150 independently from its PCV and EVAP hoses. Ford’s recall report 21V‑533
If the brake pedal suddenly takes more effort or you suspect a disconnected brake-assist line, keep the vehicle parked and have the brake system checked. Give the technician the VIN so they can check the correct Ford workshop information.
What the small lines near the back of the intake may serve
Include the intake manifold runner control (IMRC) system in your search if a small line goes to a solenoid or actuator mounted on the manifold. Ford also uses the name charge motion control valve (CMCV). The 2018 Ford OBD document describes a vacuum-operated actuator and an electrically controlled solenoid on the applicable 5.0L Mustang and F‑150 system. That gives you another component to identify when a line near the rear of the intake seems too small for the main PCV hose. Ford 2018 OBD summary, CMCV/IMRC monitor
Identify the actuator or solenoid before using any drawing of the rear ports. Compare its hose and electrical connector with the picture for your manifold. A donor manifold can put a port in a different spot, even if the valve covers and air duct on the car stayed the same. Lund Racing’s 2018 Mustang manifold swap comparison
How to trace a loose Coyote hose after intake work
- Identify the installed intake. Record the model year and confirm whether the manifold and air duct are original. Photograph any labels you can still see.
- Start at the known end. With the engine off and cool, follow the hose from the cam cover, purge valve, or air duct. Leave any suspected brake-assist hose for a technician. Tag that known endpoint on a photo.
- Compare the open end with a stock photo. Check where the hose naturally reaches. Look at the shape of the fitting, retainer, and port, including nearby connections that could be mistaken for it.
- Verify the match before buying parts. Search the parts catalog by VIN and compare the entire assembly. On a swap, identify the donor intake as well. For a possible brake-assist hose, have a technician confirm the circuit before moving the vehicle.
For example, if two lines come off during an air-duct change on a 2018 F‑150 5.0, start at their attached ends. A line to the left cam cover matches Ford’s fresh-air path. The other may be part of the brake vacuum assembly. If you suspect the brake-assist line was disturbed, keep the truck parked and have the circuit confirmed. Ford Performance/ROUSH 2018 F‑150 connection photos
If the intake was swapped, write down the year of the car and the year of the donor manifold separately. Lund Racing’s documented 2018-manifold-on-2015-Mustang swap shows that some connections move and the purge arrangement changes. Use it to understand why the same hose can look close to the right spot and still require a different routing reference. Lund Racing manifold port comparison
What to bring when you order a replacement hose
Give the parts counter the VIN, engine size, and the names of both endpoints. Add a photo of the entire line, a close-up of each connector, and a picture of any molded branch or valve. If the intake came from another vehicle, include the donor intake identification. A description such as “passenger-side cam cover to manifold” is easier to check against a parts drawing than “small vacuum hose by the throttle body.”
Use the catalog illustration to check whether Ford supplies the piece separately or as part of an assembly. A branch near the air duct may belong to a longer hose or have a valve built into it. Compare that layout with the parts on your vehicle before ordering. Ford Parts example of a 5.0L brake vacuum tube listing
What a rough idle or lean code can tell you
P0171 and P0174 are lean codes for bank 1 and bank 2, respectively. They describe what the fuel-control system detected. A disconnected hose, a sealing problem, and other fuel or air faults can lead to similar code results, so begin with evidence from your engine. Ford gasoline OBD system operation summary
If the idle changed immediately after intake work, look at the parts that moved first. Compare the duct couplers, the PCV connections, and the purge-valve hose with your before photos or the stock diagram. A fully connected hose on the wrong fitting can look tidy while leaving the intended port open.
Save the scan tool’s freeze-frame data before clearing anything. A technician can compare fuel trims at idle and higher engine speed and decide whether a leak test makes sense. The Ford P0171 and P0174 diagnostic guide explains the fuel-trim patterns and other causes to consider.
A purge-related code can justify checking the purge valve’s connector and hose seating, especially after manifold work. Keep the code, engine symptoms, and physical observations separate. If the hose looks seated, further EVAP testing can help locate the fault before you order a valve or tube. Ford OBD summary, EVAP monitor section
Coyote vacuum hose questions
Can a Mustang GT diagram be used on an F‑150 5.0?


You can compare the basic PCV endpoints on the documented stock examples. Use an F‑150 diagram to identify the actual duct and manifold ports, brake assist assembly, and related fittings on your truck. If the truck has a donor intake, cross-check both configurations.
Where is the loose hose at the rear of the intake supposed to go?
First identify its other end. The rear location alone leaves several possible circuits, and swapped manifolds can move ports. Follow the hose to the named component, then use that model’s stock removal photo or workshop diagram to find the matching port.
Where do you find the factory diagram for a model outside this guide?


Use Motorcraft technical resources and look up the workshop information for your specific model, engine, and year. Start with intake air distribution, crankcase ventilation, evaporative emissions, or brake actuation according to the known end of the line. If the underhood emissions label includes a routing sketch, use it as an additional check.
Match the hose before matching the port
A Ford 5.0 Coyote vacuum hose diagram is most useful when you start at the component you can identify. On the documented stock setups, the left cam cover leads to the clean-air duct and the right cover leads to the manifold. A hose at the electrically controlled purge valve belongs to EVAP. Trace each branch separately, check the year and installed intake, and use the applicable Ford workshop information when a fitting or brake circuit differs from the diagram.