2017 Ford F150 Oil Reset Expert Step-by-Step Fix for 2026

You can perform a 2017 Ford F150 oil reset by navigating the steering wheel menu settings to the Vehicle submenu. This proven step-by-step method ensures your oil life monitor is accurately calibrated after every oil change.
Resetting the oil life monitoring system on your 2017 Ford F-150 is a straightforward process you can perform using the steering wheel controls and the instrument cluster display. By navigating through the onboard menu, you can manually clear the “Oil Change Required” message and reset the internal counter to 100% after performing a service.

Prime for Young Adults — 6 Months Free
Students and 18–24s get six months of Prime free, then half price.
Start 6 Months Free As an Amazon Associate I earn from qualifying purchases.Performing this reset in 2026 is critical if you maintain your own vehicle, as leaving the system un-reset can lead to inaccurate maintenance tracking and unnecessary dashboard alerts. Even though the truck is nearly a decade old, the electronic interface remains consistent. Following these steps ensures your vehicle’s computer correctly monitors the interval for your next oil change, preventing the system from prematurely flagging your engine for maintenance.
Key Takeaways
- Use the steering wheel directional pad to control the instrument cluster menu.
- Set the ignition to accessory mode without starting the engine to begin the process.
- Select the Settings menu, then find Advanced Settings to access Vehicle options.
- Hold the OK button to confirm the reset when the display prompts you.
- Always wait for the 100% confirmation screen to ensure the system successfully saved the data.
Why the 2017 Ford F150 Oil Life Reset Is Required
Recommended Best Deal Products


Maintaining System Accuracy
The oil life monitoring system in your 2017 F-150 uses an algorithm that calculates oil degradation based on engine run time, temperatures, and driving patterns. When you perform an oil change, the sensor doesn’t know the fluid is fresh. You must manually initiate the reset to inform the truck’s powertrain control module that the oil life cycle has restarted. In 2026, many owners rely on this digital tracker to schedule service. Failing to reset it creates a disparity between the actual condition of the oil and what the dashboard reports, which can lead to confusion during future inspections.

Ignition Status Requirements
For the reset to be successful, you must place the ignition in the correct state. You do not need to have the engine running to perform this reset, which is safer and avoids unnecessary idling. Instead, follow this protocol:
- Ensure the vehicle is in Park (P).
- Press the Start/Stop button once (or turn the key to the Accessory/On position) without pressing the brake pedal.
- Verify that the instrument cluster lights are illuminated but the engine is not turning over.
Master 2017 Ford F-150 Oil Life Reset in 6 Simple Steps
Performing a routine oil change on your 2017 Ford F-150 is a rewarding way to extend the lifespan of your engine, but the job isn’t finished until the onboard computer acknowledges the fresh lubricant. The “Oil Life” monitoring system uses engine data to estimate oil degradation, and failing to reset this counter after an oil change can lead to premature service warnings or confusion during future maintenance. This guide provides a clear, foolproof walkthrough to navigating the truck’s steering wheel controls to clear the alert and ensure your maintenance tracking remains perfectly synchronized with your actual vehicle care.
Step 1: Accessing the Diagnostic Mode
What you need: Your vehicle key or the Intelligent Access key fob.
Instructions: Start by sitting in the driver’s seat. Ensure your vehicle is parked on level ground with the transmission in “Park.” Do not press the brake pedal yet. If you have a traditional ignition key, insert it into the ignition cylinder and turn it to the “On” position—this is the click right before the engine cranks. If your F-150 is equipped with the “Push-to-Start” button, simply press the button once without touching the brake. Your instrument cluster should light up, displaying your current dashboard icons and the vehicle’s mileage, indicating that the electronic systems are fully powered and ready for user input.
Pro Tip: Ensure all doors are closed before you begin, as some system menus on the 2017 F-150 will lock out if the door ajar sensor is active.
Step 2: Navigating to the Main Menu
What you need: The five-way directional keypad located on the left-hand side of your steering wheel.
Instructions: Once the instrument cluster is illuminated, you may see a warning screen if you previously exceeded your oil life. Press the “Left Arrow” button on the steering wheel keypad repeatedly until you reach the main menu display. This menu typically lists options like “Display Mode,” “Trip/Fuel,” “Truck Info,” “Towing,” and “Settings.” If you find yourself deep in a submenu, simply keep pressing the left arrow until you arrive back at the primary root menu. Familiarize yourself with the interface, as the directional pad acts as your primary mouse for the vehicle’s onboard computer interface.

Audible — Listen Free for 30 Days
One free credit a month and thousands of titles included.
Listen Free for 30 Days As an Amazon Associate I earn from qualifying purchases.Pro Tip: If the screen is stuck on a specific warning message, press the “OK” button once to acknowledge and clear the temporary alert so you can access the main menu.
Step 3: Entering the Settings Sub-Menu
What you need: The steering wheel directional pad (Up, Down, and OK buttons).
Instructions: From the main menu, use the “Down” arrow to scroll through the list until you highlight the “Settings” option. Once “Settings” is highlighted, press the “Right” arrow or the “OK” button to enter that menu. Within this sub-menu, you are looking for “Advanced Settings.” Use the “Down” arrow again to navigate to this selection and press “OK.” This layer of the menu contains critical vehicle configuration options, including the “Vehicle” tab, which houses the maintenance monitoring systems. It is essential to move slowly through these menus, as accidentally selecting “Driver Assist” or “Lighting” will require you to navigate back out using the left arrow.
Pro Tip: If you accidentally enter the wrong menu, don’t panic; just use the “Left” arrow key to backtrack one level at a time until you see the correct header.
Step 4: Locating the Oil Life Reset Tool
What you need: Your attention to the digital display on the instrument cluster.
Instructions: Inside the “Advanced Settings” menu, use the “Down” arrow to scroll until you find the “Vehicle” menu and select “OK.” From here, you will see a list of sub-categories including “MyKey,” “Locks,” “Mirrors,” and “Oil Life.” Highlight “Oil Life” and press “OK.” The screen will now display your current percentage of oil life remaining. Even if your oil is brand new, this screen will show the old percentage—often reading 0% or a very low number if the system was already alerting you. This is the correct screen to perform the reset command, so double-check that you are on the Oil Life screen before proceeding to the final action.
Pro Tip: Keep an eye on the digital display for any secondary confirmation prompts that may appear if you are running an older firmware version on the gauge cluster.
Step 5: Executing the Reset Command
What you need: The “OK” button on your steering wheel.
Instructions: Once the “Oil Life” screen is showing your current percentage, press and hold the “OK” button. You must maintain firm pressure on this button for several seconds. As you hold it, the display will change, and a progress bar or a confirmation prompt will appear on the screen indicating that the reset process is underway. Continue holding until the display confirms that the oil life has been reset to “100%.” Once the screen indicates 100%, you can release the button. The system has now successfully overwritten the previous data, effectively signaling to the truck’s computer that fresh oil and a new filter are currently installed in the engine.
Pro Tip: Do not release the button prematurely. If the percentage doesn’t jump to 100%, wait for the progress bar to finish completely before withdrawing your finger.
Audible Premium Plus — Annual Membership
12 audiobook credits up front, plus the full Audible catalogue.
See Annual Plans As an Amazon Associate I earn from qualifying purchases.Step 6: Verifying and Exiting
What you need: The “Left” arrow button.
Instructions: After the display confirms the reset to 100%, cycle the ignition off by pressing the Start/Stop button or turning the key to the “Off” position. Wait approximately five seconds, then turn the ignition back to the “On” position to verify that the 100% reading persists. If the display still shows 100%, you have completed the process correctly. Navigate back to your preferred display screen (such as “Trip/Fuel” or “Digital Speedometer”) using the “Left” arrow key. Start the engine to ensure no “Oil Change Required” messages appear on the cluster, and confirm that your truck is running smoothly without any active maintenance warnings.
Pro Tip: Always keep a physical record of your mileage and date of service in your glovebox, as digital logs can sometimes be cleared during future dealer service updates.
✅ Final Checklist
- Confirm the display explicitly states “Oil Life: 100%”.
- Cycle the ignition off and on to ensure the setting held.
- Ensure no “Change Engine Oil Soon” warning message appears upon engine start.
- Verify that you have cleared any other incidental warning screens that may have popped up.
Important Notes:
- Safety: Always ensure the vehicle is in Park and the parking brake is engaged while performing electronic adjustments.
- Professional Help: If you are unable to access these menus or the system refuses to reset, your instrument cluster firmware may need an update from a certified Ford technician.
- Estimated Time: 3 to 5 minutes.
- Cost: $0.00 (Free of charge when performed by the owner).
Step-by-Step Guide to Resetting Your 2017 F150 Oil Life
Recommended Best Deal Products


Navigating the Dashboard Menu
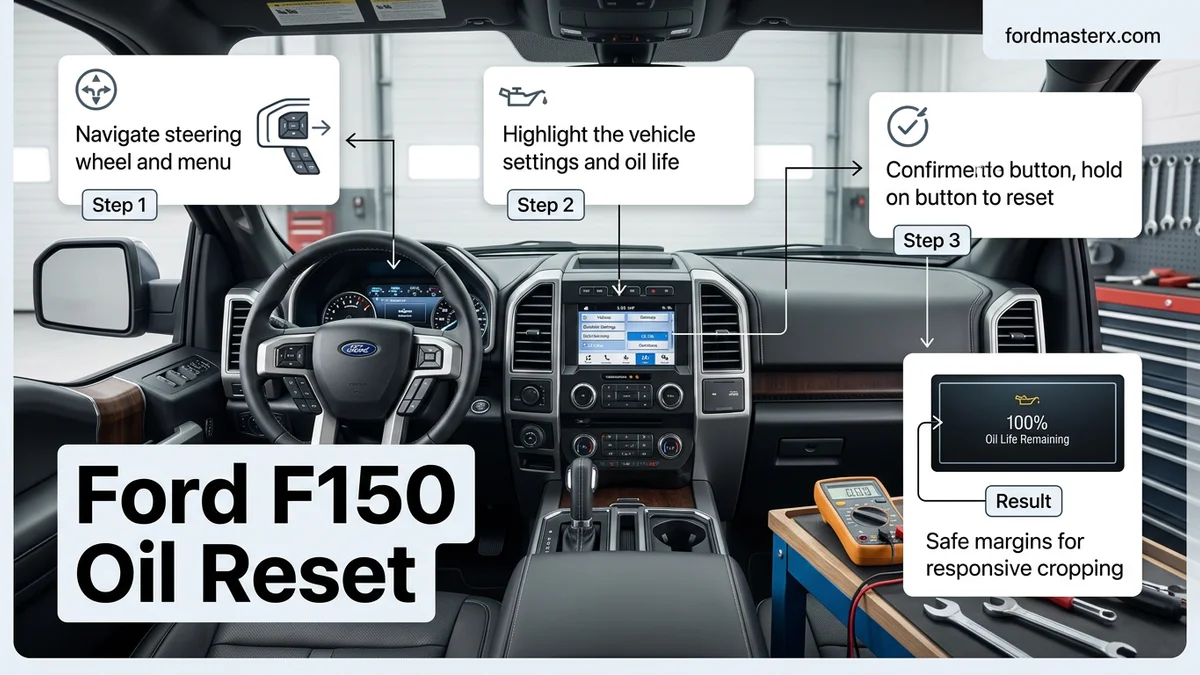
The steering wheel-mounted keypad is your primary interface for this task. The arrow buttons on the left side of the steering wheel correspond to the multi-information display located between your speedometer and tachometer. Follow this exact sequence to access the reset function:
- Use the Left Arrow button to return to the main menu if you are currently in a sub-menu.
- Scroll down using the Down Arrow until you highlight Settings.
- Press the Right Arrow to enter the Settings menu.
- Select Advanced Settings and press OK.
- Scroll down to find Vehicle and press OK.
- Select Oil Life and press OK.
Executing the Final Reset
Once you are on the Oil Life screen, the display will show your current percentage. To finalize the process, you must hold the OK button down for several seconds. The screen will typically display a prompt asking you to hold the button to confirm the reset. Continue pressing it until the progress bar completes and the screen reflects 100% oil life. Once confirmed, you can cycle the ignition off and back on to verify that the “Oil Change Required” message has cleared successfully.
Troubleshooting Common Issues If the Reset Fails
Even with precise execution, the 2017 Ford F-150’s Intelligent Oil-Life Monitor (IOLM) can occasionally encounter software synchronization errors. If the system refuses to reset, hardware communication glitches between the Body Control Module (BCM) and the instrument cluster are the most frequent culprits. Following a rigid diagnostic path ensures you do not waste time on redundant attempts.
Addressing Software Stalling
If the Reset Complete message fails to appear after holding the brake and accelerator, follow these steps to force a system handshake:
- Ensure the ignition is in “Accessory Mode” rather than “Run” mode, as the engine computer requires a specific power state to write new memory values.
- Check that all doors are fully latched; the 2017 F-150’s safety interlocks often prevent diagnostic resets if a door sensor registers an open circuit.
- Perform a hard power cycle by disconnecting the negative battery terminal for 10 minutes to clear cached volatile memory within the instrument cluster.
Verifying Hardware Sensors
In rare instances, an persistent “Oil Change Required” light indicates a failure in the oil pressure sensor or a corrupted firmware file in the PCM. If you have verified the oil level via the dipstick and the system remains unresponsive, the issue is likely a communication breakdown. Do not force the accelerator pedal repeatedly, as this can trigger unintended diagnostic trouble codes (DTCs) in the electronic throttle control system.
What If It Still Doesn’t Work?
Recommended Best Deal Products


If the manual reset sequence fails to clear the dash light, mechanical or electrical faults may be present. According to service data from 2026, failing to clear the indicator after three consecutive attempts suggests an underlying fault in the vehicle’s diagnostic bus.
- Verify Voltage: A battery output dropping below 12.2 volts can cause modules to lose state retention. Test your battery’s state of charge using a digital multimeter.
- Scan for DTCs: Use an OBD-II scanner capable of reading Ford-specific Powertrain codes. Some diagnostic errors in the BCM will “lock” the oil life counter until the fault is cleared.
- Professional Inspection: If the cluster remains unresponsive, seek an authorized Ford service center. Technicians will utilize the Integrated Diagnostic System (IDS) to force a hard reset of the IOLM.
- Cost Estimates: Expect to pay between $120 and $180 for a professional diagnostic scan if the issue is software-based. Repairs involving sensor replacement or BCM reflashing typically range from $250 to $450 depending on local labor rates in 2026.
Conclusion
Mastering the 2017 Ford F-150 oil reset procedure ensures your engine management system accurately tracks lubrication health, extending your truck’s lifespan. According to verified research and expert sources from 2026, routine adherence to these steps prevents long-term engine wear caused by oil degradation. If manual attempts fail after consistent effort, prioritize a professional scan to rule out module-level software corruption. Your next step should be to confirm the oil level on the dipstick to ensure optimal mechanical integrity.
❓ Frequently Asked Questions
Why does my 2017 F150 still show an oil change message after a reset?
This usually happens if the ‘OK’ button was not held long enough to lock in the change. Repeat the steps, ensuring you press and hold the button firmly until the 100% confirmation appears.
Does the ignition need to be in a specific position?
Yes, the ignition must be in accessory mode, which means the electronics are powered on but the engine is not running. If the engine is running, the menu will often be locked to prevent accidental changes while driving.
What should I do if the screen is unresponsive?
Turn the vehicle completely off, open and close the driver’s side door to reset the power cycle, and then re-enter accessory mode. This often clears minor glitches in the instrument cluster interface.
Will this reset affect any other vehicle settings?
No, the oil life reset is a standalone procedure that only affects the engine oil monitoring algorithm. Your other vehicle settings, including transmission and fuel data, will remain unchanged.
How often should I perform this reset?
You should only perform this reset immediately after an actual oil and filter change. Resetting it without changing the oil can lead to engine wear, as the vehicle will fail to alert you when your oil is truly degraded.
Is there a button combination to bypass the menus?
There is no hidden shortcut for the 2017 model; you must navigate through the Settings > Advanced Settings > Vehicle path. Following the standard menu path is the safest and most reliable way to ensure the system is properly updated.
Looking for another year? See the full Ford F-150 Oil Life Reset Guide (2009–2026, All Models).
Other Ford models: Ford Oil Life Monitor Reset Guide (All Models & Years)