
Ford Touch Up Paint Code: Compared Side-by-Side With 2026 Color Matching Standards

A Ford paint code is typically a two-character alphanumeric identifier found on your vehicle’s manufacturer sticker, usually located in the driver’s side door jamb. This code is required to ensure you purchase the exact color match for repairs. The following guide provides the necessary resources to identify your specific color, explains variables affecting match accuracy, and offers professional-grade techniques for applying touch-up paint to your Ford’s exterior finish.
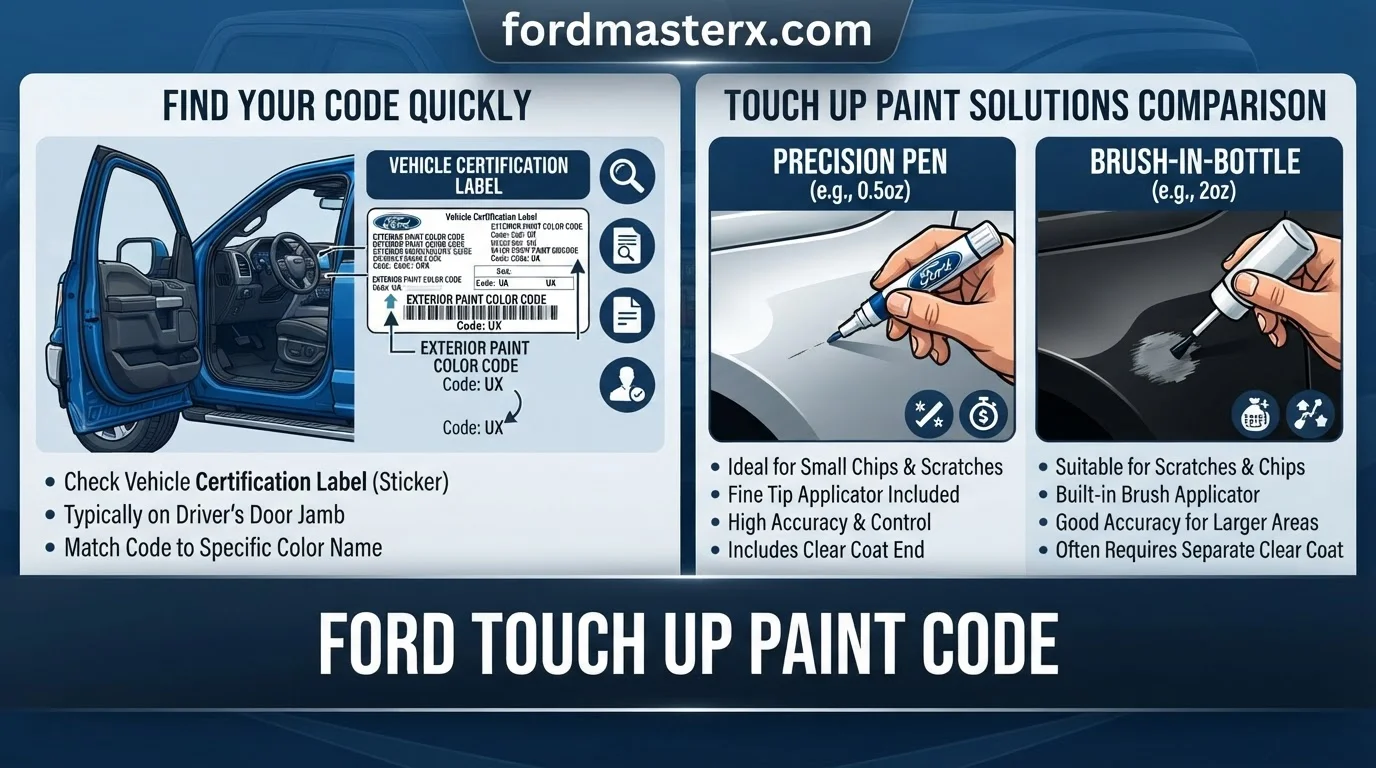
Ford Touch Up Paint Code Main Reference Chart
How to Read This Chart
The chart above outlines the identifiers used on your vehicle’s factory sticker to signify the exterior color. You will typically find this label inside the driver-side door jamb. Look for the text labeled either EXT PNT or PAINT.


The alphanumeric string following these labels is your unique Ford paint code. Most codes consist of two to three characters, which may be a mix of letters and numbers. These characters correspond directly to the specific color formula used by Ford during production.
When ordering touch-up paint, ensure you match this code exactly. Because the same model may have different color options based on its production year or trim level, the code on your door jamb is the only definitive source for your specific vehicle. If the label is damaged, verify the code using your VIN through an authorized Ford parts dealer.
Locating Your Ford Exterior Paint Code


| Component | Data Format | Identifier Location |
|---|---|---|
| Exterior Paint Code | EXT PNT: [Code] | Bottom Left/Center |
| Vehicle Identification Number | 17-Digit Alphanumeric | Top Section |
How to Read This Chart


The table above outlines the critical data fields found on the Ford Safety Compliance Certification Label. The “EXT PNT” field is the specific sequence you need for ordering touch-up materials. It is typically a two-digit alphanumeric string, such as “YZ” for Oxford White or “UX” for Ingot Silver.
The VIN, located at the top, represents your vehicle’s unique fingerprint, while weight ratings (GVWR/GAWR) appear below or to the side of the paint code. Always prioritize the “EXT PNT” indicator over other codes to ensure you are not accidentally selecting a trim or interior color code.
Step-by-Step Label Identification
Open the driver-side door completely. Look at the vertical edge of the vehicle frame, known as the B-pillar, where the door latches. You will see a white or silver rectangular sticker affixed to the metal surface.
Scan the label for the letters “EXT PNT.” Directly adjacent to this label, you will see a two-character code. Do not confuse this with the “INT TR” (Interior Trim) code or the “WB” (Wheelbase) measurement printed on the same label.
If the sticker is missing, damaged, or obscured by paint, check your owner’s manual, which often contains a duplicate factory sticker. Alternatively, locate the VIN on the dashboard (visible through the lower driver-side windshield) to proceed with professional verification.
Using Your VIN for Factory Paint Verification


If you cannot read the physical label, your 17-digit Vehicle Identification Number (VIN) acts as a permanent record. Every Ford vehicle’s original build configuration is stored in the manufacturer’s central database.
To retrieve the exact factory color, contact the parts department at any authorized Ford dealership. Provide them with your VIN; the representative can pull the specific build sheet for your exact vehicle, which lists the original paint code as applied at the assembly plant.
This method is the most reliable way to resolve ambiguity, especially for vehicles with custom fleet colors or rare limited-edition finishes. Always confirm the code with the dealership before purchasing touch-up supplies to prevent costly errors.
Variables Influencing Ford Paint Code Accuracy
| Model Year | Model | Paint Code | Formula Status |
|---|---|---|---|
| 2015 | F-150 | UH | Legacy Metallic |
| 2024 | F-150 | UA | Current Ebony Black |
How to Read This Chart
This table illustrates how paint codes evolve over time, even for colors that appear visually similar. The “Model Year” column denotes the specific production period, while the “Paint Code” column provides the two-digit alphanumeric identifier assigned by Ford.


The “Formula Status” column indicates whether the paint is a specialized metallic blend or a standard solid finish. Users should note that “UA” and “UH” are not interchangeable; attempting to use a 2024 formula on a 2015 vehicle will result in a noticeable mismatch in flake density and color depth.
Model Year and Trim Level Variations


Paint codes are not permanent identifiers for a specific shade. Ford updates its color library annually to account for advancements in chemical pigment technology and environmental regulations. Even if a color name like “Tuxedo Black” persists, the underlying chemical formulation often changes between model years.
Trim levels also introduce variables in how a paint appears. A standard basecoat may be paired with different clear coats depending on whether the vehicle is a base-model work truck or a premium trim. These top-coat differences can shift the perceived gloss and light refraction, rendering a standard touch-up pen insufficient for high-gloss metallic finishes.


Factory-fresh paint is rarely a 1:1 match for a vehicle that has spent years exposed to ultraviolet rays. Sun exposure causes pigments to oxidize and clear coats to yellow, meaning your current vehicle surface is likely lighter or duller than the original manufacturer color code.
Why Paint Codes Change by Assembly Plant
Ford operates multiple assembly plants globally, and each facility sources pigments and resins from regional suppliers. Because these suppliers utilize slightly different chemical precursors, the paint applied in a Michigan plant may vary marginally from the same color code applied in a Kentucky or overseas facility.
These minor variations are generally within the range of factory tolerance during the initial build. However, when selecting touch-up paint, these disparities become significant. The code on your door jamb identifies the standard master formula, but it does not account for the specific batch or plant-side chemical variance of your vehicle’s original application.
Production runs are managed in lots to ensure consistency across the chassis. If your vehicle was built late in a model year, it may contain an updated paint revision that differs from units built during the first quarter of the same year. Always verify your specific VIN to narrow down the exact production requirements.
Ford Touch-Up Paint Application: Tools and Best Practices


| Applicator Type | Best For | Skill Level |
|---|---|---|
| Paint Pen | Pinpoint scratches/chips | Beginner |
| Fine-Tip Brush | Deep chips/nicks | Intermediate |
| Aerosol Spray | Large areas/fading | Advanced |
How to Read This Chart
The matrix above summarizes the optimal use-case for common Ford touch-up paint delivery systems. The “Applicator Type” column identifies the physical tool, while the “Best For” column specifies the ideal damage size or depth for that tool.
The “Skill Level” column indicates the mechanical finesse required to achieve a factory-matched finish. Use these categories to determine if your specific repair—ranging from a door-edge chip to a larger parking scuff—requires precision point-application or broader surface coverage.
Preparing the Surface for Touch-Up
Achieving a professional result begins with the condition of the metal or plastic substrate. Even the most accurate Ford color match will fail if the underlying surface is not clean, as automotive paints require a perfectly neutral foundation to bond properly.
Failing to clean the area of wax, silicone, and loose debris before application is the primary cause of poor paint adhesion. If wax remains, the new paint will bead or peel shortly after drying, rendering the repair futile.
Clean the damaged area using a dedicated wax and grease remover or high-purity isopropyl alcohol. Wipe the surface using a lint-free microfiber cloth to remove all trace contaminants without leaving behind fibers that could become trapped in the wet paint layer.
If the damage has penetrated to the metal and shows signs of oxidation, use a fine-grit sandpaper or a fiberglass rust-removal pen. Lightly sand the area until the bare metal is bright and free of corrosion, ensuring the paint can grab the surface firmly.
The Critical Role of Clear Coat
Many Ford exterior colors are basecoat-clearcoat systems. The basecoat provides the pigment and metallic flake, but it lacks the chemical durability and gloss needed to survive external environments. Applying basecoat alone will inevitably lead to a dull, mismatched finish.
The clear coat serves as the sacrificial barrier against UV rays, acid rain, and road grime. Without this layer, the pigment will oxidize and lose its luster, making the touch-up site stand out as a flat, chalky spot against the surrounding factory finish.
For a professional finish, you must apply the clear coat in thin, even layers after the basecoat has fully cured. Wait at least 20 to 30 minutes between paint coats, and allow the basecoat to dry completely before applying the clear layer to prevent lifting or cloudiness.
Layering is essential for success. Apply multiple thin coats of clear rather than one thick layer, which can cause runs or pooling. Once cured for at least 48 hours, you may lightly buff the area with a fine polishing compound to blend the new clear coat edges with the original factory paint.
Applicator Types: Pens vs. Brushes vs. Aerosols
Selecting the right applicator depends on the geometry of the damage. Paint pens are highly effective for narrow, linear scratches, allowing for controlled delivery of paint into tight fissures. However, they are often less effective for larger chips where volume is required.
Fine-tip brushes allow for a more artistic approach to deeper chips. By dabbing the paint into the center of the chip and allowing it to self-level, you can build the paint layer up until it sits flush with the existing surface. Always use a high-quality artist brush if the included applicator is too coarse.
Aerosol sprays are reserved for larger surface areas or complex panels where brush marks would be visible. Using an aerosol requires a steady hand and a controlled sweeping motion to prevent “orange peel” or sagging. Always practice on a test card before applying paint to your vehicle.
Remember that paint thickness influences color accuracy. A light dusting of spray paint will appear lighter than the factory color, while a heavy, wet coat will appear darker. Consistent, overlapping passes are the standard technique for matching the factory texture and depth.
Common Pitfalls When Matching Ford Paint Colors
Achieving a seamless automotive repair requires moving beyond visual estimation. Many vehicle owners assume that a marketing color name is a universal identifier, but Ford produces multiple variations of similar-sounding shades. Relying on these catchy names rather than the specific alphanumeric paint code is a primary cause of mismatched, visible repairs.
When you attempt to match paint by name alone, you ignore the chemical complexity of modern automotive finishes. Ford utilizes advanced pigment technologies, including metallic flakes, pearls, and varying clear coat thicknesses, that make two different shades of the same color family appear drastically different once the paint dries and cures under natural lighting conditions.
Why Color Names Can Be Deceptive
Ford frequently releases multiple black, silver, or blue tones within a single model year, each with a unique chemical formulation and light-reflectivity index. For instance, the distinction between “Shadow Black” (often coded G1 or G7) and “Agate Black” (often coded UM) is substantial. These are not interchangeable; “Agate Black” contains specific metallic flakes that create a different depth compared to the flat, deep finish of “Shadow Black.”
If you purchase touch-up paint based strictly on the label “Black,” your repair will stand out immediately. The human eye is highly sensitive to variances in black tones, especially when a repair sits next to original factory paint. Always prioritize the alphanumeric code found on your vehicle’s safety compliance sticker, as this is the only data point that links to the specific factory-applied formula.
Understanding Touch-Up Limitations
One of the most frequent errors is the belief that touch-up paint functions as a universal filler or body-repair solution. Touch-up paint is formulated exclusively for small stone chips and light, surface-level scratches. It is a precision tool intended to protect exposed metal from oxidation and provide a cosmetic disguise for minor blemishes, not to restore structural damage or fill deep gouges.
Assuming that touch-up paint will hide large dents or wide, deep scratches is a fundamental misunderstanding of the product. Applying a thick layer of paint to a dented area will not level the surface; instead, it will highlight the imperfection by creating an uneven, raised “blob” of dried pigment. For dents, you must use body filler and primer to level the metal before attempting to match the color.
Furthermore, because touch-up paint lacks the controlled spray environment and high-pressure application of a professional paint booth, it will never be a perfect one-to-one match for large surface areas. Attempting to use touch-up pens or brushes over a large body panel will inevitably result in visible brush strokes, uneven color density, and an unprofessional aesthetic that lowers your vehicle’s overall finish quality.
The Importance of Pre-Application Testing
Never apply touch-up paint directly to your car’s exterior without performing a controlled test first. Even when your paint code is correct, the factory paint on your vehicle has likely been exposed to years of ultraviolet light, pollutants, and weather, causing the original finish to fade or “drift” slightly from its initial showroom color.
Always test the paint on a hidden area, such as the underside of a door frame, or preferably on a specialized plastic test card. Apply the paint, let it dry completely—which can take several hours—and observe the color in various lighting conditions, including direct sunlight and shade. This process allows you to confirm that the hue and metallic flake density are compatible with the current state of your vehicle’s exterior panels.
If the test swatch shows a significant discrepancy, do not proceed with the application on visible body panels. Once paint is applied to your car’s clear coat, removing it requires specialized solvents that can damage the surrounding finish. Pre-application testing is your final insurance policy against permanent cosmetic errors, ensuring that your repair efforts successfully mask the damage rather than drawing more attention to the affected area.
Key Takeaways
-
✓
Locate your vehicle’s paint code on the manufacturer’s label, typically found inside the driver’s side door jamb. -
✓
Understand how environmental factors and sun exposure create the pros and cons of original versus aftermarket paint batches. -
✓
Use the reference chart to identify the specific features of your color code for proper ordering. -
✓
Evaluate the advantages of using a professional-grade precision brush versus a standard foam applicator. -
✓
Recognize the disadvantages of failing to test your paint match on a hidden surface before full application.
❓ Frequently Asked Questions
1
What is a Ford touch up paint code?
A Ford touch up paint code is a unique alphanumeric identifier assigned to your vehicle’s specific exterior color during manufacturing. It ensures that any aftermarket paint repair matches the exact pigment, metallic content, and clear coat properties used when your vehicle was originally painted at the factory.
2
How does Ford paint code matching work?
Matching works by cross-referencing your code with the manufacturer’s original formula database. When you provide the code to a paint supplier, they mix the pigments to match that specific batch recipe. This process accounts for standard color variants while minimizing the visible difference between old and new paint.
3
Why is the Ford paint code important?
The paint code is vital because even slight variations in color, such as ‘Oxford White’ versus ‘Star White,’ will look drastically different once dried. Using the exact code prevents the mismatched patches that often occur when guessing a color based on visual appearance alone, ensuring professional-looking results.
4
What are the benefits of using factory-coded paint?
The primary benefits include high color fidelity, better chemical compatibility with your existing clear coat, and long-term durability against UV fading. Using the correct code ensures that the touch-up paint behaves and ages similarly to the rest of the vehicle’s panels, maintaining overall resale value.
5
How can I get started with Ford paint repairs?
Start by locating your paint code on the driver’s door jamb sticker, then procure a high-quality touch-up kit matching that specific code. Clean the affected area thoroughly with wax and grease remover, practice on a scrap piece of metal, and apply thin layers in a controlled environment.
6
Where is the paint code located on my Ford?
It is located on the Vehicle Certification Label on the driver-side door jamb. Look for ‘EXT PNT’ followed by the code.