2006 Ford Taurus Serpentine Belt Diagram: Routing & Maintenance 2026

The 2006 Ford Taurus 3.0L V6 utilizes a single serpentine belt routing path. The belt wraps around the crankshaft, alternator, power steering pump, water pump, and idler pulley. Use a 3/8-inch drive breaker bar on the belt tensioner to release tension, allowing the belt to be removed and installed efficiently.
📌 Key Takeaways
- The 3.0L Vulcan V6 engine typically requires a 6-rib belt, commonly sized at 86.5 inches (2197mm).
- Always verify the routing path against the OEM diagram decal located under the hood near the radiator support.
- The automatic belt tensioner requires a 15mm or 3/8-inch drive tool; ensure the tensioner pulley rotates freely without grinding.
- Incorrect installation or backward routing (rib-side vs. smooth-side) will cause immediate overheating or power steering failure.
- Consult a certified mechanic if the tensioner arm shows signs of excessive vibration or if the belt continues to jump off pulleys.
Maintaining the accessory drive system of the 2006 Ford Taurus requires a precise understanding of the belt routing architecture, particularly for the Vulcan 3.0L V6 engine configuration. Whether you are performing routine maintenance or replacing a failed tensioner, the 2006 Ford Taurus serpentine belt diagram serves as the critical reference point to ensure proper component synchronization. Failure to adhere to the manufacturer-specified path can lead to immediate accessory malfunction, improper rotation of the water pump or alternator, and catastrophic failure of the cooling system. This guide provides the technical data and procedural requirements necessary to execute a successful belt replacement while maintaining optimal deck engagement and pulley alignment.

Prime for Young Adults — 6 Months Free
Students and 18–24s get six months of Prime free, then half price.
Start 6 Months Free As an Amazon Associate I earn from qualifying purchases.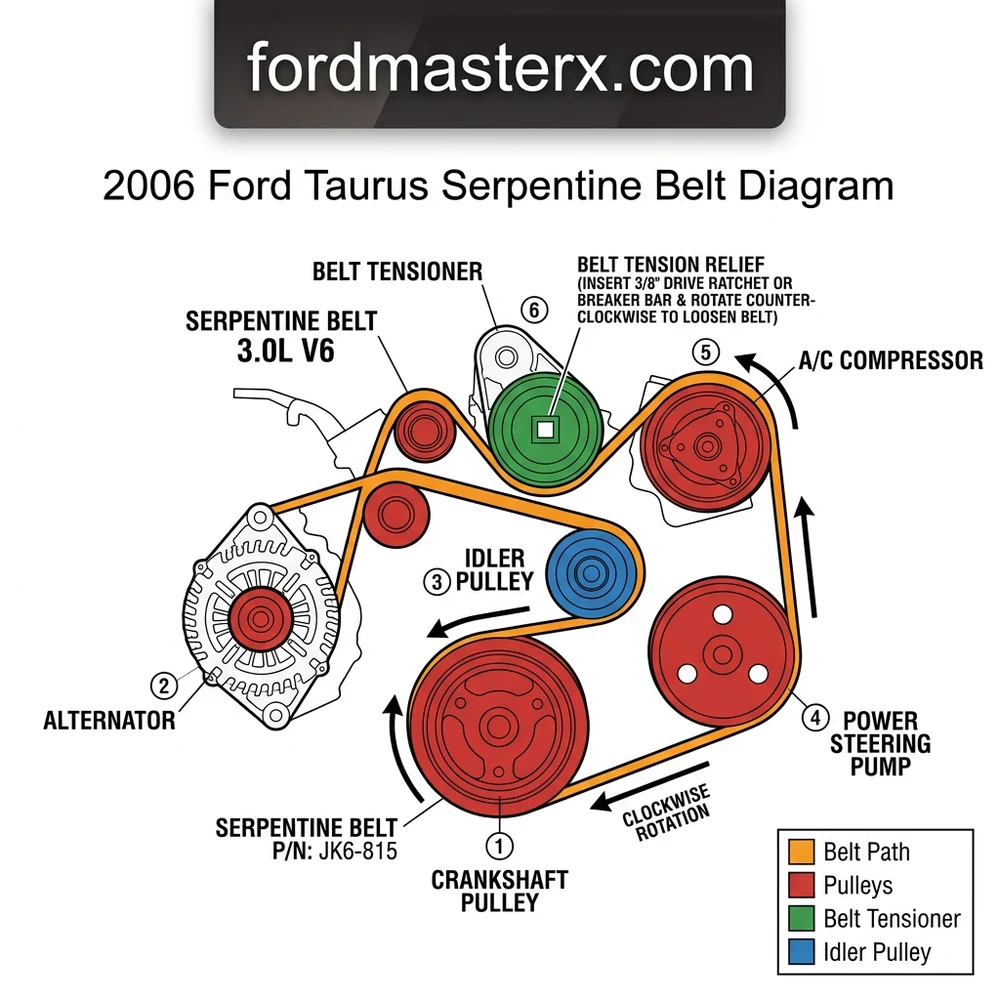
Decoding the 2006 Ford Taurus Serpentine Belt Diagram Architecture
Recommended Best Deal Products




The 2006 Ford Taurus serpentine drive system utilizes a single, multi-ribbed belt to drive the alternator, water pump, power steering pump, and the air conditioning compressor. The system architecture is designed around the Vulcan 3.0L OHV V6, which features a specific clockwise rotation requirement for the accessory drive. When reviewing the 2006 Ford Taurus serpentine belt diagram, notice that the belt is subjected to both smooth-side and grooved-side contact. The smooth backside of the belt typically rides against the water pump pulley and the belt tensioner, while the ribbed side provides the necessary friction grip on the crankshaft pulley, alternator, and power steering pump.
The crankshaft pulley acts as the primary driver. Positioned at the bottom of the engine block, it dictates the rotation speed for all secondary components. The alternator, located on the upper passenger side, relies on specific deck engagement to prevent slippage under high electrical loads. If the belt is routed incorrectly—often by bypassing the idler pulley or misaligning the ribs against the water pump—the resulting friction will lead to rapid heat degradation of the rubber compounds.
The belt tensioner is the most critical component of the assembly. It is a spring-loaded arm designed to maintain constant pressure on the belt as it stretches over time. In the 2006 Taurus model, the tensioner contains a calibrated internal spring; if the belt is installed without ensuring the tensioner is fully retracted or if the bolt mount has loosened, the belt will lose “bite,” leading to audible squealing and potential charging system failure. Always verify that the idler pulley spins freely and without lateral play before finalizing the routing path. Any resistance in the idler pulley bearings will impose unnecessary drag on the system, which can cause the belt to throw or shred prematurely. Accuracy in following the diagram ensures that the rotational axis of every component remains in plane, preventing belt walk and ensuring the longevity of your cooling system components.
How to Read the 2006 Ford Taurus Serpentine Belt Diagram Step by Step
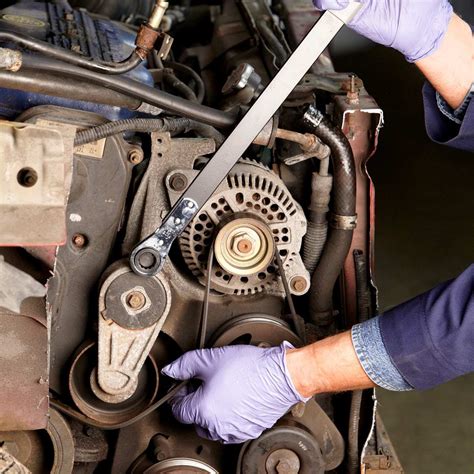
Successful belt replacement requires systematic execution to ensure the belt maintains full contact with all accessory pulleys. Before beginning, secure a dedicated serpentine belt tool; standard wrenches lack the clearance required to compress the spring-loaded tensioner in the confined engine bay of the 2006 Taurus.
1. Preparation: Verify that the engine is cold to avoid contact with hot metal components. Consult the 2006 Ford Taurus serpentine belt diagram to identify the specific orientation of the belt tensioner relative to the alternator and power steering pump.
2. Tensioner Retraction: Attach your belt tool to the tensioner bolt. Rotate the tensioner arm clockwise (or as indicated by the tensioner’s rotational arrow) to relieve pressure. Once the belt is slack, slip it off the most accessible pulley, typically the idler pulley, to prevent accidental finger entrapment.
3. Routing Implementation: Begin routing the new belt according to the pulley diagram. Start by looping the belt around the crankshaft pulley, as this acts as the anchor point. From there, route the belt upward towards the alternator and then across the power steering pump.
4. Finishing the Path: The final step involves looping the belt over the remaining pulleys, saving the idler pulley or the tensioner pulley for last. Ensure the ribbed side of the belt aligns perfectly within the grooves of the crank and power steering pulleys. If the belt is even one rib off-center, the uneven pressure will cause the belt to drift off the drive path during the first engine start.
5. Verification: Before starting the engine, confirm that the belt is fully seated on every pulley. Check for correct deck engagement on the water pump, as this is the most common point of installation error. Perform a final rotation check to ensure no wires or coolant hoses are obstructed by the belt path.
For the 2006 Taurus Vulcan engine, the tensioner should show no evidence of “bounce” at idle. If you observe the tensioner vibrating excessively, it indicates that the internal damping mechanism has failed, necessitating a full tensioner assembly replacement rather than just the belt.
Replacement 2006 Ford Taurus Serpentine Belt Part Numbers
Recommended Best Deal Products


Selecting the correct replacement belt size is paramount. The 2006 Ford Taurus uses a specific belt length designed to compensate for the throw of the tensioner arm. Purchasing a belt that is too long will result in insufficient tension, while a belt that is too short will place excessive radial load on the alternator and power steering pump bearings, leading to premature shaft seal failure.
| Component | OEM Specification | Notes |
|---|---|---|
| Serpentine Belt | 6K885 (Typical) | Ensure “K” designation for multi-ribbed profile |
| Belt Tensioner | YS4Z-6B209-AA | Verify spring resistance constant |
| Idler Pulley | F5RZ-8678-A | Check for hardened bearing grease |
Always cross-reference your specific VIN at the point of purchase, as secondary market variations in AC compressor mounting brackets can occasionally affect the required belt effective length. Using an OEM belt ensures that the EPDM compound provides the necessary heat resistance for the high-under-hood temperatures common in the Vulcan V6 engine bay.
Maintaining Proper Tension and Pulley Alignment
The health of your accessory drive system is directly tied to the interaction between the tensioner, the idler pulley, and the belt surface. When the serpentine belt is under proper tension, it should show no more than 0.5 inches of deflection between the longest pulley spans. If the belt shows signs of glazing—a shiny, slick appearance on the rib side—it is a clear indicator that the belt has been slipping, likely due to a weak tensioner spring or a seized idler pulley.

Audible — Listen Free for 30 Days
One free credit a month and thousands of titles included.
Listen Free for 30 Days As an Amazon Associate I earn from qualifying purchases.Consider these maintenance benchmarks to ensure system longevity:
Inspect the belt rib side for cracking or missing chunks; replace immediately if more than three cracks per inch are visible.
Check the idler pulley for “grittiness” by spinning it by hand with the belt removed. It should rotate silently with no drag.
Monitor the electrical charging system voltage. A slipping belt often presents as a fluctuating alternator output (13.5V to 14.8V at idle), which can lead to rapid battery discharge.
Examine the cooling system performance. If the water pump rotation is inconsistent due to belt slip, the engine will demonstrate localized hot spots and potential overheating under load.
* Verify pulley alignment. Use a straight-edge tool across the alternator and power steering pump to ensure all pulleys share the same vertical plane. Misalignment will accelerate rib wear and put side-load stress on the component bearings.
Do not use belt dressings or spray-on lubricants to stop squealing. These products create a sticky residue that attracts road debris, accelerating pulley wear and compromising the structural integrity of the belt. Always identify the root cause of the noise through diagnostic inspection of the tensioner and pulleys.
2006 Ford Taurus Serpentine Belt Diagram Questions Answered
Recommended Best Deal Products


Why does my new belt continue to squeal after installation?
Squealing often indicates a misalignment in the belt routing path or a failing tensioner. Re-verify the diagram to ensure the belt is correctly seated in the grooves of all pulleys. If the tensioner spring is fatigued, it will not exert enough force to prevent belt slippage during high-torque demands like AC compressor engagement.
Can I reuse an old serpentine belt if it looks visually clean?
While EPDM belts can last up to 100,000 miles, they lose their elasticity and “ribbed grip” over time. If you have the drive system disassembled for maintenance, it is standard professional practice to replace the belt. A new belt prevents future downtime and ensures full power transfer to the alternator and water pump.
Is there a difference in routing for 2006 Taurus models with different AC compressors?
Most Vulcan 3.0L configurations share the same routing path. However, aftermarket or fleet-specific AC units may occasionally utilize a different mounting bracket. Always compare the physical layout of your pulleys to the 2006 Ford Taurus serpentine belt diagram provided in your specific service manual to ensure no deviation exists.
What tool is required to move the tensioner on a 2006 Taurus?
A dedicated serpentine belt tool featuring a thin, offset profile is required to reach the tensioner nut. Because of the limited clearance between the frame rail and the engine block, standard sockets or ratchets will likely bottom out before providing sufficient leverage to release the tension.
How often should I inspect the idler pulley in the accessory drive?
The idler pulley should be inspected during every oil change interval. Listen for bearing whine or “dry” sounds during engine operation. A failing idler pulley will generate extreme heat through friction, which can eventually melt the serpentine belt and cause a complete loss of power steering and charging capability.
Step-by-Step Guide to Understanding the 2006 Ford Taurus Serpentine Belt Diagram
Identify – Locate the belt routing path diagram on the underside of the hood or your vehicle manual.
Locate – Find the spring-loaded belt tensioner pulley located near the center of the accessory drive system.
Reference – Use a 3/8-inch drive tool or tensioner wrench to rotate the tensioner arm and remove the old belt.
Audible Premium Plus — Annual Membership
12 audiobook credits up front, plus the full Audible catalogue.
See Annual Plans As an Amazon Associate I earn from qualifying purchases.Connect/Route – Follow the diagram precisely to thread the new belt around all pulleys, finishing at the easiest-to-reach pulley.
Verify – Check that every rib is aligned within the pulley grooves and ensure no belt overlap occurs.
Troubleshoot – Start the engine briefly to ensure the belt tracks centrally; listen for squealing, which indicates improper seating.