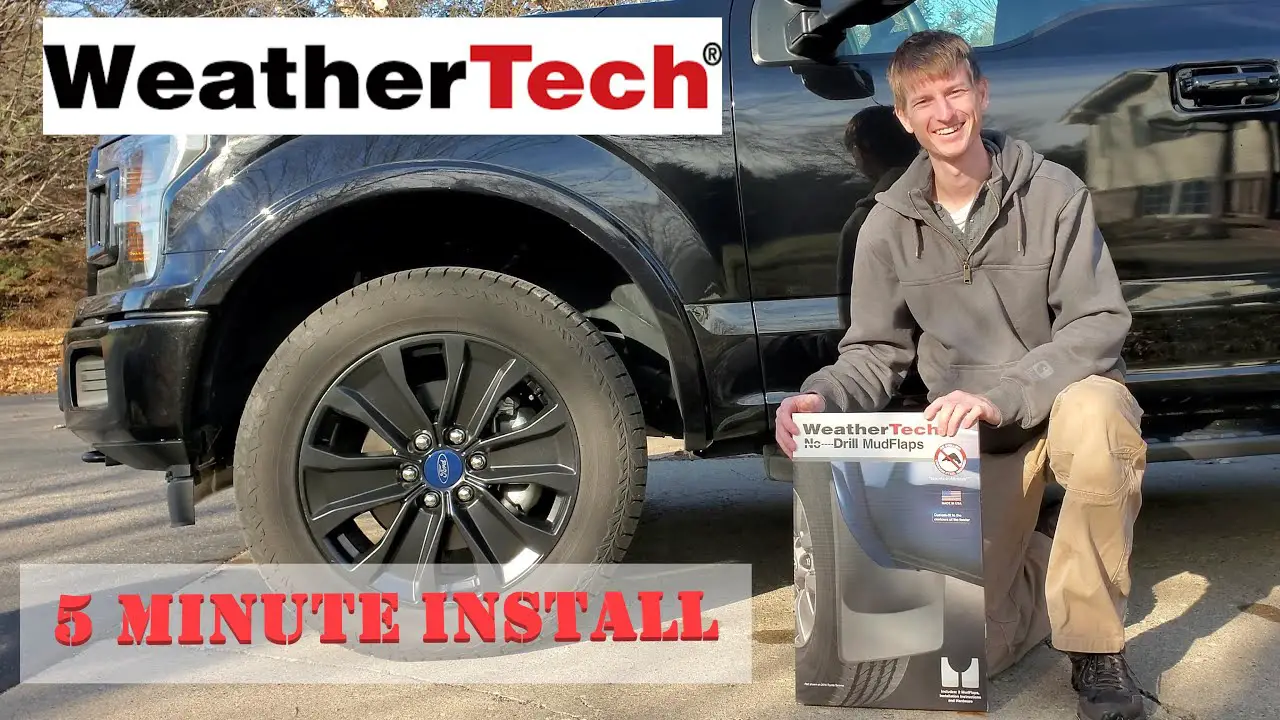
F150 No Drill Mud Flaps: Effortless Installation Guide
F150 no-drill mud flaps offer easy installation without the need for drilling. They provide excellent protection against road debris.
F150 no-drill mud flaps are designed to fit seamlessly onto your truck without requiring any drilling. This feature ensures a quick and hassle-free installation process, saving you time and effort. These mud flaps protect your vehicle’s paint and undercarriage from dirt, rocks, and other road debris.
Made from durable materials, they can withstand harsh weather conditions and rough terrains. By preventing damage to your truck, these mud flaps help maintain its resale value. They also add a sleek, professional look to your F150, enhancing its overall appearance.
Tools And Materials
Installing F150 No Drill Mud Flaps is simple with the right tools and materials. This section guides you through the essential tools and recommended materials needed for a smooth installation process.
Essential Tools
- Screwdriver Set: A good set of screwdrivers is crucial. Phillips and flathead types are necessary.
- Socket Wrench: Useful for tightening bolts securely.
- Measuring Tape: Ensures accurate placement of mud flaps.
- Marker Pen: For marking drill-free installation points.
- Plastic Pry Tool: Helps in removing existing clips without damage.
Recommended Materials
| Material | Purpose |
|---|---|
| F150 No Drill Mud Flaps | Main component to protect your vehicle from debris. |
| Mounting Clips | Secure the mud flaps in place without drilling. |
| Adhesive Strips | Provide additional support to the mud flaps. |
| Cleaning Cloth | Ensures the surface is clean before installation. |
| Rust Inhibitor Spray | Prevents rust on exposed metal parts. |
Using these tools and materials makes installing F150 No Drill Mud Flaps easy. Preparation ensures a secure and lasting fit.

Credit: www.amazon.com
Preparation Steps
Before you install F150 No Drill Mud Flaps, proper preparation is crucial. This ensures a smooth and efficient installation process. Follow these steps to get your vehicle ready.
Cleaning The Installation Area
Start by cleaning the area where the mud flaps will be installed. Dirt and debris can interfere with adhesion. Use a mild detergent and water to scrub the area.
- Use a soft cloth or sponge.
- Rinse thoroughly with clean water.
- Dry the area with a clean, dry towel.
Ensure the area is completely dry before moving to the next step.
Gathering Necessary Equipment
Having the right tools on hand can save you time and frustration. Gather all necessary equipment before starting the installation.
| Tool | Description |
|---|---|
| Socket Wrench | For tightening bolts |
| Measuring Tape | To ensure proper alignment |
| Marker | For marking drill points |
| Protective Gloves | To protect your hands |
Once you have all the tools, you are ready to proceed with the installation.
Choosing The Right Mud Flaps
Choosing the right mud flaps for your F150 is crucial. They protect your vehicle from road debris and mud. No drill mud flaps are easy to install. They save you time and effort.
Compatibility With F150
Ensure the mud flaps are compatible with your F150 model. Different models have different requirements. Check the year and model of your truck. This helps you pick the perfect fit.
Here is a table to help you understand compatibility:
| F150 Model Year | Compatible Mud Flaps |
|---|---|
| 2015-2020 | No Drill Mud Flaps A |
| 2021-2023 | No Drill Mud Flaps B |
Top Brands To Consider
There are many brands offering no drill mud flaps. Here are the top ones:
- WeatherTech: Known for durability and custom fit.
- Husky Liners: Offers tough and reliable mud flaps.
- RokBlokz: Popular for their rugged design.
Choose a brand that suits your needs. Quality and fit are essential for protection.

Credit: www.f150forum.com
Installation Process
Installing F150 No Drill Mud Flaps is easy. This section will guide you through the process. Let’s get started with step-by-step instructions.
Step-by-step Guide
Follow these simple steps to install your F150 No Drill Mud Flaps:
- Gather your tools: You will need a screwdriver and the mud flaps kit.
- Prepare the area: Clean the wheel wells to ensure a smooth fit.
- Align the mud flaps: Hold the mud flaps against the wheel well.
- Attach the clips: Use the provided clips to secure the mud flaps.
- Tighten the screws: Use the screwdriver to tighten all screws securely.
- Check the fit: Ensure the mud flaps are snug and aligned properly.
Common Mistakes To Avoid
Avoid these mistakes to ensure a perfect installation:
- Skipping the cleaning step: Dirt can cause improper fitting.
- Using the wrong tools: Always use the correct tools provided in the kit.
- Not aligning properly: Misalignment can lead to uneven wear.
- Over-tightening screws: This can damage the mud flaps and wheel well.
- Ignoring instructions: Always follow the manufacturer’s instructions for best results.
By following this guide, you can install your mud flaps correctly. Enjoy a cleaner and more protected vehicle!
Post-installation Tips
Congratulations on installing your F150 No Drill Mud Flaps! To ensure they serve you well, follow these post-installation tips. These tips help maintain the integrity and appearance of your mud flaps.
Ensuring Proper Fit
After installation, check the fit of your mud flaps. Ensure they align correctly with your truck’s wheels and body. A proper fit prevents debris from hitting your vehicle.
- Check for gaps between the mud flaps and the truck body.
- Ensure the flaps are not too close to the tires.
- Tighten all screws and clips to secure the mud flaps firmly.
If you notice any misalignment, adjust the flaps using the provided hardware. A well-fitted mud flap protects your truck from dirt and stones.
Maintenance Tips
Maintaining your F150 No Drill Mud Flaps ensures their longevity. Regular care keeps them in top condition.
- Clean regularly: Wash the mud flaps with water and mild soap.
- Inspect for damage: Check for cracks or tears after off-road trips.
- Tighten screws: Periodically check and tighten the screws.
- Avoid harsh chemicals: Use gentle cleaners to prevent material damage.
Regular maintenance ensures your mud flaps stay effective and look great.
Troubleshooting
Troubleshooting your F150 No Drill Mud Flaps can save you time and frustration. This guide will help you handle common issues like loose flaps and necessary adjustments.
Dealing With Loose Flaps
If your mud flaps are loose, they can cause problems. Loose flaps might make noise or even fall off. Here are steps to check and fix loose flaps:
- Inspect the mounting points. Ensure they are tight.
- Check the screws. Tighten them with a screwdriver.
- Look for damaged brackets. Replace if necessary.
Use a table to track your troubleshooting steps:
| Step | Action | Status |
|---|---|---|
| 1 | Inspect mounting points | Completed |
| 2 | Tighten screws | Completed |
| 3 | Replace damaged brackets | Pending |
Adjustments And Fixes
Sometimes, simple adjustments can fix your mud flaps. Follow these steps:
- Align the mud flaps properly with the wheel wells.
- Ensure the flaps cover the tire’s width.
- Recheck the screws for tightness.
If alignment issues persist, consider these tips:
- Use spacers to adjust the flap’s position.
- Check if the flaps are the correct size for your F150.
- Consider consulting the user manual.
Regular maintenance of your mud flaps ensures they last longer. Keep an eye on wear and tear. Replace parts as needed. Properly installed mud flaps protect your F150 and enhance its look.
Credit: toolsinaction.com
Frequently Asked Questions
Do You Have To Drill Holes For Mud Flaps?
Some mud flaps require drilling holes, while others use existing factory holes. Check the installation guide for specifics.
Are Mud Flaps Worth It On A Truck?
Yes, mud flaps are worth it on a truck. They protect the vehicle from debris and reduce paint damage.
What Is The Difference Between A Mud Guard And A Mud Flap?
A mud guard attaches directly to the vehicle’s body to prevent dirt splashes. A mud flap hangs behind wheels to block debris.
Is It Worth Fitting Mud Flaps?
Yes, fitting mud flaps is worth it. They protect your vehicle from dirt, debris, and road salt. Mud flaps also reduce paint damage and rust. They enhance the vehicle’s appearance and resale value.
Conclusion
Upgrade your F150 with no drill mud flaps for hassle-free installation. Protect your truck from debris and enhance its look. These mud flaps offer durability and style without compromising your vehicle’s integrity. Invest in quality and enjoy peace of mind on every drive.
Your F150 deserves the best.