
How to Update Ford SYNC With USB (SYNC 3): Steps, Drive Requirements and Fixes

Which method you can use depends on your SYNC generation. Per Ford’s update instructions, SYNC 3 can update by USB or Wi-Fi (except 2016–2017 vehicles without a touchscreen or without navigation, which can’t use Wi-Fi), while SYNC 4 and 4A update only over the air. Not sure which you have? See our Ford SYNC version chart.
This guide covers the USB method for SYNC 3, the drive requirements, the install steps and the error fixes Ford lists.
Common Issues and Errors During Ford SYNC USB Updates


Most failed USB updates come down to the drive or the file extraction. Ford’s troubleshooting page lists the common ones: a drive in the wrong format (exFAT for SYNC 3, FAT32 for older SYNC), files that weren’t extracted correctly (an LST error), Windows Error 0x80004005 during the copy, and a memory error such as mem_003 if you pull the drive out too early.


The install can take up to five minutes to start, and SYNC shows no message during that time, so don’t remove the drive. If you get a memory error, Ford says to remove the drive, do a master reset and a key cycle, wait for the Home screen, then insert the drive again.
If those steps don’t work, Ford recommends contacting a dealer.
Preparing for a Ford SYNC Update


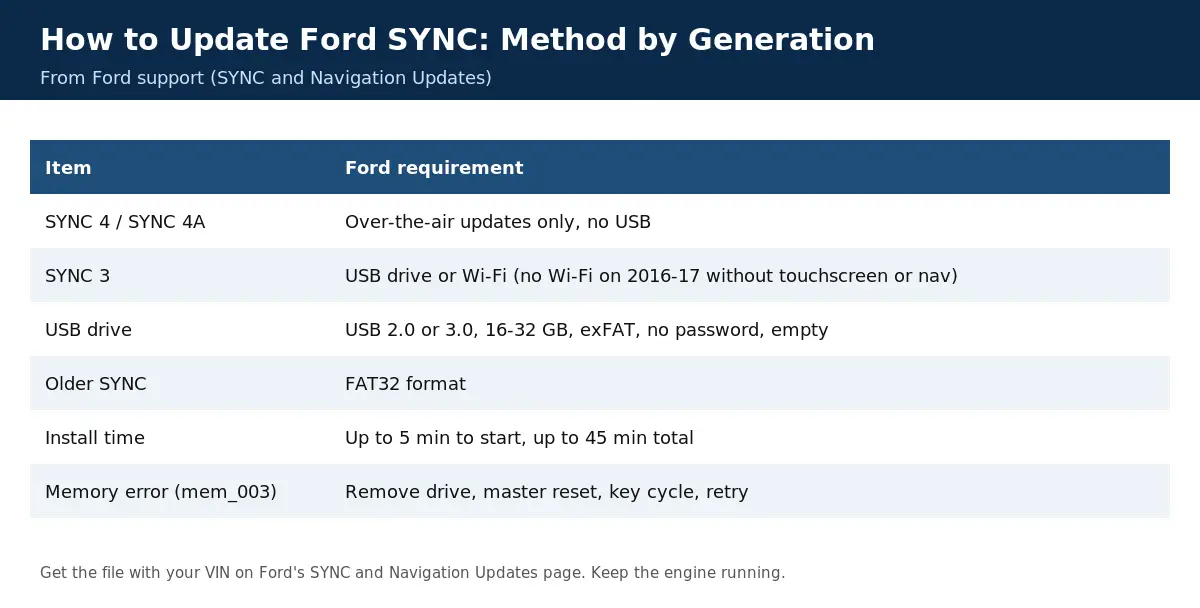
Before you download, confirm that you have SYNC 3 and get a USB drive that meets Ford’s requirements: USB 2.0 or 3.0, 16 GB to 32 GB, formatted to exFAT, with no password, and completely empty. Ford lists 8–32 GB for SYNC 3 without a touchscreen in Canada.
You’ll need a computer with a stable internet connection for the download, and your VIN, which is on the driver-side windshield corner or the door jamb label.
Step-by-Step Guide to Updating Ford SYNC With USB


- Go to Ford’s SYNC and Navigation Updates page and enter your VIN, or sign in and select your vehicle. A green checkmark means you already have the latest version.
- Choose USB Drive as the method and download the update file.
- Extract the file to the empty exFAT drive (with Windows File Explorer or The Unarchiver on a Mac), then eject the drive safely.
- Start the vehicle, wait for the Home screen, and insert the drive into the USB port.
- Leave the drive in. The install can take up to 5 minutes to start and up to 45 minutes to finish. Ford says some SYNC versions let you drive during an update and others don’t.
- When SYNC says the install is complete, remove the drive and check the version under Settings.
If the update fails, use the error fixes above and try again.
Tips for a Successful Ford SYNC Update
A master reset isn’t required before every update. Ford recommends it, plus a key cycle, after a memory error. A master reset erases paired phones and settings. For reset steps by SYNC generation, see our Ford SYNC hard reset guide. Keep the engine running so the battery doesn’t run down, and don’t remove the drive until the install is complete.
Frequently Asked Questions: How to Update Ford SYNC With USB
How Do I Update Ford SYNC With USB?
Enter your VIN on Ford’s SYNC and Navigation Updates page and download the USB update. Extract it to an empty 16–32 GB exFAT drive, insert it with the vehicle running, and leave it in until the install completes.


Can I Update Ford SYNC Without a USB?


Yes, in many cases. Per Ford, most SYNC 3 vehicles can update over Wi-Fi (but not 2016–2017 models without a touchscreen or navigation), and SYNC 4 and 4A update only over the air. A Ford dealer can also install updates, and dealer fees may apply.
Why Is It Important to Update Ford SYNC?


Updates bring bug fixes and improvements. Ford bulletins tie many SYNC 3 screen, phone and camera problems to outdated software, so updating is often the first fix.
How Often Should I Update Ford SYNC?


There is no fixed schedule. Check Ford’s update page with your VIN every few months, or whenever you have SYNC problems, since some issues are fixed by newer software.


How Long Does It Take to Update Ford SYNC With USB?


Ford says USB installs can take up to 45 minutes, and the install may take up to five minutes to begin. Keep the engine running, and do it outdoors or in a well-ventilated area, never in a closed garage.
Conclusion
A SYNC 3 USB update is straightforward if you use the right drive (16–32 GB, exFAT, empty), extract the file correctly, and leave the drive in until it finishes. If you have SYNC problems, see our Ford SYNC hard reset guide. After updating, if your phone won’t reconnect, see how to connect to Ford SYNC.
Updates can fix bugs and phone compatibility issues, but they won’t add hardware features your vehicle doesn’t have.
If you have SYNC 4 or 4A, you don’t need a USB drive. Leave automatic updates on and the vehicle will update over the air.


One Comment