Ford Explorer Fuse Box Diagram: Quick Identification Guide
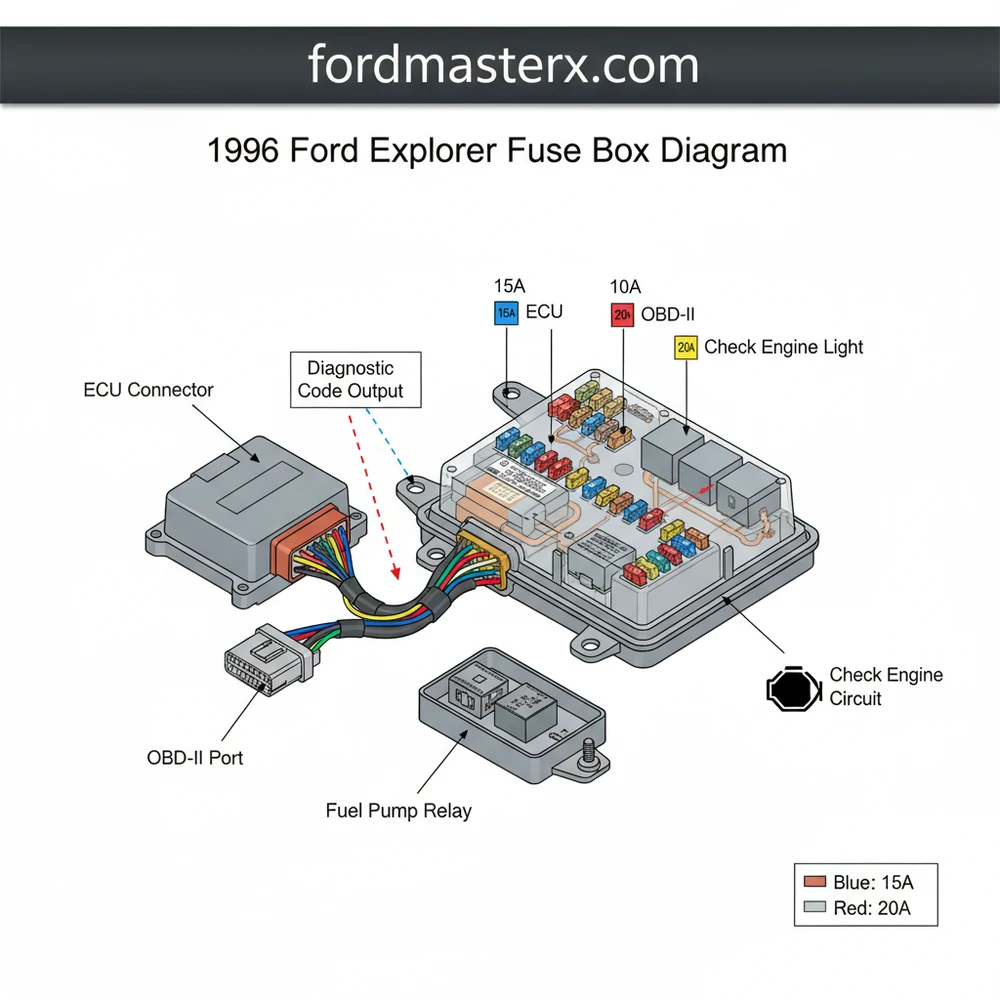
The 1996 Ford Explorer features two fuse panels: the interior fuse box is located on the left side of the dashboard, while the power distribution box sits under the hood near the battery. This diagram identifies critical fuses for the ECU and OBD-II port, essential for troubleshooting electrical failures.
📌 Key Takeaways
- Main purpose of this diagram is to identify circuit protection for critical electronics
- The Power Distribution Box under the hood is the most important component to identify
- Always turn off the ignition before pulling high-amperage fuses for safety
- Check the OBD-II port fuse first if you cannot connect a scanner
- Use this diagram when experiencing sudden electrical failure or component loss
Navigating an electrical failure in your vehicle can be a frustrating experience, especially when a simple blown fuse is the culprit behind a non-responsive radio, dimmed headlights, or a stubborn engine that refuses to turnover. Accessing a clear and accurate 1996 ford explorer fuse box diagram is the first and most critical step in diagnosing these electrical gremlins. Whether you are dealing with a malfunctioning interior light or a critical issue affecting the ECU, knowing exactly where to look saves time and prevents further damage. This guide provides a comprehensive breakdown of both fuse locations, explaining how to interpret the symbols and ratings to get your Explorer back on the road safely.
The 1996 Ford Explorer utilizes two distinct fuse panels: the Passenger Compartment Fuse Panel located inside the cabin and the Power Distribution Box located under the hood. Always consult both if an electrical system fails.
Understanding the 1996 Ford Explorer Fuse Box Layout
The electrical architecture of the 1996 Ford Explorer is divided into two primary hubs. Understanding the distinction between these two is essential for effective troubleshooting. The first is the interior fuse panel, often referred to as the instrument panel fuse box. This box houses the smaller amperage fuses that protect cabin electronics, such as the power windows, radio, interior lighting, and the diagnostic port used for reading an OBD-II diagnostic code. It is located on the driver’s side end of the instrument panel, accessible only when the driver’s door is open.
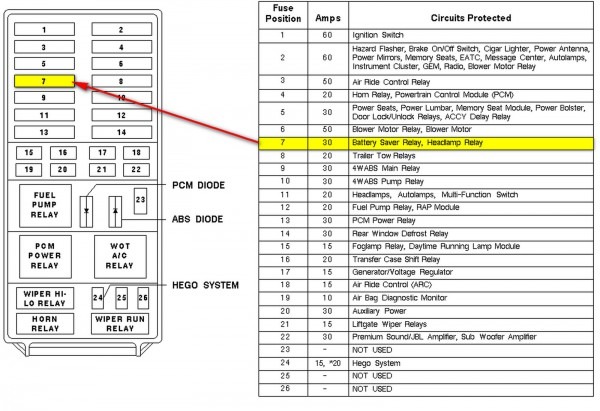
The second hub is the Power Distribution Box, located in the engine compartment. This box contains high-current “Maxi” fuses and relays that handle the heavy lifting. Components like the starter motor, the fuel pump, the anti-lock brake system, and the cooling fans are managed here. The layout is designed with a logical grid system where each slot is numbered. When looking at the 1996 ford explorer fuse box diagram, you will notice that fuses are color-coded by amperage: for instance, red usually denotes 10A, blue 15A, and yellow 20A. High-power relays are also positioned here to control high-draw items like the A/C compressor clutch.
Specific variations may exist depending on whether your Explorer is equipped with the 4.0L V6 or the 5.0L V8 engine. While the fuse locations are largely identical, the specific relays for engine management might differ slightly to accommodate different sensors. For example, the relay responsible for maintaining proper coolant flow through electric fan activation may be positioned differently in the V8 model to manage the higher heat output of the larger block.
Step-by-Step Guide: How to Read and Replace Fuses

Interpreting a fuse diagram requires a methodical approach. Follow these steps to safely identify and replace a faulty fuse in your vehicle.
- ✓ Step 1: Identify the Symptom – Before opening any panels, identify what isn’t working. Is it a single component like a cigarette lighter, or is the check engine light on? If the vehicle won’t start and the ECU isn’t communicating, the problem likely lies in the engine bay power box.
- ✓ Step 2: Locate the Correct Panel – For interior issues (wipers, turn signals, radio), open the driver’s door and pull the plastic cover off the side of the dashboard. For engine performance or exterior lighting issues, pop the hood and locate the long rectangular black box on the driver’s side near the battery.
- ✓ Step 3: Reference the Diagram – Look at the underside of the fuse box cover. There should be a printed map or numbered list. Match the number on the map to the physical slot in the box. If the lid is missing, use the 1996 ford explorer fuse box diagram provided in your owner’s manual or this guide.
- ✓ Step 4: Use the Right Tools – Use a plastic fuse puller tool. These are often stored inside the fuse box itself. If you don’t have one, small needle-nose pliers will work, but be gentle to avoid cracking the plastic housing of the fuse.
- ✓ Step 5: Inspect the Fuse – Once pulled, look at the metal wire inside the transparent plastic. If the wire is broken or the plastic is charred, the fuse is blown. However, sometimes a fuse can look fine but still be faulty; testing it with a multimeter for continuity is the most reliable method.
- ✓ Step 6: Match Amperage Exactly – This is the most critical step. If the diagram calls for a 15A fuse, only replace it with a 15A fuse. Never use a higher amperage fuse to “stop it from blowing,” as this can lead to an electrical fire.
- ✓ Step 7: Re-Test the System – Turn the ignition to the “On” position and check if the component is now working. If the fuse blows again immediately, you have a short circuit that requires deeper investigation.
- ✓ Step 8: Reset Digital Components – If you replaced a fuse related to the ECU or engine management, you may need to clear an OBD-II diagnostic code using a scanner to turn off the check engine light.
Always turn off the engine and remove the key from the ignition before pulling fuses. For high-current “Maxi” fuses in the engine bay, it is recommended to disconnect the negative battery terminal to prevent accidental shorting.
Common Issues and Electrical Troubleshooting
One of the most frequent problems owners face with the 1996 Ford Explorer is a “no-start” condition caused by a blown fuel pump relay or a failed ECU fuse. If the engine cranks but won’t catch, your first stop should be the Power Distribution Box. Another common issue involves the accessory belt system; while the belt itself is mechanical, the A/C compressor it drives relies on an electromagnetic clutch controlled by a fuse and relay. If your air conditioning stops blowing cold, check the relay before assuming the compressor has failed.
If you find that fuses are blowing repeatedly, it often points to a grounded wire. For example, the wiring harness near the timing chain cover or the exhaust manifold can sometimes melt if not properly secured, causing a direct short. In these cases, the fuse is simply doing its job by protecting the rest of the electrical system. If you see a check engine light, use an OBD-II scanner to see if the computer is reporting a “circuit low” or “circuit high” condition, which can pinpoint exactly which branch of the 1996 ford explorer fuse box diagram you need to focus on.
Tips and Best Practices for Maintenance
Maintaining the electrical health of your 1996 Ford Explorer doesn’t have to be complicated. A few proactive steps can prevent major headaches. First, always keep a kit of spare fuses in your glove box. These kits are inexpensive and usually include the specific sizes needed for Ford vehicles of this era. Second, ensure that the covers for both fuse boxes are always securely snapped into place. Moisture is the enemy of electrical connections; if water enters the engine bay box, it can lead to corrosion that causes intermittent electrical failures.
When working on the engine, check the ground straps. A loose ground strap can mimic a blown fuse by preventing current from returning to the battery. Ensure the battery terminals are tightened to the proper torque spec to maintain a steady voltage flow to the ECU.
Furthermore, if you are performing mechanical work, such as replacing an accessory belt or checking the timing chain, be careful not to pinch any wires against the engine block. Quality components matter; when replacing a relay, try to use OEM or high-quality aftermarket parts. Cheap relays can stick in the “on” position, which might drain your battery overnight or cause a component like the cooling fan to run until it burns out, disrupting the critical coolant flow needed to protect your engine from overheating. Regularly inspecting the 1996 ford explorer fuse box diagram and the condition of the fuses themselves during your routine oil changes is a great way to stay ahead of potential electrical failures.
In conclusion, the 1996 ford explorer fuse box diagram is an indispensable tool for any DIY owner. By understanding the difference between the interior and engine bay panels and following a logical troubleshooting process, you can solve most electrical issues without a costly trip to the mechanic. Remember to always prioritize safety, use the correct fuse ratings, and use diagnostic tools like OBD-II scanners to bridge the gap between electrical symptoms and mechanical solutions.
Frequently Asked Questions
Where is the fuse box located?
The 1996 Ford Explorer has two locations. The interior fuse panel is found on the driver-side end of the instrument panel, accessible when the door is open. The high-current power distribution box is located in the engine compartment on the driver’s side near the battery terminal.
What does the diagram show?
The diagram provides a visual map of every fuse and relay. It details the amperage rating and specific function for each slot, such as the ECU, fuel pump, and lights. It is essential for mapping circuits to diagnose why a specific component has stopped receiving power.
How many fuses does the Explorer have?
The system uses approximately 30-40 mini-fuses in the passenger compartment and roughly 15-20 high-current maxi-fuses and relays in the engine bay. These protect everything from the internal ECU circuits to heavy-duty components like the starter motor and cooling fans, ensuring overall electrical system safety.
What are the symptoms of a bad fuse?
Common symptoms include non-functional electronics like radio or lights, a check engine light if the ECU fuse is blown, or an inability to pull a diagnostic code from the OBD-II port. If a component stops working suddenly, a blown fuse is often the most likely culprit.
Can I replace these fuses myself?
Yes, replacing a fuse is a simple DIY task. After identifying the blown fuse using the diagram, use a fuse puller to remove it and insert a new one of the exact same amperage. This often resolves minor electrical issues without needing a professional mechanic or expensive repairs.
What tools do I need for fuse testing?
You only need a basic plastic fuse puller, often found inside the fuse box cover, and a digital multimeter or test light. If you are mounting the box back, remember the mounting bolt torque spec is quite low to prevent cracking the plastic housing or brackets.