Tailgate Light Bar Wiring Diagram: Easy Setup Guide
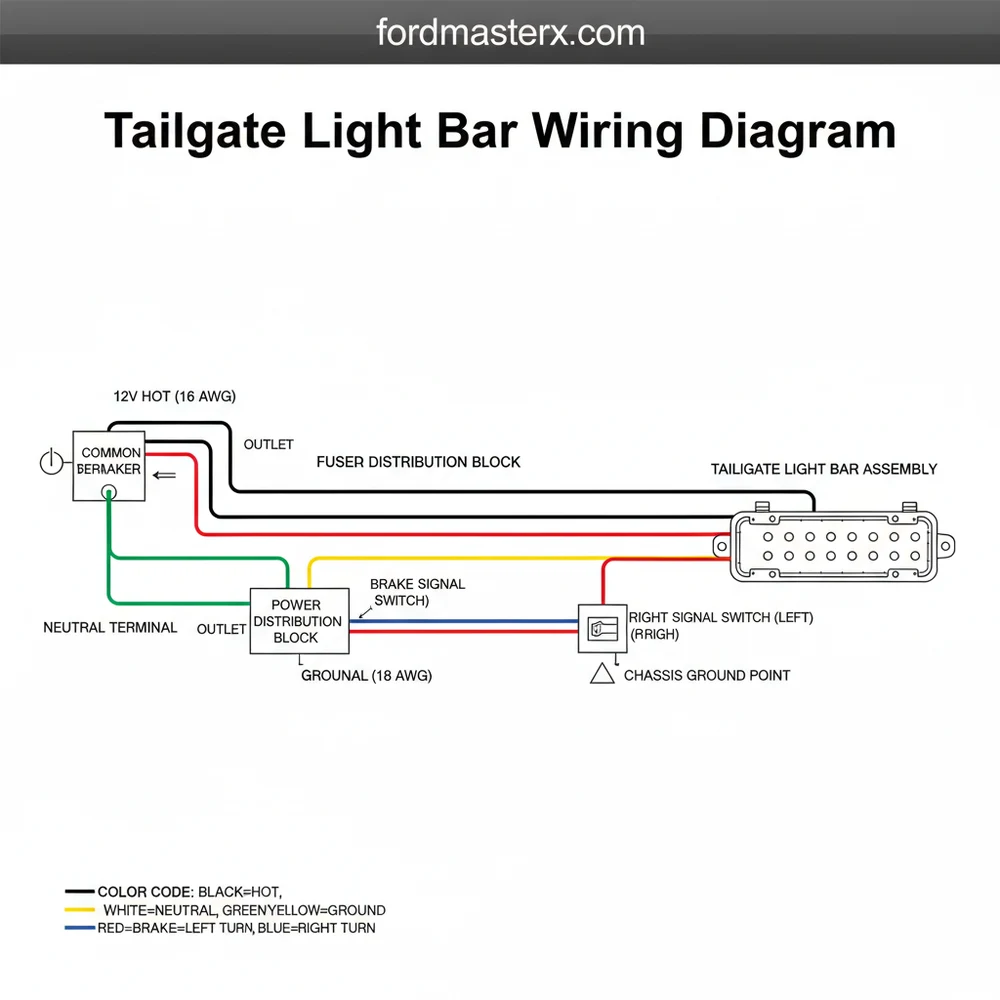
A tailgate light bar wiring diagram illustrates how to connect the bar’s harness to your truck’s 4-pin trailer plug or hardwire it into the taillights. It maps out functions for running lights, brake signals, and turn indicators, ensuring each wire matches the corresponding vehicle circuit for seamless light synchronization.
📌 Key Takeaways
- Synchronizes accessory LED lights with vehicle brake and turn signals
- The 4-pin flat connector is the most critical component for easy setup
- Always ensure a solid ground wire connection to prevent flickering or dimming
- Use heat shrink tubing on all splices to protect against road salt and moisture
- Essential for installing aftermarket LED bars on trucks, SUVs, and trailers
Adding a tailgate light bar to your truck is one of the most popular and functional modifications for DIY enthusiasts. These sleek LED strips fit into the gap between your tailgate and rear bumper, providing enhanced visibility for trailing drivers and a custom look for your vehicle. However, while most manufacturers advertise these as “plug-and-play,” the reality of automotive electrical systems can often be more complex. Understanding a tailgate light bar wiring diagram is essential for a clean installation that functions correctly with your truck’s brake, turn, and reverse signals. This guide provides a deep dive into the technical specifications, color codes, and troubleshooting steps required to master your light bar installation.
Main Components and Features
A standard tailgate light bar consists of several integrated components designed to withstand the harsh environment of the rear of a vehicle. Most modern units are built using flexible, weather-sealed silicone tubes packed with high-intensity LEDs. Depending on the model you choose, these bars can range from simple single-row red lights to advanced triple-row configurations that feature “scanning” or “sequential” amber turn signals and bright white reverse lights.
The primary features of a high-quality tailgate light bar include:
- The LED Strip: Usually available in 48-inch (mid-size trucks) or 60-inch (full-size trucks) lengths.
- The 4-Pin Flat Connector: This is the standard interface for most light bars, designed to plug directly into your truck’s trailer hitch outlet.
- The Inline Driver/Control Box: A small, sealed box that interprets the electrical signals from your truck and converts them into the specific lighting patterns (like the sequential turn signals).
- The Reverse Light Lead: An auxiliary wire (usually separate from the 4-pin plug) that must be tapped into the vehicle’s reverse light circuit.
- Adhesive Backing: Generally a high-bond 3M tape used to secure the bar to the truck’s body.
How to Use and Read the Wiring Diagram

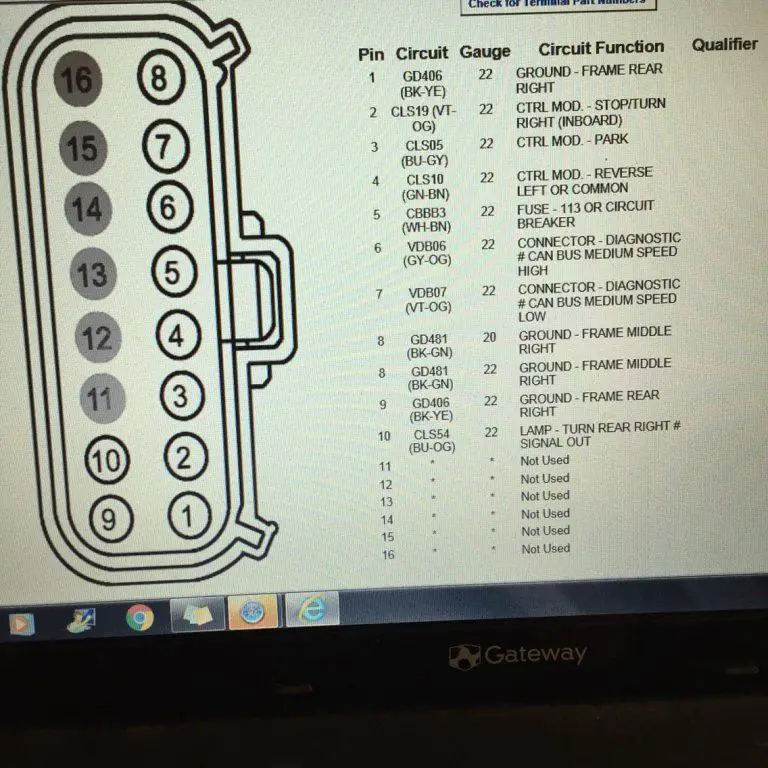
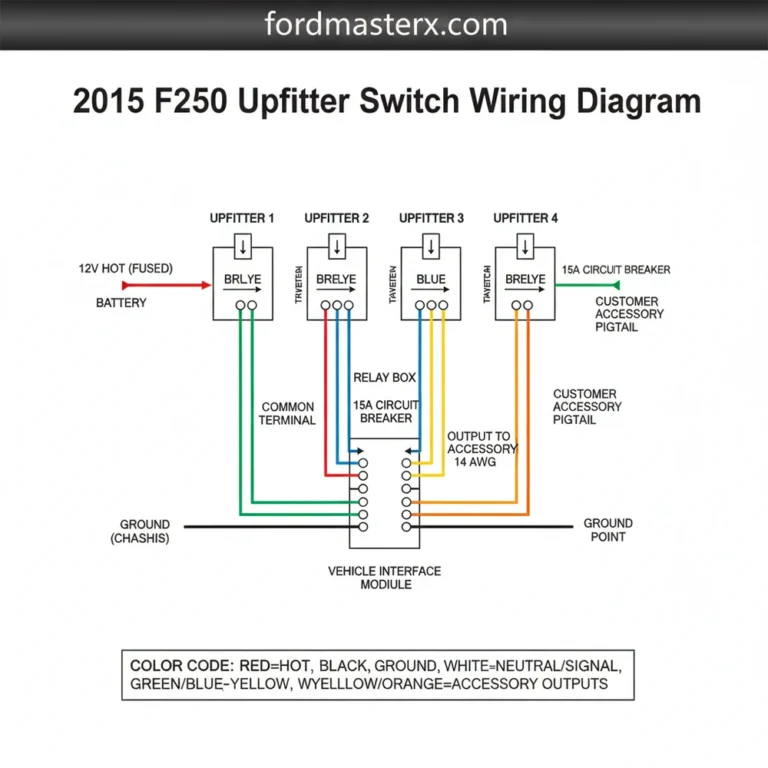
To successfully wire your light bar, you must understand the standard 4-pin trailer wiring layout. Even if you plan to hardwire the unit (cutting off the plug for a cleaner look), the wire colors inside the light bar’s harness generally follow industry standards. Here is the breakdown of the most common tailgate light bar wiring diagram:
| Wire Color | Function | Standard Pin Position |
|---|---|---|
| White | Ground (Negative) | Exposed Male Pin |
| Brown | Tail Lights / Running Lights | Next to Ground |
| Yellow | Left Turn Signal & Brake Light | Third Position |
| Green | Right Turn Signal & Brake Light | Fourth Position |
| Red or Blue | Reverse Light (Auxiliary) | Separate Wire (Non-Plug) |
When reading your vehicle’s factory wiring diagram, you may find that the colors do not match the light bar’s colors. For example, Ford, GM, and RAM often use proprietary colors for their rear harnesses. In these cases, you should not rely on color-matching. Instead, use a multimeter or a test light to probe the wires on the back of your trailer hitch or the tail light housing to confirm which wire carries the 12V signal for each function.
The Reverse Light Exception: Because a standard 4-pin trailer plug does not include a circuit for reverse lights, almost all light bars include a fifth “loose” wire. To make the white LEDs turn on when you shift into reverse, you must locate the reverse light wire in your truck’s factory harness (often found behind the tail light assembly) and use a T-tap or solder connection to bridge the signal.
Practical Installation Tips

Success with a light bar isn’t just about the wiring; it’s about the preparation and the longevity of the connection. Follow these practical tips for a professional-grade installation:
- Surface Preparation: Use 90% isopropyl alcohol to clean the area where the bar will be mounted. If the surface is cold (below 60°F), use a heat gun or hair dryer to warm the metal and the adhesive tape to ensure a strong bond.
- Wire Routing: Use zip ties to secure the excess wiring behind the bumper. Ensure the wires are not touching the exhaust pipe or any moving parts of the spare tire hoist mechanism.
- Dielectric Grease: If you are using the plug-and-play method, apply a small amount of dielectric grease into the 4-pin terminals. This prevents moisture from corroding the pins, which is the leading cause of flickering light bars.
- The Ground Connection: If you choose to hardwire your light bar, ensure the ground (white wire) is attached to a clean, unpainted part of the truck’s frame. A weak ground is responsible for 90% of all “ghosting” or dimming issues.
- Fuse Protection: If you are hardwiring, it is wise to install an inline 5-amp or 10-amp fuse on the main power lead to protect your truck’s computer (BCM) in case of a short circuit within the LED strip.
Troubleshooting Common Issues
Even with a clear wiring diagram, you may encounter issues after the installation. Here are the most common problems and how to solve them:
1. Light Bar Does Not Turn On
First, check the 4-pin connection. Ensure it is seated fully. If it still doesn’t work, use a test light on the truck’s 4-pin outlet. If the outlet has power but the bar doesn’t light up, check the light bar’s fuse (if equipped) or the ground wire. If you have hardwired the unit, double-check your splice connectors; T-taps are notorious for failing to cut through the wire insulation properly.
2. Hyper-Flashing or Error Codes
This is common in newer trucks (especially 2015+ Ford F-150s and newer Rams). The vehicle’s computer detects the low current draw of the LEDs and assumes a bulb is blown or a trailer is incorrectly connected. You may need to install load resistors (50W 6-Ohm) on the turn signal circuits or use a specialized “Y-splitter” harness with a built-in resistor to trick the computer.
3. Reverse Lights Stay On or Don’t Work
If the reverse lights are always on, you may have tapped into a “constant hot” wire instead of the switched reverse circuit. Use a multimeter to find the wire that only shows 12V when the transmission is in Reverse. If they don’t work at all, ensure the auxiliary wire has a solid connection and that the light bar itself is grounded properly.
4. One Side is Swapped (Left Turn makes Right Side Flash)
This happens if the light bar is mounted upside down or if the Green and Yellow wires are crossed. Most bars have a “this side up” indicator. If it’s already mounted, you will need to swap the Green and Yellow wire connections in your harness to correct the orientation.
By following this wiring diagram and installation guide, you can ensure that your tailgate light bar is not only a stylish addition to your truck but also a reliable safety feature. Taking the time to properly map out your vehicle’s wires and securing your connections will prevent common electrical headaches and keep your LEDs shining bright for years to come.
Step-by-Step Guide to Understanding the Tailgate Light Bar Wiring Diagram: Easy Setup Guide
Identify the harness wires on the light bar and match them to your truck’s 4-pin trailer connector functions.
Locate the factory wiring harness behind the bumper if you prefer a hardwired connection over the plug.
Understand how the traveler wire for the reverse light function needs to be tapped into the reverse circuit.
Connect the ground wire to a clean metal surface or designated common terminal to ensure a complete circuit.
Verify that the hot wire provides power for the running lights and that all signals sync with the truck.
Complete the installation by securing all loose wiring with zip ties to prevent snagging or heat damage.
Frequently Asked Questions
Where is the tailgate light bar located?
The bar is typically mounted in the narrow gap between the bottom of the tailgate and the top of the rear bumper. This central location provides maximum visibility for the integrated running, brake, and turn signals, ensuring trailing drivers can clearly see your vehicle’s movements.
What does the tailgate light bar wiring diagram show?
The diagram shows the electrical mapping between the LED bar and the truck’s lighting system. It identifies the hot wire for power and the neutral wire or ground wire for completion, detailing where to tap into the reverse, brake, and signal circuits for full functionality.
How many wires does a tailgate light bar have?
Most light bars use a 4-pin flat connector for standard functions. However, many models include a fifth traveler wire specifically for reverse lights. You must connect the common terminal correctly to the vehicle’s electrical ground to ensure all light functions operate simultaneously without interference.
What are the symptoms of a bad tailgate light bar?
Common symptoms include flickering LEDs, segments that fail to light, or specific functions like turn signals not working. Often, these issues stem from a loose ground wire or corrosion inside the 4-pin connector, which disrupts the electrical flow from the vehicle to the light bar.
Can I install a tailgate light bar myself?
Yes, most tailgate light bars are designed for DIY installation. If your truck has a 4-pin trailer hitch, it is a simple plug-and-play process. If you need to hardwire the traveler wire for reverse light functions, basic wire stripping and electrical splicing skills are required.
What tools do I need for this installation?
You will need a test light or multimeter to identify the correct hot wire, wire strippers for hardwiring, and alcohol pads for surface cleaning. If hardwiring, include waterproof heat shrink connectors and a heat gun to ensure long-lasting, weather-resistant electrical connections for your truck.