The Ultimate OBS Ford Disc Brake Conversion Guide: Parts, Kits & Step-by-Step Installation
The classic lines, rugged durability, and straightforward mechanics of Old Body Style (OBS) Ford trucks have cemented their place in the hearts of enthusiasts and collectors. These vehicles represent a golden era of American manufacturing, embodying the “Built Ford Tough” slogan. However, while their engines and frames were built to last, their braking technology reflects the standards of their time. For owners who use these classic trucks in modern traffic, for towing, or with larger aftermarket wheels, the factory drum brakes can be a significant weak point.
This guide serves as the definitive resource for any OBS Ford owner considering a disc brake conversion. We will cover every aspect of the project, from identifying your specific truck and axle to providing a detailed, step-by-step installation guide. By understanding the components, weighing the benefits, and following a clear process, you can transform your truck’s stopping power, dramatically improving its safety, performance, and ease of maintenance for years to come.
What is an OBS Ford? A Quick Guide for Enthusiasts
Before beginning any modification, it is essential to correctly identify the vehicle. The term “OBS Ford” is a community-driven nickname, not an official Ford designation, which can sometimes lead to confusion. This section clarifies which trucks fall under the OBS umbrella and how to identify the most critical component for a brake conversion: the rear axle.
Defining the “Old Body Style” Era: Generations and Years
“OBS” stands for “Old Body Style” and is an enthusiast-coined term that refers to the distinctively boxy and rugged Ford trucks produced between the 1980 and 1997 model years. This period covers three distinct generations of the Ford F-Series and the full-size Bronco.
- Seventh Generation (1980–1986): Often called the “Bullnose” or “Bulldog” Ford due to its slanted front grille, this generation was the first to be marketed with the iconic “Built Ford Tough” slogan.
- Eighth Generation (1987–1991): This generation is characterized by its flat-nosed, distinctly square-body design, making it one of the most recognizable classic trucks on the road.
- Ninth Generation (1992–1997): Ford introduced a slightly more aerodynamic front end, hood, and more rounded headlights with this generation. The OBS era for the F-150 effectively ended in 1997 with the launch of the radically redesigned tenth-generation F-150, though heavy-duty models retained the classic body style for a little longer.
The OBS family primarily includes the F-150, F-250, F-350, and the full-size Bronco, all of which share similar chassis and body characteristics within their respective generations.
Identifying Your OBS Ford’s Rear Axle: A Critical First Step
Knowing your truck’s specific rear axle is the single most important piece of information needed before ordering a disc brake conversion kit. The wrong kit simply will not fit, leading to costly returns and project delays. While Ford used several axles during this period, the vast majority of OBS trucks are equipped with one of two types.
- Ford 8.8-inch: This is an integral carrier axle, meaning the axle shafts are held in by C-clips inside the differential. It is commonly found in half-ton applications like the F-150 and Bronco from 1980 to 1996.
- Ford/Sterling 10.25-inch: This is a heavy-duty, full-float axle used in three-quarter-ton (F-250) and one-ton (F-350) trucks from approximately 1985 to 1997. Full-float axles are identifiable by the hub that protrudes through the center of the wheel.
While some axles may have a metal identification tag on one of the differential cover bolts, these are often missing or illegible after decades of service. The most reliable method of identification is the shape and bolt count of the differential cover.
| Axle Model | Differential Cover Shape | Number of Cover Bolts | Common Vehicle Applications | Key Visual Cues |
| Ford 8.8″ | Rounded, somewhat “egg-shaped” | 10 | 1980-96 F-150, Bronco | Integral (C-clip) design. Axle flange is flush with wheel. |
| Sterling 10.25″ | 12-sided with smooth, rounded corners | 12 | 1985-97 F-250, F-350 | Full-float design. Hub protrudes through the center of the wheel. |
Why Upgrade Your OBS Ford to Disc Brakes?
The decision to undertake a disc brake conversion is an investment in safety, performance, and peace of mind. While factory drum brakes were adequate for their time, they fall short of modern standards, especially when the truck is used for its intended purpose of hauling and towing.
The Limitations of Factory Drum Brakes: Heat Fade and Maintenance
Drum brakes function by pressing brake shoes outward against the inner surface of a rotating drum. The primary drawback of this enclosed design is poor heat dissipation. During prolonged or heavy braking—such as descending a steep grade or stopping with a heavy load—heat builds up inside the drum. This excessive heat can cause “brake fade,” a dangerous condition where the friction material becomes less effective, requiring significantly more pedal pressure to slow the vehicle. Furthermore, drum brakes are susceptible to trapping water and debris, can have longer stopping distances, and are mechanically complex, with numerous springs and adjusters that make maintenance a chore.
The Superior Performance of Modern Disc Brakes
Disc brakes operate by clamping brake pads onto a spinning rotor (or disc). Because the rotor is exposed to the open air, it dissipates heat far more effectively than a drum. This resistance to overheating ensures consistent, reliable braking performance even under demanding conditions. The benefits are substantial: stopping distances can be up to 33% shorter, they are self-adjusting, maintenance is simplified to replacing pads and rotors, and their open design allows them to shed water quickly for superior performance in wet weather.
| Feature | Disc Brakes | Drum Brakes |
| Stopping Power | Superior, shorter distances | Adequate, longer distances |
| Heat Dissipation | Excellent (Resists Fade) | Poor (Prone to Fade) |
| Wet Performance | Excellent (Self-clearing) | Poor (Traps water) |
| Maintenance | Simple (Fewer parts, easy access) | Complex (Many springs/parts) |
| Initial Cost | Higher | Lower |
Top 5 Benefits of a Disc Brake Conversion for Your Truck
For an OBS Ford owner, these technical differences translate into tangible, real-world advantages. The upgrade is not merely about adding a modern feature; it’s about fundamentally improving the truck’s capability and safety in a modern driving environment.
- Dramatically Improved Safety: Shorter stopping distances and near-elimination of brake fade provide a critical safety margin. This is especially true for a vehicle used as a truck—hauling materials, towing a trailer, or fitted with heavy, oversized tires—where the demands on the braking system are significantly higher than those of a typical passenger car.
- Enhanced Performance & Confidence: The consistent and powerful braking provided by a disc system inspires driver confidence. Whether navigating city traffic or managing a heavy load, the predictable response from the brake pedal makes for a much more controlled and enjoyable driving experience.
- Simplified Maintenance: A disc brake conversion is a long-term investment in easier vehicle upkeep. Swapping out a set of brake pads and a rotor is a fast, straightforward job compared to the tedious process of rebuilding a drum brake assembly with its array of springs, clips, and adjusters.
- Reduced Unsprung Weight: Cast iron brake drums are exceptionally heavy. Replacing them with lighter rotors and calipers reduces unsprung weight—the weight not supported by the vehicle’s suspension. This can lead to improved ride quality and better suspension response.
- Modern Reliability: This conversion replaces 30-year-old technology with a proven, modern braking system. It’s one of the most significant upgrades an owner can make to bring a classic vehicle’s safety and reliability up to contemporary standards.
Planning Your Conversion: Complete Kits vs. The DIY Route
Once the decision to upgrade is made, the next step is to choose a method: purchasing a complete, all-in-one conversion kit or sourcing all the components individually. For the vast majority of DIY mechanics, a complete kit is the most logical, safe, and financially sound path.
The All-in-One Solution: Why a Conversion Kit is Recommended
Complete disc brake conversion kits are engineered as direct bolt-on solutions. They include all the necessary components—caliper brackets, calipers, rotors, pads, flexible hoses, and high-grade mounting hardware—that have been designed and verified to work together seamlessly. This approach eliminates guesswork and ensures part compatibility. The benefits are clear: a more straightforward installation process, detailed instructions, and often, access to technical support from the vendor. While the initial purchase price may seem higher, a complete kit is almost always more cost-effective when the total cost of parts, potential for errors, and the value of your time are considered.
Sourcing Parts Individually: The Hidden Costs and Challenges
The piecemeal DIY route, while tempting for budget-conscious builders, is fraught with hidden costs and risks. The perceived savings from sourcing individual parts often evaporate when accounting for easily overlooked items like specialty nuts and bolts, banjo fittings, crush washers, and brake line clips. Calipers often carry hefty core charges that may not be recoverable if you don’t have old disc brake calipers to return.
The most significant risk lies in fabricating custom caliper brackets. This is not a task for the amateur welder or fabricator. These brackets are safety-critical components that must be engineered with precise dimensions from the correct grade of steel to withstand immense braking forces without failing. An improperly made bracket represents a catastrophic safety hazard. The time spent researching part numbers, cross-referencing compatibility, and sourcing dozens of small components can quickly turn a weekend project into a month-long headache. A complete kit transfers the burden of engineering and sourcing from the owner to the manufacturer, acting as a form of project insurance that guarantees a safe and successful outcome.
Popular OBS Ford Disc Brake Conversion Kit Brands
Several reputable companies specialize in providing high-quality conversion kits tailored to OBS Fords:
- Lugnut4x4, RuffStuff Specialties, and CP Addict: These vendors are well-regarded in the off-road and heavy-duty truck community, offering robust, comprehensive kits specifically for the Sterling 10.25″ axle found in F-250s and F-350s.
- Little Shop MFG: This manufacturer offers well-designed kits for the Ford 8.8″ axle used in F-150s and Broncos, providing various caliper options, including those with a parking brake.
- Wilwood: For those seeking maximum performance, Wilwood is a top-tier brand that offers high-performance “big brake” kits with multi-piston calipers and larger rotors for superior stopping power.
- SSBC-USA: This company provides direct-fit, bolt-on kits designed for straightforward installation, aiming to provide modern braking capability with a factory-like appearance.
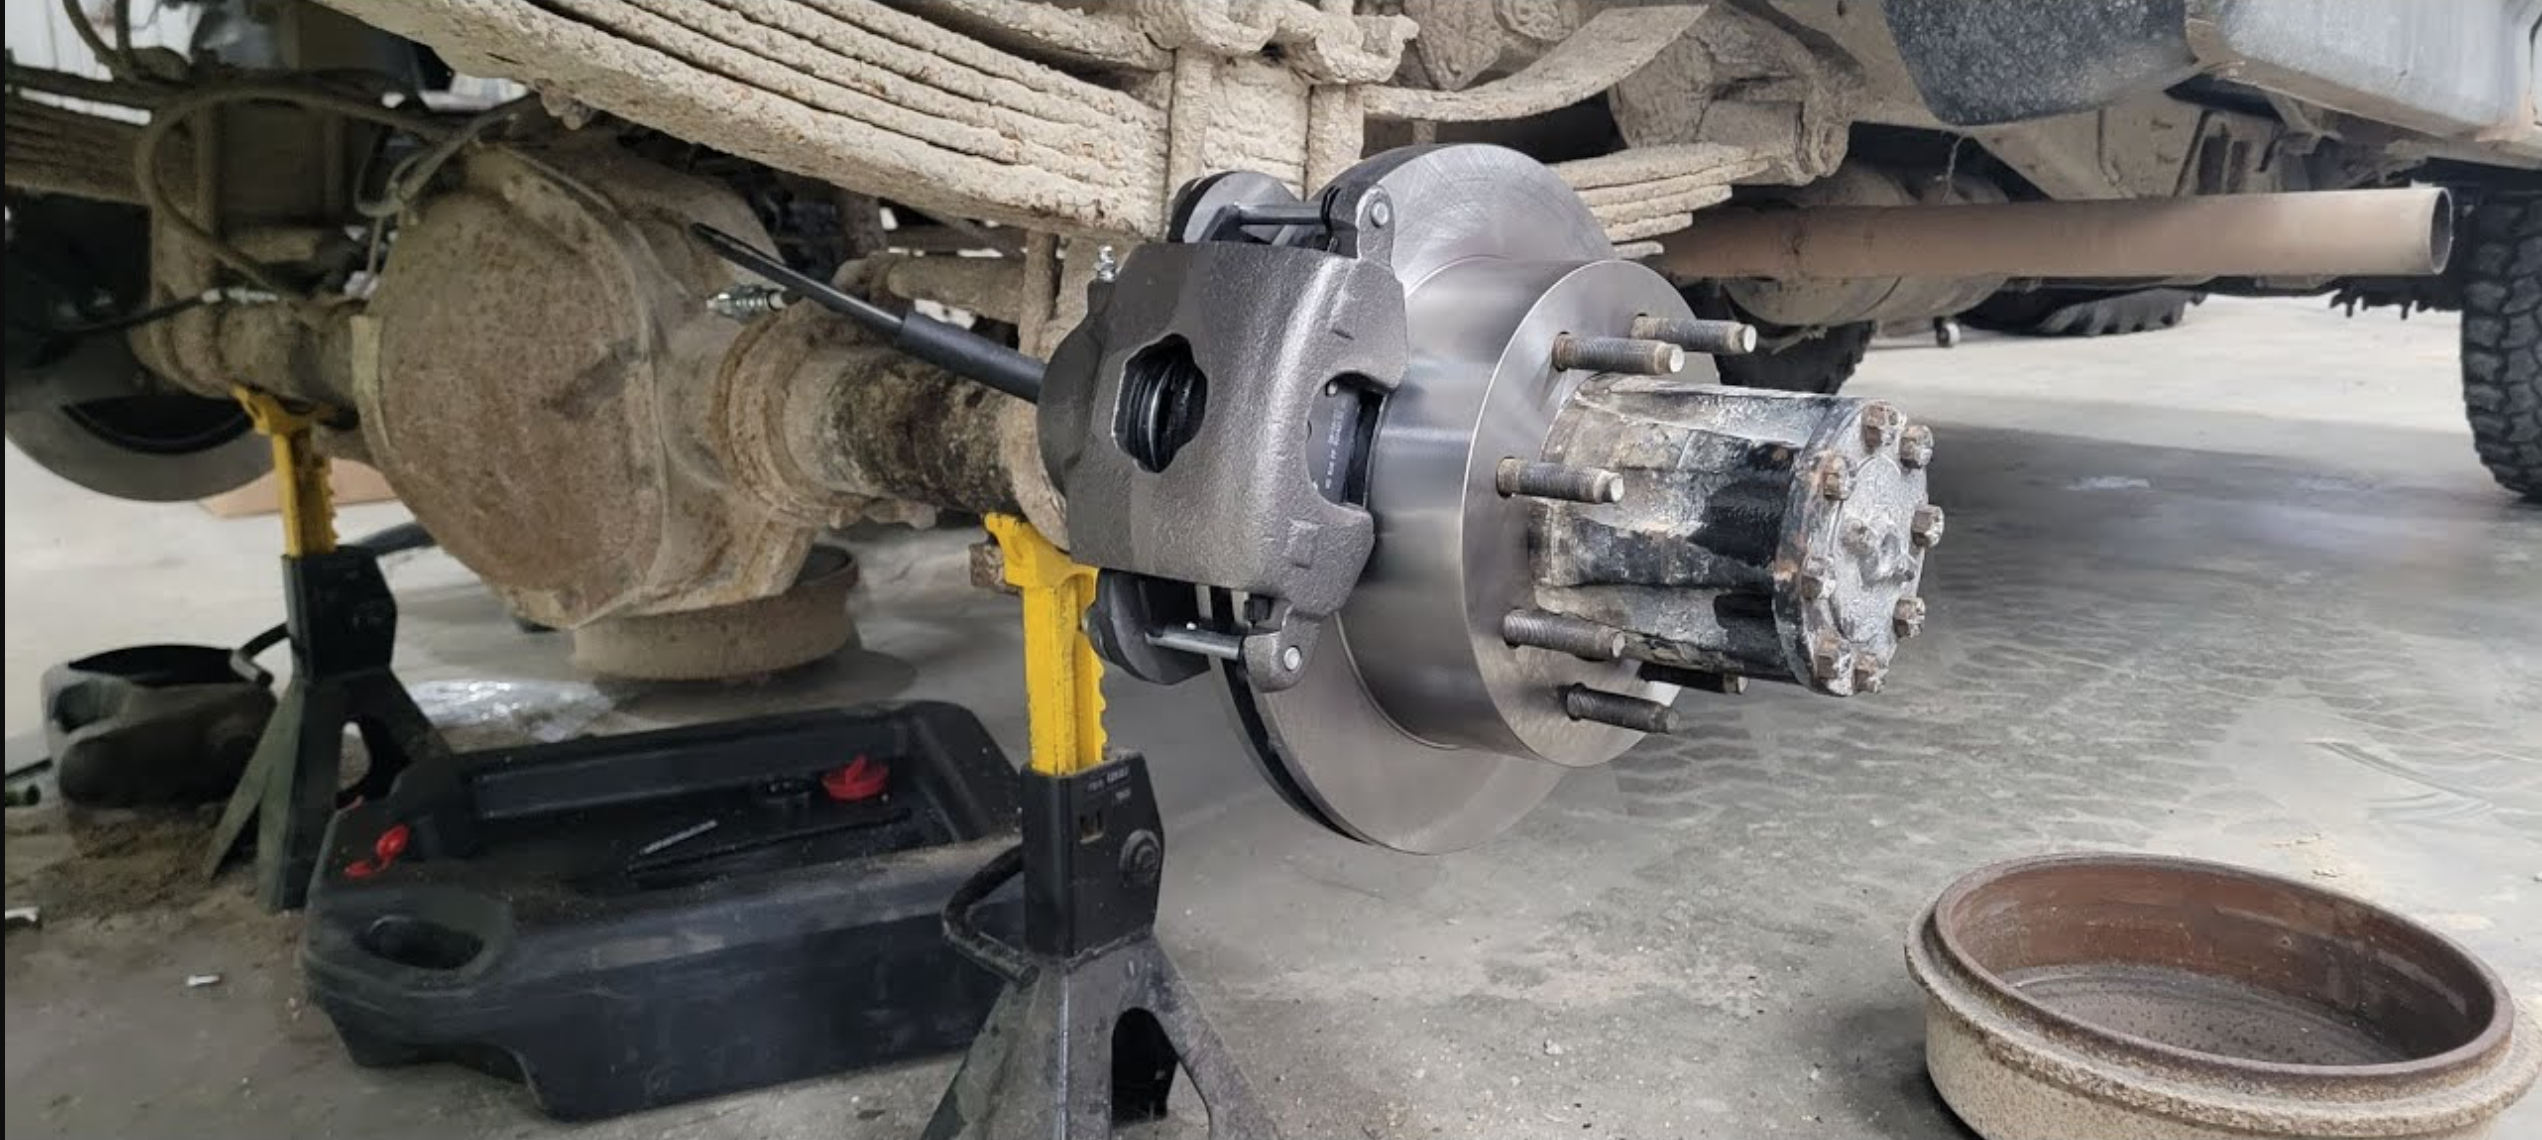
The Complete Guide to OBS Ford Rear Disc Brake Conversion
This section provides a comprehensive, step-by-step guide for converting the rear axle of your OBS Ford from drum to disc brakes. While specific instructions may vary slightly between kit manufacturers, this process covers the universal steps involved.
Essential Tools and Parts Checklist
Before starting, gather all necessary tools and verify that your conversion kit is complete.
Required Tools:
- Jack and high-capacity jack stands
- Socket set and torque wrench
- Brake line wrenches (to prevent stripping fittings)
- C-clamp or caliper piston compression tool
- Wire brush
- Drain pan
- Brake fluid (consult your vehicle’s specifications for DOT type)
- Brake cleaner
- Safety glasses and gloves
Potential Specialty Tools:
- Cut-off wheel or reciprocating saw (if cutting off old backing plates)
- Brake bleeder kit (manual or vacuum)
| Component | Quantity | Function/Notes |
| Rotors | 2 | Vented, with the correct 5-lug or 8-lug bolt pattern. |
| Calipers w/ Pins | 2 (Left & Right) | Ensure they have a parking brake mechanism if desired. |
| Brake Pads | 1 Set (4 pads) | Semi-metallic or ceramic pads are common. |
| Caliper Brackets | 2 (Left & Right) | The core of the kit; bolts directly to the axle flange. |
| Flexible Brake Hoses | 2 | Often stainless steel braided. Includes banjo bolts and crush washers. |
| Mounting Hardware | 1 Set | All necessary Grade 8 bolts, nuts, clips, and washers. |
Step 1: Vehicle Preparation and Safety
Safety is paramount. Begin by parking the truck on a flat, level surface and chocking the front wheels securely. If you plan to retain the parking brake, it’s often easiest to disconnect the cables from the central equalizer bar under the truck before lifting it. Using a floor jack, lift the rear of the truck and place jack stands securely under the axle housing on both sides. Never work under a vehicle supported only by a jack. Once the truck is safely supported, remove the rear wheels.
Step 2: Removing the Old Drum Brake Assembly
First, remove the brake drum. If it is stuck on the hub due to rust, apply penetrating oil and tap the back of it firmly with a hammer to break it loose. Next, using a line wrench, carefully disconnect the hard brake line from the back of the wheel cylinder. Be prepared for some brake fluid to leak out; have a drain pan ready.
At this point, you must decide how to remove the drum backing plate.
- Method A (Cutting): This is the fastest method. Use a cut-off wheel or reciprocating saw to cut the backing plate into two pieces. This allows it to be removed without disturbing the axle shaft.
- Method B (Axle Removal): To preserve the original backing plates, you must remove the axle shafts. For an 8.8″ axle, this involves draining the gear oil, removing the differential cover, removing the center pin and C-clips, and then sliding the axle shafts out. For a Sterling 10.25″ full-float axle, unbolt the eight bolts on the hub flange and slide the axle shaft out.
After the backing plate is removed, use a wire brush to thoroughly clean the axle flange where the new bracket will mount. This surface must be free of rust and debris to ensure the bracket sits perfectly flat.
Step 3: Installing the Caliper Mounting Brackets
Position the new caliper mounting bracket onto the clean axle flange. The brackets are side-specific (left and right), so ensure the caliper opening will face toward the rear of the truck. Secure the bracket using the new Grade 8 hardware provided in your kit. Apply a thread-locking compound to the bolt threads if recommended by the manufacturer. Use a torque wrench to tighten the bolts to the specified torque setting (e.g., 20 ft-lbs). If you removed the axle shafts, now is the time to reinstall them, secure them with their C-clips or hub bolts, install a new differential cover gasket, and refill the differential with the correct weight of gear oil.
Step 4: Mounting the New Rotors and Calipers
Slide the new rotor over the wheel studs. To keep it from falling off while you work, thread two lug nuts on by hand to hold it in place. Next, install the new brake pads into the calipers. If the caliper piston is extended, use a C-clamp and an old brake pad to gently press it back into the caliper body until it is flush.
Slide the loaded caliper over the rotor and into position on the mounting bracket. Secure it with the supplied caliper slide pins or bolts. Torque these fasteners to the manufacturer’s specification (e.g., 30 ft-lbs). If you are using calipers with an integrated parking brake, connect the parking brake cable to the lever on the caliper now.
Step 5: Connecting Hoses and Bleeding the Brake System
Attach the new flexible brake hose to the caliper. This connection uses a “banjo bolt,” which must have a new copper or aluminum crush washer on both sides of the hose fitting to create a leak-proof seal. Connect the other end of the flexible hose to the vehicle’s original hard brake line.
With all mechanical components installed, the final and most critical step is to bleed the brake system to remove all air. The sequence is crucial: always start with the wheel farthest from the master cylinder (passenger rear), then move to the driver’s rear, passenger front, and finally the driver’s front. The process involves having a helper press and hold the brake pedal while you open the bleeder screw on the caliper to release a mix of old fluid and air. Close the screw before the helper releases the pedal. Repeat this process until only clear, bubble-free fluid emerges. Throughout this process, constantly check and refill the master cylinder with fresh brake fluid to prevent it from running dry and introducing more air into the system.
Step 6: Bedding-In Your New Brakes for Optimal Performance
The job isn’t finished until the new pads and rotors are properly bedded-in. This process deposits an even layer of friction material from the pad onto the rotor surface, which is essential for maximum stopping power, quiet operation, and preventing brake judder.
In a safe area with no traffic, perform a series of 8-10 moderate-to-firm stops from about 60 mph down to 10 mph. Do not come to a complete stop or engage ABS. The goal is to build up heat in the brakes. After the last stop, drive for several minutes with minimal braking to allow the components to cool down gradually. Avoid sitting stationary with your foot on the brake pedal while the brakes are hot, as this can cause an uneven transfer of pad material to the rotor.
Addressing the Front Axle: Front Disc Brake Conversion Insights
While the rear disc conversion is the most common upgrade for OBS Fords, it’s important to note that some earlier models, particularly from the seventh generation (1980-1986), may have been equipped with drum brakes on the front axle as well. The vast majority of eighth and ninth-generation trucks came standard with front disc brakes.
For owners with front drums, a conversion is not only possible but highly recommended, as the front brakes perform approximately 70% of the vehicle’s braking. Front disc brake conversion kits are readily available from many of the same suppliers. The process is similar to the rear conversion but involves the front steering knuckles. A typical front kit includes new rotors with integrated hubs, calipers, pads, caliper mounting brackets that bolt to the factory spindles, new wheel bearings, and seals.
Critical Supporting Upgrades: Master Cylinder & Proportioning Valve
A disc brake conversion is a complete system overhaul. Simply swapping the components at the wheels is not enough and can create a dangerous situation. The hydraulic control system must be updated to match the new hardware.
Why a Disc/Disc Proportioning Valve is Non-Negotiable
The factory proportioning valve in a disc/drum vehicle is calibrated to send lower hydraulic pressure to the rear drum brakes. Drums require less pressure to operate and also need a residual pressure valve to keep the brake shoes positioned close to the drum surface. If you install rear disc brakes but keep the original valve, it will send insufficient pressure to the new calipers, resulting in poor rear brake performance. More dangerously, if the valve lacks the proper proportioning for discs, it can cause the rear wheels to lock up prematurely during a hard stop, potentially leading to a loss of vehicle control.
It is mandatory to replace the factory valve with an adjustable proportioning valve designed for a four-wheel disc brake system. This allows you to fine-tune the front-to-rear brake bias, ensuring stable, controlled stops under all conditions.
Selecting the Right Master Cylinder for Your New Setup
Disc brake calipers have much larger pistons than drum brake wheel cylinders and therefore require a greater volume of brake fluid to actuate properly. The stock master cylinder from a disc/drum setup may not have a large enough bore diameter to push the required volume of fluid. This can result in a soft, spongy brake pedal that travels too far to the floor before the brakes engage firmly.
For a firm, confident pedal feel and optimal performance, it is highly recommended to upgrade to a master cylinder with a larger bore (typically 1-1/8 inch or greater) designed for four-wheel disc brakes. Many vendors offer matched kits that include both the correct master cylinder and proportioning valve, simplifying the selection process and guaranteeing compatibility.
Frequently Asked Questions (FAQ) about OBS Brake Conversions
Q1: How much does an OBS Ford disc brake conversion cost? A: The cost varies by application and component quality. A complete rear disc conversion kit for a common axle like the Ford 8.8″ or Sterling 10.25″ typically costs between $400 and $800. Opting for features like parking brake calipers, drilled and slotted rotors, or premium brands can increase the price. High-performance kits from brands like Wilwood can exceed $2,000.
Q2: Will I need new wheels for the conversion? A: In most cases, no. The majority of conversion kits are designed to fit inside the factory 15-inch or 16-inch wheels. However, the inner diameter and backspacing of some wheel designs can interfere with the new, larger calipers. It is crucial to check the kit manufacturer’s wheel fitment guide or diagram before purchasing to confirm clearance.
Q3: How long does the conversion take for a DIY mechanic? A: For a DIY mechanic with moderate experience and the proper tools, converting a single axle can generally be completed in 4 to 6 hours. This timeframe can be affected by unforeseen issues such as heavily rusted fasteners or the need to make brake line modifications.
Q4: Can I keep my parking brake with a rear disc conversion? A: Yes, absolutely. Most reputable kit suppliers offer an option for calipers that feature an integrated mechanical parking brake mechanism. When ordering your kit, ensure you select the “parking brake” or “e-brake” caliper option. These kits typically include the necessary levers and sometimes cable adapters to connect to your factory parking brake cables.
Conclusion
Upgrading an OBS Ford with a four-wheel disc brake system is one of the most significant and rewarding modifications an owner can perform. It addresses the single greatest performance and safety shortcoming of these otherwise legendary trucks. The conversion delivers not just superior stopping power but also enhanced driver confidence, simplified long-term maintenance, and the modern reliability expected in today’s driving environment.
While the project requires careful planning and mechanical aptitude, the availability of comprehensive, bolt-on kits has made it more accessible than ever for the home mechanic. By following the steps outlined in this guide, you can confidently transform your classic Ford, ensuring it stops as well as it looks and hauls. With its braking system brought up to modern standards, your “Old Body Style” Ford will be ready and safe for any task you throw at it.
Need to verify your truck’s history before you begin? [Check your VIN with our trusted partner]. Shop for recommended tools and parts for this project on [Amazon]. For official information on vehicle safety standards, visit the (https://www.nhtsa.gov/) website. Looking for more OBS Ford content? Check out our **** guide