How to Draw a Ford Mustang: A Step-by-Step Guide for Enthusiasts
The Ford Mustang is more than just a car; it’s a 60-year-long story of American power, freedom, and style, captured in steel. Trying to draw one is an ambitious project, not just because cars are technically difficult to sketch, but because you’re trying to capture a legend. The aggressive stance, the long hood, and the iconic “pony” emblem all have to be right to feel like a Mustang.
Many people search for this to create a gift for a car-loving family member or to simply connect with their favorite vehicle on a new level. This guide is built to help you succeed, whether you’re a total beginner or an experienced artist.
We’ll provide simple, step-by-step instructions for beginners, an advanced tutorial for a realistic 3/4-perspective drawing , and the crucial design data you need to draw specific, iconic models from any generation.
Before You Start: Your Drawing Toolkit & Pro Tips
Before you touch pencil to paper, gathering the right supplies and, more importantly, the right mindset will make the biggest difference in your final drawing.
Your Drawing Toolkit
You can draw a car with anything, but for a great result, your tools can be broken into two kits.
- The Beginner’s Sketch Kit: All you need to get started.
- Paper: Any standard printer paper will do.
- Pencil: A standard $2 \text{ HB}$ school pencil is perfect.
- Eraser: A good eraser gum.
- The Enthusiast’s Pro-Grade Kit: For realistic shading and highlights.
- Paper: Thicker, smooth paper like Canson Illustration or Bristol board.
- Pencils: A set of graphite pencils (e.g., $2\text{H}$ for light sketches, $\text{HB}$ for lines, $2\text{B}$/$4\text{B}$ for shading).
- Erasers: A kneaded eraser for lightening sketch lines without fully erasing , and a pen-style eraser for sharp details.
- Markers & Pens: Alcohol-based markers (like Ohuhu or Copic) for coloring, and a white Posca paint marker or gel pen for adding those bright, “hotspot” highlights.
The 4 Most Common Car Drawing Mistakes (and How to Fix Them)
Car artists agree: drawing a car is challenging because your brain plays tricks on you. Avoid these common pitfalls first.
- The Mistake: Rushing the Proportions.Your sketch is the foundation for the entire drawing. If you jump straight to drawing the cool headlights, you’ll end up with a car where the wheels are too small or the hood is too short.
- The Fix: Use a “box method”. Start by drawing a simple, light box that represents the car’s total length and height. This forces you to get the fundamental proportions right before you add any details.
- The Mistake: Sketching Your Construction Lines Too Dark.It’s tempting to press hard, but if your initial sketch lines are too dark, you’ll never be able to erase them. They will show through your final coloring and make the drawing look messy.
- The Fix: Use a light pencil (like a $2\text{H}$) and very light pressure. If your lines are still too dark, roll a kneaded eraser over them before coloring. This will “lighten” the sketch evenly so you can still see it, but it won’t show through the final layers.
- The Mistake: Ignoring Light and Shading.A drawing with only lines will look “flat and dull”. The Mustang’s dramatic, muscular curves only come to life when you add shadows.
- The Fix: Even simple “hatching” (adding lines for shadow) under the bumpers and inside the wheel arches will instantly give your drawing 3D volume.
- The Mistake: Perspective and Foreshortening Errors.This is the big one, especially for a 3/4-view drawing. Your brain thinks it knows what a wheel or a headlight looks like, but from an angle, everything is warped. Your brain “can often play tricks on you and lead you to believe you can see much more than what is actually there”.
- The Fix: Trust your reference photo, not your brain. If the far headlight looks “wrong” and impossibly skinny, draw it that way. That’s called foreshortening, and it’s the key to making a 3D object look correct on a 2D page.
Part 1: The Beginner’s Guide — How to Draw a Classic Mustang (Side View)
For your first sketch, the easiest and most recognizable model is a 1st Generation (1965-1968) Mustang from a flat side view. This profile is simple and emphasizes the car’s most iconic feature: its “long hood, short deck” silhouette.
(A simple 4-panel illustration should be placed here, showing the drawing’s progression from a basic box to a detailed side-view sketch.)
Step 1: Sketch the Main Body Outline
Start by drawing a long, flat rectangle for the main body. On top of this, draw the cabin roof. Notice the classic Mustang roof is flat and slopes down quickly at the back. This establishes the core “pony car” proportion. Keep your lines very light.
Step 2: Place the Wheels and Arches
Draw two circles for the wheels. A common beginner mistake is making them too small or placing them too close together. A good rule of thumb is to leave a gap between the two wheels that is roughly the width of three wheels. Draw bold, rounded lines over the top of the wheels to create the wheel arches.
Step 3: Define the Cabin and Body Lines
Draw the lines for the windshield and side windows. The most iconic feature of the 1st Gen Mustang is the “C-shaped” side scoop, a character line that is carved out just behind the door. Draw this line and the outline of the door.
Step 4: Add Final Details
Darken your final lines. Add the front and rear bumpers. Draw a simple horizontal line for the door handle and a small side mirror near the front window. For the wheels, a classic five-spoke “mag” design is simple to draw and looks perfect for this era. Finally, add a small “pony” logo on the front fender.
For more practice on this “box method,” the(https://www.circlelineartschool.com) offers excellent free tutorials on a variety of car-drawing topics.
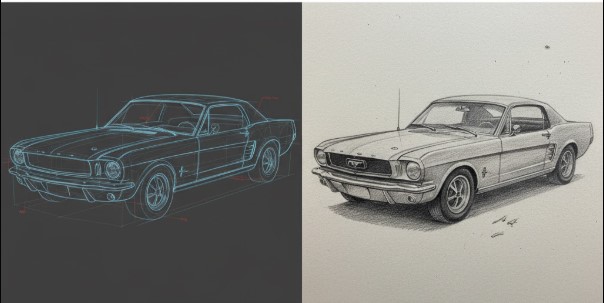
Part 2: The Enthusiast’s Guide — How to Draw a Modern Mustang (3/4 Perspective)
This is the most popular and dynamic angle, but it’s also the most challenging. This view requires a basic understanding of two-point perspective. We’ll use a modern S550 Mustang (2015-2023) as our subject.
(A 5-panel illustration should be placed here, showing the progression from a 3D perspective box to a fully detailed and shaded 3/4-view drawing.)
Step 1: Draw the Perspective Box
Do not start with the car’s outline. Start by drawing a 3D box in two-point perspective. This means all vertical lines are straight, but all horizontal lines recede to one of two “vanishing points” on a horizon line.16 This box is your foundational guide and is the single most important step for getting the proportions right.
Step 2: Place the Wheels (Ellipses)
This is the hardest part. The wheels are no longer circles; they are ellipses. Draw a vertical and horizontal line inside the side-plane of your box to find its center. The wheel will be placed here.
- Pro-Tip: The “short axis” of the ellipse (the line representing the axle) must always point toward the same vanishing point as the side of the car. This single tip will dramatically improve your drawing’s realism.
Step 3: Carve the Body from the Box
Now, you “carve” the car’s shape from the 3D box. Draw the angled trapezoid for the windshield and the rectangle for the front grille. Use the box’s top plane to sketch the hood and the side plane to sketch the doors and windows.
Step 4: Add Modern S550 Details
This is what makes it a modern Mustang. Draw the aggressive, wide, trapezoidal “shark-bite” grille. The headlights are the most important feature: they are slim, angled, and contain the iconic 3-bar “gill” LED Daylight Running Lamps (DRLs). Add the sharp, deep creases along the body.
Step 5: Realistic Shading and Highlights
A modern Mustang has deep-set vents, spoilers, and sharp body lines. Use shading to show the depth of the grille and the hood vents. Use a white paint pen or gel pen to add sharp “hotspot” highlights to the top of the windshield, the car’s “shoulder line,” and the edge of the wheels. This makes the drawing “pop.”
Mastering this is difficult, but the techniques are teachable. For a masterclass on the topic, the online guide from Gvaat provides a definitive, expert-level breakdown of drawing ellipses and using vanishing points for vehicles.
Part 3: The Design DNA — Why a Mustang Looks Like a Mustang
To draw any Mustang accurately, you must first understand its “design DNA.” Every Mustang, from the 1964.5 original to the brand-new S650, shares a core visual identity:
- A long, muscular hood.
- A short rear deck (trunk).
- An aggressive, “pony car” stance.
This iconic look wasn’t an accident. It was the result of Lee Iacocca’s vision to create a stylish, affordable car for the youth market. The Mustang’s design has always been a wrapper for its performance. That long hood wasn’t just for looks; it had to be long enough to house a powerful V8, from the original K-Code 18 to today’s 5.0L Coyote. This is why the design has always had to communicate muscle.
As an owner or enthusiast, understanding this heritage is key. The design has always been driven by the car’s performance capabilities. A powerful Engine has always been the heart of the Mustang, and its design is a direct reflection of that.
Authoritative sources like Ford’s official corporate history and Hagerty’s 1st-Generation guide confirm that this blend of style, price, and performance made the car an instant icon.
Drawing a Mustang by the Generation: Key Visual Cues
The biggest mistake artists make is drawing a “generic Mustang.” The model you choose determines every line. A 1979 “Fox Body” looks nothing like a 1965 “Pony Car.” This table is your “Rosetta Stone” for translating a specific model year into actionable design cues.
| Generation | Key Years | Body Shape (The “Silhouette”) | Grille Design | Headlight Design |
| First Gen | 1964.5–1973 | The original “pony car”: long hood, short deck, C-shaped side scoop. 1969+ models became visibly longer and larger. | “Pony in Corral” logo. GT models featured fog lamps set inside the grille. | Single round headlights. 1969–1970 models featured quad headlights (two in the grille, two out). |
| Second Gen | 1974–1978 | Mustang II.” Much smaller, shorter, and wider; based on the Ford Pinto platform. | Simple, rectangular grille, often with a horizontal bar. Pony logo was moved to the hood or absent from the grille. | Single round headlights set inside square, recessed bezels. |
| Third Gen (Fox Body) | 1979–1993 | “Fox Platform.” Lighter, boxy, European-influenced design. Available as a notchback coupe or hatchback. | (1979-86): Slanted, louvered “Four Eyes” grille, deeply set. | (1979-86): “Four Eyes” — quad rectangular headlights, two on each side. |
| Third Gen (Aero) | 1987–1993 | Same Fox Body, but with a modernized “Aero” nose for better aerodynamics. | No grille at all; a smooth, body-colored nose with the Ford oval. | Composite “Aero” headlights; a single, flush, wraparound unit on each side. |
| Sixth Gen (S550) | 2015–2023 | “Retro-meets-modern.” Low, wide, and aggressive stance. Features a sleek fastback roofline. | Wide, trapezoidal “shark bite” grille set at an aggressive forward angle. | Slim, angled headlights with the iconic 3-bar vertical DRLs, meant to look like gills. |
Part 4: Drawing the Icons (Specific Model Mini-Guides)
Want to draw a specific legend? Here are the key details you must get right.
How to Draw a 1965 Shelby GT350
To draw the original track-ready Mustang, the key is what’s missing.
- The Grille: Remove the “pony in corral.” The GT350 grille is a simple, blacked-out mesh with a small, off-center “pony” logo.
- The Body: This model is defined by its simplicity. Add the “GT350” rocker panel stripes that run along the bottom of the car.
How to Draw a 1968 “Bullitt” Mustang
This car, made famous by Steve McQueen, is all about its “mean,” stealthy stance.
- The Grille: This is the most important feature. The grille is completely blacked-out and empty. The fog lights are removed, and the central “pony” logo is gone, leaving a deep, intimidating black void.
- The Body: The car is subtle. It’s defined by its lack of badges and its dark “Highland Green” color.
How to Draw a 1980s “Four-Eyed” Fox Body
The Fox Body Mustang has a massive cult following. Its design was a total departure, but its heart was the legendary 5.0L V8, a simple, robust Engine that cemented its cult status.
- The Face: The entire drawing is defined by the “face.” The front end is aggressively slanted back.
- The Lights: You must nail the “Four Eyes” design: two distinct rectangular headlights on each side, set deep within black bezels.
How to Draw a 2020 Shelby GT500
This is a drawing of “function over form”.8 The design is dictated by the car’s immense Power.
- The Grille: The grille is not for looks; it’s a massive, gaping hole for cooling the supercharged engine. The legendary Cobra badge sits on this massive black mesh.
- The Hood: The hood is not smooth. It features massive, functional heat extractor vents.
- The Aero: The drawing must include the aggressive front splitter and side skirts.
Your Mustang, Your Drawing
Drawing a Ford Mustang is a personal way to connect with over 60 years of automotive history and design. The final result doesn’t have to be perfect. As BMW designers note, “there are no mistakes, just new food for thought”. The goal is to be brave, enjoy the process, and capture the spirit of the car.
Whether you’re sketching your dream car or looking for expert advice on maintaining the one in your garage, our general Ford guides are here to help every Ford owner.
We’d love to see your work! Post your finished Mustang drawing on social media and tag us to share your passion.
Frequently Asked Questions (FAQ)
Q: What is the easiest Mustang model to draw for a beginner?
A: The easiest is a classic 1st Generation (1965-1966) Mustang from a flat side view. Its simple, iconic lines (long hood, sloping roof, side scoop) are very recognizable and easy to capture with basic shapes.12
Q: What are the hardest parts of drawing a Mustang realistically?
A: The two hardest parts are proportions and perspective. For proportions, it’s very easy to make the hood too short or the wheels too small. For perspective (the 3/4 view), drawing the wheels as perfect ellipses and getting the foreshortening right is a major challenge for all car artists.
Q: How do I draw the running horse “Pony” logo?
A: The Mustang’s logo, first proposed by designer John Najjar, symbolizes speed and freedom. To draw it, start simple: sketch a “bean” shape for the body. Add a “triangle” for the head and four simple “stick” lines for the legs in a running position. Then, refine the shapes, adding the flowing mane and tail.
Q: What’s the main visual difference between a 1965 and a 1969 Mustang?
A: While both are 1st Generation, the 1969 model is visibly larger, longer, and more aggressive. It’s four inches longer than the original 18 and features quad headlights (two inside the grille and two on the outer edges), which is the easiest way to tell it apart from the 1965’s simple, single round headlights.


