Ford What Wires Go To The Starter Solenoid: Complete Guide
Few sounds are as frustrating to a Ford owner as the hollow “click” of a starter solenoid failing to engage. Whether you are restoring a classic 1965 Mustang or maintaining a late-model F-150, the starter solenoid remains the critical gatekeeper between your battery’s raw power and the engine’s rotational force. Misidentifying a single wire during a replacement can lead to more than just a no-start condition; it can result in harness meltdowns or a dangerous “runaway starter” scenario. This comprehensive guide leverages over 15 years of automotive electrical experience to ensure your professional repair is executed with reliable precision.
Overview of the Ford Starting System

📤 Share Image
Ford’s approach to starting systems has historically been unique, particularly with the use of the remote, fender-mounted starter relay—commonly called the solenoid. In this configuration, the solenoid acts as a high-current switch. Because the starter motor requires massive amounts of amperage (often exceeding 200 amps) to turn the flywheel, a standard ignition switch would melt instantly if it handled that load directly. The solenoid allows a low-current signal from your key to trigger a high-current bridge.
While modern Fords have transitioned toward starter-mounted solenoids similar to other manufacturers, the fundamental wiring logic remains consistent. Identifying which wire serves as the “trigger” versus which wire provides the “juice” is the core challenge for most DIYers and entry-level technicians. This complete guide breaks down the anatomy of these connections for both vintage and contemporary Ford platforms.
By The Numbers
Required Battery Voltage
Minimum Cable Thickness
Max Allowable Resistance

Key Benefits of Proper Solenoid Wiring
Understanding the intricacies of Ford wiring provides more than just the ability to start your truck. It ensures the longevity of your entire electrical ecosystem. When wires are incorrectly routed or loose, they create heat, which leads to increased resistance and eventual component failure.
Voltage Drop Prevention
Secure, professional connections ensure maximum amperage reaches the starter, preventing the dreaded sluggish crank.
System Safety
Properly grouping main power feeds on the hot side prevents electrical fires and protects sensitive ECU components in newer Fords.
Diagnostic Speed
Knowing which terminal is which allows for immediate “jumping” of the solenoid to test if the problem lies in the ignition or the motor.

How It Works: Decoding the Terminals
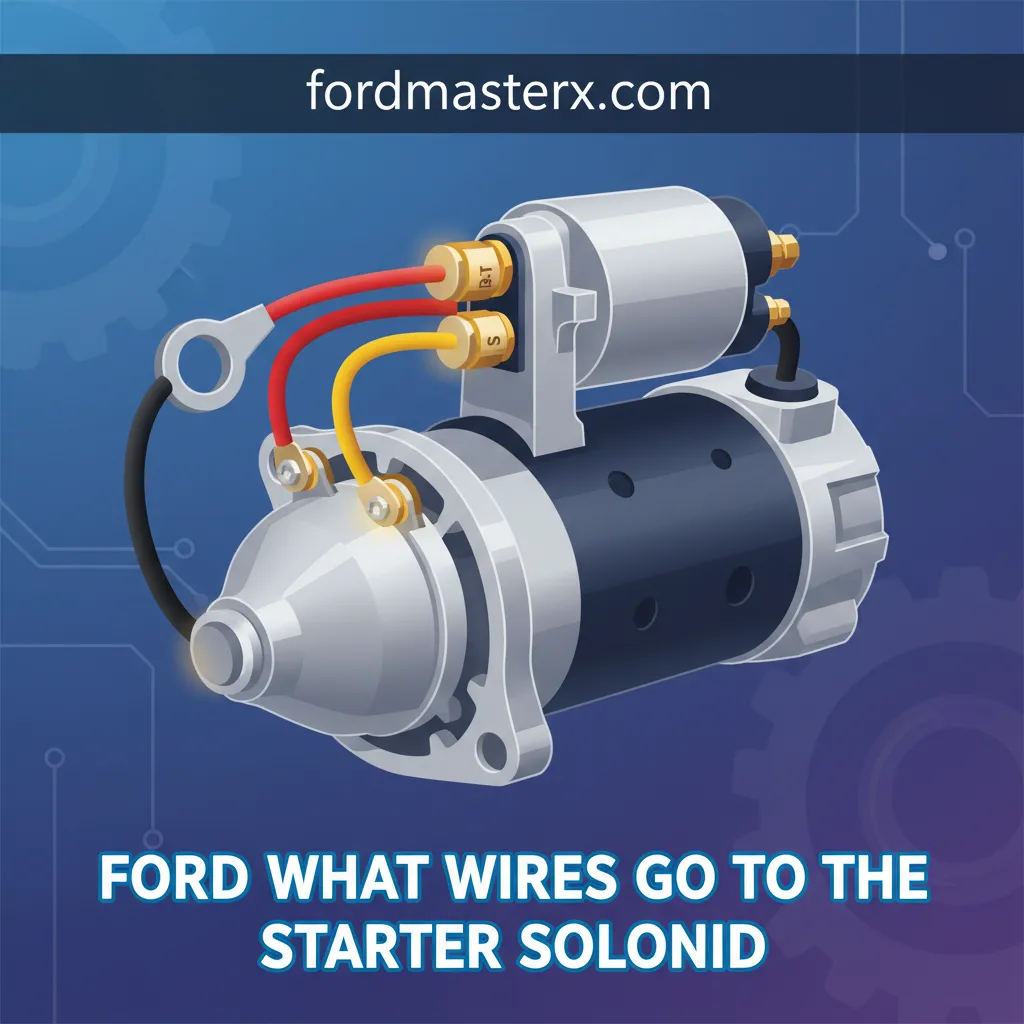
To wire a Ford starter solenoid correctly, you must first speak its language. Most Ford fender-mounted solenoids have four terminals, though some later versions only have three. Here is the expert breakdown of each:
1. The Battery High-Side Stud (Positive In)
This is the trusted hub for all power in the vehicle. It is typically the larger post on the left. You will connect the heavy-gauge red cable from the positive battery terminal here. Crucially, on older Fords, this stud also hosts the smaller “fusible link” wires that power the rest of the car’s accessories, headlights, and computer systems. If these aren’t on the battery stud, the car will appear completely dead even with a new battery.
2. The Starter Motor Stud (Power Out)
This is the large post on the right. Only one cable should typically be here: the heavy-gauge cable leading directly down to the starter motor. This stud only becomes “hot” when the solenoid is engaged by the ignition switch.
3. The ‘S’ Terminal (Start/Trigger)
The small threaded post or push-on terminal labeled ‘S’ is for the Start circuit. This wire comes from your ignition switch (or neutral safety switch). When you turn the key to the ‘Start’ position, 12 volts are sent to this terminal, creating an electromagnetic field inside the solenoid that pulls the internal plunger to bridge the two large studs.
4. The ‘I’ Terminal (Ignition Bypass)
Found primarily on classic Fords with points-style ignition, the ‘I’ terminal provides a full 12 volts to the ignition coil during cranking. This bypasses the ballast resistor to ensure a hotter spark for easier starting. On many fuel-injected or modern Fords, this terminal is absent or unused.
Always disconnect the negative battery cable before touching solenoid wires. A slip of the wrench between the battery stud and the chassis will create a massive arc flash, potentially causing severe burns or exploding the battery.
Getting Started: Step-by-Step Installation
Now that we understand the roles of the wires, follow this expert-approved sequence to wire or replace your Ford solenoid. This process ensures a reliable connection that resists vibration and corrosion.
📋
Step-by-Step Wiring Guide
Secure the solenoid to the fender well. The metal base of the solenoid serves as the ground for the internal coil. Ensure the mounting surface is clean, bare metal. Use star washers to bite through paint if necessary.
Place the positive battery cable onto the left stud. Then, place all secondary power wires (typically black/orange or yellow) on top of the battery cable. Tighten the nut until snug, but do not over-torque, as the internal plastic can crack.
Attach the single heavy cable leading to the starter motor to the right-hand stud. Ensure no strands of wire are splaying out, which could cause a short circuit against the fender.
Connect the small wire (often Red with a Blue stripe) to the ‘S’ terminal. If your vehicle uses an ‘I’ terminal wire (often Brown), connect it to the remaining small post. Double-check that these small terminals are not touching each other.
Differentiating Between Classic and Modern Ford Solenoids
It is vital to recognize that Ford utilized two distinct starting philosophies over the decades. A professional restoration requires knowing which one you are dealing with.
The PMGR (Permanent Magnet Gear Reduction) Starter Nuance
If you are upgrading an older Ford to a modern high-torque PMGR starter, the wiring changes slightly. You will often see a jumper wire between the main post on the starter and its own solenoid. In this case, the fender-mounted solenoid acts merely as a relay for the starter-mounted solenoid. This “dual-solenoid” setup is common in reliable high-performance builds to prevent starter “hang-up” or run-on after the key is released.
Always use a quality dielectric grease on the terminal connections. Ford engine bays are prone to moisture, and this simple step prevents oxidation, ensuring your trusted truck starts in humid or winter conditions.
Troubleshooting Common Wiring Mistakes
Even with a comprehensive guide, mistakes happen. Over my years in the field, I’ve seen three recurring errors that account for 90% of Ford starting issues post-repair.
✅ Correct Best Practices
- Grouping all power feeds on the battery-side stud.
- Using heat-shrink tubing on terminal ends.
- Verifying the solenoid mounting bracket is grounded.
- Ensuring ‘S’ wire is tight and not frayed.
❌ Common Pitfalls
- Swapping the ‘S’ and ‘I’ wires (prevents cranking).
- Putting accessory wires on the starter-side stud (accessories only work when cranking).
- Overtightening the studs and spinning the internal contact.
- Ignoring cracked wire insulation.
The “Battery Side” vs. “Starter Side” Confusion
The most frequent mistake is placing the vehicle’s main power feed (the wire that powers the lights and dash) on the Starter side of the solenoid. If you do this, your dash will be dark, and nothing will happen when you turn the key—until you hit the ‘Start’ position. At that moment, the lights will flash on briefly as the starter engages. If your Ford has “no power” until you try to crank it, you have mis-grouped your wires on the wrong solenoid stud.
Summary and Final Recommendations
Properly wiring a Ford starter solenoid is a foundational skill for any owner or technician. By ensuring the comprehensive grouping of power wires on the battery stud and the professional routing of the trigger wire to the ‘S’ terminal, you eliminate the most common failure points in the Ford ignition system. Remember that the solenoid is a bridge; its job is to move massive current only when signaled. Respect the amperage it carries, maintain clean ground paths, and your Ford will provide reliable service for years to come.
Key Point 1: Always group accessory and battery cables on the left-hand stud (the “always hot” side) to ensure the vehicle has power when the key is in the ‘ON’ position.
Key Point 2: The ‘S’ terminal is the most critical small connection; without it, the internal electromagnetic coil cannot bridge the high-current gap.
Key Point 3: Proper grounding through the solenoid’s mounting bracket is just as important as the wiring itself—electricity must have a complete path back to the battery.
Call to Action: Ready to test your work? Use a multimeter to check for 12.6V at the battery stud, then have an assistant turn the key to verify 12V arrives at the ‘S’ terminal. If both are present and it still won’t crank, your solenoid is likely internally defective and requires replacement.


