Ford F350 Fuse Box Diagram: Quick Identification Guide
The Ford F350 fuse box diagram identifies the location and purpose of every fuse and relay. Typically, one box is under the dashboard on the driver’s side kick panel and another is under the hood near the battery. Using this map helps you restore power to components like lights, windows, or the fuel pump.
📌 Key Takeaways
- The diagram simplifies electrical troubleshooting by mapping components to fuses.
- Always locate both the interior kick panel and the engine bay power distribution box.
- Never replace a fuse with one of a higher amperage rating to avoid fire risks.
- A blown fuse can often be the hidden cause behind a non-responsive OBD-II port.
- Use the diagram whenever a specific electrical accessory like the radio or wipers fails.
When your heavy-duty truck experiences an electrical hiccup, the first tool you should reach for is a reliable ford f350 fuse box diagram. This essential roadmap allows you to pinpoint exactly which circuit has failed, preventing you from guessing and potentially causing further damage to your vehicle’s sensitive electronics. Whether you are dealing with a dead trailer light, a non-responsive power window, or a more serious issue with the ignition system, understanding this diagram is the key to a fast, cost-effective repair. In this guide, we will explore the locations of your fuse panels, how to interpret the technical symbols, and the practical steps for troubleshooting electrical faults using a ford f350 fuse box diagram.
Understanding the Ford F350 Fuse Box Layout
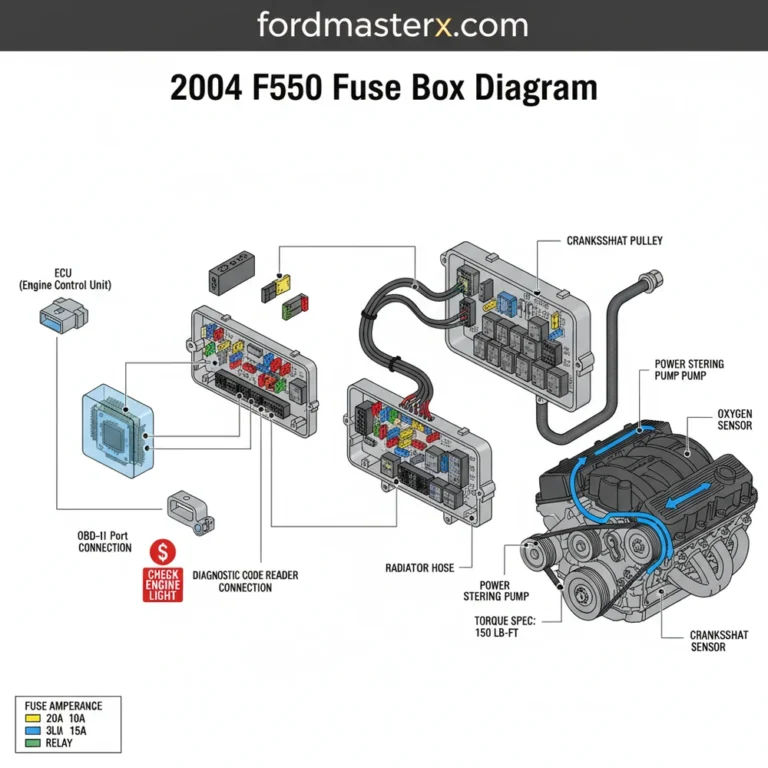
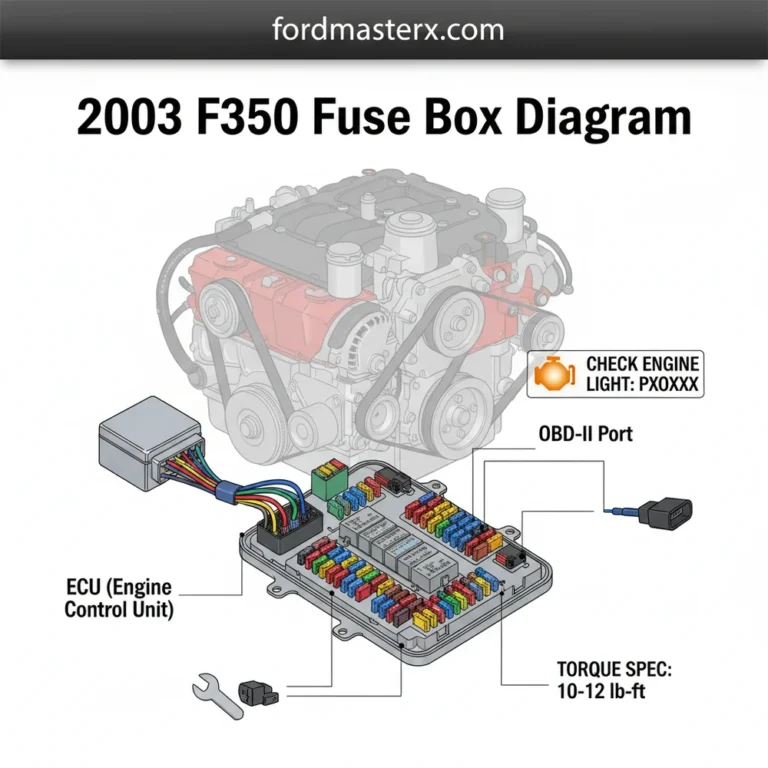
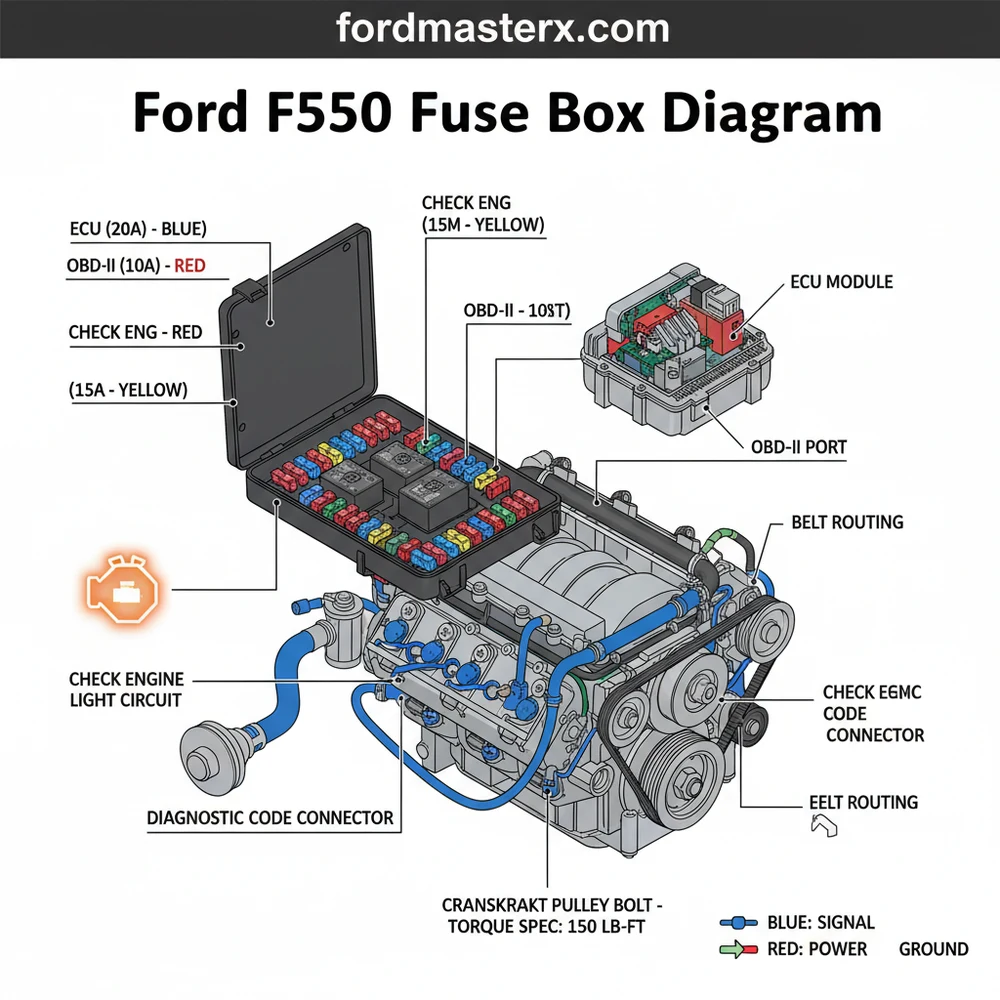
The Ford F350 is a powerhouse of engineering, but its complexity means that its electrical system is divided into several sections. Typically, your truck will utilize two primary fuse locations. The first is the Power Distribution Box, located in the engine compartment. This box houses high-current fuses and relays that protect major systems like the ECU (Engine Control Unit), the cooling fan (which maintains coolant flow), and the anti-lock brake pump. Because these components handle significant electrical loads, the fuses here are often larger “Maxi” fuses or “J-Case” fuses.
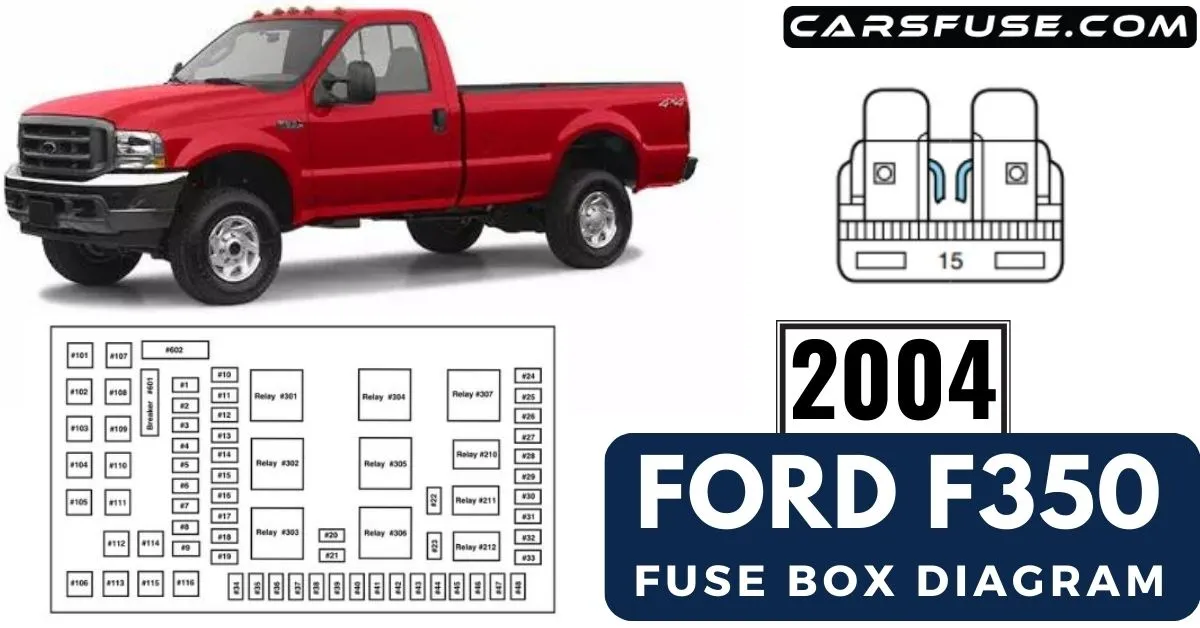
The second location is the Passenger Compartment Fuse Panel, usually found behind the kick panel on the passenger side or under the dashboard. This panel is the “brain center” for interior electronics, including the instrument cluster, interior lighting, and the OBD-II port. When you look at a diagram for these panels, you will notice a grid-like structure where each fuse is assigned a specific number and an amperage rating (such as 10A, 15A, or 20A).
Most diagrams use a standard numbering system. Even if the physical layout of the box changes slightly between different cab styles (Regular, SuperCab, or Crew Cab), the fuse numbering for critical components like the fuel pump or ignition usually remains consistent within the same model generation.
A comprehensive diagram will also include a “Relay Map.” Relays are essentially remote-controlled switches that allow a low-current signal to trigger a high-current device. For example, when you turn your key, a relay sends power to the starter motor. If your accessory belt is spinning the alternator correctly but the battery isn’t charging, the diagram can help you identify if a relay or a fuse in the charging circuit has failed.
[DIAGRAM_PLACEHOLDER – Visual Representation of an F350 Fuse Box showing rows of Mini and Maxi fuses with a Legend Table]
Step-by-Step Guide to Using Your Fuse Box Diagram

Interpreting a ford f350 fuse box diagram may seem daunting at first, but following a structured approach makes the process straightforward. Whether you are a seasoned DIYer or a beginner, use the following steps to diagnose and fix electrical issues.
Step 1: Locate the Correct Fuse Box
Identify which system is failing. If the problem is “under the hood” (like the starter or the A/C compressor), open the hood and locate the Power Distribution Box near the battery. If the problem is inside the cabin (like the radio or power seats), find the interior panel on the passenger side. Clean the area around the box to ensure no debris falls into the terminals when you open the cover.
Step 2: Access the Diagram Legend
Most F350 trucks have a simplified diagram printed on the underside of the fuse box cover. However, for full descriptions, refer to your owner’s manual or a high-quality digital ford f350 fuse box diagram. Match the orientation of the box in the truck to the orientation of the drawing on the page. Look for the numerical index that lists the “Function” and “Amperage” for each slot.
Step 3: Identify the Targeted Fuse
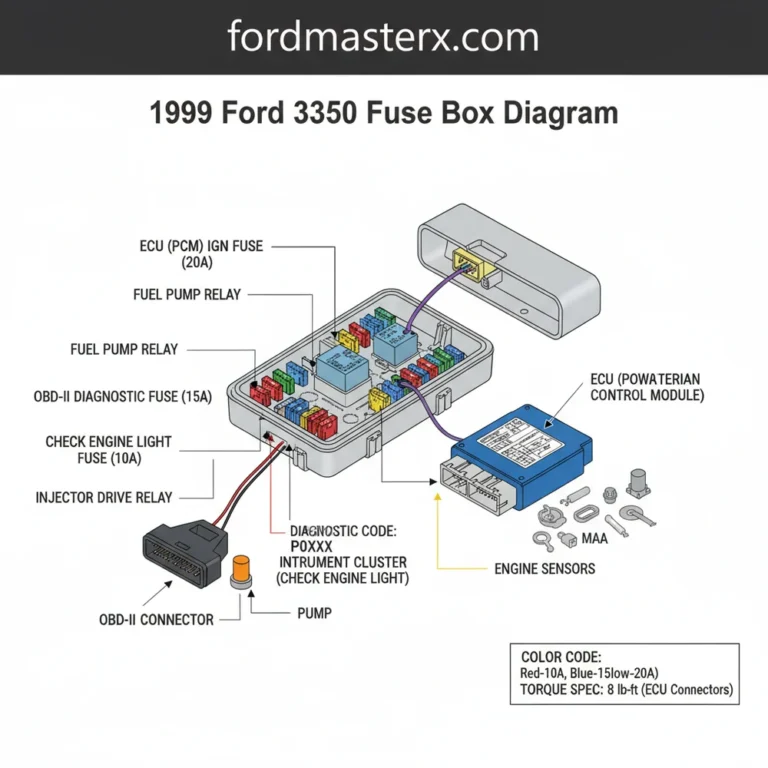
Find the component that isn’t working in the legend. For instance, if your check engine light is on and you cannot get a diagnostic code from your scanner, look for the fuse labeled “OBD-II” or “Data Link Connector.” Note the fuse number and its color-coded amperage (e.g., Blue for 15A, Yellow for 20A).
Always use a dedicated fuse puller tool. These are often clipped inside the fuse box cover. Using metal pliers can crack the plastic housing or cause a short circuit if the ignition is on.
Step 4: Inspect the Fuse Condition
Pull the fuse straight out. Hold it up to a light source. You are looking at the metal “U” or “S” shaped wire inside the plastic. If the wire is broken or the plastic is charred, the fuse is blown. However, fuses can sometimes look fine but still be faulty. If you have a multimeter, set it to the “Continuity” setting and touch the probes to the two small metal tabs on the top of the fuse. A beep indicates the fuse is good; silence indicates it is blown.
Step 5: Replace with the Correct Rating
This is the most critical step. Replace the blown fuse with a new one of the exact same amperage. If the diagram calls for a 10A fuse, do not use a 20A fuse. Doing so could allow an electrical surge to melt your wiring harness or damage the ECU, leading to thousands of dollars in repairs.
Step 6: Test the System and Reset Codes
Once the new fuse is installed, start the engine. Check if the component is now functioning. If the fuse was related to the emissions system, you might still see a check engine light. Use an OBD-II scanner to clear any old diagnostic code entries. If the fuse blows again immediately, you have a short circuit that requires deeper investigation.
Common Issues & Troubleshooting
One of the most frequent problems F350 owners face is a blown fuse for the trailer towing package. Because these trucks are often used for hauling, moisture in trailer plugs or frayed wires on a trailer can cause a short that pops the fuse in the engine bay. If you find yourself replacing the same fuse repeatedly, the ford f350 fuse box diagram can help you trace the wire color listed for that circuit, allowing you to find the physical short.
Another common issue involves the ECU power supply. If your truck cranks but won’t start, or if the timing chain and mechanical components seem fine but there is no spark, check the PCM (Powertrain Control Module) fuse. Corrosion inside the fuse box is also a common culprit in older trucks, especially those driven in “salt belt” states. If you see green crust on the fuse terminals, the diagram will help you identify which neighboring circuits might also be at risk of failing due to high resistance.
Never bypass a fuse with a piece of wire or “tin foil.” Fuses are designed to be the weakest link in the chain to protect your truck from fire. Bypassing them can lead to a total vehicle loss.
Tips & Best Practices for Electrical Maintenance
Maintaining the electrical health of your Ford F350 goes beyond just swapping fuses. Here are a few professional recommendations to keep your truck running smoothly:
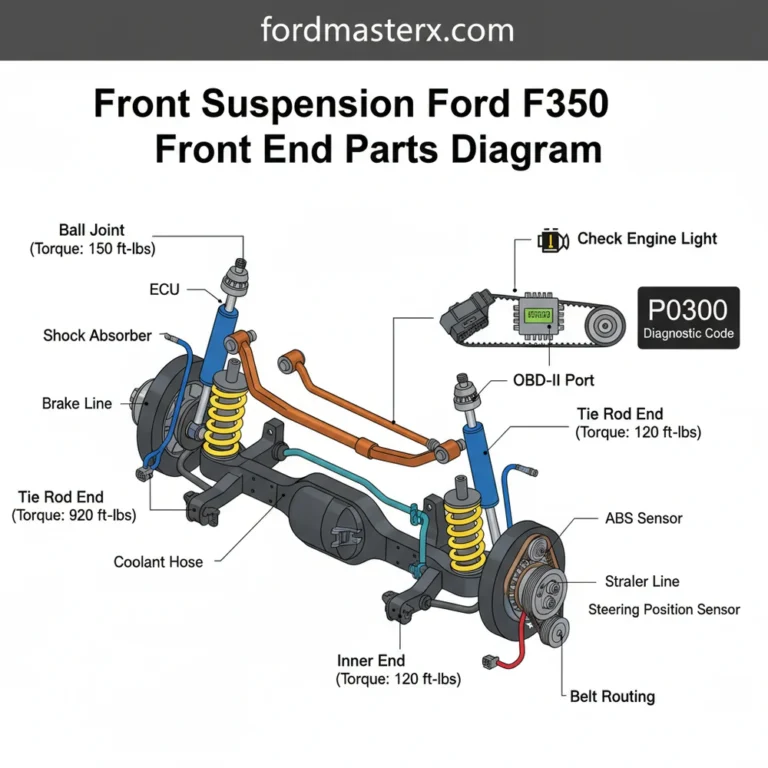
- ✓ Check Battery Terminals: Ensure your battery connections are tight. A loose terminal can cause voltage spikes that blow sensitive fuses. Always adhere to the proper torque spec when tightening terminal bolts to avoid stripping the lead posts.
- ✓ Inspect the Alternator: The accessory belt must be properly tensioned to ensure the alternator provides a steady 14.4V. Low voltage can cause relays to “chatter,” leading to premature failure.
- ✓ Keep it Dry: Ensure the gaskets on your under-hood fuse box are intact. Water ingress is the leading cause of phantom electrical issues and check engine light triggers.
- ✓ Quality Over Cost: When replacing fuses, choose high-quality OEM or name-brand replacements. Cheap, unbranded fuses may not blow at the rated amperage, putting your truck at risk.
Finally, keep a printed copy of the ford f350 fuse box diagram in your glove compartment. Digital versions are great, but if your truck’s battery is dead and your phone is out of charge, a physical paper copy is a lifesaver. By understanding how to read and apply the information in the diagram, you empower yourself to handle the majority of electrical hiccups that occur on the road, ensuring your F350 remains the reliable workhorse it was built to be.
Frequently Asked Questions
Where is the F350 fuse box located?
Most Ford F350 trucks feature two primary locations. The passenger compartment fuse panel is usually found behind a cover under the dashboard on the driver or passenger side kick panel. The high-power distribution box is located under the hood, typically near the battery or driver-side firewall for easy access.
What does the Ford F350 fuse box diagram show?
The Ford F350 fuse box diagram provides a map of all electrical protection devices. It details the amperage rating for each fuse and identifies which specific component it protects, such as the fuel pump, headlights, or radio, allowing for quick circuit identification during complex electrical repairs.
How many connections does the fuse panel have?
The main power distribution box connects to the battery via heavy-gauge wires. Internally, it distributes power to dozens of individual circuits. If a major fuse like the one for the ECU blows, it can cut power to the entire engine management system and prevent the truck from starting.
What are the symptoms of a bad fuse?
The most common symptom is a specific electrical component suddenly stopping. If your OBD-II scanner won’t connect or the check engine light won’t illuminate during the initial bulb check, you may have a blown fuse. Often, a specific diagnostic code will point you toward an open circuit failure.
Can I replace a fuse myself?
Replacing a fuse is a simple DIY task that requires very little technical knowledge. Once you locate the blown fuse using the diagram, simply pull it out and push in a new one of the exact same amperage. This often resolves minor electrical gremlins instantly without a mechanic.
What tools do I need for fuse replacement?
You primarily need a fuse puller tool, which is often located inside the fuse box cover. A multimeter or a 12V test light is also helpful for testing fuses without pulling them. If removing the battery for access, ensure terminal nuts are tightened to the factory torque spec.