Ford F-150 Check Engine Light Reset: The Definitive Engineering Guide
The illumination of the Malfunction Indicator Lamp (MIL), colloquially known as the Check Engine Light, represents a critical intersection between mechanical engineering, software logic, and environmental compliance in the Ford F-150 platform. For the modern F-150 owner, technician, or fleet manager, the “reset” is not merely a task of extinguishing a bulb; it is a complex interaction with the vehicle’s Powertrain Control Module (PCM), Keep Alive Memory (KAM), and Battery Management System (BMS).
This research report provides an authoritative, encyclopedic examination of the diagnostic architecture of the Ford F-Series. Moving beyond superficial “quick fixes,” this document dissects the underlying logic of Ford’s On-Board Diagnostics (OBD-II) implementation, the legislative history driving the evolution of “Permanent Codes,” and the precise, generation-specific protocols required to reset these systems safely. Whether dealing with a 10th Generation Triton V8 or a 14th Generation PowerBoost Hybrid, this guide serves as the ultimate reference for diagnostic resets, idle relearn procedures, and drive cycle verifications.
Ford F-150 Check Engine Light Reset
Don’t panic. It might just be a loose gas cap. Here is the authoritative data-driven guide to diagnostics, resetting protocols, and drive cycles.
Why is the Light On?
Before resetting, it is critical to understand the trigger. Data from thousands of F-150 diagnostic reports suggests that nearly 40% of alerts are caused by minor emissions leaks or sensor faults rather than catastrophic engine failure.
- ⚠ Loose Gas Cap: The #1 most common (and easiest) fix.
- ⚙ O2 Sensors: Oxygen sensors fail over time, affecting fuel economy.
- 🔥 Ignition Coils: Common on EcoBoost and 5.0L V8 engines causing misfires.
ℹ Pro Tip: Resetting the light without fixing the problem will only turn it off temporarily. The “Permanent Codes” remain in the ECU memory.
Common F-150 CEL Triggers
Data estimation based on aggregate OBD-II repair reports.
How to Reset: Scanner vs. Battery
There are two primary ways to extinguish the light. The “Hard Reset” (Battery) is effective but crude. The “Soft Reset” (Scanner) is precise and safer for modern electronics.
Method A: OBD-II Scanner
The recommended method for all F-150s from 1996 to present.
- Locate OBD-II port under the steering column.
- Turn ignition to ON (engine off).
- Plug in scanner and select “Read Codes”.
- Select “Erase/Clear Codes”.
- Wait for “Command Sent” confirmation.
Method Effectiveness Score
Method B: Battery Pull
Effective, but clears radio presets and adaptive transmission learning.
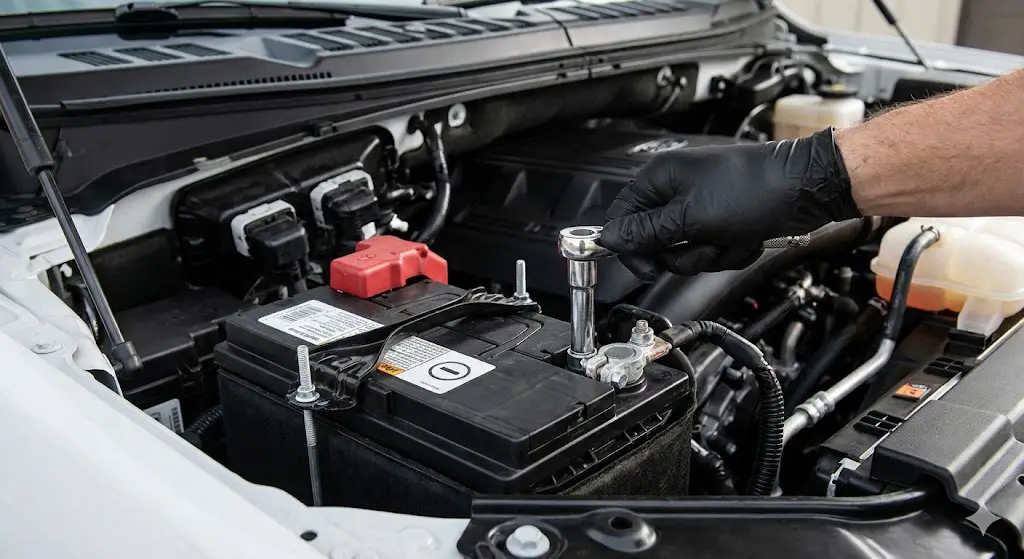
- Open hood and locate the battery.
- Loosen the nut on the Negative (-) terminal (Black).
- Disconnect negative cable for 15-30 minutes.
- Turn on headlights to drain residual capacitor power.
- Reconnect and tighten.
The “Drive Cycle” Procedure
Resetting the light clears the state of the Emissions Readiness Monitors. To pass a state inspection, or to confirm the fix, you must drive the truck through a specific “Drive Cycle” to let the computer re-test all sensors.
Step 1: Cold Soak
Park vehicle for 8 hours. Engine coolant must match air temp.
Step 2: Highway Cruise
Drive 55-60 MPH for at least 10 minutes continuously.
Step 3: City Stop & Go
20 minutes of city driving with at least 4 complete stops.
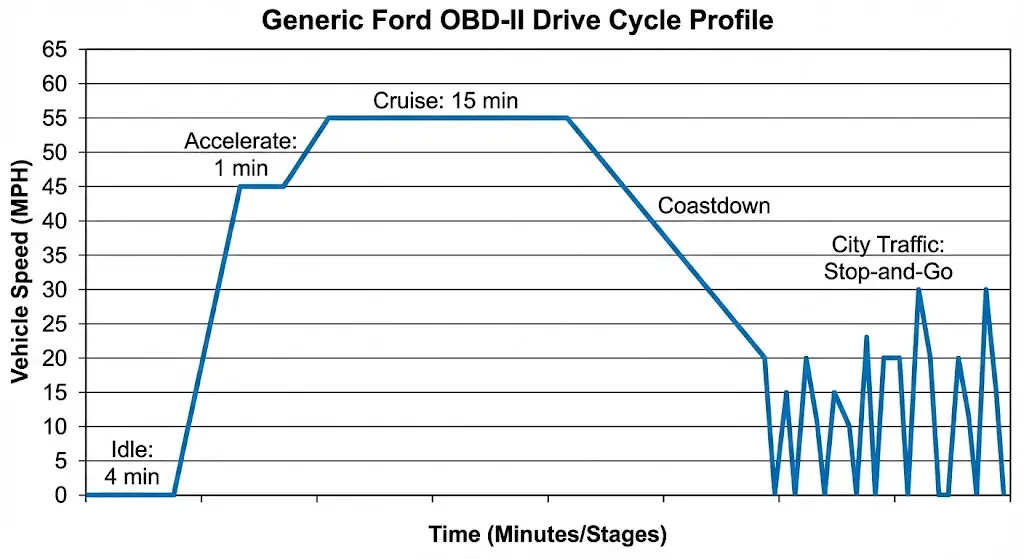
Drive Cycle Speed Profile
Graph represents an idealized Ford General Drive Cycle speed vs. time.
Decoding the Codes
When you use a scanner, you will see a “P-Code”. These are the most frequent culprits for the F-150 series.
❓ Will disconnecting the battery pass inspection?
No. Disconnecting the battery resets the “Readiness Monitors” to “Not Ready”. You will fail inspection immediately until you complete a Drive Cycle.
❓ How many miles to reset monitors?
It’s not about miles, it’s about the type of driving. Usually, 50-100 miles of mixed city/highway driving is sufficient if the Drive Cycle steps are followed.
❓ Can I clear the code while driving?
Technically, some scanners allow it, but it is dangerous and not recommended. Always perform diagnostics with the vehicle parked safely.
❓ What if the light flashes?
Stop immediately. A flashing check engine light indicates a severe misfire that is actively damaging the catalytic converter.
© 2026 FordMasterX Infographics. Data sourced from manufacturer owner manuals.
The Engineering of Diagnostics: Anatomy of the Malfunction Indicator Lamp
To effectively manage the Check Engine Light (CEL), one must first understand the system that governs it. The light is not a binary switch; it is the visual output of a sophisticated monitoring algorithm known as the OBD-II Monitor System.
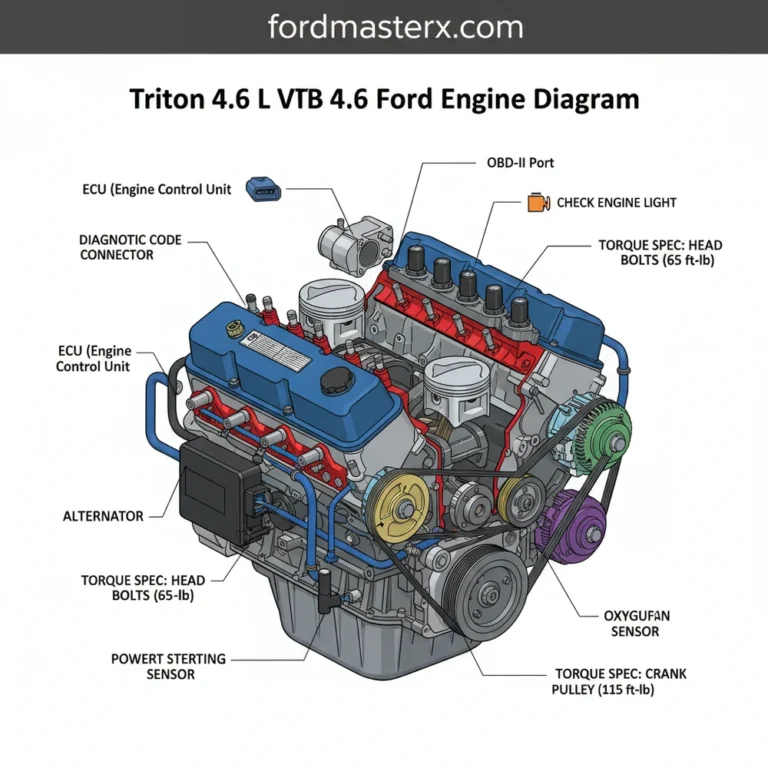
The Role of the Powertrain Control Module (PCM)
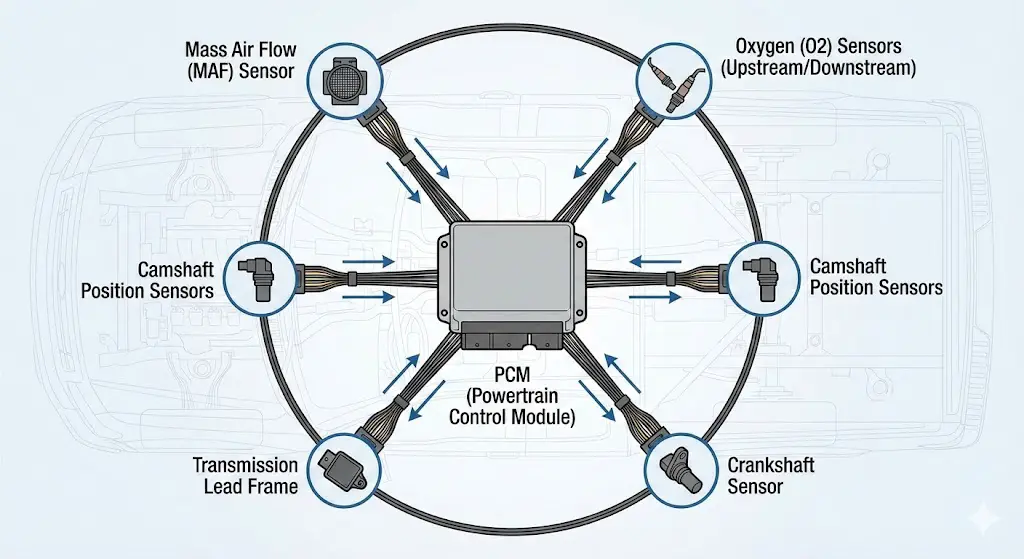
The PCM is the central processing unit of the F-150’s drivetrain. It continuously samples data from a vast array of sensors—including the Mass Air Flow (MAF) sensor, Oxygen (O2) sensors, Camshaft Position sensors, and the Transmission Lead Frame—at rates exceeding thousands of times per second.
The PCM operates on a “Lookup Table” logic. For every operating condition (RPM, load, temperature), there is a pre-programmed table of acceptable sensor values. When a sensor reports a value outside this acceptable variance (e.g., an O2 sensor voltage that fails to oscillate), the PCM initiates a “Debounce” counter. If the fault persists beyond a specific time threshold or occurs across multiple “Trip” events, the PCM sets a Diagnostic Trouble Code (DTC) and commands the Instrument Cluster (IPC) to illuminate the MIL.
The Taxonomy of Trouble Codes
Not all Check Engine Lights indicate the same state of urgency or permanence. The Ford diagnostic architecture categorizes faults into three distinct tiers, each requiring a different reset strategy.
Pending Codes (Type B Faults)
Pending codes are the PCM’s “watch list.” If a system glitches—for example, a single cylinder misfire caused by a bad batch of fuel—the PCM records a Pending Code but does not illuminate the CEL immediately.
- Mechanism: The system waits to see if the fault replicates on the next drive cycle.
- Reset Protocol: These codes are self-clearing. If the fault does not recur within 40–80 warm-up cycles (depending on the model year), the PCM erases the record without human intervention.
Confirmed Codes (Stored Codes)
When a Pending Code validates itself by occurring on two consecutive trips (the “Two-Trip Detection Logic”), it becomes a Confirmed Code.
- Visual Indicator: Solid Amber Check Engine Light.
- Implication: The PCM has adopted a “Failure Mode Effects Management” (FMEM) strategy, often substituting default values for the failed sensor (Open Loop operation) to keep the engine running, albeit inefficiently.
- Reset Protocol: Requires an OBD-II scanner command or a hard power reset (battery disconnect) to clear.
Permanent Codes (The Legislative Lock)
Introduced in 2010 (and mandatory by 2012) to comply with EPA and CARB regulations against emissions tampering, Permanent Codes represent a fundamental shift in diagnostic strategy.
- Mechanism: These codes are written to non-volatile memory (NVRAM). They cannot be erased by disconnecting the battery or using a scan tool.
- Purpose: To prevent a seller from clearing a code immediately before a smog check.
- Reset Protocol: The only way to clear a Permanent Code is for the PCM to run the specific monitor associated with the fault (e.g., the Catalyst Monitor) and pass it. The vehicle must “heal” itself through verification.
The Severity Spectrum: Flashing vs. Steady
The behavior of the light conveys immediate operational directives to the driver.
- Steady Illumination: Indicates a static fault (e.g., P0456 Evap Leak, P0171 System Lean). The vehicle is generally drivable, though emissions are elevated and fuel economy is compromised.
- Flashing Illumination (8 Hz): This indicates a “Type A” Misfire. The engine is misfiring so severely that unburned fuel is entering the exhaust stream. This raw fuel will ignite inside the catalytic converter, causing substrate meltdown (superheating > 1600°F). Engineering Directive: Immediate shutdown is required to prevent catastrophic exhaust failure.
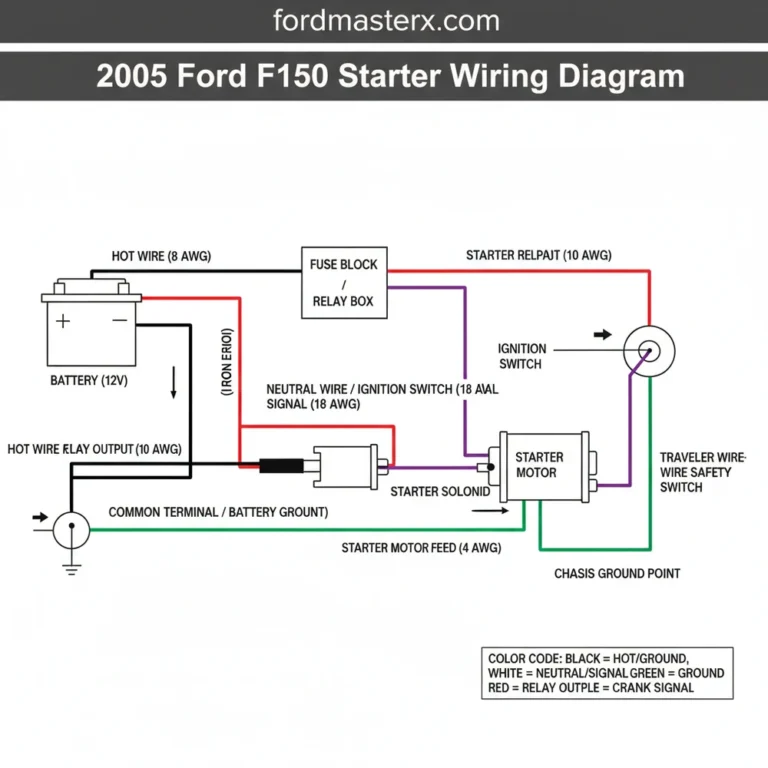
Primary Reset Methodologies: Protocols and Physics
There are three primary vectors for resetting the F-150’s diagnostic system. Each method interacts with the vehicle’s memory architecture differently.
Method A: The Digital Reset (OBD-II Scanner)
This is the only method endorsed by Ford Motor Company service literature for routine diagnostics. It interacts directly with the PCM’s memory controller via the SAE J1850 PWM (older models) or ISO 15765-4 CAN (newer models) protocols.
The Tooling Hierarchy:
- Basic Code Readers ($20–$50): Can read and clear “P” (Powertrain) codes but cannot access proprietary Ford modules.
- Enhanced Scanners ($100–$300): Devices like the BlueDriver or ANCEL AD410 can read ABS (Antilock Braking System) and SRS (Airbag) codes.
- Bi-Directional Tools ($500+): Tools capable of commanding modules to perform self-tests (e.g., “Run Evap Service Bay Test”).
The Protocol:
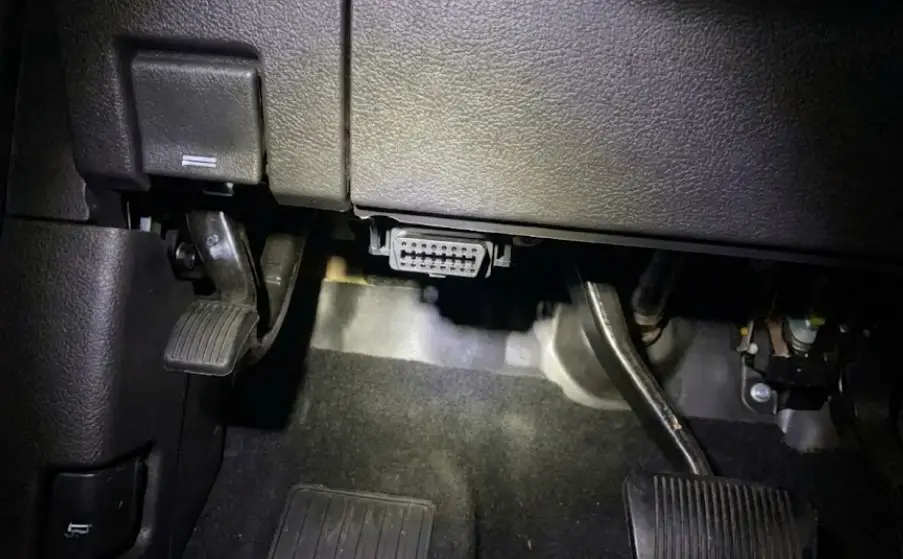
- Connection: Locate the Data Link Connector (DLC). On all F-150 generations (1996–Present), this is located under the dashboard on the driver’s side, typically between the steering column and the parking brake pedal.
- Ignition State: Turn the key to the ON/RUN position (Engine OFF). This energizes the bus without the electrical noise of the alternator.
- Communication: The scanner initiates a “handshake” with the PCM.
- Logging: Critical Step. Record the Freeze Frame Data before clearing. Freeze Frame Data captures the exact RPM, coolant temp, and load at the moment the code was set. This is invaluable for intermittent diagnosis.
- Execution: Send the “Mode 04” command (Clear/Reset Emission-Related Diagnostic Information).
- Verification: Cycle the ignition OFF, wait 10 seconds, and restart the engine.
Method B: The Hardware Reset (Battery Disconnect)
Often referred to as the “Global Reset” or “Hard Reset,” this method relies on the physics of volatile memory. The PCM uses capacitors to maintain short-term memory when the ignition is off.
The Physics of the Hard Reset:
By disconnecting the power source, the voltage in the PCM’s capacitors slowly decays. Once the voltage drops below the memory retention threshold (typically < 5V), the volatile RAM is wiped. This erases:
- Diagnostic Trouble Codes (DTCs).
- Fuel Trim Tables (Long Term and Short Term).
- Idle Air Control (IAC) Trim Strategy.
- Transmission Adaptive Shift Strategies.
The Procedure:
- Isolation: Turn off all accessories.
- Disconnection: Remove the Negative (-) battery terminal. Engineering Note: Always remove negative first to prevent chassis shorting if the wrench touches the body while on the positive terminal.
- Discharge (The Capacitor Drain): Simply removing the cable is insufficient for a rapid reset. The capacitors can hold charge for 10–20 minutes.
- Technique 1 (Time): Wait 20 minutes.
- Technique 2 (Load): With the battery disconnected, turn the headlight switch to “ON” or depress the brake pedal. This creates a path to ground, instantly draining the residual voltage in the capacitors.
- Technique 3 (The Jumper): (Expert Only) Use a jumper wire to connect the disconnected negative cable end to the positive terminal. This shorts the vehicle side capacitance safely.
- Reconnection: Reattach the cable and torque to spec (typically 48 lb-in).
Risks and Side Effects:
On modern F-150s (2011+), this method causes “Amnesia.” The truck will forget how to idle, how to shift smoothly, and the state of the battery charge. This necessitates the Relearn Procedures (detailed in Section 3).
Method C: The Verification Reset (Drive Cycle)
The most organic method of resetting the light is to fix the underlying problem and drive the vehicle. This is the only method that respects the logic of the “Permanent Code.”
The Logic:
If a fault like a loose gas cap (P0457) is corrected, the EVAP monitor will run during the next drive cycle. If the monitor passes, the PCM will turn off the MIL, although the code may remain in “History” for 40 cycles.16 This confirms the repair is genuine.
Post-Reset Architecture: Relearn Procedures and BMS
The “Reset” is not the end of the process; it is the beginning of the recalibration phase. Failure to perform these steps often results in a customer complaint of “rough idle” or “transmission shudder” immediately after a repair.
The Idle Trim Relearn (All Generations)
Over time, the throttle body plate accumulates carbon sludge (coking). This restricts airflow at idle. The PCM compensates by commanding the throttle plate to open slightly wider (increasing the “Idle Trim” value). When you disconnect the battery, this learned value is reset to factory zero. The PCM then attempts to idle the engine with the “clean” value on a “dirty” throttle body, choking the engine.15
The Official Ford Idle Relearn Procedure:
- Temperature: Bring the engine to normal operating temperature.
- Park Idle: With the transmission in Park/Neutral and all accessories OFF, idle for 1 minute.
- Load Idle: Turn the A/C on Max and idle for 1 minute. (This teaches the PCM the load torque of the A/C compressor).
- Drive Idle: Apply the parking brake and foot brake. Shift to Drive. Idle for 1 minute with A/C on.
- Drive Cycle: Drive the vehicle for approximately 10 miles to fine-tune the fuel trims.
The Battery Management System (BMS) Reset (2011+ Models)

Starting with the 12th Generation F-150 (2009/2011), Ford introduced a Smart Charging system controlled by the BMS. A Hall Effect sensor located on the negative battery cable measures current in and out of the battery.
The Engineering Problem:
As a battery ages, its internal resistance increases. The BMS compensates by increasing the alternator’s charging voltage and amperage. If you install a new battery but do not reset the BMS, the alternator will continue to charge the new battery with the aggressive profile intended for the old, dying battery. This can boil the electrolyte and shorten the new battery’s life.
The “Flash-to-Pass” BMS Reset Procedure (No Tool Required):
This “Cheat Code” works on most 2011–2023 F-150s to reset the BMS days counter.
- Enter the vehicle. Close doors.
- Turn ignition to ON (Engine OFF).
- Wait for the battery light to display.
- Flash the High Beams (pull stalk) 5 times.
- Press and release the Brake Pedal 3 times.
- Wait 5–10 seconds. The battery icon on the dash will flash, indicating the BMS has been reset to “0 Days / New Battery.”
The Official Ford Drive Cycle: Clearing Permanent Codes
For emissions compliance, simply turning off the light is insufficient. The vehicle’s “Readiness Monitors” must be set to “Ready.” This is particularly challenging for the Evaporative (EVAP) and Catalyst monitors.
The following is the Generic Ford Drive Cycle utilized by dealership technicians to force monitors to run.22
Table 1: Ford Universal Drive Cycle Protocol
| Phase | Action | System Monitored | Engineering Context |
| 1. Cold Soak | Park vehicle for 8 hours. Coolant (ECT) and Air Temp (IAT) must be within 11°F of each other. | EVAP, O2 Heater | The vacuum decay test for EVAP leaks relies on thermal stability. If the engine is hot, fuel vapor pressure prevents accurate leak testing. |
| 2. Idle | Start engine. Idle in Drive for 4 minutes. A/C & Defrost OFF. | O2 Heater, Misfire | Allows O2 sensors to reach operating temp (600°F). |
| 3. Accelerate | Drive to 45 MPH. Maintain for 1 minute. | EGR, Purge Flow | Opens the EGR valve and Purge valve under light load. |
| 4. Cruise | Maintain steady 55 MPH for 15 minutes. | Catalyst, O2 Response | The Catalyst Monitor compares the switch rate of the Upstream vs. Downstream O2 sensors. Steady state is required to filter out noise. |
| 5. Decel | Coast from 55 MPH to 20 MPH without braking. | EGR, Fuel Trim | High vacuum during deceleration tests the EGR flow and fuel cut-off strategy. |
| 6. City | Stop-and-go driving. 5 different stops. | Misfire, Flex Fuel | Verifies idle stability and transmission engagement. |
Important Note on Fuel Level: The EVAP monitor will not run if the fuel tank is > 85% full or < 15% full. The “slosh” of fuel in a full tank can block the vent valves, and an empty tank heats up too quickly. Maintain a fuel level between 1/2 and 3/4 for optimal success.
Generation-Specific Diagnostics: A Historical Analysis
The F-150 has utilized OBD-II since 1996, but the implementation has evolved radically. Common failure points and reset nuances differ by generation.
10th Generation (1997–2003)
- Engine Architecture: Modular V8 (4.6L/5.4L 2-Valve) and 4.2L V6.
- Common CEL Drivers:
- DPFE Sensor: The Differential Pressure Feedback EGR sensor was prone to corrosion, causing P0401 (Insufficient Flow).
- Vacuum Leaks: The PCV elbow behind the intake manifold frequently rotted, causing P0171/P0174 (Lean Codes).
- The “HEC” Diagnostic Mode: The 10th Gen digital odometer features a hidden “Dealer Test Mode.”
- Access: Hold the Trip/Reset button while turning the key to ON. “tESt” appears.
- Utility: Cycling to “dtc” allows the driver to read trouble codes directly on the odometer screen without a scanner.
11th Generation (2004–2008)
- Engine Architecture: 5.4L 3-Valve Triton V8.
- Common CEL Drivers:
- Cam Phasers (VCT): The Variable Cam Timing system used oil pressure to advance timing. Sludge buildup or low oil pressure caused the “Diesel Tick” and codes P0011/P0022.
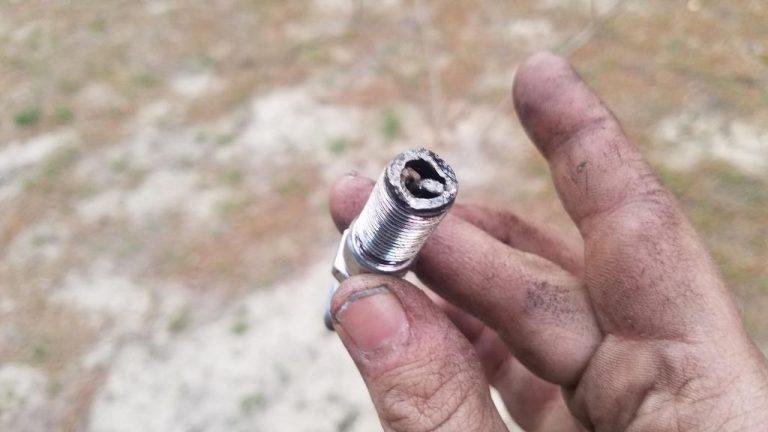
- Spark Plugs: The 2-piece spark plug design often broke during removal. While this doesn’t cause a CEL itself, the resulting misfires (P030x) from old plugs are rampant.
- Reset Nuance: The Instrument Cluster in this generation suffered from “Cold Solder Joints.” This could cause intermittent power loss to the cluster, triggering false “U-Codes” (Communication Failures) and resetting the trip meter spontaneously.
12th Generation (2009–2014)
- Engine Architecture: Introduction of the 3.5L EcoBoost (2011) and 5.0L Coyote.
- Common CEL Drivers:
- EcoBoost CAC Condensation: In humid conditions, the Charge Air Cooler (Intercooler) would condense water, which was then ingested by the engine under hard acceleration, causing severe misfires (P0300) and “Limp Mode.”
- Lead Frame (6R80 Transmission): A critical failure point. The Molded Lead Frame inside the transmission houses the Output Speed Sensor (OSS). Failure leads to P0720, the speedometer dropping to zero, and the transmission downshifting into 1st gear at highway speeds.
- Fuse 27: A common issue where the fuel pump fuse (Fuse 27) in the engine bay distribution box would melt due to insufficient contact area, causing a Crank/No-Start condition and P0230 codes.
13th Generation (2015–2020)
- Engine Architecture: Aluminum Body, 2.7L Nano EcoBoost, 10-Speed (10R80) Transmission.
- Common CEL Drivers:
- Active Grille Shutters: The aerodynamic shutters in the grille often bind or freeze in winter. This triggers a specific code and illuminates the CEL.
- Auto Start-Stop: The auxiliary transmission fluid pump required for Start-Stop is a monitored component.
- Reset Nuance: Disconnecting the battery on a 10R80 transmission wipes the “Adaptive Shift Strategy.” The transmission will shift harshly or “hunt” for gears for the first 500 miles as it relearns the clutch fill times. This is often mistaken for a mechanical failure but is a normal consequence of the reset.
14th Generation (2021–Present)
- Engine Architecture: PowerBoost Hybrid, OTA (Over-the-Air) Updates.
- Common CEL Drivers:
- Software Handshakes: With the move to the Fully Networked Vehicle (FNV) architecture, many CELs are “Ghost Codes” caused by modules failing to wake up in sync during startup.
- Gateway Modules: Resetting these trucks via battery disconnect is less effective as many modules have non-volatile memory or backup power. Diagnostic resets via software (FORScan or FDRS) are preferred.
Deep Dive: The Top 5 F-150 Trouble Codes
Statistical analysis of service data reveals that five codes account for the majority of F-150 Check Engine Light events. Understanding these specific codes prevents the “Parts Cannon” approach to repair.
P0420/P0430: Catalyst System Efficiency Below Threshold
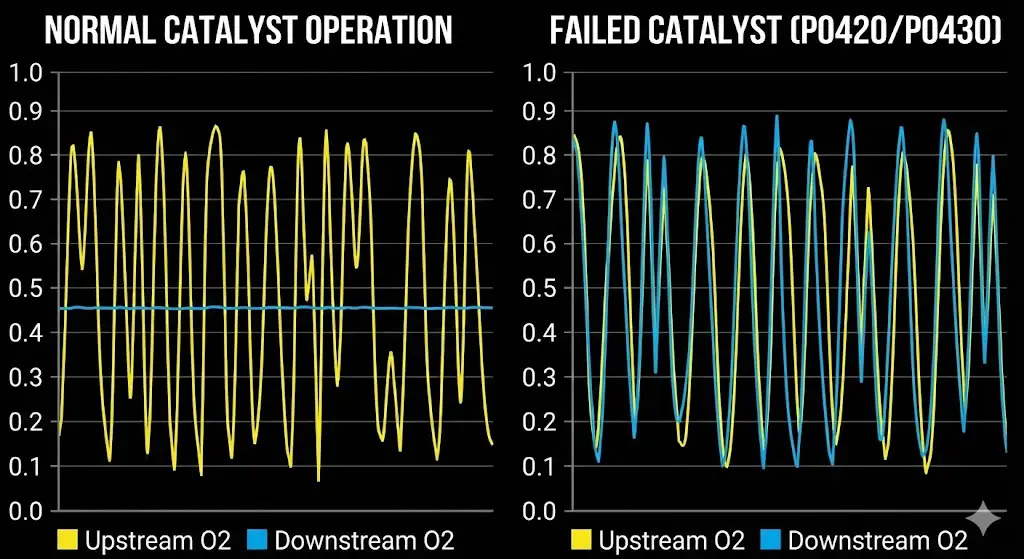
- The Sensor Logic: The PCM compares the waveform of the Upstream O2 sensor (switching rapidly) to the Downstream O2 sensor (steady line). If the Downstream sensor begins to switch rapidly, mirroring the Upstream, the PCM infers that the Catalytic Converter is no longer storing oxygen effectively.
- Common Misdiagnosis: Owners often replace the O2 sensors. This rarely works. If the sensor is reading “bad” efficiency, the sensor is likely telling the truth—the cat is dead.
- Root Cause: Cats don’t die of natural causes; they are murdered. Usually by unburned fuel (misfires) or oil consumption (blow-by).
- Reset: This is a permanent code type. A drive cycle at steady highway speeds is required to clear it permanently.
P0455/P0457/P0442: Evaporative Emission Leak
- The Capless Fuel Filler: Ford’s “Easy Fuel” system eliminates the gas cap. However, the spring-loaded flap can get debris on the seal.
- The Fix: Use the emergency funnel (located with the jack) to work the flap open and closed while cleaning the seal with compressed air or WD-40.
- The Purge Valve: On EcoBoost engines, the EVAP Purge Valve often sticks open. This applies vacuum to the gas tank at the wrong time, causing the tank to deform or the engine to stall after fueling.
P0300-P0308: Cylinder Misfires
- Coil-on-Plug (COP) Stress: Ford ignition coils are under high stress. A distinct “shudder” under light load (45-50 MPH in high gear) is the hallmark of a weak ignition coil (Mode 6 data can identify which cylinder is failing before it sets a code).
- Spark Plug Gap: EcoBoost engines are sensitive to spark plug gap. The high boost pressure can “blow out” the spark if the gap widens even slightly due to wear.
P0171/P0174: System Too Lean (Bank 1 / Bank 2)
- The Vacuum Leak: On older 5.4L engines, check the vacuum lines behind the intake manifold.
- The MAF: A dirty MAF sensor (caused by oiled aftermarket air filters) will under-report airflow, causing the PCM to inject less fuel, leading to a lean condition. Cleaning the MAF with specialized solvent often resolves this.
P0012/P0022: Camshaft Position Timing Over-Retarded
- The VCT Solenoid: On 3.5L and 5.0L engines, the VCT solenoids control oil flow to the cam phasers. Dirty oil screens on these solenoids cause the timing to lag.
- Reset Note: After replacing VCT solenoids, a code clear is insufficient. The PCM’s “Camshaft Adaptive Table” should be reset so it doesn’t apply the old compensation strategy to the new parts.
Financial Analysis: The Economics of the Reset
The Check Engine Light is a financial trigger. Understanding the costs associated with diagnosis and repair allows for better decision-making.
Table 2: Comparative Cost Analysis (F-150 Diagnostics)
| Service Item | DIY Cost | Independent Shop | Dealership | Notes |
| Code Read (Scan) | $0 (AutoZone) | $50 – $100 | $120 – $180 | Dealers charge a “Diagnostic Fee” which covers the tech’s time to verify the cause, not just read the code. |
| Code Clear (Reset) | $0 | Usually included | Included w/ Diag | Most auto parts stores are legally/policy-bound NOT to clear codes for you. |
| O2 Sensor Replacement | $40 – $80 (Part) | $200 – $350 | $350 – $500 | Labor can skyrocket if sensors are seized in the exhaust. |
| Evap Purge Valve | $30 – $60 (Part) | $150 – $250 | $250 – $400 | Easy DIY on most EcoBoost models. |
| Catalytic Converter | $400 – $900 | $1,200 – $2,000 | $2,500+ | OEM converters contain significantly higher PGM (Platinum Group Metals) loadings than aftermarket units. |
While auto parts stores offer free scanning, their handheld tools are often generic. They may report “P0720 Output Speed Sensor,” but fail to report the accompanying “U-Code” that indicates the ABS module is also offline. Relying solely on a free scan can lead to the “Parts Cannon” approach—throwing parts at a car until it’s fixed, often exceeding the cost of a professional diagnosis.
Conclusion and Strategic Recommendations
The “Reset” of a Ford F-150 Check Engine Light is not a singular action but a diagnostic pathway. The data indicates that the “Battery Disconnect” method, while effective for clearing volatile memory on older trucks, is increasingly obsolete and potentially disruptive for modern, network-dependent F-150s.
Strategic Takeaways:
- Stop Disconnecting Batteries: For 2011+ trucks, use a scanner. Preserving the BMS data and Transmission Adaptive Tables is worth the $30 investment in a code reader.
- Verify the Repair: If you are clearing a code to pass a smog test, you are wasting your time. The “Not Ready” status will fail you just as surely as the light itself. You must drive the Ford Drive Cycle (Section 4) to prove the system is compliant.
- Holistic Diagnosis: A CEL is a symptom, not the disease. Whether it is a P0455 caused by a dirty capless filler or a P0720 caused by a lead frame, successful resolution requires diagnosing the system, not just the sensor.
By adhering to these engineering protocols, F-150 owners can maintain the reliability and performance that the “Built Ford Tough” lineage promises, transforming the Check Engine Light from a source of panic into a manageable maintenance indicator.
Frequently Asked Questions (FAQ)
Will the “Key Cycle” trick (turning the key 3 times) reset my Check Engine Light?
generally, no. The “Key Cycle” trick is often confused with the method to read codes on older OBD-I Fords (pre-1996) or to enter “Engineering Mode” on digital clusters. It does not clear codes. However, if you fix the problem (e.g., tighten the gas cap), the PCM will turn off the light automatically after 3 consecutive valid drive cycles where the fault is not detected. The code will remain in history but the light will go out.
Why did my Check Engine Light come back on 20 miles after I cleared it?
You likely have a “Permanent Code” or a “Two-Trip” fault. When you cleared the code, you reset the monitors. It took 20 miles (or one complete drive cycle) for the PCM to run the specific test (like the Catalyst Monitor) again, fail it, and re-illuminate the light. This confirms the part is actually broken and the code was not a glitch.
Can I reset the light by pulling a fuse instead of the battery?
Yes, this is often safer as it preserves radio presets. On many 2004–2014 F-150s, pulling the PCM fuse (often Fuse 76 or similar, check your manual) for 15 minutes will cut power to the PCM’s volatile memory without killing power to the Body Control Module (BCM).
Does a Check Engine Light affect Remote Start?
Yes. On almost all Ford vehicles equipped with factory Remote Start (FordPass or Key Fob), the system is programmed to disable Remote Start if a Check Engine Light is active. This is a safety feature to prevent the engine from running unmonitored while a potentially catastrophic fault (like low oil pressure or overheating) exists.
What is the “Drive Cycle” specifically for the O2 Sensors?
The Oxygen Sensor Monitor is part of the larger drive cycle. To target just the O2 sensors: Start the engine and idle for 4 minutes (to heat the sensors). Then drive at a steady 45–55 MPH for at least 5 minutes. This allows the PCM to compare the switching rate of the sensors against the stored profile.
I replaced my battery and now my Auto Start-Stop doesn’t work. Is my CEL related?
Not necessarily. If you changed the battery but didn’t reset the BMS (Battery Management System), the truck thinks the old, weak battery is still installed and will disable “high load” features like Start-Stop to save power. Perform the “Flash-to-Pass” BMS reset (Section 3.2) to restore function.