Ford 4.0 Timing Chain Diagram: Complete Visual Guide
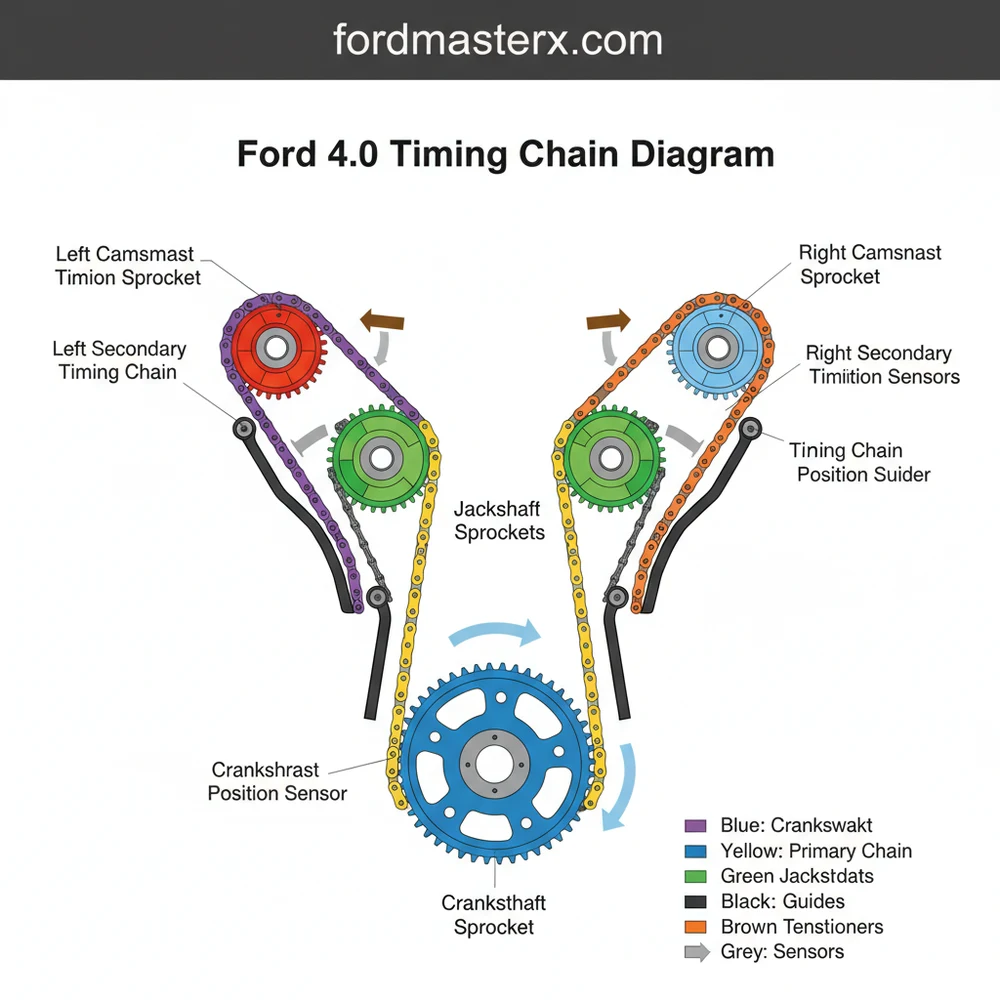
The Ford 4.0 timing chain diagram illustrates the complex SOHC system consisting of front and rear chains, a jackshaft, and hydraulic tensioners. This configuration ensures the crankshaft and camshafts stay synchronized. Understanding this structure is essential for accurate engine timing, preventing interference damage, and replacing worn guides or tensioners during a rebuild.
📌 Key Takeaways
- The diagram shows the synchronization between the crankshaft, jackshaft, and camshafts.
- The rear timing chain is a critical component located at the back of the engine block.
- Ford 4.0 SOHC is an interference engine; incorrect timing will cause terminal valve damage.
- Always use a specialized camshaft holding tool kit when following the diagram layout.
- Use this diagram when diagnosing the infamous ‘timing chain rattle’ or performing a full rebuild.
The Ford 4.0L SOHC (Single Overhead Cam) V6 engine, commonly found in the Ford Ranger, Explorer, and Mustang from the late 1990s through 2011, is a workhorse known for its longevity, provided you address its most infamous Achilles’ heel: the timing chain system. Unlike traditional V6 engines that use a single chain or a belt, the Ford 4.0L SOHC features a complex, multi-chain arrangement that includes a front chain, a rear chain, and a jackshaft. Understanding the timing chain diagram and the synchronization of these components is vital for any DIYer attempting a repair or overhaul. This guide provides a deep dive into the architecture of this system, helping you navigate the complexities of “the death rattle” and timing alignment.
Main Components and System Features
The Ford 4.0L SOHC timing system is unique because it was adapted from an older Overhead Valve (OHV) block. Because the original block wasn’t designed for overhead cams, Ford engineers used a “jackshaft” located where the old camshaft used to be. This jackshaft is driven by the crankshaft and, in turn, drives the camshafts via two separate chains.
- The Jackshaft: Positioned in the center of the “V,” the jackshaft is the heart of the timing system. It is driven by a short chain from the crankshaft.
- Primary (Crank-to-Jackshaft) Chain: This is a short, heavy-duty chain located behind the front timing cover.
- Left (Driver Side) Camshaft Chain: This chain is located at the front of the engine and connects the jackshaft to the driver-side cylinder head.
- Right (Passenger Side) Camshaft Chain: This is the most notorious component. It is located at the rear of the engine, between the engine block and the transmission. This design means that servicing the right-side timing components usually requires pulling the engine or removing the transmission.
- Balance Shaft Chain: On 4WD models, an additional chain is located in the oil pan area to drive a balance shaft designed to reduce engine vibration.
- Hydraulic Tensioners: These use oil pressure to maintain tension on the chains. When these fail, the chains slacken and begin to “slap” against the plastic guides.
- Cassettes: The chains, guides, and sprockets are often referred to as “cassettes.” These are integrated assemblies that must be timed precisely.
How to Read and Use the Timing Diagram

Reading a Ford 4.0L timing diagram requires an understanding of Top Dead Center (TDC) and the relationship between the crankshaft and the three (or four) secondary shafts. Unlike older engines with simple “dot-to-dot” alignment, this engine requires specific positioning of the camshaft “flats” and the use of specialized timing tools.
1. Establishing Top Dead Center (TDC)
Before looking at the chain marks, you must set the engine to TDC on the compression stroke for Cylinder #1. The crankshaft harmonic balancer will have a notch that aligns with the “0” or “TDC” mark on the timing cover. At this position, the crankshaft keyway should be pointing roughly at the 12 o’clock position (on the engine block center line).
2. The Jackshaft Alignment
The jackshaft does not have traditional timing marks that you “index” by eye. Instead, the jackshaft sprocket has a hole that allows for a locking pin. In a standard timing diagram, you will see the jackshaft gear oriented so that the rear drive sprocket and front drive sprocket are positioned to allow the chains to have equal slack on the tensioner side.
3. Camshaft “Flats” Positioning
This is the most critical part of reading the diagram. The camshafts do not have keyways for the sprockets; they are “interference fit” held by high torque. On the back of each camshaft (or the front, depending on the side), there are two machined flat spots.
- The flats must be parallel to the cylinder head’s mating surface.
- A specialized tool (OTC 6488 or similar) is used to bridge across these flats to lock them in place while the sprockets are torqued down.
4. Chain Link Colors
OEM and high-quality aftermarket timing kits (like Cloyes) use colored links to help you visualize the diagram. Typically:
- Copper/Gold Links: Align these with the marked teeth on the crankshaft and jackshaft sprockets.
- Silver/Dark Links: These represent the distance between the primary timing points.
On the 4.0 SOHC, there are usually two colored links on the jackshaft-to-cam chains. One link aligns with a dot on the cam sprocket, and the other aligns with a dot on the jackshaft sprocket.
Helpful Tips for DIY Success
Working on the Ford 4.0 timing system is considered an “advanced” DIY task. Here are several practical tips to ensure the job goes smoothly:
- Rent the Specialty Tools: You cannot accurately time this engine without the Ford 4.0L SOHC Timing Tool Kit (OTC 6488). This kit includes the camshaft gear holding tool, the crankshaft TDC pin, and the camshaft sensor synchronizer tool. Many local auto parts stores offer these for rent.
- Clean the Oil Passages: The hydraulic tensioners rely on tiny oil orifices. If your engine has sludge, the new tensioners will fail quickly. Use a high-quality engine flush before starting the teardown if the engine is still running.
- Mark Everything: Use a paint pen to mark the old chains and sprockets before removal. Even though you are replacing them, having the “old” reference helps verify the “new” setup.
- Replace the Torsional Damper Bolt: The crankshaft bolt is a “torque-to-yield” (TTY) bolt. Once it is stretched, it cannot be safely reused. Always buy a new one.
- Torque Specs:
- Camshaft Sprocket Bolts: 62 lb-ft.
- Jackshaft Rear Sprocket Bolt: 15 lb-ft + 90 degrees.
- Jackshaft Front Bolt: 33 lb-ft + 90 degrees.
Troubleshooting Common Timing Issues
If you are looking at a timing diagram, chances are you are already experiencing issues. Here is how to troubleshoot the most common failures in the 4.0L SOHC system.
The “Death Rattle”
This is a metallic rattling sound that usually occurs between 2,000 and 3,000 RPM. It is caused by the plastic timing chain guides breaking. Once the plastic guide breaks, the chain rubs against the metal support bracket or the engine block itself. If you hear this, stop driving the vehicle. If the chain skips a tooth, the engine is likely toast.
P0011 or P0012 Diagnostic Trouble Codes
These codes indicate “Crankshaft Position – Camshaft Position Timing Over-Advanced” or “Over-Retarded.” In the 4.0L, this usually isn’t a sensor failure; it’s a physical timing issue. It often indicates that a tensioner has collapsed or the chain has stretched significantly, allowing the camshaft to lag behind the crankshaft’s rotation.
Cold Start Rattle
If you hear a rattle for 1-3 seconds immediately after a cold start that then disappears, your hydraulic tensioners are bleeding down. Replacing the two external tensioners (the front one is on the passenger side head, the rear one is on the driver side head) can often fix this and extend the life of your guides significantly. These can be changed without tearing the engine apart.
Broken Guides in the Oil Pan
A definitive way to diagnose a failed timing system without pulling the timing cover is to drop the oil pan. If you find pieces of brown or black plastic in the pan or clogging the oil pickup tube, your timing chain guides have disintegrated. At this point, a full timing component replacement (including the rear cassette) is required.
In conclusion, while the Ford 4.0L SOHC timing chain system is intimidating, it is manageable with patience, the right specialty tools, and a clear understanding of the diagram. By ensuring the camshaft flats are locked parallel and the jackshaft is correctly indexed to the crankshaft, you can restore this engine to its smooth-running state and avoid the dreaded “death rattle” for another 100,000 miles.
Step-by-Step Guide to Understanding the Ford 4.0 Timing Chain Diagram: Complete Visual Guide
Identify the timing marks – Start by identifying the TDC (Top Dead Center) marks on the crankshaft pulley and the camshaft flats.
Locate the tensioners – Find the front and rear hydraulic tensioners that maintain pressure on the chain guides within the system.
Understand the jackshaft role – Study how the center jackshaft transfers motion from the crankshaft to the individual cylinder head chains.
Apply the alignment tools – Connect the camshaft locking tools to the rear of the cams to ensure the configuration doesn’t shift during assembly.
Verify chain tension – Check that all guides and chains are seated correctly against the sprockets before releasing the hydraulic tensioner pins.
Complete the rotation check – Manually rotate the engine two full turns to verify that all timing marks return to their original diagram positions.
Frequently Asked Questions
Where are the Ford 4.0 timing chains located?
The Ford 4.0 SOHC engine features a unique layout with chains in multiple locations. The main timing chain is at the front, but a second critical chain is located at the rear of the engine, driving the passenger-side camshaft. This often requires engine removal for full service of the rear components.
What does a ford 4.0 timing chain diagram show?
A ford 4.0 timing chain diagram provides a visual map of the engine’s internal timing system. It highlights the primary chain, jackshaft, front and rear camshaft chains, and the hydraulic tensioners. It identifies the exact positioning of timing marks required to keep the valvetrain and pistons in perfect synchronization.
How many chains does the Ford 4.0 system have?
The standard Ford 4.0 SOHC system configuration typically includes four distinct chains. There is one chain from the crankshaft to the jackshaft, one from the jackshaft to the left cam, one from the jackshaft to the right cam (rear), and often a balance shaft chain depending on the specific vehicle model.
What are the symptoms of a bad timing chain?
The most common symptom is a metallic rattling or ‘marbles in a can’ sound, especially during cold starts or at specific RPM ranges. Other signs include engine misfires, a rough idle, illuminated check engine lights for timing correlation, and metal shavings found in the oil pan during a routine oil change.
Can I replace the Ford 4.0 timing chain myself?
Replacing these chains is a highly advanced DIY task. Because the system features a rear-mounted chain, the engine or transmission usually must be pulled. It requires precision timing tools to lock the camshafts. Without these tools and significant mechanical experience, there is a high risk of catastrophic engine failure.
What tools do I need for timing chain service?
Beyond standard sockets, you must have the Ford-specific camshaft service tool kit. This includes camshaft positioning tools, a crankshaft TDC pin, and tensioner hold-down tools. Using these ensures the engine structure remains locked in place while you align the chains according to the manufacturer’s specified layout and timing marks.


