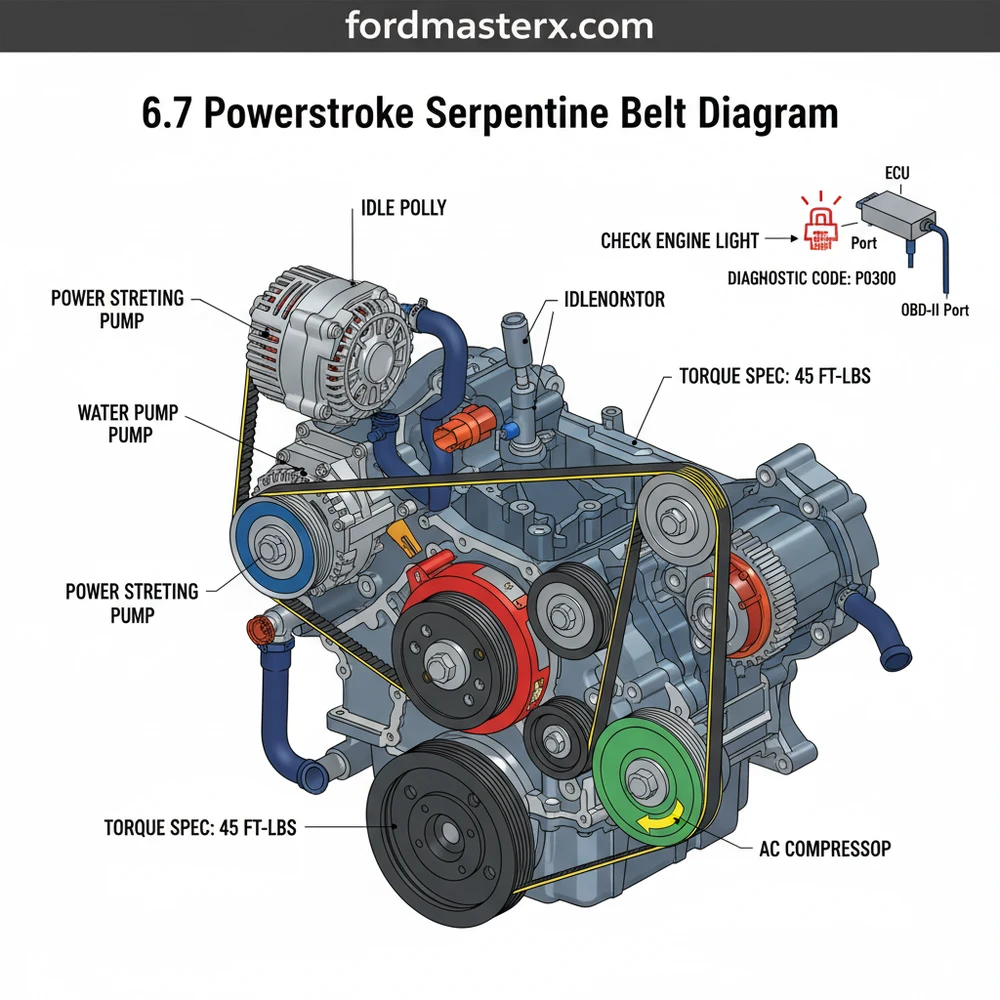
6.7 Powerstroke Serpentine Belt Diagram: Routing Guide
The 6.7 Powerstroke serpentine belt diagram illustrates the specific path the drive belt takes around the crankshaft, alternator, water pump, and A/C compressor. To use it, locate the automatic tensioner, rotate it with a breaker bar to release pressure, and follow the pulley sequence to ensure the belt ribs sit flush.
📌 Key Takeaways
- Provides the exact sequence for routing the belt around pulleys
- The automatic tensioner is the primary component for belt installation
- Always disconnect batteries to prevent accidental fan engagement
- Take a photo of the original routing before removal for reference
- Use this diagram when replacing a worn, squealing, or snapped belt
Maintaining the heavy-duty cooling and charging systems of a Ford 6.7L diesel engine requires a precise understanding of the accessory drive system. Whether you are performing routine maintenance or responding to a snapped belt on the side of the road, having a clear 6.7 powerstroke serpentine belt diagram is the difference between a quick fix and hours of frustration. This guide provides a comprehensive breakdown of the belt routing paths for various configurations, ensuring you understand how each pulley interacts with the system. You will learn the exact routing for single and dual alternator setups, the tools required for the job, and how to troubleshoot related mechanical failures.
The 6.7L Powerstroke engine utilizes a complex accessory drive system designed to handle the high torque and demands of a modern diesel workhorse. Depending on your truck’s specific build—such as whether it has the high-output dual alternator package—your 6.7 powerstroke serpentine belt diagram will show either one or two distinct belts. The primary belt is responsible for driving the heavy hitters: the crankshaft (the power source), the water pump (critical for coolant flow), and the primary alternator. On many configurations, a secondary, smaller accessory belt may drive the A/C compressor or a secondary alternator.
When looking at the diagram, you will notice a series of pulleys. Some are “grooved,” meaning they have teeth that lock into the ribs of the belt, while others are “smooth” idler pulleys. The smooth side of the belt always contacts the smooth pulleys, while the ribbed side must perfectly seat into the grooved pulleys. The crankshaft pulley is the largest and sits at the bottom center; it provides the rotational force for the entire system. The tensioner pulley is spring-loaded and maintains the necessary pressure to prevent slipping. In the diagram, the tensioner is usually indicated by a directional arrow showing which way it must be rotated to release the belt’s grip.
Most 6.7 Powerstroke engines utilize a 1/2-inch drive square hole on the tensioner arm. You do not need a specific socket; a standard long-reach breaker bar or a dedicated serpentine belt tool is usually sufficient to bypass the high-strength spring tension.
Reading and interpreting the 6.7 powerstroke serpentine belt diagram requires a systematic approach to ensure the belt is seated correctly before the engine is started. Failure to follow the path exactly can lead to the belt being shredded instantly or components spinning in the wrong direction.
Follow these steps to successfully navigate the installation:
- ✓ Identify your Configuration: Open the hood and check if your engine has one or two alternators. This dictates which version of the diagram you need to follow.
- ✓ Clear the Path: Remove the plastic air intake ducting if necessary to gain better visibility and physical access to the front of the engine.
- ✓ Release Tension: Insert your 1/2-inch breaker bar into the tensioner. Rotate the tool (usually counter-clockwise) to compress the internal spring. While holding the tensioner back, slip the old belt off one of the upper smooth idler pulleys.
- ✓ Begin Routing at the Bottom: Start by looping the new belt around the crankshaft pulley at the bottom. It is much easier to work from the bottom up.
- ✓ Follow the Weave: Use the diagram to route the belt around the water pump to maintain proper coolant flow. Ensure the belt goes under and over the specific idler pulleys as indicated.
- ✓ Final Seating: The last pulley you should attempt to slip the belt over is a smooth idler pulley, as it has no “lips” or “grooves” to fight against.
- ✓ Inspection: Before releasing the tensioner, double-check every pulley. A belt that is half-on or half-off a groove will jump or snap immediately upon startup.
Never place your fingers between the belt and a pulley while the tensioner is being held back. If the breaker bar slips, the tensioner will snap back with enough force to cause severe injury. Always handle the belt from the side or use a reach-tool.
Serpentine belt issues on the 6.7 Powerstroke can sometimes manifest as electrical or cooling problems before the belt actually fails. If the belt is slipping due to a worn tensioner, the alternator may not spin fast enough to satisfy the ECU (Engine Control Unit). This can trigger a check engine light or specific diagnostic code related to low system voltage. If you connect an OBD-II scanner and find codes such as P0620 (Generator Control Circuit) or P0625 (Generator Field Terminal Low), your first step should be to inspect the accessory belt for glazing or lack of tension.
Another common issue is a “chirping” or “squealing” sound. This usually indicates that one of the pulleys, such as the A/C compressor or an idler, has a failing bearing. The 6.7 powerstroke serpentine belt diagram helps you identify which component is which so you can use a mechanic’s stethoscope to pinpoint the noise. If the belt appears to be vibrating excessively (belt slap), the tensioner has likely lost its internal spring rate and must be replaced.
If you are replacing an idler pulley, ensure you follow the correct torque spec for the mounting bolt. Over-tightening can crack the timing chain cover or the accessory bracket, leading to expensive repairs. Most 6.7 idler pulley bolts require approximately 35-40 lb-ft of torque.
Proper maintenance of the serpentine system is vital for long-term engine health. Unlike the internal timing chain, which is designed to last the life of the engine, the serpentine belt is a wear item. It is exposed to heat, road salt, and debris. You should inspect your belt every 30,000 miles for signs of “cracking” (small horizontal lines in the ribs) or “chunking” (where pieces of the ribs have fallen out).
When purchasing a replacement, opt for high-quality EPDM (Ethylene Propylene Diene Monomer) belts. These are far more resistant to heat and do not crack like older neoprene belts; instead, they gradually wear down in thickness. You can use a belt wear gauge to check the depth of the grooves. If the belt sits too deep in the gauge, it is time for a replacement even if no cracks are visible.
Additionally, always check the water pump for leaks when the belt is off. Because the belt facilitates coolant flow, a seized water pump will not only snap the belt but can lead to rapid engine overheating. If you notice any crusty orange or red residue around the water pump pulley, replace the pump and the belt simultaneously to save on labor.
By keeping a printed copy of the 6.7 powerstroke serpentine belt diagram in your glovebox and a spare belt behind the seat, you ensure that a simple rubber component doesn’t turn into a major logistical headache. Regular inspection, adherence to torque specs, and understanding the routing logic will keep your Powerstroke running cool and charged for hundreds of thousands of miles. Remember that while the ECU can monitor the results of a belt failure via the OBD-II system, it cannot predict a mechanical snap—that responsibility lies with the owner’s visual inspection.
Step-by-Step Guide to Understanding the 6.7 Powerstroke Serpentine Belt Diagram: Routing Guide
Identify the belt routing by locating the factory 6.7 powerstroke serpentine belt diagram decal under the hood.
Locate the automatic tensioner and insert a 1/2-inch drive breaker bar into the square adjustment hole.
Understand how the belt flows by pulling the breaker bar to release tension and sliding the belt off the top pulley.
Apply the new belt by starting at the bottom crankshaft pulley and working upward, following the specific pulley sequence.
Verify that every belt rib is perfectly aligned within the pulley grooves and tighten any mounting bolts to the factory torque spec.
Complete the task by starting the engine and checking for smooth operation; if issues persist, use an OBD-II scanner to check if the ECU triggered a diagnostic code.
Frequently Asked Questions
Where is the belt tensioner located?
On the 6.7 Powerstroke, the automatic belt tensioner is located on the passenger side of the front engine cover. It features a 1/2-inch square drive hole. Rotating this component clockwise allows you to release tension on the belt for removal or routing according to the serpentine belt diagram.
What does the routing diagram show?
The diagram illustrates the path the belt takes around the crankshaft pulley, cooling fan, water pump, power steering pump, and alternator. It differentiates between smooth pulleys, which contact the back of the belt, and grooved pulleys, which must align perfectly with the belt ribs to prevent premature wear.
How many pulleys does the 6.7 Powerstroke have?
Depending on the specific configuration (single vs. dual alternators), the 6.7 Powerstroke typically features between seven and nine pulleys. This includes the main crankshaft dampener, tensioner, idlers, and accessory pulleys. The 6.7 powerstroke serpentine belt diagram is vital to ensure the belt wraps around each one in the correct order.
What are the symptoms of a bad serpentine belt?
Common symptoms include loud squealing or chirping from the engine bay, visible fraying, or cracks on the belt ribs. If the belt slips significantly, it can trigger a check engine light or a diagnostic code related to alternator output, requiring an OBD-II scan to confirm electrical system health.
Can I replace the serpentine belt myself?
Yes, replacing the belt is a manageable DIY task for most truck owners. By following the 6.7 powerstroke serpentine belt diagram, you can complete the job in under an hour. Ensure you have a long breaker bar to move the tensioner and verify that all ribs are seated correctly.
What tools do I need for this task?
You will need a 1/2-inch drive breaker bar or a dedicated serpentine belt tool to rotate the tensioner. A flashlight is helpful for viewing lower pulleys. If you are replacing the tensioner itself, you will also need a socket set and a torque wrench to meet the factory torque spec.


