6.0 Powerstroke Serpentine Belt: Step-by-Step Instructions
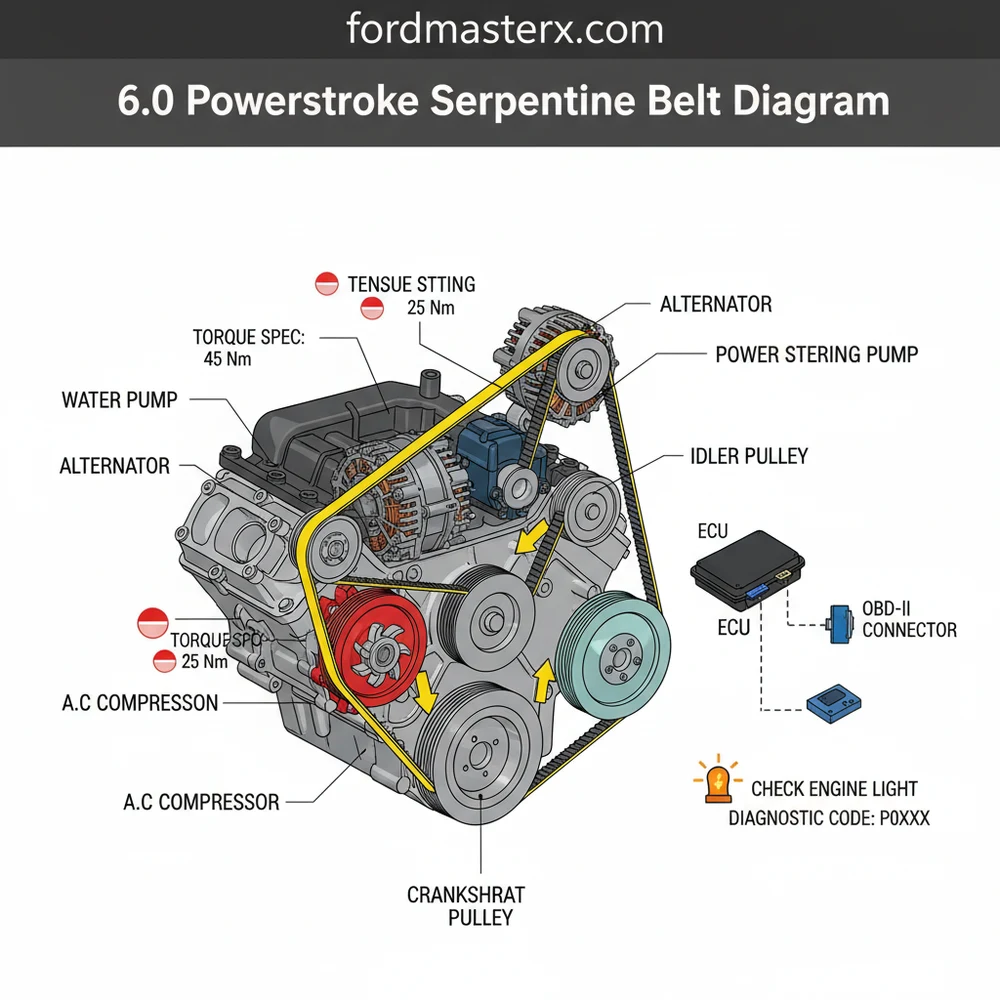
The 6.0 Powerstroke serpentine belt diagram illustrates the routing path across the crankshaft, water pump, alternator, and power steering pulleys. By following the specific loop around the automatic tensioner, you ensure the engine accessories operate correctly, preventing a check engine light or diagnostic code related to low system voltage.
📌 Key Takeaways
- Ensures correct rotation of water pump and alternator
- Identification of the automatic belt tensioner location
- Safety warning regarding the high-tension spring mechanism
- Always inspect pulleys for bearing wear during replacement
- Essential for resolving battery charging and cooling issues
Maintaining a heavy-duty diesel engine requires precision, and having a clear 6.0 powerstroke serpentine belt diagram is an essential first step for any owner or mechanic. The 6.0-liter Powerstroke engine, utilized in various Super Duty trucks and vans, relies heavily on a single accessory belt to drive critical systems including the water pump, alternator, and power steering pump. Because this engine generates significant heat and torque, any failure in the belt routing or tension can lead to immediate mechanical issues. In this comprehensive guide, you will find a detailed breakdown of the belt routing for both single and dual alternator configurations, along with professional installation steps and troubleshooting advice to keep your engine running efficiently.
The 6.0 Powerstroke uses a serpentine belt (also known as an accessory belt) that is significantly longer and wider than those found on smaller gasoline engines. This is necessary to handle the high-load demands of the cooling system and high-output charging systems.
Understanding the 6.0 Powerstroke Serpentine Belt Diagram
The 6.0 powerstroke serpentine belt diagram is more than just a map; it is a functional blueprint for the engine’s external power distribution. Unlike the internal timing chain which synchronizes the camshaft and crankshaft, the serpentine belt is an external component that converts the rotational energy of the crankshaft into functional power for various accessories. Depending on your specific vehicle trim, you may have a single alternator setup or a dual alternator “Ambulance Package” setup. Understanding which one you have is the first step in successful maintenance.
In a standard single-alternator configuration, the belt begins its journey at the large crankshaft pulley located at the bottom center of the engine block. From there, it travels upward to the water pump pulley, which is vital for maintaining consistent coolant flow through the radiator and oil cooler. The routing then continues to the power steering pump, the A/C compressor, and finally the alternator before returning through a series of idler pulleys and the automatic tensioner. The tensioner is a spring-loaded arm designed to maintain a specific pressure on the belt, preventing slippage during rapid acceleration or heavy towing.
If your truck features the dual alternator setup, the 6.0 powerstroke serpentine belt diagram becomes slightly more complex. This system uses a longer belt to wrap around a secondary alternator usually mounted lower on the engine. Proper routing is critical here because an incorrectly routed belt can rotate the water pump in the wrong direction, leading to a catastrophic loss of cooling efficiency. The diagram clearly labels each component: the Crankshaft (Drive), Water Pump (Driven), Alternator (Driven), A/C Compressor (Driven), Power Steering (Driven), and the various Idlers that guide the belt’s path.
[DIAGRAM_PLACEHOLDER: 6.0 Powerstroke Serpentine Belt Routing – Visualizing the path from Crankshaft to Alternator, Water Pump, and A/C Compressor for both single and dual setups]
Step-by-Step Belt Replacement and Installation

Replacing the belt using a 6.0 powerstroke serpentine belt diagram requires a combination of the right tools and a systematic approach. Because the engine bay of a Super Duty is often cramped, especially with the large fan shroud in place, following these steps will save you time and frustration.
Tools and Materials Needed
- ✓ 1/2-inch drive breaker bar or a specialized long-reach serpentine belt tool
- ✓ 8mm and 10mm sockets for shroud removal (if necessary)
- ✓ Replacement heavy-duty serpentine belt
- ✓ Flashlight or work lamp
- ✓ Shop towels and brake cleaner for pulley surfaces
The Installation Process
Step 1: Preparation and Safety. Ensure the engine is completely cool. Park the vehicle on a level surface and engage the parking brake. Disconnect the batteries to prevent any accidental engine engagement. While the serpentine belt is not linked to the ECU for timing purposes, a sudden start could cause serious injury.
Step 2: Accessing the Tensioner. Locate the belt tensioner, which is usually found on the passenger side of the engine. On the 6.0 Powerstroke, the tensioner has a square 1/2-inch female drive hole. Insert your breaker bar into this hole. If your fan shroud is in the way, you may need to loosen the upper bolts of the shroud to gain enough clearance for the tool’s handle.
Step 3: Releasing Tension. Pull the breaker bar toward the driver’s side (counter-clockwise) to compress the internal spring. This will create slack in the belt. While holding the tensioner back, slide the belt off the uppermost pulley, which is typically the alternator.
Step 4: Inspection of Pulleys. Once the belt is removed, use your hand to spin each pulley (alternator, water pump, idlers). They should spin smoothly without any grinding noise or side-to-side play. If you notice a pulley is “frozen” or wobbly, now is the time to replace it. Check the torque spec of the idler pulley bolts, which typically require 35 to 45 ft-lbs of torque if they have been loosened.
Step 5: Routing the New Belt. Referencing your 6.0 powerstroke serpentine belt diagram, begin threading the new belt from the bottom up. Start by looping it around the crankshaft pulley, then the power steering pump and A/C compressor. It is often easiest to leave the water pump or the alternator as the final step, as these pulleys do not have “lips” or “grooves” that make it difficult to slide the belt over under tension.
Double-check that the belt’s “ribs” are perfectly seated in the pulley grooves. If the belt is off by even one rib, it will shred within minutes of the engine starting, potentially damaging the radiator or cooling hoses.
Step 6: Final Tensioning. Rotate the tensioner arm again using your breaker bar and slip the belt over the final pulley. Slowly release the breaker bar, allowing the tensioner to apply pressure to the belt. Inspect the entire path one last time to ensure everything matches the diagram.
Common Issues & Troubleshooting

The serpentine belt system on the 6.0 Powerstroke is robust, but it is not immune to failure. One of the most common issues is a “chirping” or squealing sound. This often indicates a misaligned idler pulley or a belt that has become “glazed” due to heat. If the belt slips significantly, it can cause the alternator to under-produce electricity. When this happens, the ECU (Engine Control Unit) may detect a low voltage condition, which can trigger a check engine light or store a specific diagnostic code (DTC) in the OBD-II system. If you see a battery light on your dashboard, the belt should be your first point of inspection.
Another critical issue is water pump failure. Since the belt drives the water pump, a snapped belt means an immediate stop to coolant flow. On a diesel engine, this leads to rapid overheating. Always monitor your temperature gauge; if it spikes, pull over immediately. Checking for “belt dust” (black soot around the front of the engine) is a proactive way to catch a failing accessory belt before it snaps and leaves you stranded.
Tips & Best Practices for Maintenance
To ensure the longevity of your engine components, follow these pro tips for belt maintenance. First, always choose a high-quality, name-brand EPDM (Ethylene Propylene Diene Monomer) belt. These belts are designed to withstand the high heat environment of the 6.0 Powerstroke engine bay far better than cheaper neoprene alternatives. EPDM belts do not crack as easily, so instead of looking for cracks, you should use a belt wear gauge to check the depth of the grooves.
If you are replacing the belt, it is highly recommended to replace the tensioner and the two idler pulleys at the same time. These components often have the same service life as the belt, and a new belt on a worn-out tensioner will likely fail prematurely.
Keep the pulleys clean. During a belt change, use a wire brush and some brake cleaner to remove any old rubber deposits or oil from the pulley grooves. This ensures maximum grip and prevents the squealing often associated with new belt installations. Additionally, while the belt is off, it is a great time to inspect the fan clutch and the harmonic balancer for any signs of separation or fluid leaks. By following the 6.0 powerstroke serpentine belt diagram and performing these inspections, you ensure that your truck remains reliable for the long haul, avoiding expensive repairs and keeping your diagnostic code scanner in the toolbox where it belongs.
In conclusion, the 6.0 powerstroke serpentine belt diagram is a vital resource for anyone performing DIY maintenance on their Ford diesel. By understanding the routing, using the correct tools, and following safety protocols, you can ensure your cooling system and electrical accessories function perfectly. Regular inspection of the accessory belt will prevent unexpected failures, protect your ECU from voltage fluctuations, and maintain the steady coolant flow necessary for this high-performance engine.
Frequently Asked Questions
Where is the serpentine belt located?
The serpentine belt is located at the very front of the 6.0 Powerstroke engine block, tucked behind the cooling fan shroud. It wraps around various pulleys, including the crankshaft, alternator, and water pump. Accessing it usually requires removing the upper fan shroud or using a long-reach serpentine belt tool for easier clearance.
What does the 6.0 Powerstroke serpentine belt diagram show?
This diagram displays the precise path the ribbed belt must take to power all engine accessories. It indicates which pulleys the belt goes over or under, ensuring the water pump turns the right way. Correct routing is vital to prevent overheating or a check engine light triggered by the ECU.
How many pulleys does the 6.0 Powerstroke belt have?
Standard single-alternator setups typically involve eight pulleys, including the crank, water pump, fan clutch, power steering, A/C compressor, two idlers, and the tensioner. Dual-alternator configurations include additional pulleys and a longer belt. Always verify your specific truck configuration using an OBD-II scanner if you suspect any electrical load issues.
What are the symptoms of a bad serpentine belt?
Symptoms include audible squealing, visible fraying, or heavy steering. If the belt slips significantly, the alternator fails to charge the batteries properly. The ECU will detect this, potentially throwing a diagnostic code. You may see a battery light or check engine light on the dashboard if the voltage drops too low.
Can I replace the 6.0 Powerstroke belt myself?
Yes, replacing the belt is a common DIY task. It requires a 1/2-inch drive breaker bar to rotate the tensioner and release the belt. While the space is tight near the fan, following the diagram makes it manageable. Ensure the belt is fully seated in the pulley grooves before starting.
What tools do I need for belt replacement?
You primarily need a 1/2-inch breaker bar or a dedicated serpentine belt tool. A 10mm socket is often required to remove shroud bolts for better access. If you are replacing the tensioner itself, ensure you have a torque wrench to meet the manufacturer torque spec for the mounting bolts.


