2002 Ford F250 Fuse Box Diagram: Quick Layout Guide
The 2002 Ford F250 features two main fuse boxes: the passenger compartment panel located under the dashboard to the left of the steering column, and the power distribution box found under the hood on the driver’s side. This diagram details the specific amperage and function for every fuse and relay.
📌 Key Takeaways
- Identifies precise fuse locations for interior and engine systems
- The ECU and fuel pump relays are critical components to locate
- Always disconnect the battery or turn off the ignition before service
- The OBD-II port power is often linked to the cigarette lighter fuse
- Use this diagram when facing electrical failure or a check engine light
Maintaining your Super Duty truck requires a clear understanding of its electrical backbone, specifically the power distribution systems that keep your engine and accessories running. If you are struggling with a dead radio, flickering lights, or a non-responsive diagnostic port, the 2002 ford f250 fuse box diagram is your most essential tool for a quick and effective repair. This guide provides a comprehensive breakdown of both the interior and under-hood fuse panels, helping you identify failed components and restore functionality to your vehicle. You will learn how to locate these panels, interpret the numerical layouts, and use diagnostic tools to ensure your electrical system is operating at peak performance.
Understanding the 2002 Ford F250 Fuse Box Layout
The 2002 Ford F250 utilizes a two-tier electrical protection system: the Passenger Compartment Fuse Panel and the Power Distribution Box located in the engine compartment. The interior panel, found under the dashboard to the left of the steering column, primarily handles low-amperage cabin features like the instrument cluster, power windows, and interior lighting. In contrast, the under-hood Power Distribution Box manages high-current circuits, including the starter motor, fuel pump, and the ECU (Electronic Control Unit).
Each diagram uses a numerical grid system to categorize fuses (typically blade-style) and relays. The interior fuses are numbered 1 through 37, while the engine bay box utilizes larger Maxi-fuses and various relay sizes. Understanding this distinction is vital; for instance, if your truck won’t start, you would prioritize the engine bay’s starter relay over the interior cabin fuses. Furthermore, variations may exist depending on whether your truck features the 7.3L Powerstroke diesel or the V8/V10 gasoline engines, particularly regarding glow plug or fuel injection control modules.
F01: 20A – Flasher
F03: 20A – Cigar Lighter / OBD-II
F19: 10A – Instrument Cluster
F24: 10A – ECU Power
R01: Starter Relay
F10: 50A – Ignition Switch
F22: 20A – Fuel Pump
R05: Trailer Tow Relay
Note: Always verify amperage ratings on the fuse cover before replacement.
On the 2002 Ford F250, Fuse #3 (20 Amp) in the interior panel is one of the most frequently checked fuses. It powers both the cigar lighter and the OBD-II diagnostic port. If this fuse is blown, your handheld scanner will not be able to communicate with the vehicle to read a diagnostic code.
How to Use and Interpret the Fuse Box Diagram

Navigating an automotive electrical system can be intimidating, but following a structured approach ensures you don’t cause further damage to sensitive components like the ECU or the timing chain sensors.
- ✓ Step 1: Accessing the Panels – To reach the interior panel, pull the cover handle located below and to the left of the steering wheel. For the engine bay box, unclip the black plastic lid located near the driver-side fender.
- ✓ Step 2: Identifying the Target Circuit – Use the 2002 ford f250 fuse box diagram to match the symptom to the fuse. For example, if your check engine light is on but your scanner won’t power up, look specifically for the fuse labeled for the Data Link Connector or Cigar Lighter.
- ✓ Step 3: Removing the Fuse – Use a dedicated fuse puller tool (often found inside the engine bay fuse box lid) to grasp the fuse firmly and pull it straight out. Avoid using metal pliers, which can crack the plastic housing or cause a short.
- ✓ Step 4: Visual Inspection – Hold the fuse up to the light. Look at the metal “S” or “U” shaped filament inside. If the wire is broken or if there is a dark brown scorch mark on the plastic, the fuse has blown.
- ✓ Step 5: Testing with a Multimeter – For a more accurate reading, set your multimeter to the continuity setting. Touch the probes to the small exposed metal points on top of the fuse while it is still installed. A “beep” indicates the fuse is intact; silence means it must be replaced.
- ✓ Step 6: Confirming Amperage – Fuses are color-coded: Red (10A), Blue (15A), Yellow (20A), and Clear/White (25A). Never replace a fuse with one of a higher amperage. Doing so can cause the wiring to overheat and potentially start a fire.
- ✓ Step 7: Testing the Relay – If the fuse is good but the component (like the coolant flow fans or fuel pump) still doesn’t work, you may need to test the relay. You can often temporarily swap a relay of the same part number from a non-critical system (like the horn) to see if the issue resolves.
Always turn off the ignition and disconnect the negative battery terminal before performing significant electrical work. When reconnecting battery terminals, ensure they are tightened to the proper torque spec (usually around 10-12 lb-ft) to prevent arcing and electrical noise.
Common Electrical Issues and Troubleshooting

The 2002 Ford F250 is known for a few specific electrical gremlins that can be traced back to the fuse box. One common issue involves the “no-start” condition. Before assuming a mechanical failure in the timing chain or fuel rail, check the PCM (Powertrain Control Module) relay in the engine bay box. If the ECU is not receiving power, the engine will crank but never fire.
Another frequent problem is the failure of the trailer tow lighting. Owners often find that their truck’s turn signals work, but the trailer lights do not. This is usually due to a dedicated trailer tow relay or fuse in the engine compartment that has failed under the heavy load of a trailer’s electrical system. If you notice your check engine light illuminated and have symptoms of sluggish performance, it is possible that a sensor fuse (like the one for the HEGO/Oxygen sensors) has blown, leading the computer to run in a “limp mode” where it ignores certain diagnostic code inputs to protect the engine.
If you experience intermittent power loss to the dashboard, check for water leaks near the windshield. Moisture can seep into the interior fuse box, causing corrosion on the terminals. Applying a small amount of dielectric grease to the fuse blades can help prevent oxidation in humid environments.
Maintenance and Best Practices for Your F250 Electrical System
To keep your 2002 Ford F250 running reliably, you should treat the electrical system with the same care as your engine oil or coolant flow. Periodically inspect the under-hood fuse box for signs of heat stress. If any fuse sockets look melted or discolored, it indicates a high-resistance connection that needs professional attention.
When performing other maintenance, such as replacing the accessory belt or alternator, take a moment to clean the battery posts. A charging system that fluctuates can cause fuses to pop prematurely. Furthermore, if you are adding aftermarket accessories like off-road lights or a winch, never tap into an existing circuit on the fuse box. Instead, use a dedicated relay and an inline fuse connected directly to the battery. This protects the sensitive ECU and factory wiring from being overloaded.
Finally, always keep a spare kit of various amperage fuses and a basic multimeter in your glove box. Being able to reference the 2002 ford f250 fuse box diagram and swap a fuse on the side of the road can save you hundreds of dollars in towing fees. By understanding how these circuits interact—from the ignition switch to the diagnostic port—you ensure your Super Duty remains the dependable workhorse it was designed to be.
In conclusion, mastering the 2002 ford f250 fuse box diagram is the first step toward becoming a self-sufficient truck owner. Whether you are clearing a persistent diagnostic code, troubleshooting a check engine light, or simply restoring power to your cabin accessories, this knowledge is invaluable. Proper identification of fuses, coupled with safe testing procedures, allows you to maintain the complex electrical network of your vehicle with confidence and precision.
Step-by-Step Guide to Understanding the 2002 Ford F250 Fuse Box Diagram: Quick Layout Guide
Identify the electrical issue by observing which components, such as the ECU or OBD-II port, have lost power.
Locate the appropriate fuse panel, choosing between the interior dash panel or the under-hood distribution box.
Understand how the diagram’s numbering system corresponds to the physical slots inside the fuse box housing.
Apply the diagram to find the specific fuse protecting the circuit that has failed or triggered a diagnostic code.
Verify that the fuse is blown by inspecting the internal metal filament or using a multimeter for continuity.
Complete the repair by inserting a new fuse with the correct amperage and resetting any check engine light codes.
Frequently Asked Questions
Where is the fuse box located?
The 2002 Ford F250 has two primary locations. The interior fuse panel is situated under the instrument panel to the left of the steering wheel. The high-current power distribution box is located in the engine compartment, typically mounted near the driver-side fender for easy access during maintenance.
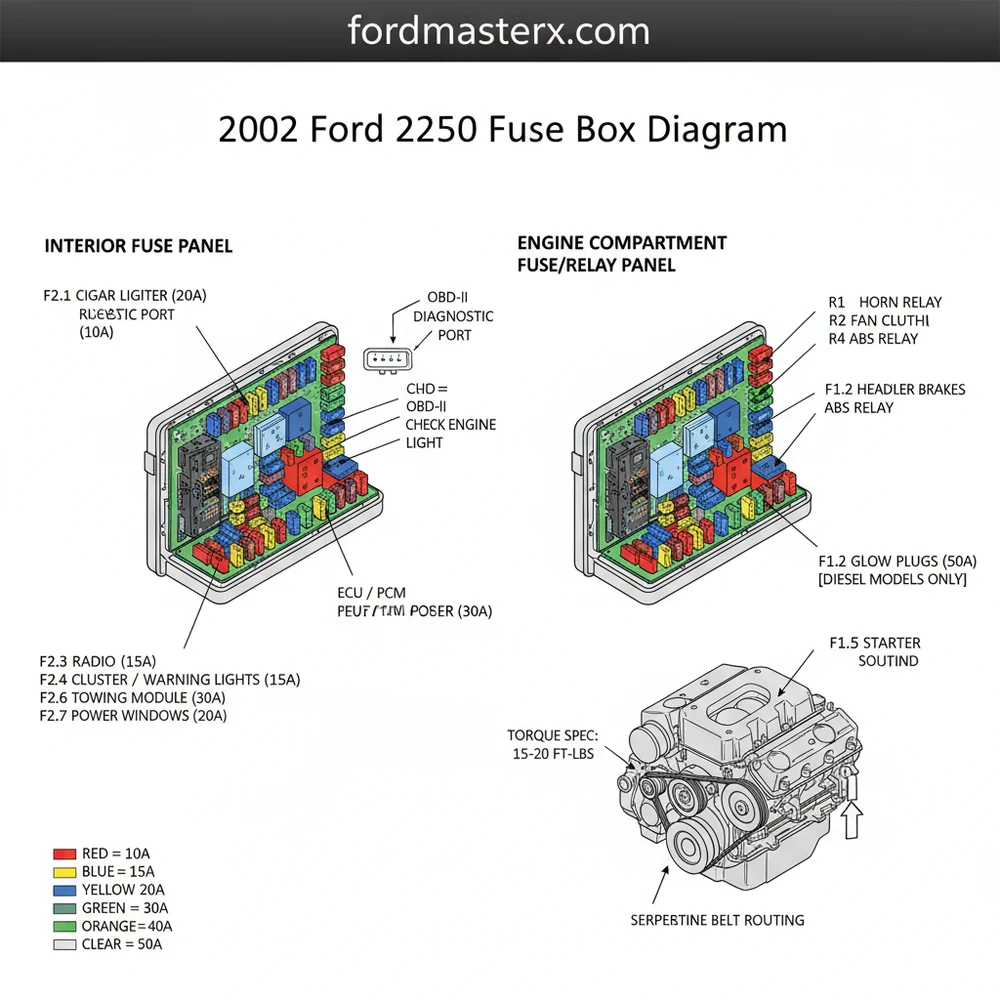
What does this fuse box diagram show?
This diagram provides a comprehensive map of both the interior and under-hood fuse panels. It identifies the numerical position of each fuse, its specific amperage rating, and the electrical circuit it protects, such as the ECU, fuel pump, headlights, or the cabin’s various power and accessory outlets.
How many connections does the fuse box have?
The 2002 Ford F250 fuse panels include dozens of circuits for systems like the ECU and lighting. The interior panel typically contains 37 fuse positions, while the engine box houses high-amp maxi-fuses and relays. Each connection is rated for a specific amperage to protect the vehicle’s electrical wiring.
What are the symptoms of a bad fuse box?
Symptoms of a bad fuse include non-functional electrical components like the radio, headlights, or the OBD-II port. If a critical fuse for the ECU blows, your truck may fail to start or trigger a check engine light. A diagnostic code might also indicate a lack of power to sensors.
Can I replace these fuses myself?
Yes, replacing a fuse is a straightforward DIY task. Once you locate the correct panel using the diagram, use a fuse puller to remove the suspect fuse. If the internal metal strip is broken, replace it with a new fuse of the exact same color and amperage rating.
What tools do I need for fuse replacement?
You primarily need a plastic fuse puller tool, which is often found inside the fuse box cover. A multimeter is helpful for checking continuity without pulling every fuse. If you are replacing the entire distribution box, ensure any mounting bolts are tightened to the correct manufacturer torque spec.


