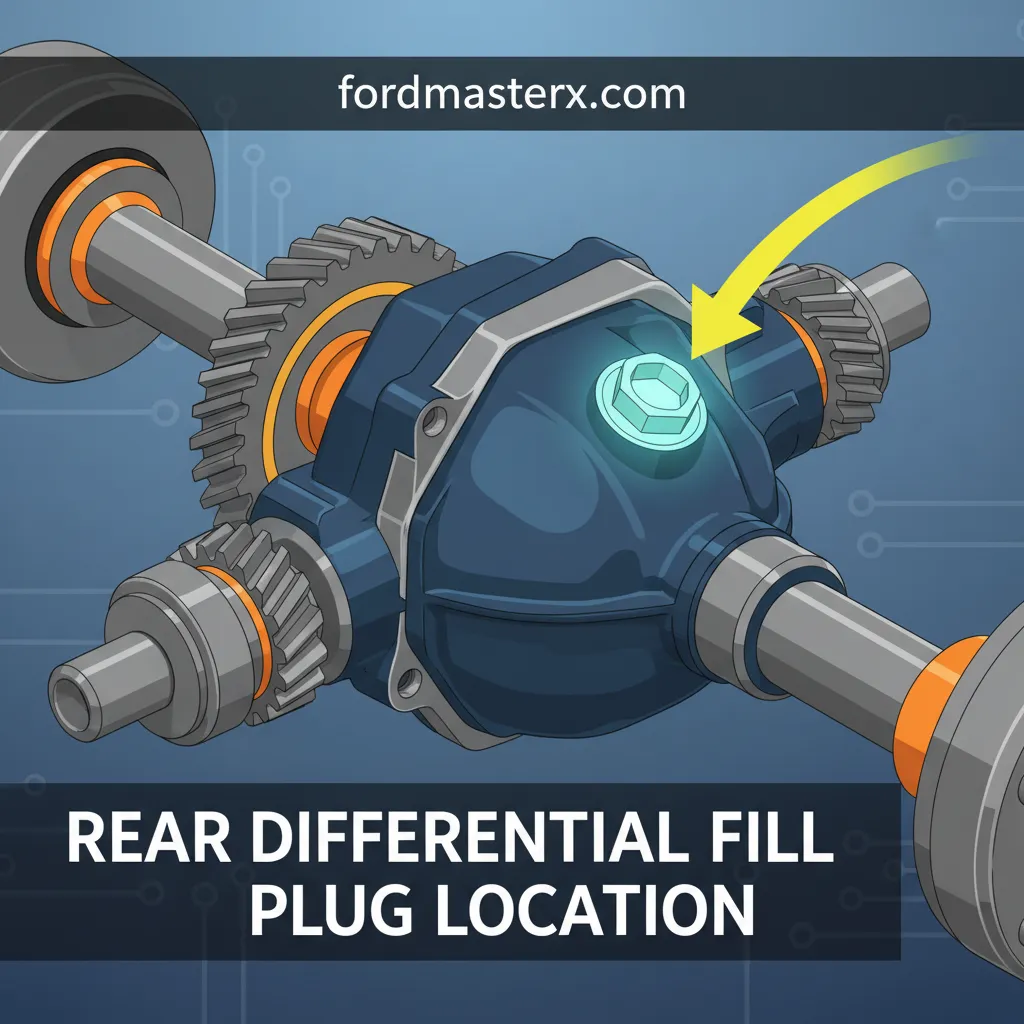
Rear Differential Fill Plug Location: Complete Guide
Maintaining the drivetrain is the hallmark of a meticulous vehicle owner, yet the rear differential remains one of the most overlooked components in modern automotive care. When gear oil breaks down or leaks occur, the results are rarely subtle; they manifest as costly metal-on-metal friction that can lead to total axle seizure. Finding the rear differential fill plug location is the critical first step in performing preventative maintenance that can extend the life of your vehicle by decades. This guide provides the professional insight needed to identify, access, and service this vital component with the confidence of a master technician.
Overview: Identifying the Service Point
The rear differential is a complex gearbox that allows your drive wheels to rotate at different speeds while cornering. Because these gears—known as the ring and pinion—operate under immense pressure and heat, they require heavy-weight gear lubricant. Unlike an engine oil dipstick, which is easily accessible from the engine bay, the differential requires crawling beneath the vehicle to find the service ports.

📤 Share Image
Finding the location of the fill plug varies depending on the axle manufacturer (such as Dana, AAM, or Ford). In most light trucks and SUVs, the fill plug is a threaded bolt situated on the front side of the differential housing, facing the front of the vehicle, or directly on the rear steel cover. For those serving their own vehicles in a home garage, knowing these variations is the difference between a 20-minute job and a weekend-long headache.
Before you begin, clean the area around the plug with a wire brush and brake cleaner. Dirt and grit nearby the opening can fall into the differential once the plug is removed, causing internal abrasion to the precision bearings.
Common Locations by Axle Type
While every vehicle is unique, most differentials follow one of two primary design philosophies regarding their service ports:
- • Rear Cover Plugs: Frequently found on GM and Chrysler vehicles, the plug is a rubber or threaded metal insert located directly on the stamped steel cover at the very back of the axle.
- • Carrier Housing Plugs: Common on Ford, Toyota, and Jeep (Dana) axles, the plug is located on the main cast-iron housing, usually on the driver’s side, midway up the “pumpkin.”
- • Independent Rear Suspension (IRS): On modern SUVs and performance cars, the differential is bolted to the chassis. The fill plug is often tucked away on the side of the aluminum casing, requiring a convenient extension or swivel socket to reach.
By The Numbers
Severe Service Interval (Miles)
Average Fluid Capacity (Quarts)
Standard Synthetic Grade

Key Benefits of Proper Differential Service
Locating and opening the fill plug is about more than just checking fluid levels; it is an essential part of a long-term vehicle health strategy. Whether you are part of an off-roading community or simply a commuter, the benefits are immediate and tangible.
Reduced Operating Temperatures
Fresh gear oil has the proper viscosity and thermal stability to whisk heat away from the gear teeth, preventing metal fatigue.
Prevention of “Whine”
Properly lubricated gears operate silently. Identifying the plug location early allows you to top off fluid before permanent damage causes gear whine.
Contaminant Removal
Checking the plug often reveals moisture or metal shavings. Early detection via an available inspection point saves the entire axle.

How It Works: The Mechanics of the Fill Plug
The fill plug serves a dual purpose: it is both the accessible port for adding fluid and the primary gauge for the fluid level itself. Unlike an engine, where you add oil to a specific volume, most rear differentials are filled until the lubricant reaches the bottom edge of the fill hole. When the fluid begins to weep back out, the differential is at its available capacity.
Mechanically, these plugs are either “Internal Hex” (requiring an Allen wrench), “External Hex” (requiring a standard socket), or “Square Drive” (where you insert the 3/8″ or 1/2″ drive of a ratchet directly into the plug). Some modern vehicles use a simple rubber “interference fit” plug, though these are becoming less common due to their tendency to leak under high pressure.
Step-by-Step Guide to Locating and Opening the Fill Plug
Whether you are working in your driveway or a trusted local shop, following a standardized protocol ensures safety and efficiency. This process applies to nearly all vehicles with a solid rear axle or a frame-mounted differential.
📋
Service Procedure
Park the vehicle on a level surface. If you must lift it, use jack stands on all four corners. The differential must be level to accurately measure the fluid available in the housing.
Slide under the rear bumper. Look for a bolt or plug located roughly 4 to 6 inches above the bottom of the differential. It is almost always positioned on the location that offers the most clearance for a tool.
Never drain the fluid before removing the fill plug. If the fill plug is seized and you have already drained the oil, your car is immobilized until a nearby professional can extract the plug.
Be extremely cautious of the spare tire. In many trucks, the spare tire blocks access to the rear cover. You may need to lower the spare to make the fill plug convenient to reach with a wrench.
Getting Started: Tools and Preparation
To successfully service your differential, you need the right kit. Because the location is often cramped, standard wrenches may not suffice. A trusted local auto parts store will usually carry specialized fluid pumps, which are essential because you cannot pour gear oil bottles vertically into the small fill hole.
Essential Tool List
- ➤ Fluid Transfer Pump: This screws onto the gear oil bottle and allows you to pump fluid into the accessible port.
- ➤ Breaker Bar: Fill plugs are often subjected to road grime and heat cycles, making them very difficult to break loose.
- ➤ Replacement Gasket or Crush Washer: Some plugs use a copper or aluminum washer that must be replaced to prevent leaks.
- ➤ PB Blaster or Liquid Wrench: Spray the nearby threads 24 hours in advance if the vehicle has high mileage.
✅ Pros of DIY Service
- Significant cost savings over dealership rates.
- Personal verification of gear condition.
- Ability to use premium synthetic fluids.
- Deepened understanding of vehicle mechanics.
❌ Cons & Challenges
- Gear oil has a very strong, unpleasant sulfur smell.
- Requires working in a dirty environment.
- Risk of stripping threads on the housing.
- Proper disposal of old oil is required.
Dealing with Limited Slip Differentials (LSD)
If your vehicle is equipped with a limited-slip differential, finding the location of the fill plug is only half the battle. These units require a specific friction modifier additive to ensure the clutch packs inside the differential engage and disengage smoothly. Without this additive, you will experience “chatter” or vibrations during tight turns. Many modern synthetic gear oils come with this additive already mixed in, but you should always verify the bottle’s label before pumping it through the fill hole.
The Importance of the Vent Breather
While you are at the location of the fill plug, look slightly higher on the axle tube for a small rubber hose. This is the breather vent. If this vent becomes clogged with mud or debris, internal pressure will build up as the differential heats up. This pressure has to go somewhere, and it usually forces oil past the pinion seal or axle seals. Ensuring this vent is accessible and clear is just as important as the oil change itself.
Summary of Best Practices
After 15 years in the industry, I have seen many DIY projects go sideways because of a simple lack of preparation. The rear differential fill plug location isn’t just a point of entry; it’s your window into the health of the drivetrain. By following these professional guidelines, you ensure that your vehicle remains a trusted local fixture on the roads for years to come.
- ✔ Verify Level: Always ensure the vehicle is perfectly horizontal.
- ✔ Magnet Inspection: Most fill and drain plugs are magnetic. Inspect the “fuzz” on the magnet; fine grey paste is normal, but large metal flakes indicate imminent failure.
- ✔ Torque Specs: Do not over-tighten the plug. Cast iron housings can crack, and aluminum housings can strip. Use a torque wrench to meet the manufacturer’s specification (usually 20-30 ft-lbs).
Conclusion
Mastering the rear differential fill plug location is a fundamental skill for any automotive enthusiast or proactive owner. By understanding that this plug is the gateway to your axle’s longevity, you can prevent catastrophic failures before they start. Remember the golden rule: always loosen the fill plug before the drain plug, use high-quality synthetic lubricants, and never ignore the importance of a clean workspace. If you’re unsure of your vehicle’s specific requirements, consult your owner’s manual or visit a trusted local mechanic who is already serving your community. Taking action today ensures your vehicle remains reliable, efficient, and available for the long haul.
Next Step: Inspect your rear differential this weekend. Locating the plug now, even if you don’t plan to change the fluid immediately, will give you the peace of mind that you’re prepared for future maintenance.