The Definitive Technical Analysis of Ford Integrated Garage Door Opener Systems: Reset Protocols, RF Architecture, and Systems Interoperability
The convergence of automotive telematics and residential automation has created a seamless interface for the modern driver, yet this integration masks a complex backend of proprietary radio frequency (RF) protocols, fluctuating supply chain agreements, and evolving security standards. For the Ford Motor Company, this journey has been defined by the adoption and integration of two distinct, incompatible hardware ecosystems: the HomeLink® system, engineered by Gentex Corporation, and the Car2U® system, developed by Lear Corporation.
This report serves as an exhaustive technical dossier designed for automotive technicians, systems integrators, and advanced end-users. Its primary objective is to deconstruct the “reset” and “programming” methodologies for Ford’s integrated garage door openers (GDOs). While the user intent often begins with a simple desire to clear old codes—perhaps following a vehicle purchase or a move to a new residence—the process requires a nuanced understanding of non-volatile memory architectures, rolling code algorithms (Security+), and the specific frequency modulation characteristics of the hardware installed in the vehicle.
The necessity for this deep-dive analysis is underscored by the significant confusion observed in the field, particularly regarding Ford vehicles manufactured between the 2007 and 2013 model years. During this “transition era,” Ford utilized both Lear and Gentex systems across different model lines, creating a fragmented maintenance landscape.
A failure to correctly identify the system leads to the application of incorrect reset protocols, resulting in persistent frustration, inability to sync with modern openers, and potential security vulnerabilities where legacy codes remain active.
This document will systematically explore the physical and electronic differences between these systems, provide detailed, step-by-step engineering protocols for resetting and reprogramming them, and analyze the interoperability challenges posed by the modern Security+ 2.0 encryption standards. Through this analysis,
we will demonstrate that the “reset” is not merely a button press, but a specific electronic trigger designed to wipe the EEPROM (Electrically Erasable Programmable Read-Only Memory) of the transceiver, preparing it for a new cryptographic handshake with the home infrastructure.
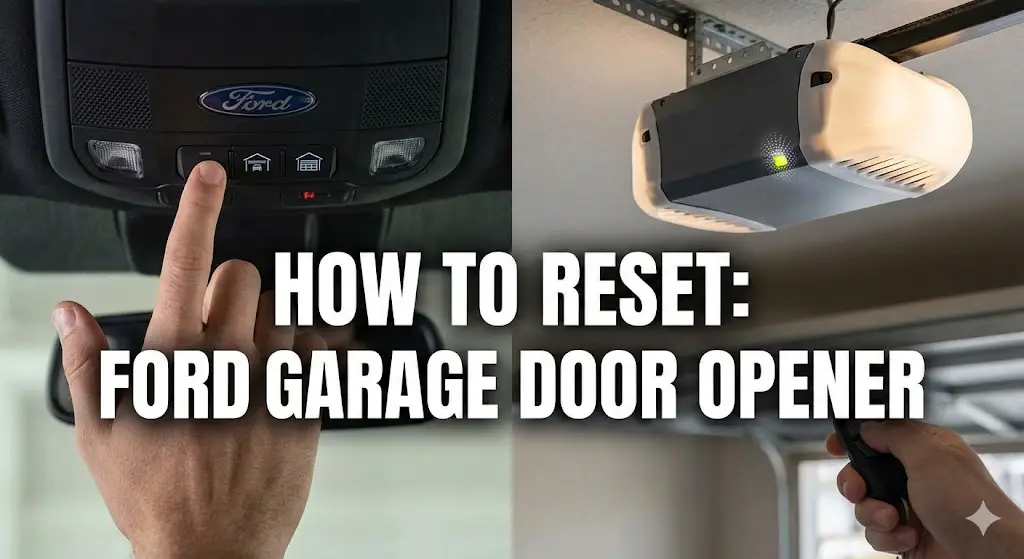
MASTERING THE RESET
The Definitive Guide to Ford Garage Door Openers
Whether you’ve bought a used F-150, are selling your Explorer, or simply experiencing connectivity glitches, a factory reset is critical for security.
Know Your System Before You Start
Before attempting a reset, you must identify which transponder system your Ford is equipped with. Ford primarily uses two systems: HomeLink (most common) and Car2U. The reset procedures differ slightly.
HomeLink System
- • Has a small “House” icon above buttons.
- • Usually has 1 single LED light.
- • Buttons are often soft rubber.
Car2U System
- • No “House” icon.
- • Has 3 separate LED lights (one for each button).
- • Buttons are typically hard plastic.
Ford System Prevalence
Estimated distribution across 2010-2024 models.
Most modern Fords come equipped with the HomeLink system. However, older models (pre-2015) and certain trims utilized the Car2U system. Knowing this helps you choose the right guide. If you are troubleshooting key fob issues alongside this, ensure your vehicle battery is stable.
The Universal Reset Protocol
This process wipes all programmed garage doors from the vehicle’s memory. You cannot erase just one button; it is an all-or-nothing factory reset.
Enter Reset Mode
Locate the two outer buttons (Button 1 and Button 3) on your visor.
The 20-Second Hold
Press and hold both outer buttons simultaneously. Do not release them.
Wait for the Flash
HomeLink: Hold until the indicator light
stops burning solid and begins to flash rapidly (approx 20
sec).
Car2U: Hold until all 3 LEDs begin to flash
slowly (approx 20 sec).
Release & Verify
Release both buttons. The memory is now cleared. Pressing any button should now result in a slow, searching blink pattern.
Why Do Programming Attempts Fail?
Based on user reports from HomeLink Official and Ford Support, here are the most common culprits when a reset or reprogramming fails.
Pro Tip: If you recently installed LED light bulbs in your garage opener unit, they may be emitting frequencies that interfere with the programming signal. Remove them temporarily while resetting.
The Architecture of Automotive Access Control
To understand the reset procedure, one must first appreciate the engineering context of the device being manipulated. The integrated garage door opener in a Ford vehicle is not a simple switch; it is a sophisticated radio transceiver capable of emulating or generating complex RF signals.
The Evolution from Clip-On to Integrated Logic
Historically, garage door access was achieved through varying remote controls clipped to the sun visor. These devices were crude, often operating on fixed frequencies with dip-switch security. The integration of this functionality into the vehicle’s electrical architecture—powered by the 12V rail and embedded in the headliner or visor—represented a significant leap in convenience and aesthetics. However, it also introduced a layer of abstraction. The user could no longer simply “swap the remote” if the technology changed; the vehicle’s hardware had to be adaptable.
The Dual-Supplier Ecosystem: Gentex vs. Lear
The core complexity in Ford’s ecosystem arises from its dual-sourcing strategy. While HomeLink (Gentex) became the de facto industry standard, used by brands ranging from BMW to Honda, Ford (and GM) engaged Lear Corporation to produce the Car2U system for a significant portion of their fleet during the mid-2000s and early 2010s.
- HomeLink (Gentex): Operates primarily as a “learning” device. It contains a frequency analyzer and a software-defined radio (SDR) capability to listen to a handheld remote, analyze its carrier frequency and modulation pattern (AM or FM), and clone it. It effectively mimics the “voice” of the original remote.
- Car2U (Lear): Operates differently. It is primarily a “database” device. It contains a pre-programmed library of GDO protocols. When programming, the user is essentially selecting a driver from a library rather than teaching the device a new language. This fundamental architectural difference dictates why the reset and programming procedures are incompatible.
The implication for the “reset” function is profound. Resetting a HomeLink unit clears the cloned waveforms from its memory. Resetting a Car2U unit resets the pointer in its database back to the factory default (or null) state.
System Identification: The Critical First Step
Before any buttons are pressed, the operator must positively identify the hardware. The visual similarity between the two systems is deceptive, as both occupy the same physical space on the visor and offer three buttons. However, their user feedback mechanisms—specifically the LED indicators—are distinct and non-interchangeable.
The LED Indicator Signature
The most reliable, non-intrusive method for identification lies in the Light Emitting Diode (LED) configuration. This visual signature is the direct output of the microcontroller’s state machine and provides the necessary feedback during the reset process.
- HomeLink (Gentex) Architecture:
- Visual ID: Characterized by a single LED light located above or adjacent to the three buttons. Often, this light is housed within a small icon of a house or a simple circular lens.
- Operational Logic: When any of the three buttons is pressed, this single shared LED illuminates. The system utilizes this single channel to communicate status (slow flash, fast flash, solid).
- User Interface: The single light confirms that the device is transmitting, regardless of which button is actuated.
- Car2U (Lear) Architecture:
- Visual ID: Characterized by three separate LED lights. Each physical button has a corresponding LED located directly above or integrated into it.
- Operational Logic: The button-to-LED relationship is 1:1. Pressing Button 1 lights up LED 1. Pressing Button 2 lights up LED 2.
- User Interface: This granular feedback is essential for the Car2U programming method, which sometimes involves complex button combinations that resemble data entry more than simple signal transmission.
Tactile and Physical Differentiators
Beyond the LEDs, subtle physical cues exist, though they are less reliable than the light signature due to trim variations across Ford models (e.g., Lariat vs. XL trims).
- Car2U: The outer two buttons often feature a slightly different texture or concave contour compared to the center button in some implementations. The buttons are frequently described by technicians as having a firmer, more distinct “click” or travel compared to the softer membrane-feel of some HomeLink units.
- HomeLink: Typically features a uniform button texture and consistent haptic feedback across all three inputs.
Model Year Probability Matrix
While visual inspection is the gold standard, historical production data allows us to predict the system type based on the vehicle’s model year. The “Lear Era” at Ford roughly spans 2007 to 2013, creating a specific pocket of vehicles that defy standard HomeLink instructions.
Table 1: Probability of Car2U System Presence in Ford Vehicles
| Model | Model Years with High Car2U Prevalence |
| Ford F-150 | 2010, 2011, 2012, 2013 |
| Ford Mustang | 2010, 2011, 2012, 2013 |
| Ford Explorer | 2010, 2011 |
| Ford Fusion | 2010, 2011, 2012 |
| Ford Expedition | 2010, 2011, 2012, 2013 |
| Ford Escape | 2010, 2011 |
| Super Duty (F-250/350) | 2011, 2012, 2013 |
Insight: This data suggests a specific contractual period with Lear Corporation. Vehicles manufactured after 2014 show a marked return to HomeLink (specifically HomeLink 5 with Security+ 2.0 compatibility), while pre-2007 vehicles are typically older HomeLink generations. The 2010-2013 window is the “danger zone” for confusion, where a user might look up a generic “Ford garage opener reset” video and be given HomeLink instructions that fail on their Car2U-equipped F-150.
The Physics of the Reset: Clearing Non-Volatile Memory
To understand the “reset,” we must define what is actually happening electronically. The device does not mechanically reset; rather, the user is triggering a firmware subroutine that overwrites the data stored in the NVRAM (Non-Volatile Random Access Memory). This memory is designed to persist even when power is lost (e.g., changing the car battery), which is why disconnecting the battery is not a valid reset method.
The reset procedure is a “destructive” action in the context of data—it wipes all stored channels. It is distinct from “reprogramming,” which can be done on a single channel. Both systems share a limitation: you cannot “erase” a single button. You can only overwrite a single button or erase the entire unit.
HomeLink® (Gentex) Factory Reset Protocol
The HomeLink reset is the most common procedure found in literature, but precision is key.
Standard Operating Procedure (SOP):
- Ignition State: The vehicle must be powering the accessory rail. Turn the ignition key to the ‘On’ or ‘Accessory’ position. If the vehicle has a Push-To-Start button, press the start button without depressing the brake pedal to enter Accessory mode. This ensures the overhead console is energized.
- The “Clear” Command: Locate the two outer buttons (Button I and Button III). This spatial separation is a deliberate design choice to prevent accidental erasure during normal operation.
- Simultaneous Actuation: Press and hold both outer buttons simultaneously. The timing here is critical.
- The Wait (Hysteresis): Maintain pressure.
- 0-5 Seconds: The indicator light may be solid or off. This is the “debouncing” and “safety” period.
- 5-10 Seconds: The microcontroller validates that the buttons are intentionally held, not stuck.
- 10-20 Seconds: The erase command is executed.
- Visual Confirmation: The indicator light will transition from a solid state (or off) to a rapid flash. This change in frequency (blinking rate) is the visual handshake from the firmware confirming that the NVRAM has been cleared.
- Release: Release both buttons immediately upon observing the rapid flash. The system is now in “Training Mode.”
Technical Context: If the buttons are held too long (e.g., past 30-40 seconds), some versions of the firmware may interpret this as a “stuck button” fault and time out, effectively canceling the reset. The user must react to the rapid flash.
Car2U® (Lear) Factory Reset Protocol
The Car2U reset appears similar physically but differs in user feedback and timing tolerances.
Standard Operating Procedure (SOP):
- Ignition State: Ensure the vehicle ignition is ‘On’ or in ‘Accessory’ mode.
- The “Clear” Command: Press and hold the two outer buttons (Button 1 and Button 3) simultaneously.
- The Wait: Hold for approximately 20 seconds. The internal clock of the Lear unit is often slightly slower or requires a longer validation period than Gentex units.
- Visual Confirmation:
- Initial State: The LEDs might be solid or off.
- Completion State: All three LEDs will begin to blink rapidly in unison. This synchronized flashing of the entire array is the definitive signal of a successful factory reset.
- Release: Release the buttons. The memory pointers for all three channels have been reset to 0 (Factory Default).
Crucial Distinction: Unlike HomeLink, where one light flashes, the Car2U system uses the full array. If only one light is flashing, or if they are flashing slowly, the reset has not occurred.
The Single Button “Overwrite” (Non-Destructive Reset)
A frequent point of confusion is whether one must reset the whole unit to change just one garage door (e.g., moving to a new house but keeping the gate code for the office). The answer is no.
- Mechanism: To change only Button 2 (for example):
- Press and hold Button 2.
- Do not release when the light illuminates.
- After 20 seconds, the light will change its flash pattern (indicating it has entered “Learn Mode” for that specific channel).
- While continuing to hold, introduce the new remote signal (HomeLink) or perform the programming sequence.
- This preserves the data on Button 1 and Button 3 while “resetting” and immediately reprogramming Button.
Programming Methodologies: The Fork in the Road
Once the “Reset” is complete, the module is effectively a blank slate. The subsequent step—programming—is where the technical paths of HomeLink and Car2U diverge radically. This divergence is driven by the RF environment they are trying to communicate with.
Understanding the Target: GDO RF Protocols
To program the car, one must understand the garage door opener (GDO) receiver.
- Fixed Code (Dip Switch): (Pre-1996) The simplest protocol. A static 8-12 bit binary code. Frequency is usually fixed (e.g., 300, 310, 390 MHz).
- Rolling Code (Security+ / Intellicode): (Post-1996) The code changes every time the button is pressed, utilizing a pseudo-random number generator (PRNG) and a seed key exchanged between transmitter and receiver. This prevents “replay attacks.”
- Security+ 2.0: (Post-2011) A multi-frequency (Tri-Band) protocol that hops between 310, 315, and 390 MHz to avoid interference. It uses encrypted digital packets.
Programming HomeLink (The “Clone and Sync” Method)
HomeLink’s strength is its ability to clone. It uses a “listen and repeat” logic.
Phase 1: The Handshake (Cloning)
- Positioning: Hold the handheld remote 1-3 inches from the HomeLink buttons. The proximity is crucial because the HomeLink receiver is near-field optimized for this step to avoid picking up stray signals.
- Dual Activation: Press the handheld remote button and the target HomeLink button simultaneously.
- Signal Analysis: The HomeLink LED will flash slowly. This indicates it is sampling the RF spectrum. It is analyzing the carrier frequency and the modulation.
- Capture: When the LED flashes rapidly, the signal has been successfully cloned. Release both buttons.
Phase 2: The Synchronization (Rolling Code Only)
If the GDO is a modern rolling code unit, the “cloned” signal is only half the key. It has the correct frequency and manufacturer ID, but it doesn’t have the current rolling code seed.
- Learn Mode: Press the “Learn” or “Smart” button on the GDO motor head (ceiling unit).
- The 30-Second Window: You have 30 seconds to return to the vehicle.
- The Press-Hold-Release Cycle: Press the programmed HomeLink button for 2 seconds. Release. Press again for 2 seconds. Release. (And often a third time).
- Technical Note: The first press introduces the car to the GDO. The GDO registers the new device. The second/third press confirms the rolling code algorithm synchronization.
Programming Car2U (The “Database” Method)
Car2U is less about cloning and more about “selecting.” For Rolling Code units, it often doesn’t need the handheld remote at all.
Rolling Code Protocol:
- Learn Mode: Press the “Learn” button on the GDO motor head.
- Blind Transmission: Return to the car. Press and HOLD the target Car2U button.
- The Database Cycle: While holding, the Car2U unit is internally cycling through known rolling code protocols (e.g., Chamberlain Type 1, Genie Type 2, etc.).
- The Trigger: Watch the garage door. The moment it moves, release the button immediately.
- Why? The unit just transmitted the correct protocol. Releasing the button tells the microprocessor “Stop cycling, that was the one.”.
- Lock-In: Press the button again to save that protocol to memory.
Fixed Code Protocol (The “Keypad” Method):
For old dip-switch openers, Car2U requires you to physically enter the switch positions using the three buttons as a keypad.
- Button 1 = Switch Up/On
- Button 2 = Switch Middle
- Button 3 = Switch Down/OffThis manual entry highlights the fundamental difference in architecture: Car2U is a synthesizer, not a cloner.
The Compatibility Crisis: Security+ 2.0 and the “Yellow Button” Era
The most significant technical hurdle identified in the research—and the source of most user failure—is the incompatibility of the 2007-2013 Car2U units with modern Security+ 2.0 openers.
The Frequency Mismatch
Security+ 2.0 (identified by a yellow antenna and yellow learn button on LiftMaster/Chamberlain units) utilizes a sophisticated hopping algorithm across 310, 315, and 390 MHz. The older Car2U hardware in Ford vehicles (e.g., a 2011 F-150) was hard-coded for legacy frequencies (mostly 315 MHz or 390 MHz fixed). It physically cannot generate the multi-frequency encrypted burst required by the new openers.
Symptom: No matter how many times you reset or try to program, the door never responds. The Car2U unit is “shouting” in a language (AM modulation at 315 MHz) that the new opener (FM/Tri-Band) simply ignores.
The Hardware Bridge Solution
Software updates cannot fix this, as it is a hardware limitation of the radio transmitter. The solution is a Repeater or Compatibility Bridge.
- Car2U Repeater (Kit): This device plugs into an AC outlet in the garage. It listens for the older Car2U signal (which your truck can send) and instantaneously translates and re-transmits it as a Security+ 2.0 signal (which your opener can receive).
- Critical differentiation: There is a “HomeLink Repeater” and a “Car2U Repeater.” They are not interchangeable. You must buy the bridge that matches your car, not your opener.
- Market Status: Snippet. notes that the official Lear Car2U repeater is discontinued in some channels, forcing users to hunt for “New Old Stock” or use universal receiver kits that wire directly into the opener’s terminals.
Model-Specific Nuances and Case Studies
While the underlying tech is consistent, the implementation across Ford’s lineup varies.
- Ford F-150 (2010-2014): Heavily impacted by the Car2U vs. HomeLink confusion. Owners often find that the “Universal” instructions in the manual do not account for the specific Security+ 2.0 incompatibility, leading to hours of wasted effort. The visor swap (installing a newer visor with HomeLink 5 into an older truck) is a popular enthusiast modification to bypass the Car2U limitations.
- Ford Mustang (2010-2013): Similar to the F-150, the Mustang utilized Car2U. The low roofline and potential metallic tinting on windows can sometimes exacerbate range issues, making the placement of the “Bridge” (if used) critical.
- Ford Bronco Sport / Mach-E (Modern Era): These vehicles utilize modern HomeLink systems (v5 or later). However, users report range issues potentially caused by LED lighting interference (see Section 7). The programming here typically involves the “Process 1” (Clone) and “Process 2” (Train) method without deviation. The Mach-E, being an EV, provides a stable voltage, but the heavy RF shielding in the cabin can sometimes necessitate holding the remote closer to the visor during programming.
Troubleshooting and Diagnostics: Beyond the Reset
When a reset and standard programming attempt fails, a systematic diagnostic approach is required.
The LED Interference Phenomenon (Phantom Jamming)
A widespread but poorly understood issue is RF interference from LED light bulbs screwed into the garage door opener itself. Cheap LED drivers emit broad-spectrum noise in the 300-400 MHz range.
- The Scenario: You reset the Ford unit successfully. You program it successfully. But the door only opens when the car is literally bumping the door.
- The Physics: The LED noise floor “deafens” the GDO receiver. It’s like trying to whisper to someone standing next to a jet engine.
- The Fix: Remove the LED bulbs or purchase “Garage Door Specific” LEDs which are shielded and FCC certified for low RF emission.
The “Fast Flash” Anomaly (HomeLink)
If the HomeLink light flashes rapidly immediately when you press a button (without holding), it means the unit is already programmed to a rolling code but hasn’t received the synchronization signal.
- Resolution: Do not reset. Proceed directly to the “Press Learn on Opener -> Press Button in Car 3 Times” sequence.
Antenna Orientation
For older systems struggling with range, the receiving antenna on the motor head (usually a small hanging wire) is the weak link.
- Mod: Splicing a coaxial extension to this wire and routing it outside the garage structure (especially if the door is metal/insulated) can dramatically improve the signal-to-noise ratio and effective range.
Safety Compliance and Legal Constraints
It is imperative to address the safety warnings embedded in every Ford GDO manual.
- Pre-1982 Systems: The systems must not be programmed to control GDOs manufactured prior to April 1, 1982. These older units lack the “Safety Stop and Reverse” feature (optical eyes or pressure sensors). A car-based remote allows operation without line-of-sight; triggering a non-reversing door onto a child or pet is a catastrophic risk. The Ford systems are technically capable of operating them (if the frequency matches), but it is a violation of federal safety standards to do so.
Conclusion
The “reset” of a Ford garage door opener is the gateway to a complex ecosystem of RF negotiation. Whether equipping a 2011 F-150 or a 2024 Mach-E, the user must navigate the bifurcation of Lear and Gentex architectures.
Summary of Action:
- Identify: 1 LED (HomeLink) vs. 3 LEDs (Car2U).
- Reset: Hold outer buttons (10-20s for HomeLink, 20s+ for Car2U) until rapid flashing occurs.
- Analyze Environment: Is the opener Security+ 2.0 (Yellow Button)? If yes, and the car is 2007-2013 Car2U, a Bridge is mandatory.
- Program: Clone then Sync (HomeLink) or Database Select (Car2U).


