Ford Focus Mk2 Rear Suspension Diagram: Complete Guide
The Ford Focus Mk2 rear suspension diagram illustrates the Control Blade multi-link setup, featuring upper and lower control arms, trailing arms, and coil springs. Understanding this layout is essential for replacing worn bushings or performing an alignment, ensuring every bolt meets the manufacturer torque spec for optimal vehicle stability and safety.
📌 Key Takeaways
- The diagram visualizes the complex Control Blade multi-link architecture
- Identifying the trailing arm and its bushings is critical for handling
- Always follow the manufacturer torque spec for all suspension fasteners
- Use the diagram to check for correct orientation of the coil springs
- A detailed diagram helps distinguish between upper and lower control arms
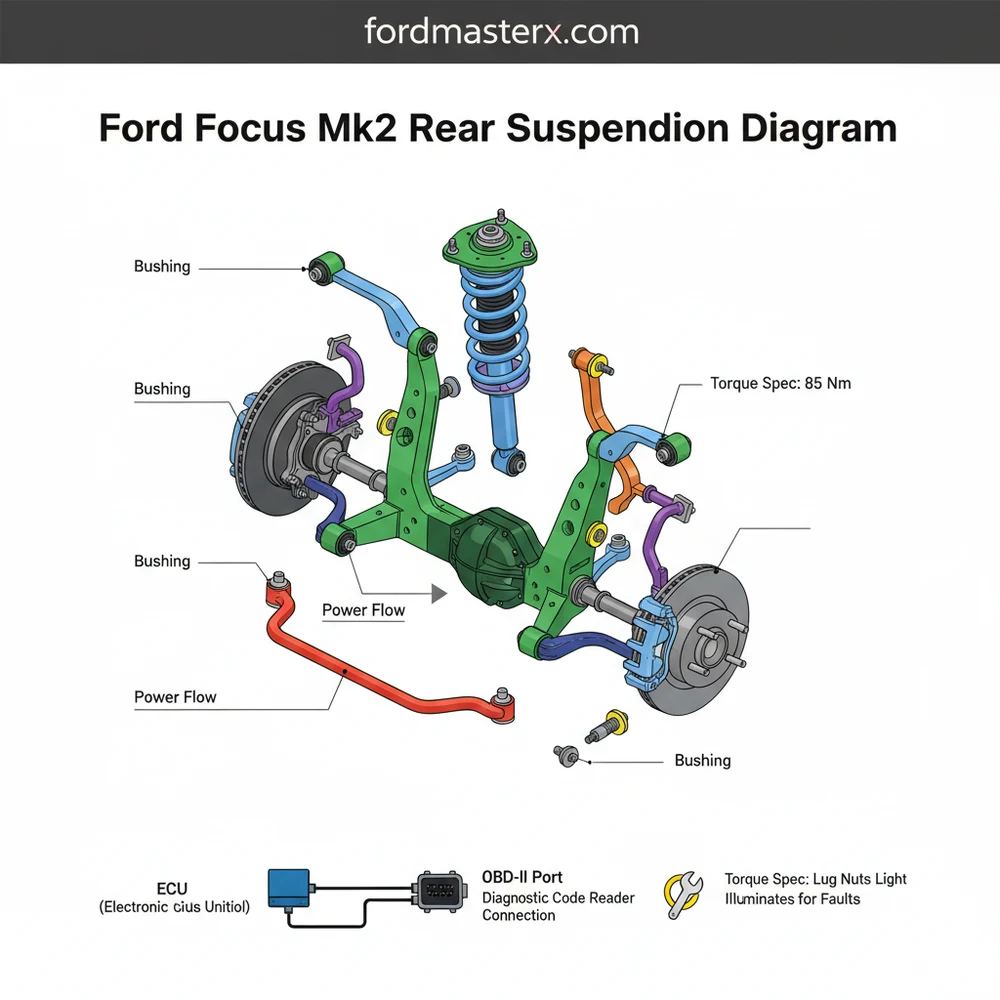
Understanding the intricacies of the ford focus mk2 rear suspension diagram is essential for any owner or mechanic looking to maintain the legendary handling characteristics of this vehicle. The MK2 Focus is renowned for its “Control Blade” multi-link rear suspension system, a design that revolutionized the compact car segment by balancing ride comfort with sharp, responsive steering. Having an accurate diagram allows you to identify specific components like trailing arms, control links, and bushings that often wear out over time. This guide will provide a deep dive into the suspension’s architecture, offering the technical clarity needed for successful repairs and performance tuning.
The rear suspension of the Ford Focus MK2 is a sophisticated multi-link arrangement, often referred to in technical manuals as the independent rear suspension (IRS) system. Unlike simpler twist-beam axles found in many competitors, this setup utilizes a variety of specialized arms to control wheel movement precisely. At the heart of the system is the trailing arm, a large longitudinal component that handles braking and acceleration forces. Attached to this trailing arm are three lateral links: the upper control arm (often called the “camber link”), the lower control arm (which serves as the spring carrier), and the toe link (the forward-most small arm).
The diagram illustrates how these components interact to maintain the tire’s contact patch during cornering. The coil springs sit nestled within the lower control arms, while the shock absorbers are mounted independently to the chassis and the trailing arm, allowing for easier replacement without disturbing the spring. You will also notice the anti-roll bar (stabilizer bar) which connects the two sides of the suspension via end links to reduce body roll. Many diagrams use a specific numbering system to differentiate between the various bolts and nuts, which is critical because different arms require specific hardware. For example, the eccentric bolts on the toe links are designed for alignment adjustments, and confusing them with standard bolts can lead to poor handling and rapid tire wear.
[DIAGRAM_PLACEHOLDER: A detailed exploded-view diagram of the Ford Focus MK2 Rear Suspension showing the trailing arm, upper/lower control arms, toe link, coil spring, shock absorber, and stabilizer bar with numerical labels for each component.]
The MK2 Focus rear suspension uses high-tensile steel for its control arms. When viewing the diagram, pay close attention to the orientation of the “Control Blade” trailing arm, as its thin, vertical profile is designed to provide lateral stiffness while remaining flexible longitudinally for better bump absorption.
Interpreting the ford focus mk2 rear suspension diagram and applying it to a physical repair requires a systematic approach. Follow these steps to ensure you are reading the visual data correctly and performing the work safely:
- Identify the Primary Components: Before going under the car, match the diagram’s labels to the physical parts. Locate the trailing arm, which is the largest piece running front-to-back. Identify the three lateral links (upper, lower, and toe) that connect the trailing arm to the rear subframe.
- Prepare the Vehicle and Tools: Secure the car on heavy-duty jack stands. You will need a comprehensive socket set (13mm to 18mm are common), a torque wrench, and potentially a coil spring compressor if you are removing the lower control arm. While the suspension is mechanical, keep an OBD-II scanner handy to clear any diagnostic code related to the ABS/ESC system if you accidentally disturb the wheel speed sensors.
- Analyze the Fasteners: The diagram will show specific torque spec requirements for each bolt. These are not suggestions; the multi-link system relies on precise tension to function. Most lateral link bolts require roughly 48Nm to 115Nm depending on their position.
- Manage the Spring Tension: The lower control arm acts as a bucket for the coil spring. When following the diagram to remove this arm, use a floor jack to support the arm’s weight before removing the outer bolt. This prevents the spring from “launching” out unexpectedly.
- Inspect Bushings and Joints: Use the diagram to locate every pivot point. Check for cracks in the rubber or oil leakage from the hydraulic bushings. The trailing arm front bush is a notorious failure point that often requires a specialized press tool for replacement.
- Reassembly and Loading: When reinstalling arms, do not perform the final tightening while the car is in the air. The diagram assumes the suspension is at “static ride height.” Lower the car onto its wheels or use a jack to compress the suspension before applying the final torque spec to prevent bushing pre-loading.
Never reuse the pinch bolts for the rear hub or the main trailing arm bolts if they appear corroded. These are often “stretch bolts” or have nylon locking threads that lose effectiveness after one use. Always refer to the diagram’s part numbers for high-grade replacements.
Even with a perfect diagram, the Focus MK2 rear suspension can present challenges. The most frequent issue is a “clunking” or “thumping” sound when driving over bumps. This is almost always caused by worn trailing arm bushings or degraded stabilizer bar end links. If the car feels “loose” in the rear or the steering feels disconnected, the toe links are likely the culprit.
Another common problem is uneven tire wear, specifically on the inner edges. This indicates that the camber or toe settings have drifted out of spec, likely due to sagging springs or worn control arm bushings. While the suspension itself won’t trigger a check engine light, a severely misaligned rear end can interfere with the Stability Control System. This might send a signal to the ECU, resulting in a traction control warning or a specific diagnostic code related to steering angle or wheel speed sensor correlations. If you see these warnings, the diagram helps you identify which link might be bent or which sensor wire might be pinched.
If you are struggling to remove seized bolts in the rear subframe, use a penetrating oil like PB Blaster 24 hours in advance. If the bolt is stuck in the metal sleeve of a bushing, you may need to use a reciprocating saw to cut the bolt, as excessive heat can damage the surrounding subframe.
To keep your Ford Focus MK2 handling like new, maintenance should be proactive rather than reactive. Always opt for high-quality polyurethane or heavy-duty rubber bushings when replacing factory units. While you are under the vehicle inspecting the suspension, take a moment to conduct a broader vehicle health check. Inspect the front of the engine for any signs of coolant flow leaks near the water pump or cracks in the accessory belt. Though the timing chain on these engines is generally robust, ensuring the chassis is vibration-free through proper suspension maintenance reduces stress on the entire powertrain.
- ✓ Alignment: Always perform a full four-wheel alignment after replacing any rear suspension component.
- ✓ Rust Prevention: The rear subframe is prone to surface rust; apply a wax-based undercoating to extend its life.
- ✓ Symmetric Replacement: Always replace components in pairs (both left and right sides) to maintain balanced handling.
- ✓ Hardware: Use copper grease on the shafts of the alignment bolts to prevent them from seizing in the future.
By utilizing the ford focus mk2 rear suspension diagram as your primary roadmap, you can demystify the complexities of the multi-link system. Whether you are chasing a mysterious clunk or performing a full overhaul to restore the car’s famous agility, understanding the relationship between the control blade and the lateral links is the key to success. Proper attention to torque specs and bushing health will ensure your Focus remains safe and enjoyable to drive for many years to come.
Step-by-Step Guide to Understanding the Ford Focus Mk2 Rear Suspension Diagram: Complete Guide
Identify – Start with identifying all parts on the Ford Focus Mk2 rear suspension diagram, specifically the trailing arms and coil springs.
Locate – Locate the mounting points on the subframe to ensure you have clear access to every critical bolt and bushing before starting.
Understand – Understand how the Control Blade system pivots to manage wheel travel while maintaining proper rear-wheel alignment during cornering and braking.
Apply – Apply the specific torque spec to each fastener during reassembly to prevent premature bushing wear or hardware failure under load.
Verify – Verify that the ABS sensors are correctly routed so the ECU does not trigger a check engine light or stability control fault.
Complete – Complete the job by performing a professional alignment to ensure the geometry matches the diagnostic code requirements for optimal tire life.
Frequently Asked Questions
Where is the rear suspension located?
The rear suspension is mounted to a dedicated subframe beneath the trunk floor. It consists of two trailing arms, two lower control arms, and two upper control arms. This layout, visible on any Ford Focus Mk2 rear suspension diagram, isolates road noise and improves cornering precision while supporting the vehicle’s rear weight.
What does the diagram show?
This diagram shows the ‘Control Blade’ multi-link architecture, detailing the relationship between the subframe, springs, dampers, and arms. It provides a visual roadmap for identifying every component, including the anti-roll bar and end links, making it easier to order the correct replacement parts for any suspension overhaul or repair.
How many control arms does the rear suspension have?
The MK2 rear suspension utilizes three main links per side: the large trailing arm, the lower ‘spring pan’ arm, and the upper camber link. Additionally, it connects to the anti-roll bar via end links. Each connection point requires a specific high-tensile bolt tightened to a precise torque spec for safety.
What are the symptoms of a bad suspension?
Symptoms include ‘rear-end steer,’ clunking over bumps, or uneven tire wear. While suspension faults rarely trigger a check engine light, a damaged ABS sensor wire during suspension work can send a diagnostic code to the ECU, which is easily readable via an OBD-II scanner to identify the specific wheel fault.
Can I replace this myself?
Replacing bushings or arms is feasible for experienced DIYers with a floor jack, stands, and a torque wrench. However, because this multi-link system is complex, refer to the Ford Focus Mk2 rear suspension diagram carefully. Note that a professional four-wheel alignment is mandatory after any major suspension work is finished.
What tools do I need for suspension repairs?
You will need a standard socket set, breaker bar, torque wrench, and likely a coil spring compressor. If a sensor is damaged during the process, an OBD-II tool helps clear a diagnostic code from the ECU. Always have a Ford Focus Mk2 rear suspension diagram on hand for reference.


