Diagram Ford 4.6 Timing Marks: Step-by-Step Instructions
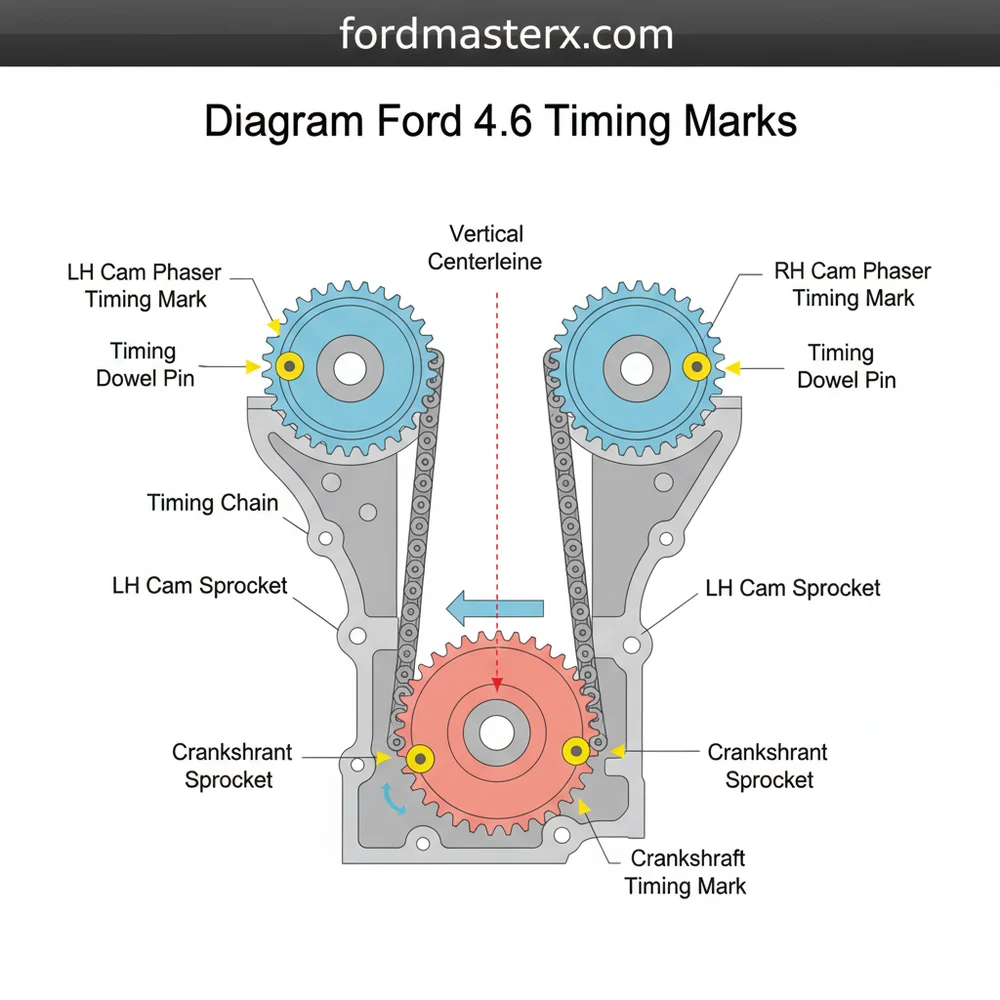
The Ford 4.6 timing marks align the crankshaft sprocket keyway at the 6 o’clock position while the camshaft sprocket marks face roughly 11 o’clock (driver) and 1 o’clock (passenger). Use the colored links on the timing chains to bridge these points, ensuring the engine configuration remains in perfect sync during assembly.
📌 Key Takeaways
- Main purpose of this diagram is to ensure valve-to-piston clearance through perfect synchronization.
- The crankshaft sprocket keyway is the most critical reference point for the entire structure.
- Always use the colored chain links as visual indicators to avoid common alignment errors.
- Rotate the engine by hand at least two full turns to verify the configuration before starting.
- Use this diagram whenever performing a timing chain replacement or major cylinder head work.
Setting up the valvetrain on a Ford Modular engine is a task that requires absolute precision and a clear understanding of the mechanical synchronization between the crankshaft and the camshafts. Whether you are performing a head gasket repair or a complete engine overhaul, having access to an accurate diagram ford 4.6 timing marks is essential for success. This comprehensive guide provides a detailed blueprint of the timing system, explaining the critical relationship between the primary and secondary chains, the tensioning components, and the specific alignment indicators used to ensure your engine runs smoothly. By the end of this article, you will understand how to interpret the schematic layout, identify every key component, and follow a systematic process to achieve perfect engine timing.
Understanding the Layout and Components of the 4.6 Timing System
The Ford 4.6L engine utilizes a complex timing configuration known as an Overhead Cam (OHC) system. Unlike traditional pushrod engines that use a short, simple chain, the 4.6L engine relies on long, winding chains that must navigate a series of guides and tensioners. The diagram ford 4.6 timing marks illustrates a system consisting of two separate timing chains: one for the passenger side (Bank 1) and one for the driver side (Bank 2). Each chain is driven by a sprocket on the crankshaft and connects to a larger sprocket or cam phaser on the end of each camshaft.
In a standard overview of this schematic, you will notice that the crankshaft sprocket features two distinct rows of teeth to accommodate both chains. The primary components shown in the layout include the timing chains, the hydraulic tensioners, the stationary guides, and the pivoting tensioner arms. Most modern diagrams use color-coding to help you identify the “timing links” on the chains—usually two dark or copper-colored links that align with specific dots or stamped marks on the sprockets. Depending on whether you have a 2-valve, 3-valve, or 4-valve configuration, the specific appearance of the cam sprockets may vary. For instance, the 3-valve variants utilize variable cam timing (VCT) phasers which have different marking structures than the fixed sprockets found on earlier 2-valve models. Understanding this structure is the first step in ensuring the mechanical integrity of the engine.
[DIAGRAM_PLACEHOLDER – A detailed technical schematic showing the Ford 4.6L front engine assembly. The diagram includes the crankshaft at the bottom center with a sprocket at the 6 o’clock position. Two timing chains loop upward to the left and right cylinder heads, wrapping around large camshaft sprockets. Marks are highlighted on the chain links and the gear teeth. Labels indicate: Left Chain, Right Chain, Tensioner Arms, Guides, and Crankshaft Keyway.]
The Ford 4.6L is an “interference” engine. This means that if the timing marks are not aligned correctly, the pistons can strike the valves, resulting in catastrophic internal engine damage. Always double-check your alignment before rotating the engine.
Step-by-Step Guide to Aligning Ford 4.6 Timing Marks
Interpreting a diagram ford 4.6 timing marks is one thing, but applying that knowledge to the physical engine requires a methodical approach. Follow these steps to ensure your timing is set correctly.
- ✓ Step 1: Prepare the Engine and Set TDC
- ✓ Step 2: Position the Crankshaft Sprocket
- ✓ Step 3: Align the Camshaft Sprockets
- ✓ Step 4: Install the Timing Chains
- ✓ Step 5: Install Guides and Tensioners
- ✓ Step 6: Verify the Marks and Rotate
1. Prepare the Engine and Set TDC
Before touching the chains, you must ensure the number one cylinder is at Top Dead Center (TDC) on the compression stroke. Remove the spark plugs to make the engine easier to turn by hand. Use a socket on the crankshaft bolt to rotate the engine clockwise until the piston reaches its highest point.
2. Position the Crankshaft Sprocket
Referencing your blueprint, locate the timing mark on the crankshaft sprocket. On the 4.6L engine, the crankshaft keyway should typically be at the 10:30 position, which places the actual timing dot on the sprocket at the 6 o’clock position. This is the “neutral” position for the crankshaft where the pistons are safely away from the valves during the initial setup.
3. Align the Camshaft Sprockets
The camshafts must be positioned according to the specific engine variant. For a 2-valve engine, the marks on the cam sprockets should generally point toward the top of the cylinder head, perpendicular to the valve cover mating surface. Use a camshaft holding tool if possible to prevent the cams from “jumping” or rotating due to valve spring pressure.
4. Install the Timing Chains
Examine your timing chains for the colored master links. Each chain has two marked links. Drape the first chain over the crankshaft sprocket, aligning one colored link with the dot at the 6 o’clock position. Pull the chain taut along the stationary guide side and align the second colored link with the timing mark on the corresponding camshaft sprocket. Repeat this process for the second chain.
When installing the chains, always keep the tension on the “fixed” side (the side without the tensioner arm). This ensures that when the tensioner is released, the marks remain perfectly aligned without any slack causing a misalignment.
5. Install Guides and Tensioners
Once the chains are draped and aligned, install the pivoting tensioner arms and the hydraulic tensioners. If you are using new tensioners, they will likely come with a retaining pin. Do not pull this pin until you are certain the chains are correctly seated on the guides and the marks are perfectly aligned with the dark links.
6. Verify the Marks and Rotate
This is the most critical step. Visually inspect the diagram ford 4.6 timing marks one last time and compare it to your engine. The marks on the crank should be at 6 o’clock, and the cam marks should be aligned with the colored links. Pull the tensioner pins. Finally, rotate the crankshaft two full revolutions by hand. If you feel any mechanical resistance, stop immediately—this indicates the timing is off and a piston is hitting a valve.
Never use an impact wrench to rotate the crankshaft during this process. Doing so can damage the delicate timing components or hide the “feel” of valve-to-piston contact, leading to hidden damage that only appears once the engine is started.
Common Issues and Troubleshooting

Even with a detailed schematic, problems can arise during or after the installation of a 4.6L timing system. The most frequent issue encountered is “chain rattle” or “slapping” noises upon startup. This is often caused by a failure in the hydraulic tensioner or worn-out plastic guides. Over time, the plastic guides can become brittle and break, allowing the chain to rub against the aluminum timing cover, producing metallic shavings that can clog the oil pickup tube.
Another common problem is the “Check Engine” light appearing with codes such as P0340 (Camshaft Position Sensor Circuit Malfunction) or P0011/P0012 (Timing Over-Advanced or Over-Retarded). These codes often indicate that the timing marks were off by even a single tooth during installation. If the engine idles roughly or lacks power, the diagram ford 4.6 timing marks likely wasn’t followed with 100% accuracy. If you notice heavy ticking from the front of the engine, it is vital to stop driving immediately to prevent a total chain failure.
Tips and Best Practices for a Professional Finish
To ensure longevity and performance, professional technicians follow several best practices when working with the Ford 4.6L timing system. First and foremost, always replace the timing components as a complete kit. Using a new chain with old, worn guides or tired tensioners is a recipe for premature failure. Look for high-quality kits that include high-strength guides and updated tensioner designs.
Cleanliness is paramount. Before reassembling the timing cover, ensure that all mating surfaces are perfectly clean and free of old RTV silicone. A small oil leak from the timing cover can be a massive headache to fix later. Additionally, use a small amount of assembly lube on the chain and sprockets to provide initial lubrication during the first few seconds of engine startup before oil pressure builds up.
Finally, consider the age of your oil pump. Since the timing cover is already removed, this is the perfect opportunity to inspect or replace the oil pump, as the 4.6L engine relies heavily on consistent oil pressure to keep the hydraulic timing tensioners functioning correctly. Investing in quality components and taking the time to verify your work against the diagram ford 4.6 timing marks will ensure your engine remains reliable for years to come. By following this structured overview and blueprint, you can confidently tackle this complex mechanical task and restore your Ford engine to peak operating condition.
Frequently Asked Questions
Where is the crankshaft timing mark located?
On the Ford 4.6L engine, the crankshaft timing mark is located on the sprocket face. For proper alignment, the keyway on the crankshaft should point to the 6 o’clock position. This ensures the bottom component of the timing system is correctly indexed before you begin installing the chains.
What does this timing diagram show?
The diagram illustrates the complete timing chain system configuration for the Ford 4.6L V8 engine. It highlights the specific alignment points for the crankshaft and both camshafts, showing exactly where the colored links on the chains must meet the marks on the gears for perfect engine synchronization.
How many timing chains does the Ford 4.6 have?
The Ford 4.6L Modular engine features two separate primary timing chains. Each chain connects the crankshaft to one of the two cylinder heads. Depending on the specific engine structure (2-valve, 3-valve, or 4-valve), the layout may also include secondary chains or variable cam timing phasers.
What are the symptoms of a bad Ford 4.6 timing?
Common symptoms include a rough idle, engine misfires, metallic rattling noises from the front cover, or a Check Engine Light. If the system layout is compromised by a stretched chain or broken guide, the engine may fail to start or suffer catastrophic internal damage due to valve contact.
Can I replace the timing chains myself?
While possible for experienced DIYers, replacing timing chains on a 4.6L engine is a complex task. It requires specific tools, such as camshaft holding brackets, and a deep understanding of the engine configuration. Precision is vital, as a single tooth off can lead to poor performance or failure.
What tools do I need for timing alignment?
You will need a basic socket set, a torque wrench, and specialized Ford timing tools. These include a crankshaft positioning tool and camshaft holding tools. Having a clear diagram Ford 4.6 timing marks is also essential to verify the structure and placement of every component during reassembly.


