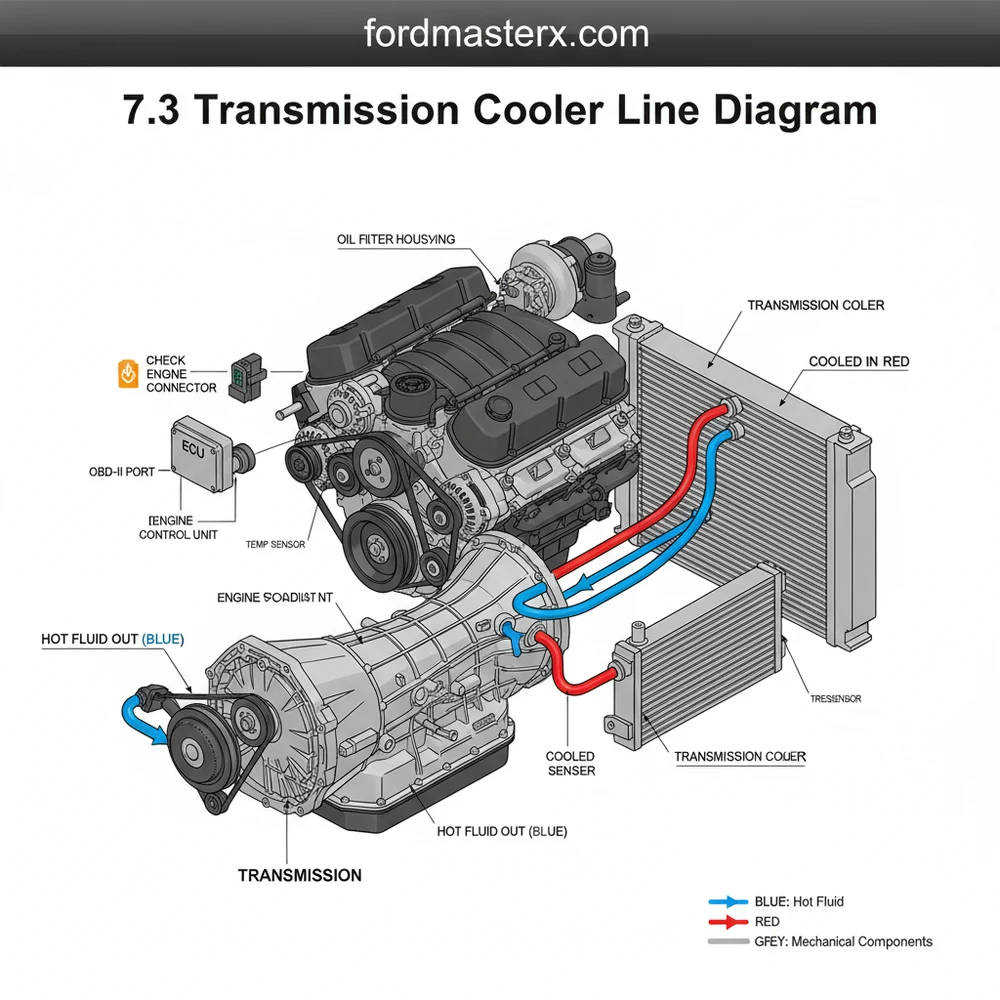
7.3 Transmission Cooler Line Diagram: Layout & Flow Guide
A 7.3 transmission cooler line diagram identifies the flow from the front transmission fitting (outflow) to the radiator and auxiliary cooler, then back to the rear fitting (return). Understanding this routing is essential for installing bypass kits or upgraded coolers to maintain proper operating temperatures and protect your transmission.
📌 Key Takeaways
- Identify flow direction between the front (hot) and rear (return) ports
- The radiator cooler and auxiliary cooler are primary cooling points
- Use flare nut wrenches to avoid stripping fragile line fittings
- Ensuring leak-free connections prevents low fluid levels and damage
- Use this when replacing lines or adding an external 6.0 cooler upgrade
The Ford 7.3L Powerstroke diesel is legendary for its durability, but its companion, the 4R100 automatic transmission, often requires a bit of extra care to match that longevity. One of the most critical systems for maintaining the health of this transmission is the cooling circuit. Understanding the 7.3 transmission cooler line diagram is essential for any DIY enthusiast looking to perform maintenance, repair leaks, or upgrade to a more efficient cooling system. Because heat is the primary killer of automatic transmissions, knowing exactly how fluid flows from the case to the coolers and back can save you thousands of dollars in rebuild costs.
In this guide, we will break down the plumbing of the 4R100 transmission cooling system found in 1999–2003 Ford Super Duty trucks. We will cover the specific flow directions, fitting sizes, and the common bypass valve assembly that often confuses owners during a repair. Whether you are replacing rusted hard lines or installing a larger 6.0L cooler upgrade, this detailed layout will provide the technical specifications you need to get the job done right.
Main Components and Features
The 7.3L transmission cooling system is comprised of several distinct parts that work together to pull heat away from the transmission fluid. For most stock configurations, the system uses a combination of rigid steel lines and flexible high-pressure rubber hoses. Here are the primary components you will encounter:
- The 4R100 Transmission Ports: There are two main ports located on the passenger side of the transmission case. The Front Port (closest to the engine) is the “Out” or pressure port. The Rear Port (closer to the tail shaft) is the “In” or return port.
- The Bypass Valve (The “Pork Chop”): Located on the passenger side of the transmission, this is a small manifold block where both the supply and return lines connect. It contains a spring-loaded ball valve designed to allow fluid to bypass the coolers if they are plugged or if the fluid is extremely cold and thick.
- In-Radiator Cooler: Most 7.3 models route the fluid through a heat exchanger located inside the bottom or side tank of the engine radiator. This helps warm the fluid in winter and provides initial cooling in summer.
- External Air-to-Oil (OTA) Cooler: Located behind the grille, this looks like a miniature radiator. In stock 7.3 trucks, this cooler is notoriously small (often only 9 to 13 rows).
- Line Measurements: The standard hard lines are 3/8-inch outer diameter. The fittings at the transmission case are typically 1/4-inch NPT (National Pipe Thread) which then transition to inverted flare or quick-connect fittings.
How to Use and Read the Cooler Line Diagram

Reading a 7.3 transmission cooler line diagram requires understanding the “loop.” The goal is to follow the fluid from the moment it leaves the hot torque converter until it returns to lubricate the rear gear set. Follow this routing sequence to trace your lines:
Step 1: The Exit (Front Port)
Hot fluid exits the 4R100 through the Front Port. It travels through a short section of hard line into the bypass valve assembly. From the bypass valve, the line runs forward along the passenger side of the engine oil pan, secured by brackets to prevent vibration damage.
Step 2: The Radiator Interface
The line continues toward the front of the vehicle and connects to the radiator. On most Super Duty models, the fluid enters the bottom fitting of the radiator’s internal cooler. It flows through the internal heat exchanger and exits through the top fitting. This “bottom-to-top” flow ensures that any air pockets are pushed out of the system naturally.
Step 3: The External Cooler
Once the fluid leaves the radiator, it travels via a rubber hose to the external Air-to-Oil (OTA) cooler mounted in front of the AC condenser. It enters one side of the cooler, passes through the cooling fins, and exits the other side. If you are upgrading to the popular 6.0L Powerstroke cooler, this is the point where you will use 1/2-inch to 3/8-inch adapters, as the 6.0L cooler uses larger fittings.
Step 4: The Return (Rear Port)
After being cooled by the air flowing through the grille, the fluid travels back toward the transmission. It passes through the bypass valve once more (on the return side) and enters the Rear Port of the transmission case. This cooled fluid is then used to lubricate the internal components and the rear bushing.
Tips for Working on 7.3 Cooler Lines
Working on transmission lines can be messy and frustrating due to tight spaces and stubborn fittings. Here are some practical tips for DIYers:
- The 6.0L Cooler Upgrade: If you tow frequently, the best modification you can make is replacing the stock 7.3 cooler with one from a 2003–2007 6.0L Powerstroke. The 6.0L cooler is massive (26 or 31 rows) compared to the 7.3 unit. You will need 1/2-inch to 3/8-inch barbed reducers to make the lines fit.
- Use Flare Nut Wrenches: The fittings on the transmission and radiator are made of relatively soft metal. Use a flare nut wrench (line wrench) to prevent rounding off the hex heads.
- Check for “The Rub”: A common failure point on the 7.3 is where the lines pass near the crossmember or the engine block. Vibration can cause the lines to rub against metal surfaces, eventually wearing a hole through the steel. Use rubber isolators or sections of split heater hose to protect these contact points.
- Double Clamp Rubber Hoses: If you are using rubber hoses and hose clamps, use high-quality constant-tension clamps or double-up on traditional worm-gear clamps. Ensure the hose is pushed at least one inch past the barb on the hard line.
- Bypass Valve Maintenance: If your transmission is running hot but the cooler is cold to the touch, the bypass valve may be stuck open. Many enthusiasts install a “bypass delete” kit, which forces 100% of the fluid through the coolers at all times. This is generally recommended for warmer climates or heavy towing.
Troubleshooting Common Issues
If you are experiencing transmission issues, your cooler lines and flow path are often the first place to look. Here is how to troubleshoot common 7.3 transmission cooling problems:
1. Identifying Leaks
The most common leak points are the quick-connect fittings at the radiator and the rubber-to-metal crimp joints. If you see red fluid (ATF) dripping near the front bumper, it is likely the cooler connections. If the leak is near the passenger side floorboard, check the bypass valve and the case fittings. Color Note: 7.3 transmission fluid should be bright red (Mercon V). If it is strawberry milkshake-colored, your internal radiator cooler has ruptured, mixing coolant with transmission fluid—this requires an immediate flush and a new radiator.
2. Overheating (Trans Temps above 220°F)
If your gauge shows high temperatures while towing, first verify that the external cooler isn’t clogged with bugs or road debris. Next, perform a “bucket test.” Disconnect the return line at the rear of the transmission and place it in a graduated bucket. Have an assistant start the truck for 15 seconds. You should see a vigorous flow (roughly 1 quart every 15-20 seconds). If it trickles, you have a restriction in the lines, a clogged cooler, or a failing pump.
3. Foaming Fluid on the Dipstick
Air entering the system can cause fluid to foam. This usually happens if a suction leak exists on the return line or if the fluid level is too low. Check all connections between the external cooler and the rear transmission port to ensure they are airtight.
4. Hard Shifting when Cold
If the bypass valve is deleted and you live in a sub-zero climate, the fluid may be too thick to flow properly through the coolers, causing high pressure and harsh shifts until the system warms up. In extremely cold regions, keeping the bypass valve functional is actually beneficial for the first few miles of driving.
By following this 7.3 transmission cooler line diagram and understanding the flow logic of the 4R100, you can ensure your truck remains capable of hauling heavy loads without the risk of heat-related failure. Regular inspection of the hard lines for rust and the rubber lines for brittleness is the best insurance policy for your drivetrain.
Step-by-Step Guide to Understanding the 7.3 Transmission Cooler Line Diagram: Layout & Flow Guide
Identify the supply (front) and return (rear) ports on the passenger side of the transmission.
Locate the lines running forward along the frame rail toward the radiator and auxiliary cooler.
Understand how the fluid enters the bottom of the radiator cooler and exits the top for maximum efficiency.
Connect the new lines, ensuring you use a flare nut wrench to meet the required torque spec.
Verify that there are no leaks while the engine is running and the fluid is circulating.
Complete the process by checking the fluid level and clearing any diagnostic code using an OBD-II scanner.
Frequently Asked Questions
Where are the transmission cooler ports located?
The transmission ports are located on the passenger side of the 4R100 case. The front port is the pressure/outflow port carrying hot fluid, while the rear port is the return/inlet port. Identifying these correctly is vital for proper fluid circulation through the radiator and external cooling units.
What does this transmission cooler diagram show?
This diagram illustrates the plumbing route for transmission fluid as it travels from the 7.3 Powerstroke’s 4R100 transmission to the radiator’s internal cooler and any auxiliary air-to-oil coolers. It maps out the specific flow direction, fitting types, and junction points within the cooling circuit.
What are the line specifications and connections?
The lines typically use 5/16 or 3/8 inch metal tubing with threaded flare fittings. When tightening these, following the correct torque spec is crucial to prevent case cracks. The system manages fluid temperature signals sent to the ECU, which can trigger a check engine light if overheating occurs.
What are the symptoms of a bad line or blockage?
Common symptoms include visible red fluid leaks, transmission slipping, or high operating temperatures. If a blockage occurs, the ECU may detect a fault, triggering a diagnostic code via the OBD-II port. A flashing tow/haul light or check engine light often indicates thermal issues related to poor flow.
Can I replace these transmission lines myself?
Yes, replacing lines is a common DIY task. You will need to drain some fluid, disconnect the lines at the transmission and coolers, and route new lines carefully to avoid moving parts. Using a 7.3 transmission cooler line diagram ensures you connect the supply and return ports correctly.
What tools do I need for this repair task?
You will need a set of flare nut wrenches, a drain pan, and a scan tool to monitor temperatures via the OBD-II port. If you have a check engine light, use the tool to clear any diagnostic code after the repair is completed. Always double-check connections for leaks after installation.


