6.0 Powerstroke Transmission Cooler Lines Diagram: Guide
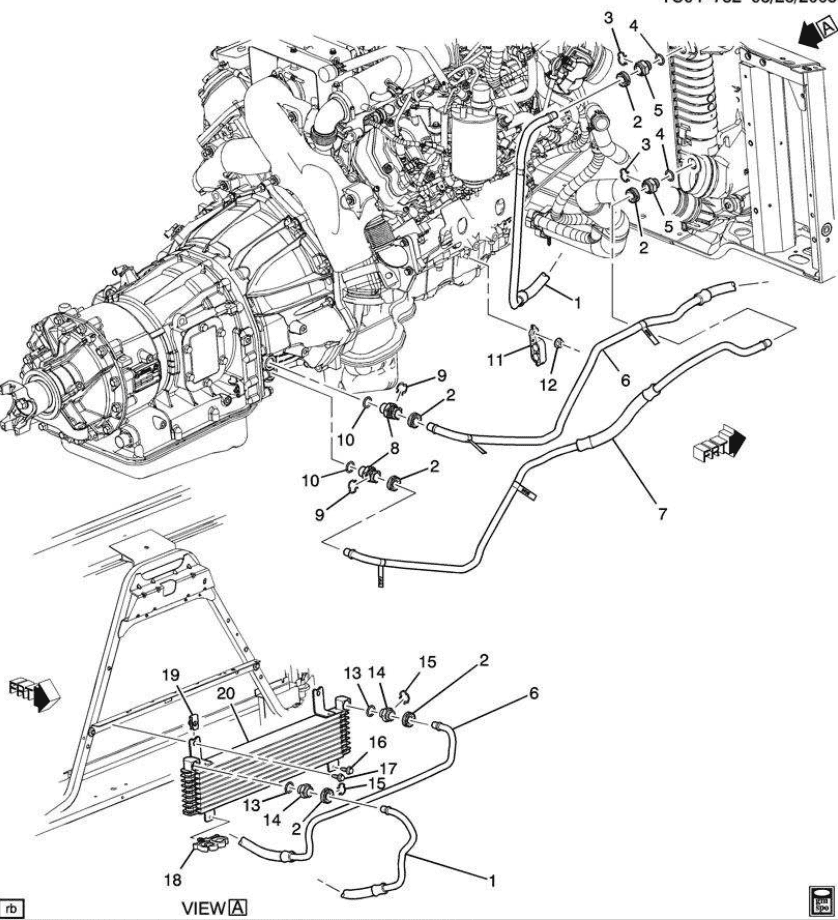
The 6.0 powerstroke transmission cooler lines diagram shows fluid exiting the front transmission port, traveling through the radiator’s internal tank, passing into the auxiliary air-to-oil cooler, and returning through the rear transmission port. This routing ensures the 5R110W transmission remains at stable temperatures under heavy towing or high-performance conditions.
📌 Key Takeaways
- Identifies the directional flow between the transmission and dual-cooler system
- The 5R110W front and rear ports are the most critical identification points
- Always use a backup wrench to prevent damaging the aluminum cooler fittings
- Proper routing prevents line rubbing, which often leads to catastrophic fluid loss
- Use this diagram when upgrading to the larger 6.4L cooler for better thermal efficiency
Maintaining a Ford Super Duty equipped with the 6.0L Powerstroke engine requires a precise understanding of its heavy-duty cooling systems, particularly the transmission circuit. If you are dealing with a persistent leak, performing a fluid flush, or upgrading your cooling capacity for towing, having a clear 6.0 powerstroke transmission cooler lines diagram is essential for success. This guide provides a detailed visual and technical breakdown of the 5R110W TorqShift transmission’s fluid path. You will learn how the fluid travels from the case through the external filter and coolers, ensuring your truck remains reliable even under the most demanding conditions. By the end of this article, you will be able to identify every fitting, hose, and routing path necessary for a professional-grade repair.

Technical Breakdown: The 5R110W Transmission Cooling Circuit
The 6.0 Powerstroke transmission cooling system is unique due to its multi-stage approach designed to protect the 5R110W transmission from extreme heat. The diagram illustrates a specific fluid path that must be followed to ensure the thermal bypass operates correctly. On the 5R110W transmission case, there are two main ports located on the passenger side. The “out” port, or the supply line, is the fitting located toward the front of the transmission case. The “return” port is situated toward the rear of the case.
The flow follows a highly specific sequence: first, the hot fluid exits the front port of the transmission and travels toward the passenger-side frame rail. Here, it passes through an external, serviceable “bypass” filter housing, often referred to by enthusiasts as the “toilet paper” filter due to its appearance. From this junction, the fluid moves forward to the bottom of the radiator (the internal heat exchanger). In this phase, the coolant flow within the radiator helps stabilize the transmission fluid temperature, either heating it up during cold starts or providing initial cooling during operation.
After exiting the radiator, the fluid enters the large air-to-oil cooler located behind the front grille. This secondary cooler is responsible for the majority of heat rejection. Finally, the cooled fluid exits the air-to-oil cooler and travels back through a dedicated return line to the rear fitting on the transmission case. Most diagrams use color-coding to distinguish these paths: red or orange for the high-temperature supply lines and blue or green for the cooled return lines. Understanding this loop is critical because improper routing or bypassing the external filter can lead to inadequate cooling or even catastrophic internal failure during high-load scenarios.
[DIAGRAM_PLACEHOLDER: 6.0 Powerstroke 5R110W Transmission Cooler Lines Routing Map showing Transmission Case, External Filter, Radiator Heat Exchanger, and Air-to-Oil Cooler]
The 6.0L Powerstroke utilizes 1/2-inch diameter lines for its transmission cooling system. This is a significant upgrade from the 3/8-inch lines found on earlier 7.3L models, allowing for much higher flow rates and better heat dissipation.
Step-by-Step Guide to Interpreting and Servicing the Lines
Using a 6.0 powerstroke transmission cooler lines diagram to service your vehicle requires a methodical approach. Whether you are replacing rusted steel lines or installing high-pressure rubber replacements, following the correct sequence is paramount for system integrity.
Recommended Tools and Materials
- ✓ 1/2-inch quick-disconnect tool (specifically for Ford transmission lines)
- ✓ 10mm, 13mm, and 15mm deep-well sockets
- ✓ Large drain pan and lint-free shop rags
- ✓ Replacement O-rings for the external filter housing
Installation and Identification Steps
- Identify the Supply Port: Locate the front fitting on the passenger side of the transmission. According to the diagram, this line carries the hottest fluid. Trace this line forward to the external bypass filter located near the passenger-side frame rail.
- Verify External Filter Orientation: Ensure the lines entering and exiting the external filter housing are not swapped. The housing has an internal bypass valve that opens if the filter becomes clogged; if the lines are reversed, this safety feature will not function.
- Trace to the Radiator: Follow the line from the filter to the lower fitting of the radiator. Use your quick-disconnect tool to release the spring clips. Be prepared for a small amount of fluid discharge.
- Inspect the Air-to-Oil Cooler Path: The line exiting the top of the radiator leads directly to the large auxiliary cooler situated in front of the AC condenser. Check the rubber sections of these hoses for dry rot or cracking.
- Confirm the Return Line: The exit from the auxiliary cooler must travel all the way back to the rear port on the transmission case. This is the “cold” side of the circuit.
- Clearance Check: As you route the lines, ensure they are secured in their factory plastic clips. Verify that no part of the line is in contact with the accessory belt or the sharp edges of the frame. Vibration can cause the lines to rub through, leading to a sudden loss of fluid.
- Final Torque and Connection: When threading adapters into the transmission case, always follow the specific torque spec of 18-22 lb-ft. Over-tightening can easily crack the aluminum transmission housing.
Never attempt to service transmission lines while the engine is hot. The fluid can reach temperatures exceeding 200°F and is under high pressure. Wait at least one hour after driving before disconnecting any fittings.
Common Issues and Troubleshooting

One of the most frequent problems reported by owners is a leak at the quick-connect fittings. These fittings utilize internal O-rings that flatten and fail over time. If you notice a red puddle under the front bumper, the 6.0 powerstroke transmission cooler lines diagram will help you determine if the leak is coming from the radiator interface or the air-to-oil cooler hoses.
Another common symptom of line issues is the appearance of a check engine light or a flashing “Tow/Haul” light on the dashboard. When this occurs, use an OBD-II scanner to pull any stored data. You may find a diagnostic code such as P0711 (Transmission Fluid Temperature Sensor Range/Performance). This code often points to a restriction in the cooler lines or a heavily clogged external filter, causing the fluid to overheat. If the ECU detects that the fluid is not cooling at the expected rate, it may put the vehicle into a “limp mode” to protect the internal clutches. If you see these codes, cross-reference your line routing with the diagram to ensure no lines are kinked and that the flow is moving through the coolers in the correct order.
Pro Tips and Best Practices
To maximize the life of your TorqShift transmission, consider these professional recommendations for maintenance and upgrades:
When replacing your external filter, always use a high-quality synthetic media filter. Standard “toilet paper” style filters can sometimes shed fibers if they become overly saturated, which can clog the fine passages in the transmission’s solenoid body.
- ✓ Fluid Choice: Only use Mercon SP or Mercon LV fluid. These are specifically formulated for the high-shear environment of the 5R110W.
- ✓ The “6.7 Cooler Upgrade”: Many 6.0 owners swap their factory air-to-oil cooler for the much larger version found in 6.7L Powerstroke trucks. If you do this, you will need 1/2-inch to 5/8-inch adapters, but the routing remains identical to the standard 6.0 powerstroke transmission cooler lines diagram.
- ✓ Secondary Inspections: While you are tracing lines near the front of the engine, take a moment to inspect the area around the timing chain cover and water pump. It is common for coolant leaks in this area to drip onto the transmission lines, causing external corrosion over time.
- ✓ Thermal Bypass: The 5R110W has an internal thermal bypass valve. If your lines are cool to the touch even when the transmission is under load, the bypass valve may be stuck, preventing fluid from ever reaching the coolers.
By following the 6.0 powerstroke transmission cooler lines diagram and adhering to these maintenance intervals, you can significantly extend the service life of your drivetrain. Proper fluid flow is the single most important factor in preventing transmission failure in heavy-duty trucks. Regularly check your fittings for dampness and ensure your external filter is replaced every 30,000 miles to keep your Powerstroke running cool and efficient.
Frequently Asked Questions
Where are the transmission cooler lines located?
The lines run along the passenger side of the engine block, connecting the transmission case to the lower radiator tank and the auxiliary cooler behind the grille. They are secured by several mounting brackets and use quick-disconnect fittings at the cooler ends and threaded fittings at the transmission housing.
What does the transmission cooler lines diagram show?
The diagram illustrates the specific routing of the supply and return lines for the 5R110W transmission. It identifies which port on the transmission sends hot fluid to the radiator and how the fluid circulates through the secondary external air-to-oil cooler before returning to the transmission case.
What are the connections for these cooler lines?
The 6.0 Powerstroke uses 1/2-inch lines with quick-disconnect fittings at the coolers and 1/4-inch NPT or flare fittings at the transmission case. When reinstalling, ensure you adhere to the specific torque spec for the transmission case fittings to prevent cracking the aluminum housing or causing high-pressure leaks.
What are the symptoms of bad transmission cooler lines?
Common symptoms include visible red fluid leaking under the truck, slipping gears, or an illuminated check engine light. If the ECU detects high fluid temperatures via the OBD-II port, it may trigger a diagnostic code like P0712 or P0713, indicating the transmission is overheating due to restricted flow.
Can I replace these cooler lines myself?
Yes, replacing these lines is a common DIY task for 6.0 Powerstroke owners. You will need a quick-disconnect tool for the cooler fittings and standard wrenches for the transmission side. It is a straightforward process, though reaching the fittings on the transmission case can be tight without extensions.
What tools do I need for this task?
You need a basic socket set, a line disconnect tool set, and a torque wrench. Additionally, keep an OBD-II scanner handy to clear any diagnostic code triggered by heat issues. Using a backup wrench on the cooler fittings is essential to avoid damaging the radiator or auxiliary cooler ports.


