2000 Ford Ranger Brake Line Diagram: Identification Guide
The 2000 Ford Ranger brake line diagram details the hydraulic routing from the master cylinder through the ABS unit to the front calipers and rear drum cylinders. It identifies the critical junctions and frame-mounted brackets, ensuring enthusiasts can safely replace corroded lines while maintaining proper fluid pressure and system integrity.
📌 Key Takeaways
- Visualizes the path from the master cylinder to all four wheels
- Identifies the ABS module and proportioning valve locations
- Ensures correct replacement of steel lines and rubber hoses
- Critical for bleeding air out of the hydraulic system correctly
- Essential reference when diagnosing soft pedals or fluid leaks
Navigating the hydraulic system of a compact pickup requires precision, especially when you are dealing with a 2000 Ford Ranger brake line diagram. Whether you are battling the effects of road salt corrosion or performing a routine performance upgrade, understanding the specific routing and connection points of your vehicle’s braking system is the first step toward a successful repair. This guide provides a comprehensive breakdown of the hydraulic pathways, from the master cylinder to the individual wheel cylinders and calipers. By mastering this diagram, you will learn how to identify critical components, choose the correct replacement materials, and ensure your Ranger maintains the stopping power necessary for safe operation on and off the road.
The 2000 Ford Ranger was produced with variations in its braking system depending on whether it featured Rear-Wheel ABS (RWAL) or Four-Wheel ABS (4WABS). Ensure you identify your specific ABS configuration before purchasing replacement lines, as the routing near the master cylinder and the number of ports on the ABS module will differ significantly.
Understanding the 2000 Ford Ranger Brake Line Diagram
The 2000 Ford Ranger brake line diagram serves as a blueprint for the vehicle’s hydraulic nervous system. At its core, the system begins at the master cylinder, which is mounted to the vacuum brake booster on the driver’s side firewall. The diagram typically illustrates two primary circuits: the primary circuit, which services the front wheels, and the secondary circuit, which directs fluid to the rear. This split-circuit design is a safety feature intended to ensure that if one line fails, the vehicle retains at least 50% of its braking capacity.
In the diagram, you will observe the lines exiting the master cylinder and entering a proportioning valve or an ABS hydraulic control unit. For Rangers equipped with 4-wheel ABS, the lines will route into a complex manifold where the ECU (Electronic Control Unit) monitors wheel speed sensors. If the ECU detects a skid, it modulates pressure through these specific lines. From the control unit, the lines are distributed along the frame rails. The front lines are relatively short, crossing the crossmember to reach the passenger side and dropping down to the driver’s side brake flex hoses. The rear line is a single long run that travels along the driver’s side frame rail, eventually meeting a T-junction at the rear axle.
Visualizing the 2000 Ford Ranger brake line diagram also involves identifying the transition from rigid steel or NiCopp (Nickel-Copper) hard lines to flexible rubber or braided stainless steel hoses. The hard lines are designed to withstand high pressure without expanding, while the flexible hoses allow for the movement of the suspension and steering components. The diagram highlights these “soft points” at each wheel, which are common failure areas due to dry rot or internal collapsing.
[DIAGRAM_PLACEHOLDER: 2000 Ford Ranger Brake Line Routing – Visualizing Master Cylinder to Proportioning Valve, Frame Rail Runs, and Rear Axle T-Junction]
Step-by-Step Guide to Reading and Replacing Brake Lines

Interpreting a 2000 Ford Ranger brake line diagram is one thing; applying that knowledge to a physical repair is another. To properly utilize the diagram during a replacement project, follow these systematic steps to ensure accuracy and safety.
1. Identify Your ABS Configuration: Before you touch a wrench, look under the hood. A large aluminum block with several metal lines exiting it indicates 4-wheel ABS. If you only see a small proportioning valve, you likely have rear-wheel ABS. Your diagram must match this configuration, as the line lengths and flare types (typically double flare or bubble flare) vary by model.
2. Locate the Source of the Leak: Use the diagram to trace the lines from the master cylinder downward. Common failure points on the 2000 Ranger include the area where the lines are clipped to the frame rail, as these clips trap moisture and road debris, leading to localized corrosion. If your pedal feels soft, you should also check for a diagnostic code using an OBD-II scanner, as some ABS-related hydraulic issues may trigger a warning light without a visible external leak.
3. Prepare Necessary Tools and Materials: Replacing brake lines requires specific tools to avoid stripping the soft metal fittings. You will need:
- ✓ Flare nut wrenches (10mm, 12mm, and 13mm are common)
- ✓ Tubing cutter and flaring tool (if custom-making lines)
- ✓ Penetrating oil (apply 24 hours in advance)
- ✓ Fresh DOT 3 brake fluid
4. Remove the Damaged Section: Once the vehicle is securely on jack stands, follow the diagram to disconnect the old line. Be prepared for fluid drainage; use a catch pan to prevent environmental contamination. If the fittings are seized, avoid using excessive force which could damage the threads on the ABS module or master cylinder.
5. Route the New Line: Use the 2000 Ford Ranger brake line diagram to replicate the factory bends. Bending the line correctly is vital to avoid “kinks” that can restrict fluid flow. Ensure the line is secured back into the plastic frame clips to prevent vibration, which can lead to metal fatigue over time.
6. Tighten to Specification: Thread the flare nuts by hand first to avoid cross-threading. Once snug, use your flare nut wrench to tighten them to the proper torque spec. Over-tightening can crush the flare and cause a leak, while under-tightening will result in a pressurized spray when you hit the brakes.
7. Bleed the System: This is the most critical step. Start at the wheel furthest from the master cylinder (usually the passenger rear) and work your way closer. Ensure the master cylinder reservoir never runs dry, as this will introduce air into the ABS module, often requiring a professional-grade scan tool to purge.
Brake fluid is highly corrosive and will damage your vehicle’s paint almost instantly. Always keep a damp rag and a bottle of water nearby to neutralize spills. Furthermore, never drive the vehicle until you have confirmed a “firm” brake pedal and checked all new connections for leaks under pressure.
Common Issues and Troubleshooting

Even with a 2000 Ford Ranger brake line diagram in hand, troubleshooting can be tricky. One frequent problem is a “spongy” pedal that persists even after bleeding. This often points to air trapped in the ABS hydraulic unit. Since the 2000 Ranger uses a specific OBD-II protocol for its braking system, you may need to check for a diagnostic code that indicates an internal valve failure within the ABS module.
Another common issue is the “check engine light” or ABS light illuminating after a line replacement. If the ECU detects a pressure imbalance between the front and rear circuits, it will disable the ABS system as a precaution. Furthermore, check the rear brake line “T” junction above the rear axle. This part is notorious for rusting out, and because it is hidden above the spare tire, it is often missed during visual inspections. If you notice a sudden drop in fluid levels but no leaks at the wheels, the diagram will direct you to this hidden junction along the rear crossmember.
Tips and Best Practices for Maintenance
When working on your 2000 Ford Ranger, it is wise to take a holistic approach to vehicle health. While you have the vehicle on jack stands and are consulting the brake line diagram, take the opportunity to perform a multi-point inspection. This is the perfect time to check the condition of your accessory belt for cracks or the coolant flow through your radiator hoses to ensure your engine stays within operating temperatures.
Switch to NiCopp (Nickel-Copper) tubing for your replacement lines. It is much easier to bend by hand than traditional steel, and it is virtually immune to salt corrosion, making it a “lifetime” fix for your Ranger.
To ensure long-term reliability, always use high-quality DOT 3 fluid and replace your flexible rubber hoses every 10 years, as they can swell internally and act as a one-way valve, causing brakes to drag. If you are performing high-mileage maintenance, consider that while brake lines are a priority, internal engine components like the timing chain also require attention to prevent catastrophic failure. Proper maintenance isn’t just about fixing what is broken; it is about utilizing every resource, including the 2000 Ford Ranger brake line diagram, to keep your vehicle in peak condition for years to come.
In conclusion, having a 2000 Ford Ranger brake line diagram is an essential resource for any DIY mechanic. It clarifies the complexities of the hydraulic system, ensures you are following the correct path for fluid distribution, and helps you troubleshoot issues related to the ECU and ABS sensors. By following the steps outlined above and adhering to safety protocols, you can confidently restore your truck’s braking performance and ensure your Ranger remains a reliable workhorse.
Frequently Asked Questions
Where is the ABS module located?
On the 2000 Ford Ranger, the ABS module is typically located on the driver-side frame rail or inside the engine bay near the fender. It receives hydraulic lines from the master cylinder and distributes them to the wheels. If malfunctioning, it may trigger a check engine light or ABS light.
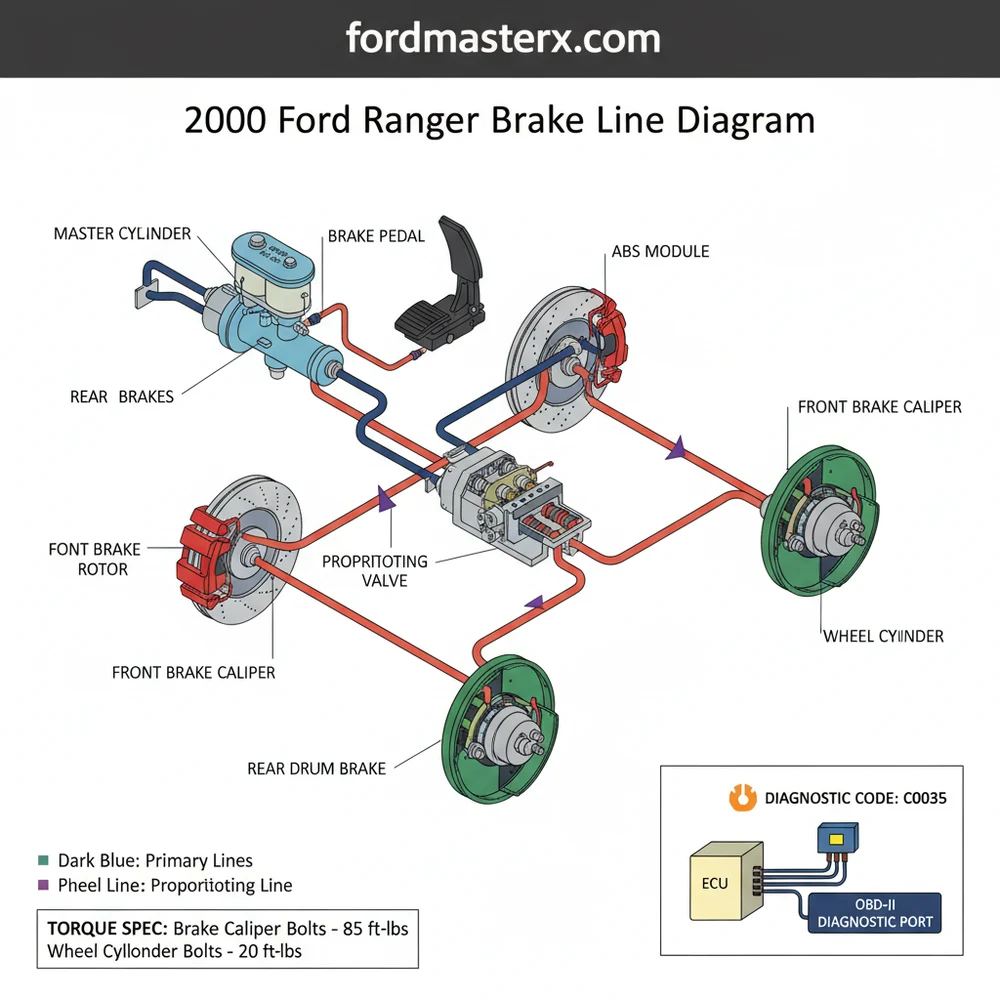
What does this brake line diagram show?
The diagram illustrates the complete routing of primary and secondary brake lines. It highlights the connections between the master cylinder, the ABS control unit, the front brake calipers, and the rear wheel cylinders, including the flexible hoses that allow for suspension movement and steering at the front wheels.
How many connections does the master cylinder have?
The master cylinder typically has two main threaded ports that connect to the primary and secondary brake circuits. These lines lead directly to the ABS module or a proportioning valve, which then splits the fluid pressure between the front disc brakes and the rear drum brakes for balanced stopping.
What are the symptoms of a bad brake line?
Common symptoms include a spongy brake pedal, visible fluid leaks under the chassis, or a low brake fluid warning. Corroded lines can burst under pressure. While a leak won’t trigger a specific OBD-II diagnostic code, a resulting low pressure can cause the ABS system to alert the ECU.
Can I replace brake lines myself?
Yes, DIY replacement is possible with a 2000 Ford Ranger brake line diagram and the right tools. You will need to flare steel lines accurately and ensure every fitting meets the required torque spec to prevent leaks. Always perform a full system bleed after opening any hydraulic connection.
What tools do I need for brake line repair?
You will need a set of flare nut wrenches to prevent stripping the fittings, a tube cutter, and a high-quality double-flaring tool. Additionally, have a vacuum bleeder or a second person to help bleed the air out, and a scan tool to clear any related ABS diagnostic code.


