PCV Valve Ford 4.2 Liter V6 Engine Diagram: Pro Guide
The PCV valve Ford 4.2 liter V6 engine diagram illustrates the valve located on the rear passenger-side valve cover. It connects to the upper intake manifold through a rubber or plastic hose. This setup allows the ECU to manage crankcase gases, preventing pressure buildup that can cause oil leaks or performance issues.
📌 Key Takeaways
- Identify the PCV valve’s location on the passenger side valve cover.
- Recognize the vacuum line routing to the intake manifold.
- Avoid vacuum leaks that trigger a check engine light.
- Ensure the grommet and hose are in good condition to maintain idle.
- Use this diagram for routing and component identification during maintenance.
Understanding your vehicle’s ventilation system is crucial for long-term engine health, especially when working with the robust Ford 4.2L V6 power plant. If you are searching for a precise pcv valve ford 4.2 liter v6 engine diagram, you have likely encountered issues like a rough idle, oil leaks, or an unexpected drop in fuel economy. This comprehensive guide provides a detailed visual and technical breakdown of the Positive Crankcase Ventilation (PCV) system. You will learn how to identify the valve’s location, interpret the vacuum routing, and execute a replacement that restores your engine’s performance and clears diagnostic trouble codes.
The PCV valve is a critical emissions component that recirculates “blow-by” gases from the crankcase back into the intake manifold to be burned off. On the Ford 4.2L V6, this system is a primary culprit for lean-run conditions and vacuum leaks.
Deep Dive into the PCV Valve Ford 4.2 Liter V6 Engine Diagram
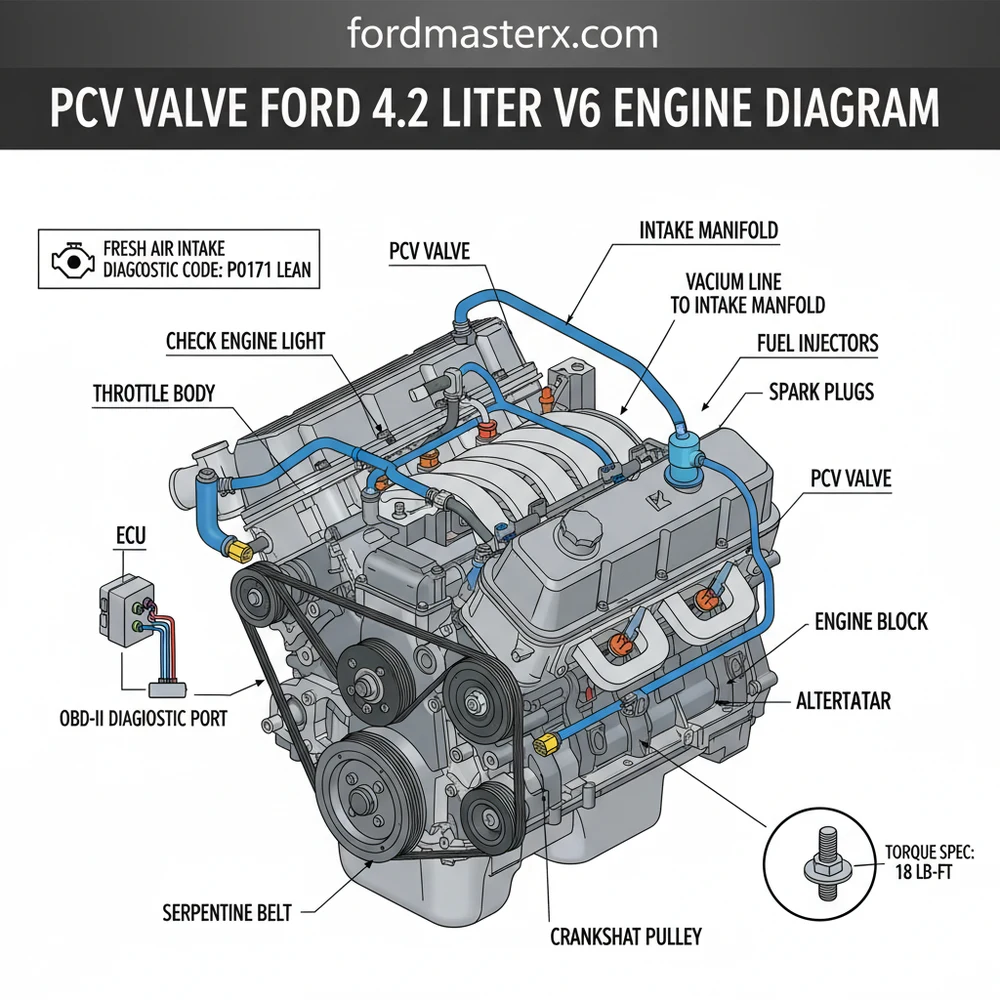
The Ford 4.2L V6 engine, often found in the F-150 and E-Series vans, utilizes a relatively straightforward but sensitive PCV layout. When viewing a pcv valve ford 4.2 liter v6 engine diagram, the first thing you will notice is the component’s specific placement. The PCV valve itself is located on the passenger-side valve cover (Bank 1), typically toward the rear of the engine bay near the firewall.
The diagram illustrates several key interconnecting parts. The valve sits inside a rubber grommet in the valve cover. From the top of the valve, a rigid plastic or reinforced rubber hose extends forward. On many 4.2L configurations, this hose includes a 90-degree rubber “elbow” that connects directly to the upper intake manifold plenum. This elbow is a frequent point of failure, often cracking or collapsing due to heat and oil exposure over time.
Beyond the valve itself, the diagram shows how the system interacts with the broader engine environment. You will see the proximity to the upper intake manifold and the fuel rail. In some specialized diagrams, you may also see the PCV heating element. Some Ford 4.2L engines use a heated PCV system where a small loop of the engine’s coolant flow passes near the valve to prevent moisture from freezing inside the line during extreme cold, which could lead to pressure buildup and blown seals.
Visualizing the diagram requires understanding the flow:
- ✓ The Crankcase Port: The entry point where gases exit the engine block through the valve cover.
- ✓ The PCV Valve: The one-way check valve that regulates gas flow based on engine vacuum.
- ✓ The Vacuum Line: The conduit that carries gases to the intake.
- ✓ The Intake Plenum Port: The final destination where gases mix with the air-fuel charge.
[DIAGRAM_PLACEHOLDER: A detailed 2D technical illustration showing the Ford 4.2L V6 engine from a top-down perspective. The passenger side valve cover is highlighted with a red circle around the PCV valve location. Blue arrows indicate the vacuum path from the valve cover to the center-rear of the intake manifold. Labels point to the PCV Valve, the Rubber Elbow, and the Intake Port connection.]
Step-by-Step Guide: Interpreting the Diagram and Replacing the Valve
Using a pcv valve ford 4.2 liter v6 engine diagram to perform maintenance is a great way to save on labor costs. The process is accessible for beginners but requires attention to detail to ensure no vacuum leaks are introduced during the swap.
Tools and Materials Needed:
- ✓ New PCV Valve (Motorcraft brand is highly recommended for Ford engines)
- ✓ Replacement rubber grommet (if the old one is brittle)
- ✓ Needle-nose pliers
- ✓ Shop rag and throttle body cleaner
Always ensure the engine is completely cool before reaching toward the back of the engine bay. The PCV valve is located near the EGR tube and exhaust manifold areas, which retain heat long after the engine is turned off.
Step 1: Locate the Valve via the Diagram
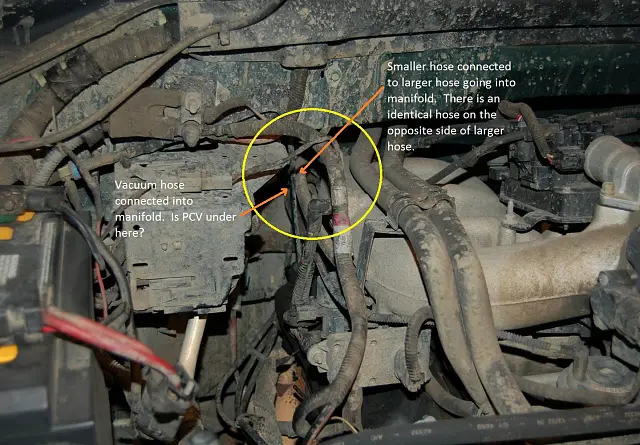
Refer to your diagram and find the passenger side valve cover. You may need to move the air intake assembly or plastic engine cover to get a clear view. Look for a thick black hose that disappears toward the back of the intake manifold.
Step 2: Disconnect the Vacuum Hose
Grasp the rubber elbow or hose connected to the top of the PCV valve. Gently twist and pull. If the hose is stuck, use needle-nose pliers to carefully break the seal without tearing the rubber. On the 4.2L V6, if the rubber feels “mushy” or extremely soft, it has been saturated with oil and must be replaced along with the valve.
Step 3: Remove the PCV Valve
The valve is held into the valve cover by the friction of the rubber grommet. Pull the valve straight up. In some 4.2L models, there may be a quarter-turn locking mechanism. If it doesn’t pull straight out, try a 90-degree counter-clockwise twist.
Step 4: Inspect the Grommet
Check the rubber seal remaining in the valve cover. If it is cracked or hard, it can allow unfiltered air into the engine or let oil mist escape. Use pliers to pull the old grommet out, being careful not to let any pieces fall into the valve train area.
Step 5: Install the New Components
Press the new grommet into the valve cover first. Then, slide the new PCV valve into the grommet until it seats firmly. Reattach the vacuum hose, ensuring the elbow is pushed all the way onto the valve’s stem.
Step 6: Verify Connections and Clear Codes
Check that no other hoses were bumped loose, such as the accessory belt sensors or coolant flow lines. If your check engine light was on, use an OBD-II scanner to clear the diagnostic code (commonly P0171 or P0174).
Common Issues & Troubleshooting
A malfunctioning PCV system on the Ford 4.2L engine is more than just a minor annoyance; it can trigger the ECU to adjust fuel trims incorrectly. When the PCV valve sticks open, it creates a massive vacuum leak. Because this air enters the engine without being measured by the Mass Air Flow (MAF) sensor, the engine runs “lean.”
Common symptoms of a failed PCV valve include:
- ✓ Whistling Noise: A high-pitched whistle at idle often indicates a cracked PCV elbow.
- ✓ Oil Consumption: A stuck-closed valve increases crankcase pressure, forcing oil past gaskets or the timing chain cover.
- ✓ OBD-II Codes: P0171 (Lean Bank 1) and P0174 (Lean Bank 2) are the most common indicators of PCV-related vacuum leaks.
If you replace the valve and the check engine light persists, use the diagram to trace the vacuum line all the way to the back of the intake manifold. The “hidden” side of the hose (where it connects to the plenum) is notorious for deteriorating where it is hard to see.
Pro Tips & Best Practices
To keep your Ford 4.2L V6 running smoothly, maintenance of the PCV system should be performed every 30,000 to 50,000 miles. While it is a small part, its impact on engine longevity is significant.
Perform the “Rattle Test.” Remove your old PCV valve and shake it. If you hear a clear metallic clicking/rattling sound, the internal pintle is moving. If it sounds muffled or makes no noise at all, it is clogged with sludge and must be replaced.
When installing related components, always respect the torque spec for any bolts you might have loosened, such as the intake plenum bolts (usually around 89-124 inch-pounds for this engine). Overtightening can crack the plastic manifold, leading to even more severe vacuum leaks than a faulty PCV valve would cause.
Lastly, always choose high-quality replacement parts. The ECU on the 4.2L V6 is finely tuned to the flow rates of the original Motorcraft PCV valve. Many aftermarket “universal” valves have different spring tensions, which can lead to erratic idling or persistent diagnostic code triggers even after replacement. Keeping the system clean also prevents oil vapor from coating the timing chain and internal components with excessive sludge, ensuring your Ford stays on the road for years to come.
By following this guide and utilizing the pcv valve ford 4.2 liter v6 engine diagram, you ensure your vehicle remains efficient, passes emissions testing, and maintains the internal pressure balance necessary for peak performance.
Frequently Asked Questions
Where is the PCV valve located?
The PCV valve is found on the passenger side valve cover, positioned toward the rear of the engine block near the firewall. Following the PCV valve Ford 4.2 liter V6 engine diagram, you will see it connects via a thick vacuum hose directly to the upper intake manifold port for gas recycling.
What does the PCV valve diagram show?
The PCV valve Ford 4.2 liter V6 engine diagram illustrates the flow of crankcase gases. It shows the valve, the rubber grommet, and the vacuum line routing from the valve cover to the intake plenum. This visualization helps identify potential vacuum leak points that disrupt engine air-fuel ratios.
How many connections does the PCV valve have?
This specific PCV valve typically features one primary vacuum connection to a hose. However, the system interacts with the ECU through sensors. The diagram shows a single outlet port on the valve that must be snugly fitted into the valve cover grommet to ensure the system remains pressurized correctly.
What are the symptoms of a bad PCV valve?
A failing PCV system often triggers a check engine light and a lean diagnostic code like P0171 or P0174. You may notice a rough idle, oil consumption, or whistling sounds. Using the PCV valve Ford 4.2 liter V6 engine diagram helps you find and inspect the hose for cracks.
Can I replace this valve myself?
Replacing the valve is a straightforward DIY task that takes about 15 minutes. By following the PCV valve Ford 4.2 liter V6 engine diagram, you can easily swap the part without specialized mechanical knowledge. It is one of the most cost-effective ways to maintain your Ford’s idle quality and efficiency.
What tools do I need for this task?
You generally need basic hand tools like needle-nose pliers to release hose clamps and a flathead screwdriver to gently pry the old valve from the grommet. While there is no heavy torque spec for the valve itself, ensure the hose clamps are tight enough to prevent any air leaks.


