How To Turn Off Emergency Brake Systems: A Technical Guide To Manual And Electronic Releases
Operating a vehicle safely requires more than just mastering the steering wheel; it demands total control over the braking systems designed to keep your car stationary. Whether you are navigating a steep incline or parking on a level surface, the secondary braking system—commonly known as the emergency or parking brake—is your final line of defense against unintended vehicle movement. However, drivers often find themselves struggling with a stuck lever, a stubborn pedal, or a confusing electronic button when trying to disengage the emergency brake. In this comprehensive guide, you will learn the precise technical steps to turn off any emergency brake system, understand the mechanics behind the release, and master troubleshooting techniques for seized components, ensuring you can explore the road with confidence and discover the nuances of your vehicle’s safety features.
Mastering the Center Console Manual Lever Release
📤 Share Image
The traditional center-console handbrake is an essential piece of automotive history that remains common in many modern sedans like the 2015 Honda Civic or Mazda 3. To effectively operate this system, one must first understand the mechanical ratchet system that holds the lever in place. When you pull the handle up, you are manually tensioning high-strength steel cables connected to the rear brake calipers or dedicated parking drums. A spring-loaded “pawl” drops into the teeth of a curved ratchet gear, locking the lever in its elevated position.
If the release button feels “frozen” or impossible to press, it is because the ratchet pawl is under extreme tension. Pull the lever upward slightly (about 1/4 inch) while pressing the button to “unseat” the pawl from the gear tooth.
Executing the “Lift and Press” technique is the professional standard for disengaging this system. Before attempting to lower the lever, ensure your foot is firmly on the primary brake pedal to prevent the vehicle from rolling. Mechanical handbrakes typically require 5 to 10 pounds of upward force to clear the ratchet teeth before the button can be successfully depressed. If the lever has been over-tightened or if the cables have stretched over time, you may encounter significant resistance. Once the button is depressed, maintain pressure and guide the lever all the way down to the floor. Finally, verify that the dashboard ‘Brake’ or ‘P’ indicator light extinguishes completely; a partially engaged lever can cause rapid friction material wear and excessive heat buildup.

📋
Step-by-Step: Manual Lever Release
Firmly plant your right foot on the main brake pedal. This is a critical safety interlock that prevents vehicle roll during the transition from parking brake to service brake.
Grip the lever handle. Pull it upward slightly while simultaneously pressing the thumb release button on the end of the handle.
Guide the lever down to its lowest rest position. Ensure the dash indicator light turns off before releasing the foot brake.
How to Release Foot-Pedal Emergency Brake Mechanisms
Foot-pedal systems are prevalent in nearly 65% of American-made full-size pickups manufactured between 2000 and 2020, such as the Chevrolet Silverado, as well as several luxury sedans like the Lexus LS. These systems are favored for their high leverage and for clearing up space in the center console. However, they can be confusing because there are two distinct ways to release them: “Push-to-Release” and “Hand-Release Lever” configurations.
In a Push-to-Release system, you must press the pedal further down toward the floor until you feel it “click” and then release your foot. An internal spring-back mechanism then returns the pedal to its upward resting position. Conversely, the Hand-Release style (common in older Ford and GM trucks) utilizes a T-handle or lever located on the lower-left dashboard panel. Pulling this lever releases the internal ratchet, often with a loud “thump” as the pedal springs back. If a pedal sticks near the floor, it is frequently due to pivot point corrosion; a beginner mistake is trying to pull the pedal up manually by hand, which can snap the return spring if the ratchet is still engaged.
When pulling a dash-mounted release lever, keep your leg clear of the pedal’s path. These pedals are under high spring tension and can snap back with enough force to cause minor injury or bruising to your shin.
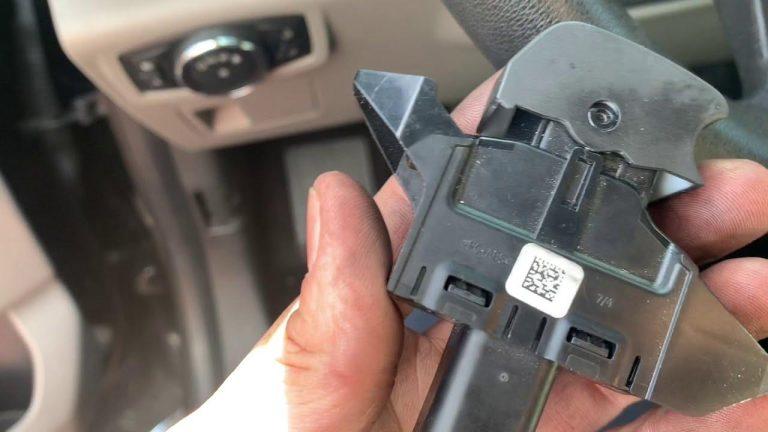
Navigating Electronic Parking Brake (EPB) Interface Controls
We have entered the era of the solenoid-driven Electronic Parking Brake (EPB). EPBs now appear in over 70% of new vehicles sold globally, replacing complex mechanical linkages with high-torque 12V DC actuators. While they are more convenient, they require a nuanced understanding of their logic. For example, in a Tesla Model 3 or Audi A4, you do not physically pull a cable; you send a digital signal to a computer that controls electric motors at the rear calipers.
To master the EPB, you must understand the role of the brake pedal interlock. Most systems will refuse to disengage unless the primary brake pedal is actively pressed. Furthermore, manufacturer standards vary wildly: BMW and Audi typically require you to push down on the toggle switch to release, while many Volkswagen and Mazda models require a pull up action to engage and a push to release. You should listen for the distinct auditory feedback—a low-pitched whirring sound—signifying that the rear actuators have retracted.
Auto-Release Feature
Most modern EPB systems will automatically release the brake when you engage a gear (Drive/Reverse), fasten your seatbelt, and apply slight pressure to the throttle.
Service Mode
EPBs require a specific “Service Mode” (accessible via the dashboard menu) to retract the pistons fully when replacing rear brake pads.
What happens during an electrical failure or dead battery? This is a common pitfall. In many vehicles, the EPB cannot be released without power. Professional technicians must either use a portable jump pack or, in extreme cases, manually unbolt the electric actuator from the caliper and retract the screw mechanism with a Torx bit. Always ensure your battery is in good health to avoid being stranded by an electronic lock.
Troubleshooting a Stuck Emergency Brake in Adverse Conditions
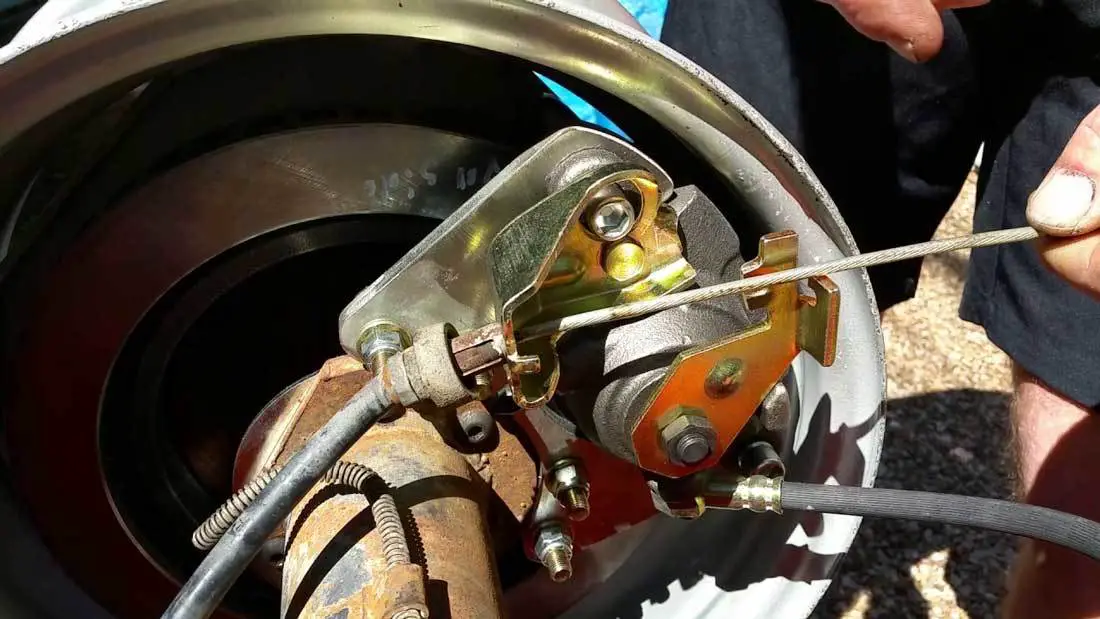
Mechanical failure is rarely convenient. In northern climates, approximately 12% of roadside assistance calls during winter months are attributed to frozen parking brake cables. When water enters the cable housing and freezes, it prevents the return spring from pulling the brake shoes away from the drum or rotor. If you find your brake stuck in sub-zero temperatures, avoid forcing the lever. Instead, if safe, try to warm the wheel areas or the undercarriage where the cables are exposed.
Another common issue is rust-jacking. In high-humidity coastal environments, or if a car is parked for 3 months without use, corrosion can “weld” the brake shoe to the drum. To break this bond, you can master the “Rocking Technique.” Start the engine and gently alternate between Drive and Reverse, applying light throttle. The shifting torque of the drivetrain can often break the friction bond and free the seized components.
Adverse Condition Statistics
Winter Roadside Calls Due to Frozen Cables
Threshold for Significant Rust-Jacking in Coastal Air
Thermal expansion is a professional-grade consideration. If you apply the parking brake immediately after heavy braking (such as descending a mountain pass), the heat causes the metal drums or rotors to expand. As they cool, they contract around the brake shoes, effectively clamping them in place. Practical insights suggest allowing your brakes to cool for a few minutes of level driving before engaging the parking brake after a high-heat event.
Safety Standards and Professional Maintenance for Brake Systems
A common misconception among drivers is that the “Parking Pawl” in an automatic transmission is a sufficient substitute for the emergency brake. This is incorrect. The parking pawl is a small metal pin that locks the transmission’s output shaft; it is not designed to hold the weight of the vehicle on a steep incline. The NHTSA recommends utilizing the parking brake every time a vehicle is parked to reduce the risk of ‘roll-away’ accidents, which cause thousands of injuries annually.
To ensure reliable operation, maintenance is essential. Mechanical cable systems follow a “use it or lose it” rule. Regular use prevents the cables from seizing within their sleeves. During routine service, a technician should lubricate the cable linkages and adjust the star wheel on drum-in-hat systems to ensure the lever travel remains within factory specifications. For manual transmission vehicles, mastering the “Hill-Start” transition is vital. By holding the emergency brake while finding the “bite point” of the clutch on a 15-degree incline, you prevent the vehicle from rolling back into traffic while transitioning to the throttle.
In conclusion, whether you are operating a manual lever, a foot-pedal, or a modern electronic interface, the key to turning off the emergency brake lies in understanding the mechanical or digital interlocks involved. Always prioritize safety by keeping your foot on the primary brake pedal during disengagement. By proactively maintaining your cables and understanding how to troubleshoot environmental seizures like ice or rust, you ensure that your vehicle remains both mobile and secure. Ensure your vehicle’s safety by testing your parking brake’s release tension today, and consult a certified technician if you notice persistent sticking, grinding noises, or dashboard warning lights that fail to extinguish.
Frequently Asked Questions
Why won’t my emergency brake release when I push the button?
If a manual lever button won’t depress, the ratchet pawl is likely under too much tension. Pull the lever upward firmly while pushing the button to relieve the pressure. If it still won’t move, the cable may be over-tightened or the internal spring mechanism may have failed, requiring mechanical inspection.
Can I drive a short distance with the emergency brake partially engaged?
Driving with the parking brake engaged, even partially, generates extreme heat through friction. This can glaze your brake pads, warp rotors, and boil brake fluid, leading to catastrophic brake failure. Always ensure the dashboard ‘Brake’ light is off before shifting into drive to maintain the integrity of your braking system.
How do I turn off an electronic parking brake with a dead battery?
Most vehicles with an electronic parking brake (EPB) require a jump-start to provide the 12V power needed for the actuator to retract. In total electrical failure, some models have a manual override screw located in the trunk or under the chassis, which requires a specific tool to manually wind back the brake caliper piston.
What does it mean if the brake light stays on after I release the handle?
A persistent brake light usually indicates one of three things: the handle isn’t fully seated in the ‘down’ position, the brake fluid level in the master cylinder is dangerously low, or the parking brake sensor switch is misaligned. Check your fluid levels immediately, as this is a critical safety warning for your entire hydraulic system.
Is it normal for the emergency brake to make a loud noise when releasing?
A single ‘clunk’ or ‘pop’ can be normal, especially if the vehicle was parked on an incline or in wet conditions where the pads may have slightly adhered to the rotors. However, grinding or high-pitched squealing during release suggests that the return springs are weak or the calipers are sticking due to debris buildup.