How To Replace Fuel Pump: Technical Steps For In-Tank And External System Maintenance
The precision of a vehicle’s fuel delivery system is the fundamental bridge between combustion and performance. In the high-pressure environment of modern Electronic Fuel Injection (EFI) systems, the fuel pump is not merely a delivery device; it is a critical component that must maintain specific pressure and volume parameters under varying engine loads. When a fuel pump begins to degrade, drivers experience debilitating symptoms ranging from intermittent stalling and loss of power under load to a complete no-start condition that leaves the vehicle stranded. In this comprehensive guide, you will learn how to accurately diagnose a failing fuel pump, understand the specialized tools required for the task, and master the step-by-step technical process of replacing the unit to restore factory-spec reliability.
Learn How to Diagnose a Failing Fuel Pump Before Component Removal

📤 Share Image
Before you begin the essential labor of dismantling your fuel system, a rigorous diagnostic phase is mandatory. Many technicians fall into the trap of “part cannon” repairs, replacing a fuel pump only to discover that the actual culprit was a $20 relay or a corroded ground wire. To master the diagnosis, you must utilize a professional-grade fuel pressure gauge. Connect this to the Schrader valve on the fuel rail to verify if the PSI meets manufacturer specifications. For most modern EFI systems, this range sits strictly between 35 and 60 PSI. A reading below this threshold indicates a pump that can no longer overcome the resistance of the pressure regulator or the demands of the injectors.
However, pressure is only half of the equation. You must also perform a fuel volume test. A pump might show adequate static pressure but fail to deliver the required milliliters per second under load. In my experience, a pump that delivers pressure but lacks volume will cause the engine to lean out and sputter during high-speed acceleration. Furthermore, conduct an electrical continuity and voltage drop test at the pump harness. If you aren’t seeing battery voltage (typically 12.6V or higher with the engine off) at the pump connector during the initial two-second prime, the issue likely resides in a faulty fuel pump relay, a blown fuse, or degraded wiring rather than the pump itself.
Be wary of a faulty Crankshaft Position Sensor (CKP). If the CKP fails, the Engine Control Module (ECM) will not receive a “RPM signal” and will consequently cut power to the fuel pump as a safety measure. This creates a “no-start” condition that perfectly mimics a dead pump, but no amount of pump replacement will fix it.
Listen for auditory symptoms. When the ignition is turned to the ‘on’ position, a healthy pump should emit a distinctive, low-frequency hum for approximately two seconds as it primes the system. A high-pitched whining noise often signals mechanical wear in the pump’s internal turbine, while total silence suggests an electrical open circuit or a seized motor. Industry standards indicate that while pumps are designed to last 100,000 miles, premature failure is common if the vehicle is consistently operated with less than 1/4 tank of gas. In these cases, the gasoline—which acts as a coolant for the pump motor—is insufficient, leading to rapid overheating and eventual seizure.
Understand Essential Tools and Safety Protocols for Fuel System Work
Working with gasoline requires a nuanced understanding of chemical safety. Gasoline vapors are not only highly flammable but are also heavier than air, meaning they will “pool” along the floor of your garage, searching for an ignition source like a pilot light or a dropped shop light. The flammable range of gasoline vapor in air is approximately 1.4% to 7.6% by volume, a window that is easily reached in poorly ventilated spaces. Therefore, implementing strict environmental safety is non-negotiable. Always work outdoors or in a shop with cross-ventilation, and keep a Class B fire extinguisher within immediate reach.
To explore the technical side of the repair safely, you must first execute the system depressurization procedure. This is done by pulling the fuel pump fuse while the engine is idling; let the vehicle run until it stalls, then crank it for an additional five seconds. This clears the residual 40+ PSI of line pressure that would otherwise spray fuel into your eyes upon line disconnection. Beyond safety, you need a specialized technical apparatus:
- Fuel line disconnect tool set: Necessary for the quick-connect fittings used on most modern supply and return lines.
- Non-sparking brass drift punch: Used to rotate the lock ring. Using a steel screwdriver can create a spark that ignites concentrated fuel vapors.
- Chemical-resistant nitrile gloves: To protect your skin from hydrocarbons and benzene.
- Professional-grade hoist or heavy-duty jack stands: If your vehicle requires “dropping the tank,” the fuel load must be siphoned to below 1/8 tank to prevent weight shifts and sloshing during the descent.
Never use a standard incandescent work light under a vehicle during fuel system service. If the bulb breaks or the light is dropped, the exposed filament will instantly ignite gasoline fumes. Use only LED or explosion-proof lighting.

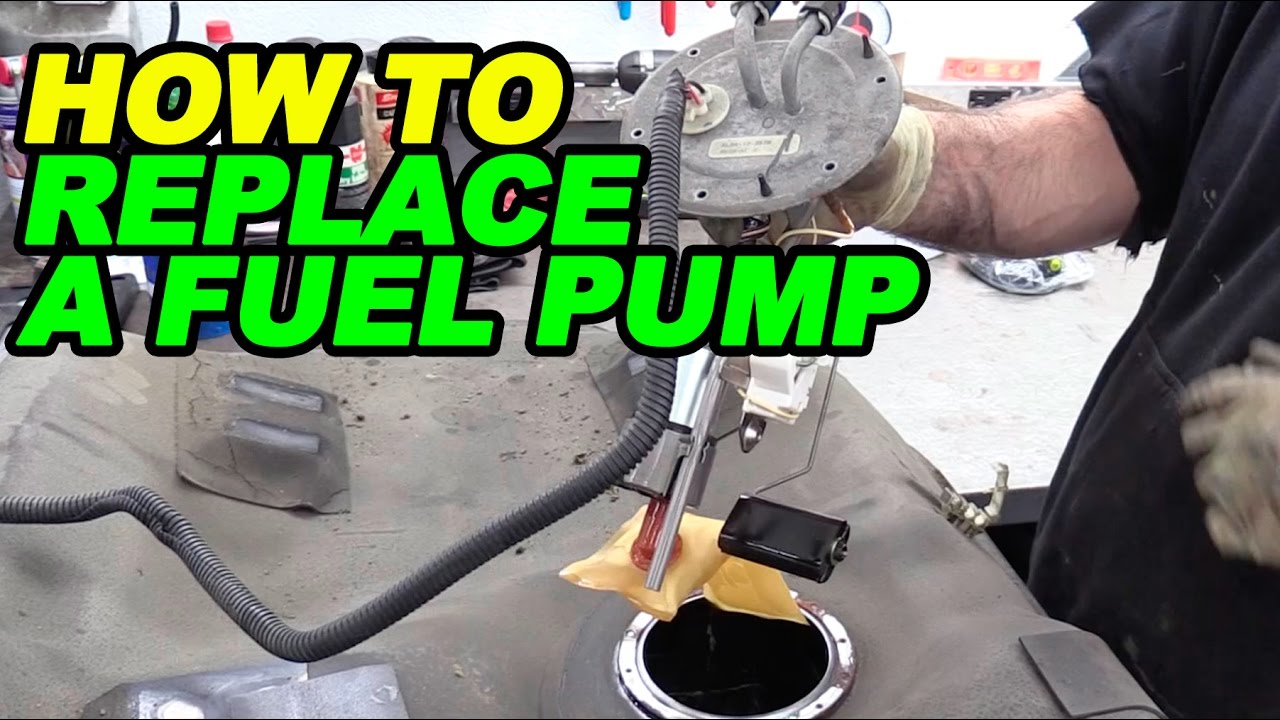
Master the Mechanical Process of Removing the Defective Fuel Pump Assembly
The extraction process varies significantly by vehicle architecture. For many sedans and SUVs, you will discover an access panel located directly beneath the rear passenger seat cushion. This is the ideal scenario for a beginner or a DIY enthusiast as it avoids the complexity of lowering the fuel tank. However, many pickup trucks and older vehicles require the removal of the tank straps and the disconnection of the filler neck and Evaporative Emission (EVAP) lines to access the pump module.
📋
Step-by-Step Removal Guide
Clean the area surrounding the fuel pump module thoroughly using compressed air and a brush. If dirt or rust falls into the tank during removal, it will clog the new pump’s intake “sock” and cause premature failure within weeks.
Disconnect the electrical harness and the quick-connect lines. Pay close attention to the orientation of the supply, return, and vapor lines. In salt-belt regions, these fittings are often seized; apply penetrating oil and use a specialized release tool to avoid snapping the plastic nipples on the module.
Rotate the locking ring counter-clockwise. Use a brass drift punch or a dedicated lock ring wrench. Once the ring is free, the pump module—which is spring-loaded to sit on the floor of the tank—will likely pop up slightly.
As you extract the module, you must be exceptionally mindful of the delicate fuel level sending unit float arm. Tilting the module as you lift it prevents the arm from snagging on the tank opening or internal baffles. If you bend this arm even slightly, your fuel gauge will read incorrectly for the remainder of the vehicle’s life. In many modern vehicles, the fuel pump is a “modular” design, meaning it contains the pump, the filter, the regulator, and the sending unit in one housing. If you are only replacing the pump “insert,” ensure the internal O-rings are lubricated with a dab of clean engine oil to prevent them from tearing during assembly.
Discover the Professional Methodology for New Pump Installation and Priming
The professional installation of a fuel pump is won or lost at the O-ring. A single pinched O-ring is the leading cause of post-replacement fuel odors and P0440-series EVAP system failure codes. Before placing the new module into the tank, inspect the seat for any debris. Install a new tank seal (O-ring) into the groove, ensuring it is not twisted or rolled. Understand that the fuel tank environment is harsh; even a microscopic gap will trigger a “Check Engine” light once the system performs its vacuum self-test.
Align the new fuel pump module with the tank’s indexing marks—usually a small arrow on the pump and a corresponding notch on the tank. Proper indexing ensures that the float arm has a clear path of travel and that the internal baffles don’t obstruct the pump’s intake. Press the module down firmly, compressing the internal springs, and reinstall the locking ring. Reconnect all lines until you hear an audible ‘click’ from the retainers. This sound is your confirmation that the high-pressure lines are locked and will not blow off once the engine is started.
The Priming Sequence
Cycles of Ignition
Duration per Prime
Do not attempt to crank the engine immediately. The fuel lines are currently filled with air. Perform the priming sequence by cycling the ignition key from ‘off’ to ‘run’ (not ‘start’) at least five times. This forces the pump to run its two-second prime cycle repeatedly, pushing fuel from the tank to the rail and purging the air back through the return line. After the fifth cycle, inspect all connections for leaks while the system is under pressure but before the engine is running. Once confirmed dry, proceed to start the vehicle.
Explore Post-Installation Testing and Long-Term System Maintenance
A successful repair is not complete until it is verified through data. Use an OBD-II scanner to monitor Short Term Fuel Trims (STFT) and Long Term Fuel Trims (LTFT). Ideally, these values should fluctuate between -5% and +5%. If the LTFT is showing high positive values (e.g., +15%), the engine is still running lean, suggesting that the new pump may not be receiving full voltage or there is a restriction elsewhere in the system. Reset the Engine Control Module (ECM) to clear any “Lean Condition” codes (P0171/P0174) and allow the computer to relearn the fuel map with the healthy pump.
Maintenance: Filter Discipline
If your vehicle has an external fuel filter, replace it every 30,000 miles. A clogged filter forces the pump to work harder, increasing its internal temperature and reducing its lifespan.
Ethanol Awareness
Ethanol-blended fuels (E10/E85) are hygroscopic and attract water. If the vehicle sits for extended periods, this moisture can cause internal corrosion in the new pump’s turbine.
Finally, adopt high-quality maintenance habits. Inspect the fuel tank filler neck seal and the gas cap for integrity. A faulty gas cap is a primary entry point for moisture and contaminants that can damage the internal components of your new pump. Furthermore, perform a “Live Data” scan during a Wide-Open Throttle (WOT) acceleration test; a healthy pump will maintain consistent pressure even under the highest fuel demand scenarios. By following these comprehensive steps, you ensure that your fuel system remains reliable for the next 100,000 miles of operation.
Accurate diagnosis through pressure and volume testing prevents unnecessary part replacement, while adhering to strict safety protocols, including system depressurization and the use of non-sparking tools, is mandatory for a successful repair. Precision in seating O-rings and indexing the pump module ensures the long-term integrity of the EVAP system and fuel level accuracy. Ensure your vehicle’s longevity by performing a final pressure check and monitoring fuel trim data for the first 50 miles of operation following the replacement to verify peak efficiency.
Frequently Asked Questions
How do I know if the fuel pump or the fuel pump relay is bad?
To differentiate between the two, check for 12-volt power at the fuel pump connector using a multimeter while a helper cycles the ignition. If power is present but the pump does not prime, the pump has failed. If no power is present, the issue lies in the relay, fuse, or wiring harness.
Can I replace just the fuel pump motor instead of the whole assembly?
While some aftermarket kits allow for motor-only replacement, it is professionally recommended to replace the entire module. The assembly includes the fuel strainer, internal filter, pressure regulator, and level sending unit, all of which are subject to wear and can cause subsequent failures if not refreshed simultaneously.
Do I always have to drop the fuel tank to replace the pump?
Not necessarily. Many modern sedans and SUVs feature an access panel located beneath the rear seat or trunk carpet. Consult your service manual to determine if your vehicle allows for ‘top-side’ access, which significantly reduces the labor time and complexity of the replacement procedure compared to dropping the tank.
Why did my new fuel pump fail shortly after installation?
Premature failure is often caused by debris left in the fuel tank from the previous pump or contaminated fuel. If the tank was not thoroughly cleaned during the replacement, particulates can quickly clog the new strainer or damage the internal turbine. Electrical issues, such as a high-resistance ground, can also cause the motor to overheat.
Is it necessary to replace the fuel filter when replacing the pump?
If your vehicle is equipped with an external, inline fuel filter, it must be replaced concurrently with the pump. A clogged filter increases backpressure, forcing the new pump to work harder and significantly shortening its lifespan. For vehicles with internal ‘lifetime’ filters, the filter is replaced as part of the new module assembly.