Critical Emergency Guide: How to Open a Ford F-250 Hood from the Outside (1999–2026)
The mechanical failure of a hood latch system on a Ford F-250 Super Duty represents a significant operational disruption, effectively quarantining the engine bay from essential maintenance and emergency servicing. Whether triggered by a snapped Bowden cable, a corroded latch assembly, or the degradation of interior release polymers, this failure mode is a pervasive issue affecting millions of trucks across the Super Duty lineage. This comprehensive research report provides an exhaustive technical analysis of the F-250 hood latch mechanism, detailing its evolution through four distinct generations of truck architecture.
We provide authoritative, step-by-step protocols for non-destructive emergency entry from the vehicle exterior, analyze the complexities introduced by modern Active Grille Shutters (AGS), and offer definitive repair strategies. This document serves as the ultimate resource for owners, fleet operators, and technicians facing the “stuck hood” scenario, synthesizing mechanical engineering principles with field-tested bypass techniques.
The Criticality of Engine Bay Access in Heavy-Duty Operations
The ability to access the engine compartment is the fundamental prerequisite for vehicle maintenance. For the Ford F-250 Super Duty—a vehicle platform synonymous with heavy towing, commercial hauling, and agricultural application—the engine bay is a high-traffic zone. Operators frequently access this space to check critical fluids (oil, coolant, transmission fluid), inspect belt drive systems, and, most crucially, jump-start batteries during cold-weather failures. When the hood latch mechanism fails, it transforms a minor maintenance task into a disabling condition that can strand a vehicle and its payload.
The user query “how to open ford f250 hood from outside” reflects a widespread mechanical vulnerability in the interface between the driver and the primary latch. This is not merely a nuisance; it is a safety hazard. If a battery dies and the hood cannot be opened, the vehicle is immobilized. If an engine fire occurs or an overheat condition manifests, the inability to access the source can be catastrophic. Furthermore, the latch system is a federally mandated safety device governed by Federal Motor Vehicle Safety Standard (FMVSS) No. 113, which requires a dual-stage locking mechanism to prevent accidental opening during vehicle operation.
This report addresses the full spectrum of hood latch failures, moving beyond simple troubleshooting to a deep forensic analysis of why these components fail and how to circumvent them without causing hundreds of dollars in cosmetic damage to the grille or bodywork. We will explore the specific geometry of the latching mechanisms across the diverse model years—from the 7.3L Power Stroke “OBS” era to the modern 6.7L “Alumiduty”—and provide actionable, data-driven solutions for gaining entry.
The Anatomy of Failure: Why F-250 Latches Jam
To defeat a lock, one must understand its architecture. The Ford F-250 hood latch is not a single component but a system comprised of three distinct elements, each with its own failure horizon:
- The Interior Release Handle: Typically located on the driver’s side kick panel or under the instrument cluster, this is a plastic lever subject to brittle fracture and UV degradation.
- The Bowden Cable Assembly: This is the transmission line of the system, consisting of a braided steel inner core sliding within a friction-reducing outer sheath. It is prone to stretching, snapping due to tensile fatigue, or seizing due to moisture intrusion.
- The Latch Assembly (The Lock): Mounted to the radiator core support, this mechanical claw captures the hood striker. It sits at the leading edge of the vehicle, directly exposed to road spray, salt brine, and thermal cycling, making it a prime candidate for corrosion seizure.
Evolutionary Engineering: F-Series Front-End Architecture (1999–2024)
The strategy for opening a stuck hood is dictated entirely by the physical architecture of the truck’s front end. Ford has redesigned the Super Duty multiple times, and with each generation, the grille has become larger, the cooling stack more complex, and the security shielding more robust. We must categorize the vehicle in question to determine the viable entry vectors.
Generation I: The Steel Era (1999–2007)
The first-generation Super Duty, introduced in 1999 to replace the older F-250/F-350 lines, established the modern heavy-duty truck template. These trucks are characterized by a distinct separation between the grille and the bumper, and a relatively open grille mesh design, particularly on XL and XLT trims.
- Latch Access: High. The latch is visible through the grille mesh or accessible from below the bumper.
- Security: Low. The gap between the hood and the grille header often allows for direct tool insertion.
- Common Engines: 7.3L Power Stroke, 6.0L Power Stroke, 5.4L Triton V8, 6.8L V10.
Generation II: The Bold Facelift (2008–2010)
This generation introduced a much larger, “blockier” grille with massive horizontal chrome bars. The “Super Duty” script was embossed directly into the upper grille surround.
- Latch Access: Moderate. The horizontal bars are thicker, reducing the gaps for tool insertion.
- Changes: The latch mounting points were revised, and the headlight assemblies became larger, complicating the “wheel well” access route.
Generation III: The C-Clamp Era (2011–2016)
Marked by the introduction of the 6.7L “Scorpion” diesel engine, this generation features a prominent “C-clamp” grille design. The cooling requirements of the new diesel engine led to tighter packaging of the radiator and intercooler stack.
- Latch Access: Difficult. Rubber dust shields and air deflectors were added to direct airflow, inadvertently blocking the line of sight to the latch.
- Key Challenge: The cable routing was lengthened, increasing the likelihood of stretch.
Generation IV: The Alumiduty & Aerodynamics (2017–2022)
The most radical shift occurred in 2017 with the switch to a high-strength, military-grade aluminum alloy body. While lighter, this body required different panel gap tolerances. More critically, Ford introduced Active Grille Shutters (AGS) on many trims to improve fuel economy.
- Latch Access: Very Difficult. The AGS system places a physical wall of motorized plastic louvers between the exterior world and the radiator support.
- Security: High. The integrated hood-ajar switch in the latch assembly is tied into the vehicle security system, meaning forced entry often triggers the alarm.
Generation V: The Connected Truck (2023–Present)
The newest generation continues the aluminum construction but integrates even more sensors (cameras, radar) into the grille area.
- Latch Access: Restricted. Care must be taken not to damage expensive ADAS (Advanced Driver Assistance Systems) sensors while probing for the latch.
Table 1: Ford F-250 Latch Assembly Specifications by Generation
| Generation | Model Years | OEM Latch Part Number | Key Features | Replacement Difficulty |
| Gen I | 1999–2007 | 4C3Z-16700-AA | Basic mechanical release. | Low |
| Gen II | 2008–2010 | 8C3Z-16700-A | Revised mounting geometry. | Low |
| Gen III | 2011–2016 | BC3Z-16700-A | Enhanced corrosion coating. | Moderate |
| Gen IV | 2017–2022 | HC3Z-16700-F | Integrated remote start/alarm switch. | Moderate |
| Gen V | 2023+ | PC3Z-16700-A | Integrated sensor suite compatibility. | High |
Diagnostic Triage: Determining the Failure Mode
Before attempting to “break in” to the engine bay, a systematic diagnosis is required. The tactile feedback from the release handle provides critical data about the state of the mechanism.
The “Loose Handle” Phenomenon
If the interior release handle moves freely with zero resistance (it feels “floppy” or disconnect), the diagnosis is almost certainly a broken cable or a detached cable stop.
- Scenario A: Handle Failure. The cable is intact, but the plastic retaining clip on the back of the handle has snapped. This is common in cold weather.
- Scenario B: Cable Snap. The steel inner core of the cable has snapped, usually at the latch end where corrosion weakens the metal strands.
The “Stuck Handle” Phenomenon
If the handle is rigid and will not move, or moves only slightly before hitting a hard stop, the issue is likely mechanical seizure or cable freeze.
- Scenario A: Frozen Latch. Rust and road grime have cemented the latch pivot points. The spring cannot overcome the friction.
- Scenario B: Ice Blockage. In winter, water can enter the cable sheath and freeze, locking the inner wire to the outer sheath.
The “Partial Pop” Phenomenon
If pulling the handle produces a “clunk” sound but the hood does not pop up to the safety catch height, the issue is often hood bumper misalignment or a weak pop-up spring. The latch has released, but the hood is stuck down due to friction or suction.
Non-Destructive Entry Methods: The First Line of Defense
Before employing tools that might scratch the paint or damage the grille, several non-invasive techniques should be attempted. These rely on physics—specifically, vibration and pressure modulation—to free a sticky mechanism.
The “Helper” Technique (Two-Person Method)
This method is highly effective for latches that are seized or cables that are stretched but not broken. It requires two people.
- Person 1 (Inside): Pulls the hood release handle and holds it in the fully open position. If the handle is broken, use pliers to pull the bare cable core.
- Person 2 (Outside): Stands at the front of the truck, directly centered over the grille.
- The Action: Person 2 applies firm downward pressure on the leading edge of the hood, directly above the latch.
- The Physics: Pressing down relieves the tension on the striker bar. If the latch pawl is binding against the striker due to friction, removing the load allows the pawl to retract.
- The Release: While pressing down, Person 2 should suddenly lift up. Alternatively, delivering open-palm strikes (percussive maintenance) to the hood edge while the cable is pulled can jar a rusty spring loose.
The “Fonzie” Bump
Named after the character who fixed jukeboxes with a hit, this involves pulling the release handle (or clamping it open) and then firmly banging on the center of the hood with a closed fist (carefully) or open palm. The vibration can disturb the rust bond holding the latch pawl.
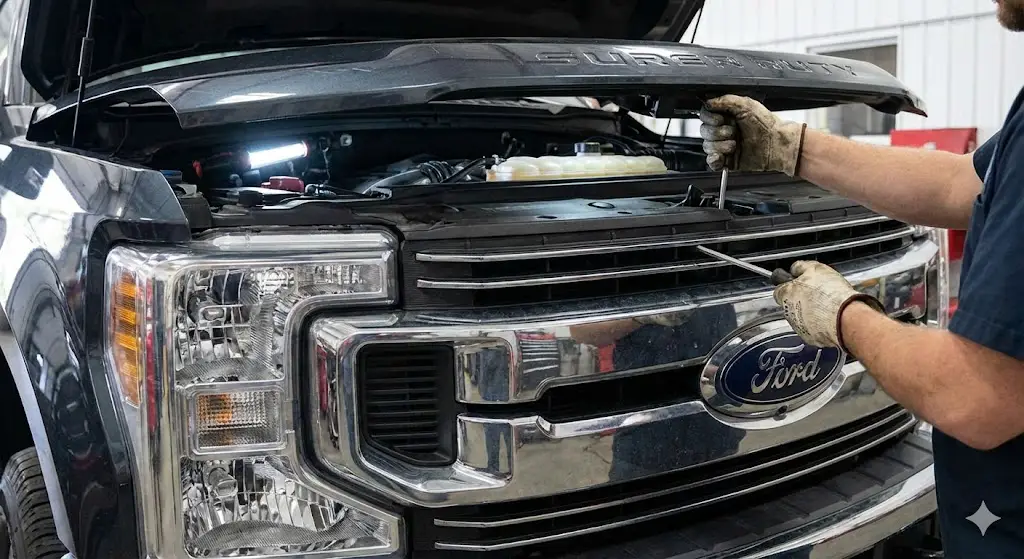
Mechanical Bypass Techniques: Gaining Entry from the Outside
When the cable is snapped or the latch is completely seized, manual intervention at the latch assembly is required. The goal is to mechanically mimic the action of the cable by pushing the release lever on the latch assembly.
Method A: The Long Screwdriver Attack (Gen I & Gen II)
This is the standard method for 1999–2010 trucks. It relies on the relatively open grille architecture.
Tools Required:
- Flathead screwdriver (extra long, 12–18 inches is ideal).
- Flashlight (high intensity).
- Masking tape (to protect grille chrome).
Procedure:
- Visual Identification: Shine the flashlight through the grille mesh, aiming centrally and slightly upward toward the radiator support. You are looking for the latch assembly (a zinc-plated or rusty metal box).
- Locate the Lever: Identify the actuator arm. This is the lever the cable attaches to. On most Ford latches of this era, the lever moves from the driver’s side toward the passenger’s side to release.
- Insert the Tool: Carefully thread the screwdriver through the grille mesh. If the truck has a honeycomb grille, you may need to go through the lower bumper opening and angle upward.
- Bypass the Dust Shield: A rubber dust shield often covers the gap between the radiator support and the grille. Use the screwdriver to push this flap down or lift it up to clear your line of sight.
- The Thrust: Place the blade of the screwdriver against the end of the actuator arm.
- The Actuation: Push the lever firmly to the right (passenger side). You should hear the metallic “pop” of the primary latch disengaging.
- Secondary Latch: Once the hood pops, slide your hand in and release the secondary safety catch manually.1
Method B: The “Coat Hanger” Fishing Expedition (Gen III & IV)
For 2011+ models, or older trucks with dense mesh grilles (like the Lariat or King Ranch trims), a rigid screwdriver may not fit. A flexible wire tool is required to navigate the tortuous path.
Tools Required:
- Metal coat hanger (untwisted) or stiff welding rod.
- Pliers (to shape the tool).
Procedure:
- Fabricate the Tool: Straighten the hanger, leaving a small hook (approx. 1/2 inch) at one end.
- Entry Point: Insert the tool through the grille, aiming for the bottom of the latch mechanism.
- Target Acquisition: You are aiming for the point where the cable connects to the latch lever. Even if the cable is broken, the lever remains.
- The Maneuver: Hook the wire around the lever arm. Unlike the screwdriver push, you may need to pull the lever laterally, depending on your angle of attack.
- Insight: On many 2011–2016 models, the lever pull direction is toward the driver’s side.
- Execution: Pull steadily. If you feel resistance (spring tension), you are on the right component.
Method C: The Wheel Well Incursion (The “Nuclear Option”)
This method is highly effective for 2017+ “Alumiduty” trucks where Active Grille Shutters block the front access, or for any generation where the grille mesh is too tight. It involves accessing the cable from inside the fender.
Tools Required:
- Ratchet and 5.5mm/7mm/8mm sockets (for fender liner screws).
- Vise-grip pliers.
- Box cutter or sharp knife.
Procedure:
- Access the Liner: Go to the driver’s side front wheel well. Turn the wheels fully to the right to maximize workspace.
- Remove Fasteners: Remove the screws securing the front half of the plastic fender liner. You do not need to remove the whole liner; just enough to peel it back.
- Peel and Reveal: Pull the liner back to expose the inner fender area behind the headlight.
- Locate the Cable: Look for a black cable running along the top of the inner fender, heading toward the radiator support. This is the hood release cable.
- The Bypass:
- If the cable is intact: You can try to pull the entire cable sheath toward the firewall. If the cable mounts are broken, this might tension the inner wire enough to pop the hood.
- The Cut (Destructive): If the handle is broken inside the cab, you can cut the outer black sheath of the cable carefully to expose the steel inner core. Caution: Do not cut the steel core.
- The Pull: Clamp the vise-grips onto the exposed inner steel core and pull firmly toward the rear of the truck. This mimics the action of the interior handle and should pop the latch.
- Note: This destroys the cable, necessitating replacement, but it guarantees entry without damaging bodywork.
The Active Grille Shutter (AGS) Complication (2017–Present)
The integration of Active Grille Shutters on the 2017+ Ford F-250 (Part of the “Alumiduty” redesign) introduced a significant barrier to traditional hood opening methods. These shutters are computer-controlled vanes that close at highway speeds to reduce drag and during warm-up to reach operating temperature faster.
Understanding the AGS Barrier
When the truck is parked and the engine is off, the shutters may remain in a closed or semi-closed state, forming a plastic wall behind the grille. This prevents the insertion of screwdrivers or rods to access the latch.9
- Safety Warning: The AGS system uses powerful stepper motors. Forcing the shutters open can strip the plastic gears inside the actuator, leading to a permanent “Check Engine” light or a “P-code” stored in the PCM.
Bypassing the AGS
If you must enter through the grille on an AGS-equipped truck:
- Gentle Manipulation: The plastic vanes have some flex. You can gently pry one vane downward or upward to create a slot for a thin rod (like a welding rod).
- The “Gap” Method: Often, there is a small gap at the very top of the shutter assembly (between the shutter housing and the radiator support header). A long, thin tool “fished” over the top of the shutter assembly may reach the latch lever.
- The Wheel Well Priority: Because of the risk of damaging the expensive AGS assembly (replacement costs often exceed $500), the Wheel Well Incursion (Method C) described above is the recommended primary method for stuck hoods on 2017+ models.
Table 2: Active Grille Shutter Diagnostics
| Symptom | Implication for Hood Access | Recommended Action |
| Shutters Open | Clear line of sight to radiator support. | Proceed with Rod/Wire Method (Sec 5.2). |
| Shutters Closed | Physical barrier blocks tools. | Attempt Wheel Well Method (Sec 5.3) or gently pry vane. |
| Shutters Fluttering | AGS motor or linkage failure. | Be cautious; loose parts may jam tools. |
Addressing Interior Failures: Broken Handles and Kick Panels
A significant percentage of “stuck hood” issues originate inside the cabin. The plastic release handle is a high-stress component that often fails before the cable does.
Diagnosing the Handle
- Visual Inspection: Look at the handle mechanism under the dash. Is the plastic lever cracked? Is the cable ball end disconnected from the lever slot?
- The “Vise-Grip” Solution: If the plastic handle has snapped off entirely, leaving the bare cable exposed:
- Use a pair of locking pliers (Vise-Grips) to clamp onto the metal ball or cylinder at the end of the cable.
- Pull straight back.
- Insight: If the outer black sheath moves with the inner wire, the mounting clip is broken. You must hold the black sheath stationary with one pair of pliers while pulling the inner wire with another pair.1 This “counter-hold” is critical; without it, you are just moving the whole assembly without creating tension.
Repairing the Kick Panel Release
Replacing the handle assembly (Part # FL3Z-16916-AB for newer models) is relatively simple.
- Remove the kick panel trim (usually held by spring clips).
- Unscrew the mounting bolts holding the handle bracket (typically two screws).
- Unhook the cable from the handle mechanism.
- Install the new handle and reconnect the cable.
Comprehensive Repair Protocols: Replacing the Latch and Cable
Once the hood is open, closing it without fixing the underlying issue guarantees you will be locked out again. Immediate repair is mandatory.
Replacing the Hood Latch Assembly
If the latch is seized with rust, replacement is safer than cleaning, as internal springs may be fatigued.
Parts:
- 1999–2007: Ford Part # 4C3Z-16700-AA.
- 2017–2022: Ford Part # HC3Z-16700-F (includes alarm switch).
Procedure:
- Mark Alignment: Use a paint pen or Sharpie to trace the outline of the old latch on the radiator support. This ensures the new latch is installed in the exact same position, maintaining hood alignment.
- Remove Bolts: Remove the two 8mm or 10mm bolts securing the latch.
- Disconnect: Unclip the hood release cable and disconnect the electrical harness (for alarm/remote start switches).
- Install: Bolt the new latch in place, aligning it with your marks. Torque to approximately 9–11 lb-ft (12-15 Nm).
- Test: Before closing the hood, use a screwdriver shaft to push the latch pawl closed (simulating the striker). Then pull the release handle. If it snaps open, the system is functional. Never close the hood until you have verified release function.
Replacing the Bowden Cable
Replacing the cable is labor-intensive because it passes through the firewall.
The “Fish Tape” Trick:
- Disconnect: Detach the cable from the latch end.
- Tie-Off: Securely tie a strong string or paracord to the end of the old cable in the engine bay. Wrap the knot with electrical tape to keep it smooth.
- Pull Through: From inside the cab, pull the old cable out. The string will be pulled through the firewall grommet into the cabin.
- Reverse: Tie the string to the new cable’s engine bay end.
- Install: Pull the string from the engine bay side to feed the new cable back through the firewall. This prevents the frustration of trying to find the blind hole in the firewall insulation.
Preventative Maintenance: The “Rust Belt” Survival Guide
For F-250 owners in northern climates, hood latch maintenance is as critical as oil changes. The latch’s location puts it in the direct path of road salt spray.
Lubrication Strategy
Factory lithium grease eventually dries out and hardens, becoming a trap for dirt and grit.
- Clean: Use a solvent (brake cleaner) to blast away old grease and grime from the latch mechanism.
- Lubricate: Apply a lanolin-based creeping oil (e.g., Fluid Film) or a synthetic dry film lubricant.7 Unlike grease, these do not attract dirt and will not freeze in winter.
- Interval: Perform this service at every oil change, or at least twice a year (Spring/Fall).
The “Hood Flutter” Check
If the hood vibrates or flutters at highway speeds, the primary latch may be loose or the hood bumpers (rubber stops) are worn.
- Adjustment: Loosen the two latch mounting bolts and slide the latch assembly down slightly (1-2mm) to increase tension on the striker. Retighten and test.
- Bumpers: Rotate the threaded rubber bumpers on the corners of the radiator support counter-clockwise to raise them, stabilizing the hood.
Economic & Strategic Analysis: DIY vs. Professional Repair
The decision to repair a hood latch system personally versus visiting a dealership involves cost, time, and vehicle downtime considerations.
Cost Breakdown
- DIY Cost: A new OEM latch costs between $40–$120 depending on the generation. A release cable costs $30–$60. Total: $70–$180.
- Dealership Cost: Labor rates for Ford dealerships typically range from $120–$180 per hour. Diagnosing and replacing a latch and cable can be billed as 1.5 to 2.5 hours of labor, plus parts markup. Total estimate: $350–$600.
- Resource: For a detailed breakdown of F-250 maintenance costs, refer to the(https://fordmasterx.com/ford-f-250-repair-estimate-maintenance-costs/).
The Value of DIY
Given the high labor costs and the relative simplicity of the repair (once the hood is open), this is a high-value DIY project. Furthermore, learning to open the hood manually is a vital skill for roadside emergencies.
Safety, Legal, and Security Implications
FMVSS 113 and Road Safety
Driving with a damaged hood latch is illegal and dangerous. The secondary safety catch is designed to hold the hood only if the primary latch fails during a drive; it is not designed to secure the hood at highway speeds indefinitely. Air pressure at 60+ mph can tear a hood off its hinges if only the safety catch is engaged.
Anti-Theft Systems
On 2017+ models, the hood latch (Part # HC3Z-16700-F) contains an integrated switch that monitors the hood’s position.
- The Issue: A failing switch can intermittently signal that the hood is open. If the vehicle is locked, this triggers the anti-theft alarm, often in the middle of the night.
- The Fix: Replacing the latch assembly solves both the mechanical sticking issue and the electrical alarm fault.
- Resource: For procedures on resetting the alarm system after a repair, see the(https://fordmasterx.com/ford-anti-theft-system-reset/).
Battery Maintenance
A stuck hood prevents access to the battery. If your key fob battery dies and you cannot open the hood to jump-start the truck, you are completely locked out.
- Resource: Learn how to manage key fob power issues at(https://fordmasterx.com/how-to-replace-a-ford-key-fob-battery/).
Conclusion
The “stuck hood” on a Ford F-250 is a complex failure of a simple system, exacerbated by environmental exposure and material fatigue. While the specific entry method varies by generation—from the screwdriver pry on the 7.3L OBS to the wheel-well surgery on the modern Alumiduty—the principles of diagnostics and mechanical bypass remain constant.
By following the protocols outlined in this report, owners can bypass a failed latch without resorting to destructive methods that damage the grille or bodywork. Furthermore, understanding the “why” behind the failure—be it the corrosion of the latch or the snapping of the cable—empowers owners to implement preventative maintenance strategies, ensuring that the engine bay remains accessible when it is needed most. Whether upgrading an older truck (see(https://fordmasterx.com/obs-ford-disc-brake-conversion/) for other legacy upgrades) or maintaining a new fleet vehicle, the integrity of the hood latch is a non-negotiable aspect of vehicle readiness.
Frequently Asked Questions (FAQ)
Q1: Can I just cut the grille to access the latch?
A: While cutting the grille will provide immediate access, it is an expensive “repair” costing $300-$800 for a replacement grille. The non-destructive methods (screwdriver, coat hanger, wheel well) should always be exhausted first.
Q2: Why does my hood pop up but won’t release?
A: This indicates the primary latch has released, but the secondary safety catch is engaged. You simply need to reach under the hood (usually to the left or center) and manually flip the safety lever. If it still won’t lift, the safety hook may be rusted.
Q3: My 2018 F-250 alarm keeps going off. Is this related to the hood latch?
A: Yes. The 2017+ latches have a microswitch inside that fails. It falsely reports the hood is “ajar,” triggering the perimeter alarm. Disconnecting the switch at the latch (a two-wire connector) will stop the alarm temporarily, but replacing the latch is the permanent fix.
Q4: How do I open the hood if the cable is broken and I have a brush guard/bull bar?
A: Aftermarket bumper guards make grille access difficult. In this case, the Wheel Well Incursion (Method C) is often the only viable option, as it approaches the latch from behind the headlight, bypassing the front-end armor entirely.