Ford Ranger Parking Brake Cable Diagram: Easy Setup Guide
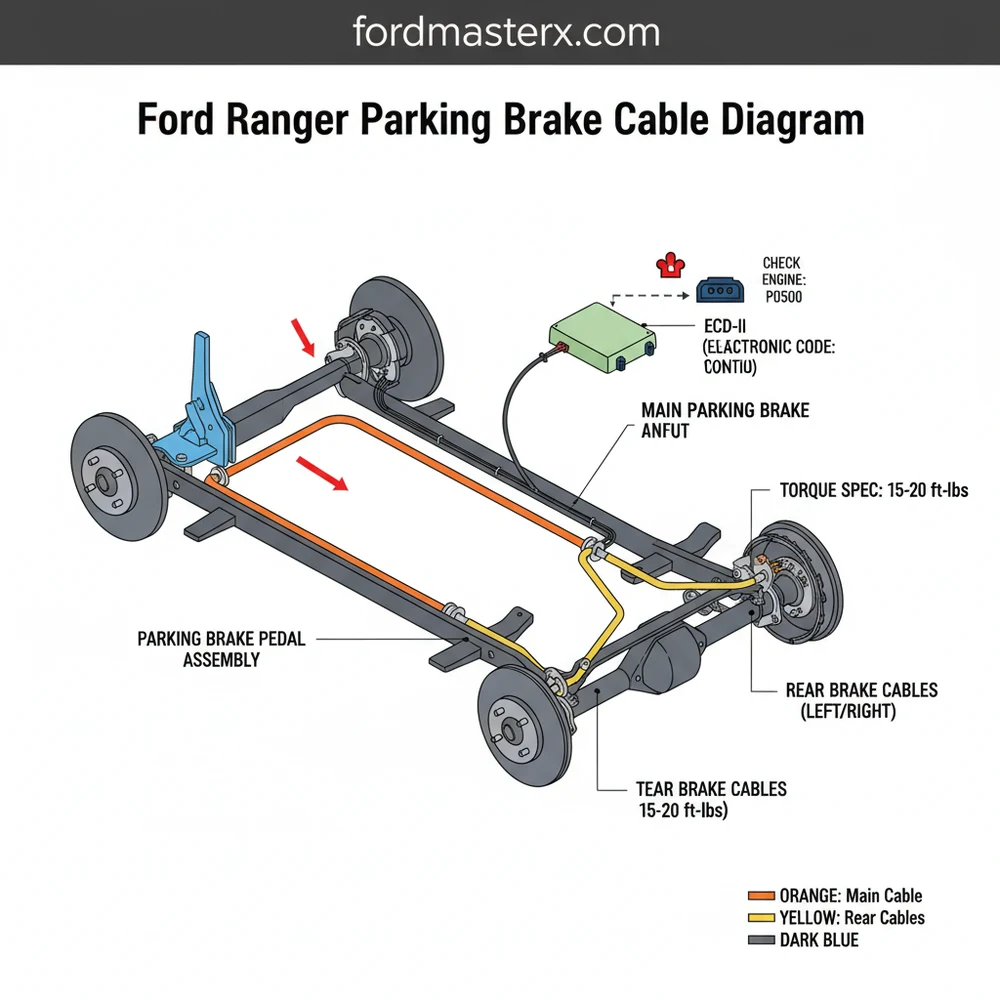
The Ford Ranger parking brake cable diagram illustrates a three-cable system: one front cable from the pedal, a connector, and two rear cables leading to the drum assemblies. To ensure proper tension, you must route the cables through the frame brackets and adjust the tensioner to meet factory torque spec requirements.
📌 Key Takeaways
- Visualizing the routing of front and rear cables along the frame
- Identifying the equalizer bracket where cables connect
- Ensuring the parking brake is fully released before any adjustment
- Checking for frayed cables or rusted tensioners during installation
- Using this diagram when cables snap or the brake pedal feels loose
Understanding the intricacies of a ford ranger parking brake cable diagram is a vital skill for any truck owner who values safety and mechanical reliability. Whether you are dealing with a foot-pedal that sinks to the floor without resistance or a parking brake that refuses to disengage, having a visual and conceptual map of the system is the first step toward a successful repair. This guide provides a comprehensive breakdown of the cable routing, from the interior control mechanism to the rear drum or disc assemblies. By the end of this article, you will be able to identify every component, understand the physics of the equalizer bar, and perform a full replacement or adjustment with confidence.
Decoding the Ford Ranger Parking Brake Cable Diagram
The parking brake system in a Ford Ranger is a mechanical override designed to hold the vehicle stationary independently of the primary hydraulic system. The ford ranger parking brake cable diagram illustrates a multi-stage assembly. The system begins at the driver’s side kick panel with the front control cable. This cable passes through the firewall and down along the inner frame rail. In most models, this single lead connects to a component known as the equalizer or tensioner assembly.
The equalizer is the heart of the system. It is a metal bracket that splits the pulling force from one front cable into two rear cables. One rear cable routes to the driver-side wheel, while the other—often longer—crosses over the top of the fuel tank or rear axle to reach the passenger-side wheel. The diagram identifies these as the intermediate and rear cables. In terms of visual identification, the front cable is usually shielded in a thick black nylon housing, while the rear cables feature heavy-duty springs at the ends where they enter the brake backing plates.
Variations in the diagram occur based on the wheelbase of your Ranger (Regular Cab vs. SuperCab). Longer trucks require an additional intermediate extension cable to bridge the gap between the front lead and the equalizer bar. When viewing the diagram, pay close attention to the mounting brackets and “E-clips” that secure the cable housing to the frame. Without these clips, the cable housing would move along with the inner wire, resulting in a total loss of mechanical leverage.
A detailed technical illustration showing the path from the foot pedal, through the frame rail, into the equalizer bracket, and branching out to the rear left and right brake assemblies.
Step-by-Step Installation and Calibration Guide

Interpreting the ford ranger parking brake cable diagram is only half the battle; applying that knowledge requires a systematic approach. Before you begin, ensure you have the necessary tools: a set of pliers, a 10mm and 13mm socket, a flathead screwdriver, and a specialized cable removal tool (though needle-nose pliers can suffice in a pinch).
Always chock the front wheels and use heavy-duty jack stands when working under your truck. Never rely on a hydraulic jack alone, especially when disconnecting the parking brake system, as the vehicle could roll if the transmission is not properly engaged.
- 1. Release System Tension: Locate the adjustment nut on the equalizer bar along the driver-side frame rail. Back the nut off until there is significant slack in all three cables. This is crucial for removing the cables without damaging the interior pedal assembly.
- 2. Disconnect from the Pedal: Inside the cab, pull the front cable end out of its seat in the pedal assembly. You may need to use a screwdriver to depress the locking tabs that hold the cable housing to the firewall.
- 3. Remove Exterior Mounting Bolts: Follow the diagram to locate the frame brackets. Use your socket set to remove the bolts holding the cable guides in place. Be careful not to snap these bolts, as they are often exposed to significant road salt and debris.
- 4. Detach from the Equalizer: Slide the front and rear cables out of the equalizer bracket slots. If they are seized, use a penetrating lubricant and let it sit for ten minutes.
- 5. Disengage at the Wheels: For drum brakes, you will need to remove the brake drum to unhook the cable from the secondary shoe lever. For disc brakes, the cable usually attaches to a lever on the back of the caliper.
- 6. Route the New Cables: Using your ford ranger parking brake cable diagram as a reference, thread the new cables through the same path. Ensure the housing is securely seated in every frame bracket to prevent chafing.
- 7. Set the Torque Spec and Tension: Reconnect all ends. Tighten the equalizer nut until the cables are taut but not engaging the brakes. The wheel should spin freely when the pedal is up.
- 8. Final Testing: Pump the parking brake pedal several times to stretch the new cables, then re-adjust the tension at the equalizer if necessary.
While replacing the brake cables, it is an excellent time to inspect other chassis components. Check the accessory belt for cracks and ensure your coolant flow is unobstructed, as these are common maintenance items that are easier to see while you are already under the vehicle with a flashlight.
Common Issues and Troubleshooting

The most frequent problem owners face is a “frozen” cable. Because these lines are exposed to the elements, water can enter the housing and cause the internal wire to rust. If your parking brake light stays on or the truck feels sluggish, one of the rear cables may be stuck in the “engaged” position. Referencing the ford ranger parking brake cable diagram allows you to pinpoint exactly where the cable enters the backing plate, which is the most common failure point.
Another issue is a stretched cable. Over time, the steel strands within the cable can elongate, meaning the pedal must be pushed further to achieve the same holding power. If you have run out of adjustment threads on the equalizer bar, the cables must be replaced.
It is important to distinguish mechanical brake failure from electronic warnings. While a parking brake issue is purely mechanical, a glowing check engine light or a persistent diagnostic code retrieved via an OBD-II scanner usually points to engine or sensor malfunctions, such as issues with the ECU or oxygen sensors. However, if your “Brake” warning light is on, it could indicate low fluid or a mechanical fault in the parking brake lever’s switch.
Pro Tips and Best Practices for Maintenance
To extend the life of your parking brake system, use it daily. Many drivers with automatic transmissions rarely use the parking brake, which allows the cables to seize in place due to inactivity. Engaging and disengaging the system regularly keeps the wires moving within their housings and prevents rust buildup.
Before installing a new cable, hang it vertically and drip a small amount of silicone-based lubricant into the housing. Let it gravity-feed through the entire length. This provides an extra layer of moisture protection that factory cables often lack.
When shopping for replacement parts, prioritize high-quality, galvanized steel cables. Economy-grade cables often use inferior coatings that succumb to corrosion within a single winter season. If you are performing a full overhaul, consider inspecting the timing chain and other internal engine components if you notice any unusual rattling sounds during startup, as a well-maintained Ranger is the sum of all its parts.
Finally, always respect the specific torque spec for your wheel lug nuts after you have finished the job and lowered the truck. Most Rangers require between 85 and 100 lb-ft of torque. Proper maintenance of your parking brake system doesn’t just pass an inspection; it provides peace of mind that your truck will remain exactly where you parked it, regardless of the incline. Using the ford ranger parking brake cable diagram as your roadmap ensures that this critical safety system remains in peak operating condition for the life of your vehicle.
Frequently Asked Questions
Where is the parking brake cable located?
The Ford Ranger parking brake cables run along the driver-side frame rail. The front cable extends from the cabin pedal, meeting the rear cables at an equalizer bracket near the middle of the chassis. From there, individual cables branch out to the driver and passenger side rear brake drums.
What does this parking brake diagram show?
The Ford Ranger parking brake cable diagram shows the mechanical connection between the foot pedal and the rear wheels. It details the routing path, the location of guide brackets, and how the equalizer distributes tension. This is essential for ensuring both rear wheels engage simultaneously and hold the truck firmly.
How many connections does the cable system have?
The system typically features three main cables and four primary connections. The front cable connects to the pedal and equalizer. Two rear cables connect to the equalizer and the brake actuators inside the drums. Proper setup ensures the ECU doesn’t trigger alerts if sensor systems detect unintended rolling.
What are the symptoms of a bad parking brake cable?
Common symptoms include a loose parking brake pedal, the vehicle rolling while parked, or the check engine light or brake warning light appearing. If the OBD-II system detects motion while the brake is engaged, it may throw a diagnostic code. Cables often stretch, fray, or seize due to corrosion.
Can I replace these cables myself?
Yes, replacing cables is a manageable DIY task for most owners. You will need to lift the vehicle safely and remove the rear drums to access the actuators. Ensure you follow the diagram for correct routing and apply the correct torque spec to all mounting hardware for safety.
What tools do I need for this task?
You will need a floor jack, jack stands, a socket set, pliers for the tensioner clips, and a torque wrench. A diagnostic code reader or OBD-II scanner can help clear any related brake warning lights or check engine light notifications that might persist after the mechanical repair is finished.


