Ford Ranger Manual Transmission Diagram: Diagnosis & Fix Guide
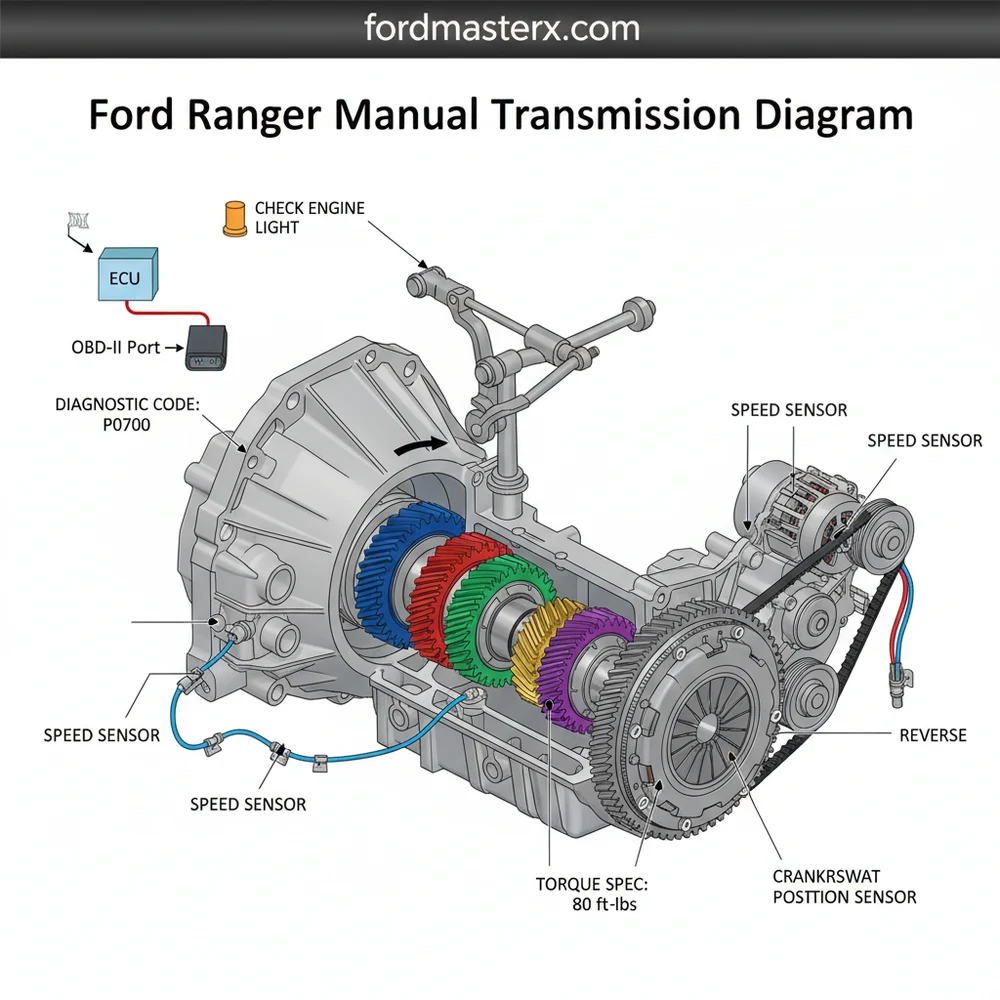
A Ford Ranger manual transmission diagram illustrates the assembly of the M5OD or Toyo Kogyo units, detailing the input shaft, gear sets, shift rails, and synchronizers. It helps identify internal components for rebuilds or troubleshooting gear grinding, ensuring you apply the correct torque spec for every internal bolt during reassembly.
📌 Key Takeaways
- Identifies internal gear relationships and assembly order
- The synchronizer assembly is the most critical part for smooth shifting
- Always verify the torque spec for housing bolts to prevent leaks
- Cross-reference the diagram with an OBD-II scanner if sensors fail
- Essential for rebuilds, fluid changes, or clutch replacements
Navigating the complexities of a ford ranger manual transmission diagram is the first step for any owner or mechanic looking to maintain, troubleshoot, or rebuild their gearbox. Whether you are dealing with a classic M5OD-R1 or a newer variant, having a clear visual roadmap is essential for identifying the specific arrangement of gears, bearings, and synchronizers that keep your truck moving. In this guide, we will break down the essential components of the transmission assembly, explain how to interpret technical exploded views, and provide actionable insights into maintaining the mechanical integrity of your vehicle. By the end of this article, you will have a comprehensive understanding of how your transmission functions within the broader powertrain system.
Most Ford Ranger manual transmissions produced after 1988 use the Mazda-sourced M5OD-R1 (Manual 5-Speed Overdrive, Revision 1). It is unique because it uses Mercon Automatic Transmission Fluid (ATF) rather than traditional heavy gear oil.
Decoding the Ford Ranger Manual Transmission Diagram
When you first look at a ford ranger manual transmission diagram, the “exploded view” can appear overwhelming. However, the diagram is logically organized into three primary sections: the input section, the main case (gears), and the extension housing. At the front of the diagram, you will find the input shaft and the bellhousing, which connects the transmission to the engine block. This is where the clutch release bearing (slave cylinder) resides, a common point of failure in these vehicles.
The center of the diagram illustrates the main shaft and the countershaft. The main shaft holds the first, second, third, and fifth gears, along with the reverse gear. The countershaft, located parallel to the main shaft, is responsible for transferring torque between the input and output. Between these gears are the synchronizer assemblies—brass rings that allow the gears to match speeds during a shift. If your diagram is color-coded, these are often highlighted to indicate wear-prone surfaces. On the top of the case, the diagram will show the shift rail and shift fork assembly, which are the mechanical linkages that move the synchronizers when you move the gear stick in the cabin.
Variations exist depending on the engine size. For instance, the transmission housing for a 2.3L four-cylinder engine has a different bolt pattern than the one for a 3.0L or 4.0L V6. Additionally, 4WD models feature a shorter extension housing to accommodate the transfer case, whereas 2WD models have a longer tailshaft housing. Understanding these subtle differences in the diagram ensures you are ordering the correct seals and gaskets for your specific Ranger configuration.
Step-by-Step Guide to Using the Diagram for Repairs

Interpreting a ford ranger manual transmission diagram is about more than just identifying parts; it is about understanding the sequence of assembly and the relationship between mechanical systems. Follow these steps to utilize your diagram effectively during a diagnostic or repair session.
- ✓ Step 1: Orient the Visual Perspective. Identify the front (engine side) and rear (driveshaft side) of the diagram. The input shaft always points toward the engine, while the output shaft or tailshaft points toward the rear differential.
- ✓ Step 2: Trace the Power Path. Follow the flow from the input shaft through the countershaft and back to the main shaft. This helps you understand which gear sets are engaged in specific speeds.
- ✓ Step 3: Locate Critical Seals and Plugs. Look for the three rubber shift rail plugs at the rear of the top cover. These are notorious for leaking fluid, and identifying them on the diagram allows you to check them without removing the entire transmission.
- ✓ Step 4: Identify Synchronizer Hubs. If you are experiencing grinding during shifts, find the synchronizer hubs on the diagram. Note the small springs and detent balls; these are tiny parts that can easily be lost during a rebuild.
- ✓ Step 5: Reference the Torque Spec Table. Most professional diagrams include a table for the torque spec of the case bolts, extension housing bolts, and the drain/fill plugs. Tightening these to the correct foot-pounds prevents casing cracks and leaks.
- ✓ Step 6: Cross-Reference with the ECU and OBD-II. While the manual transmission is primarily mechanical, the vehicle speed sensor (VSS) mounted on the tailshaft sends data to the ECU. If your speedometer fails or the check engine light appears, use the diagram to locate the sensor and wiring harness.
Before disassembling your transmission based on the diagram, always clean the exterior of the case. Debris entering the internal gear clusters can cause premature bearing failure and metal shavings in the fluid.
When performing work on the transmission, you will need a specialized toolset including a transmission jack, snap ring pliers, a torque wrench, and a clutch alignment tool. Safety is paramount; never work under a truck supported only by a floor jack. Use heavy-duty jack stands and ensure the vehicle is on level ground.
Common Troubleshooting Using the Transmission Diagram

A ford ranger manual transmission diagram is a diagnostic powerhouse. One of the most common issues Ranger owners face is “popping out of gear.” By looking at the diagram, you can identify the shift forks and the detent springs. If a shift fork is bent or a spring is broken, the transmission cannot stay locked into the selected gear.
Another frequent problem is a “hard to shift” condition when the engine is running. The diagram shows the relationship between the input shaft and the pilot bearing. If the pilot bearing is seized, the input shaft keeps spinning even when the clutch is depressed, making gear engagement difficult. Furthermore, if you encounter a diagnostic code through your OBD-II scanner related to vehicle speed, the diagram helps you locate the specific gear on the output shaft that drives the speed sensor. If the check engine light is on and the code points to a “Neutral Safety Switch” or “Clutch Pedal Position Sensor,” the diagram will help you trace the electrical leads coming off the transmission housing to the vehicle’s main wiring loom.
Low fluid levels are the number one killer of Ranger manual transmissions. Because the M5OD uses thin ATF, even a small leak from the shift rail plugs can empty the case quickly, leading to total internal meltdown.
Maintenance Tips and System Integration
While the ford ranger manual transmission diagram focuses on the gearbox itself, it is important to remember that the transmission operates as part of a larger machine. For optimal performance, you should perform a holistic vehicle inspection. While you are underneath the truck inspecting the transmission, check the accessory belt and the timing chain for noise or wear, as engine vibrations can sometimes be misinterpreted as transmission chatter.
Maintaining proper coolant flow is also vital. In some heavy-duty Ranger setups, there is a transmission cooler integrated into the radiator. If the coolant flow is restricted, the engine runs hotter, which in turn increases the operating temperature of the transmission fluid, breaking it down faster. Check your OBD-II system periodically for any stored codes that might indicate an overheating condition or sensor malfunction before they lead to a check engine light.
To keep your transmission in top shape, replace the fluid every 30,000 to 50,000 miles. Always use a high-quality Mercon-rated fluid as specified in your owner’s manual. If you are replacing internal components, prioritize high-quality brass synchronizers and steel shift forks over cheaper alternatives. These quality components, combined with the precise torque spec applications found on your diagram, will extend the life of your truck by decades. By treating the transmission as a vital organ that interacts with the ECU and engine systems, you ensure your Ford Ranger remains a reliable workhorse for years to come.
Frequently Asked Questions
Where is the transmission speed sensor located?
The transmission speed sensor is typically located on the driver-side tailhousing of the Ford Ranger manual transmission. It monitors the output shaft speed and sends signals to the ECU. If this sensor fails, it may trigger a check engine light or cause speedometer issues on later models.
What does a manual transmission diagram show?
The diagram shows the exploded view of the transmission housing, gears, bearings, and shifter linkage. It provides a visual guide for the sequence of assembly, identifying exactly where components like the throw-out bearing or slave cylinder interact with the main transmission case for proper mechanical function.
How many main connections does the transmission have?
Most Ford Ranger manual transmissions feature a hydraulic line for the clutch, a harness connection for the reverse light switch, and a speed sensor plug. These electrical connections communicate with the vehicle computer to ensure proper lighting and engine performance monitoring across various driving conditions.
What are the symptoms of a bad manual transmission?
Common symptoms include grinding during shifts, popping out of gear, or difficulty engaging first gear. If a sensor fails, you might see a diagnostic code through an OBD-II port. Mechanical failures often manifest as whining noises or fluid leaks from the input or output shaft seals.
Can I replace the transmission myself?
Replacing a manual transmission is a complex task but feasible for experienced DIYers. You will need a floor jack, transmission cradle, and a solid understanding of the diagram. Ensuring the clutch is properly aligned and the bellhousing bolts meet the required torque spec is vital for safety.
What tools do I need for transmission work?
You need a comprehensive socket set, a torque wrench for precise tightening, and snap ring pliers for internal gear work. An OBD-II scanner is helpful for clearing any check engine light issues, while a transmission jack is essential for safely lowering the heavy unit during removal.


