Ford Ranger Fuel Line Diagram: Repair & Routing Guide
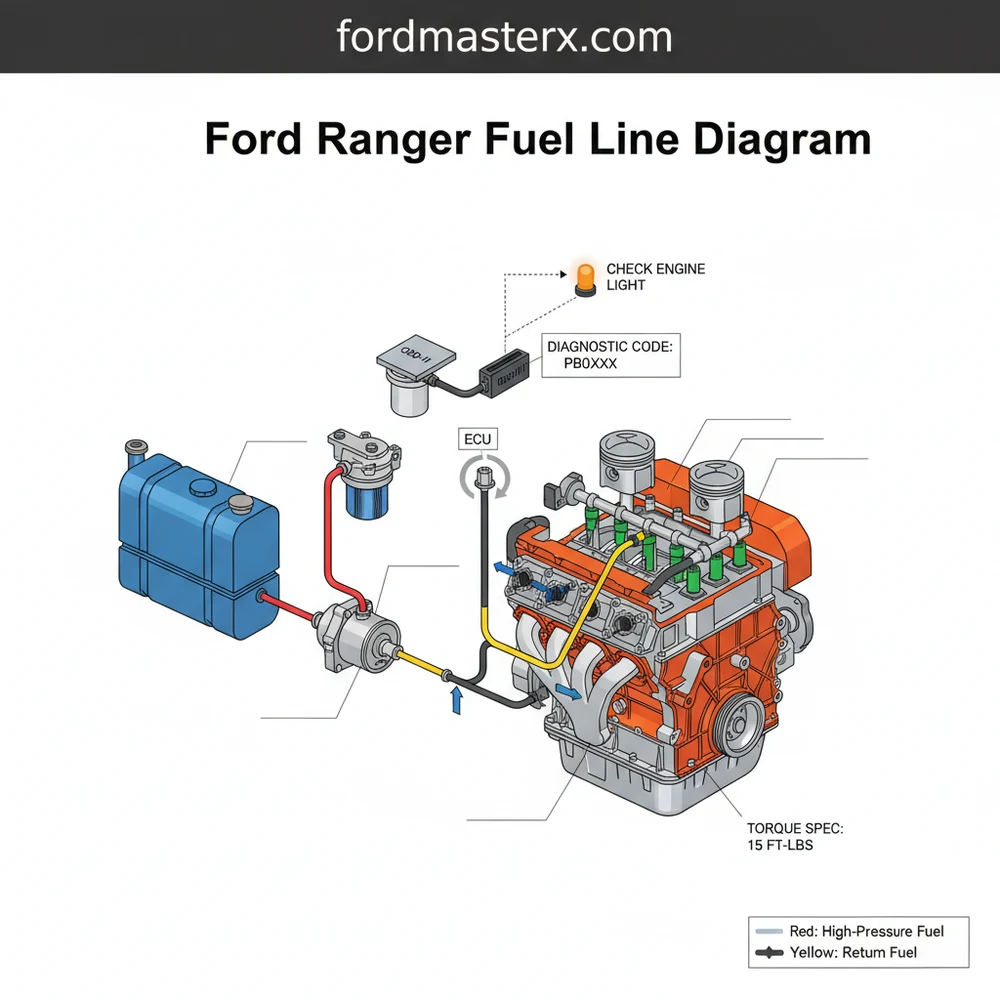
The Ford Ranger fuel line diagram illustrates the routing from the fuel tank through the filter and up to the fuel rail. It maps the supply and return lines, pressure regulators, and connection points, helping owners identify leaks or blockage points while ensuring secure fittings and consistent fuel pressure.
📌 Key Takeaways
- Visualizes the complete path from fuel tank to fuel injectors
- Distinguishes between the high-pressure supply and the return lines
- Always relieve fuel system pressure before disconnecting components
- Use specialized disconnect tools to avoid damaging plastic clips
- Ideal for diagnosing fuel leaks or replacing rusted chassis lines
Identifying fuel delivery issues can be a daunting task for even a seasoned truck owner. Whether you are dealing with a sudden loss of engine power, a persistent smell of gasoline, or a truck that refuses to start, having a clear ford ranger fuel line diagram is the most critical tool in your diagnostic arsenal. This comprehensive guide provides a detailed visual and technical breakdown of the fuel delivery system, explaining how fuel travels from the rear-mounted tank to the engine’s fuel rail. By understanding this layout, you will learn how to identify specific components, troubleshoot pressure drops, and perform repairs safely and efficiently.
The Ford Ranger typically utilizes a “returnless” fuel system in later models, where the pressure is regulated inside the tank. Earlier models may feature a return line that sends excess fuel back to the tank via a vacuum-operated regulator.
Understanding the Ford Ranger Fuel Line Diagram
The ford ranger fuel line diagram is a roadmap of the high-pressure environment that keeps your engine running. At its core, the system consists of three primary segments: the tank and pump assembly, the chassis-routed supply lines, and the engine-side fuel rail. The diagram highlights how the Fuel Pump Driver Module (FPDM) receives signals from the ECU to modulate fuel flow based on real-time engine demand.
Visually, the diagram is broken down into specific color-coded paths. The supply line, often represented in blue or solid black, carries high-pressure fuel (typically 40-65 PSI) from the pump to the injectors. If your model includes a return line, it is usually thinner and marked in a different shade to indicate lower pressure. The diagram also illustrates the location of the fuel pulse damper, which prevents “hammering” noises in the lines, and the fuel rail pressure sensor, which communicates with the OBD-II system to ensure the engine is receiving the correct volume of fuel.
Variations exist depending on your engine size (such as the 2.3L, 3.0L, or 4.0L variants) and wheelbase length. Extended cab models will naturally have longer chassis lines, which are often secured by plastic retaining clips along the inner driver-side frame rail. The diagram also accounts for the evaporative emission (EVAP) lines, which run parallel to the fuel lines and carry gasoline vapors to the charcoal canister to prevent environmental pollution.
[DIAGRAM_PLACEHOLDER: A technical schematic showing the fuel tank at the rear, lines running along the driver-side frame rail, passing through a fuel filter, and connecting to the fuel rail on the engine intake manifold.]
Step-by-Step Guide to Reading and Navigating the System

Navigating a ford ranger fuel line diagram requires a methodical approach. To successfully interpret the schematic and apply it to your vehicle, follow these structured steps:
- ✓ Step 1: Relieve System Pressure. Before touching any fuel line, you must depressurize the system. Locate the inertia switch (usually in the passenger footwell) and disconnect it, then crank the engine until it stalls. This prevents high-pressure fuel from spraying when a connection is broken.
- ✓ Step 2: Identify the Supply Source. Look at the diagram and locate the fuel tank. On the Ranger, the fuel pump is integrated into the tank. Tracing starts here, following the thickest line that exits the top of the tank assembly.
- ✓ Step 3: Locate the Fuel Filter. Most diagrams will show an inline fuel filter located along the frame rail. This is a common maintenance point. Use the diagram to confirm the direction of flow, as installing a filter backward can cause severe performance issues.
- ✓ Step 4: Trace the Routing Path. Follow the line as it moves forward toward the engine bay. Note where the line passes near the timing chain cover or accessory belt. The diagram serves as a guide to ensure you re-clip these lines exactly as the factory intended to avoid heat or friction damage.
- ✓ Step 5: Inspect Engine Bay Connections. The line will eventually transition from steel or rigid nylon to a flexible braided hose or quick-connect fitting near the firewall. Trace this to the fuel rail, which distributes fuel to each individual injector.
- ✓ Step 6: Check Sensor Integration. Use the diagram to locate the fuel pressure sensor. If you are getting a diagnostic code related to fuel trim, this is the component you will need to test using a multimeter or a scan tool.
Fuel systems operate under extreme pressure. Always wear safety goggles and keep a fire extinguisher nearby. Ensure the engine is completely cool to prevent fuel from igniting on hot exhaust components or areas with restricted coolant flow.
Necessary Tools for Fuel Line Work
To work effectively with the components shown in your ford ranger fuel line diagram, you will need a specific set of tools. Standard wrenches often won’t suffice for modern quick-connect fittings. Ensure you have a set of fuel line disconnect tools (scissor-style or circular), a fuel pressure gauge compatible with Schrader valves, and a high-quality socket set to manage the torque spec requirements of fuel rail mounting bolts.
Common Issues and Troubleshooting Techniques

When the check engine light illuminates on your dashboard, the fuel system is often a primary suspect. The most frequent issues identified through a ford ranger fuel line diagram involve leaks at the quick-connect fittings or a clogged inline filter. If your truck is stumbling under load, a diagnostic code such as P0171 (Lean Condition) or P0191 (Fuel Rail Pressure Sensor Range) may appear.
The diagram helps you narrow down the “where” and “why.” For instance, if you have low pressure at the rail but the pump is audible, the diagram directs you to inspect the line between the pump and the filter for kinks or leaks. If the pressure is too high, the diagram identifies the location of the regulator or the return line that may be pinched. Additionally, keep an eye on the fuel lines near areas of high heat; if coolant flow is restricted and the engine runs hot, it can cause the fuel in the lines to “boil,” leading to vapor lock—a condition where the pump cannot move gaseous fuel, causing the engine to stall.
If you are experiencing intermittent starting issues, check the fuel pump relay in the power distribution box. Use the diagram to confirm the wiring path to the pump; often, the issue is electrical (ECU or FPDM) rather than a physical blockage in the fuel line itself.
Maintenance Tips and Best Practices
Longevity for your Ford Ranger’s fuel system starts with proactive maintenance. One of the best practices is to replace your fuel filter every 30,000 miles, even if the manufacturer suggests a longer interval. Debris in the tank can easily bypass older filters and clog the tiny orifices of the fuel injectors. When replacing any part of the line, always use high-quality OEM or equivalent components. Cheap aftermarket nylon lines may not withstand the heat cycles of the engine bay as effectively as factory-spec materials.
When reassembling the system, pay close attention to the torque spec for any bolted connections. Over-tightening the fuel rail bolts can crack the intake manifold or strip the threads, leading to dangerous leaks. Furthermore, ensure that all lines are snapped securely into their chassis clips. Vibrations from the engine and the road can cause unsecured lines to rub against the timing chain cover or the accessory belt, eventually wearing a hole through the line.
Finally, always use an OBD-II scanner to clear codes and perform a “keep alive memory” (KAM) reset after any major fuel system repair. This allows the ECU to relearn the fuel trim values based on the now-optimized fuel flow. Regular inspection of the lines for corrosion—especially in regions where road salt is used—can save you from expensive roadside breakdowns and ensure your Ford Ranger remains reliable for years to come. By following your ford ranger fuel line diagram and these best practices, you can maintain peak performance and safety.
Frequently Asked Questions
Where is the fuel filter located?
On most Ford Ranger models, the fuel filter is located along the inner frame rail on the driver’s side. It sits between the fuel tank and the engine. Accessing it requires following the fuel line diagram to ensure the flow arrow points toward the engine for correct installation.
What does a fuel line diagram show?
This diagram illustrates the layout of the supply and return lines, including the fuel pump assembly, filter, and fuel rail. It highlights connection types, such as quick-connect fittings, and shows how the system interacts with sensors that communicate with the ECU to maintain proper fuel-air ratios.
How many connections does the fuel rail have?
The fuel rail typically features one main supply connection from the fuel line and individual connections for each fuel injector. Some older systems also include a return line connection at the pressure regulator, while newer returnless systems rely on the ECU and pump to manage internal pressure levels.
What are the symptoms of a bad fuel line?
Symptoms include a strong smell of gasoline, visible puddles under the truck, or an illuminated check engine light. If the line is restricted, you might experience engine sputtering, hard starts, or a specific diagnostic code like P0171, indicating a lean condition detected by the vehicle’s sensors.
Can I replace fuel lines myself?
Yes, fuel line replacement is a common DIY task with the right tools. You must use specialized disconnect tools and strictly follow the torque spec for any threaded fittings. Always work in a ventilated area and have a fire extinguisher nearby since you are dealing with pressurized flammable liquid.
What tools do I need for fuel line repair?
You will need a set of fuel line disconnect tools, a socket set, a drain pan to catch excess fuel, and a torque wrench. Additionally, an OBD-II scanner is helpful for clearing any stored codes and verifying that the system is functioning correctly after the repair is finished.


