Ford Ranger EVAP System Diagram: Complete Layout Guide
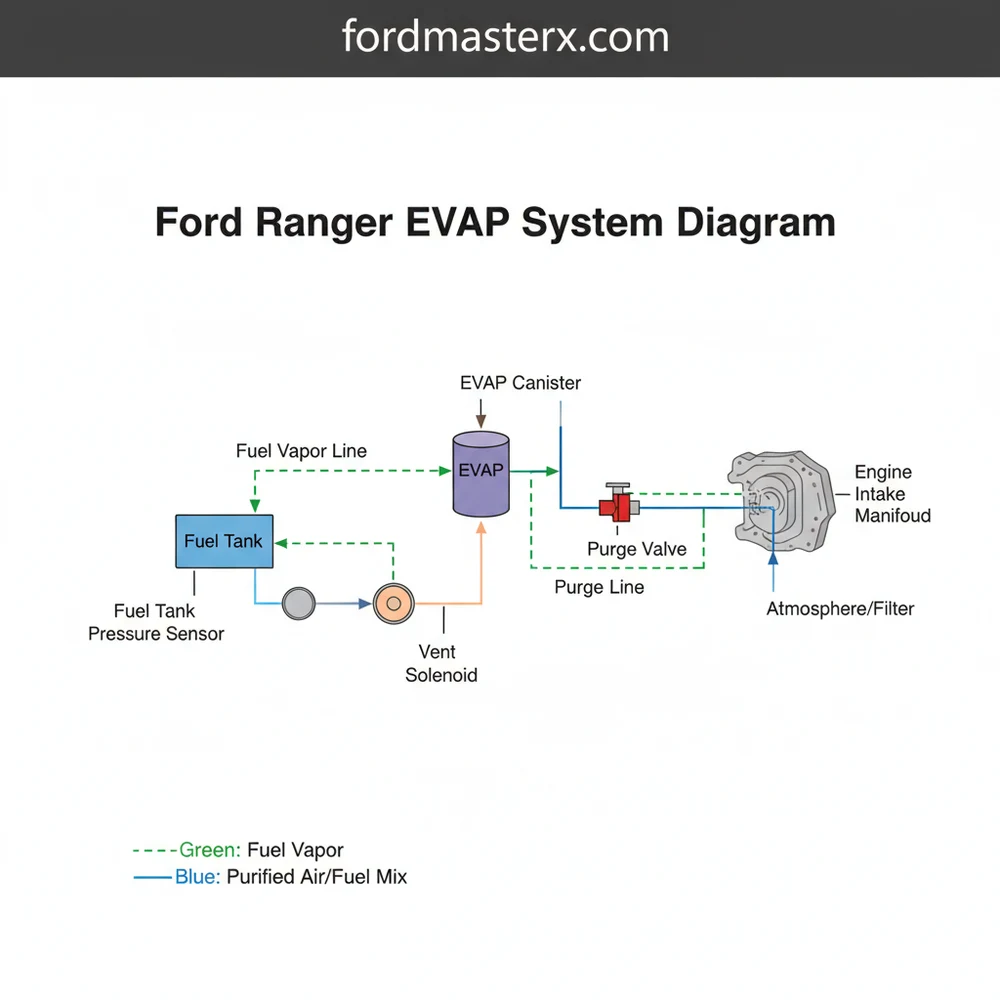
A Ford Ranger EVAP system diagram outlines the flow of fuel vapors from the gas tank to the charcoal canister and intake manifold. This visual map identifies the purge valve, vent solenoid, and vapor lines, allowing you to trace the system structure for effective leak detection and emission control troubleshooting.
📌 Key Takeaways
- Visualizes the path of fuel vapors to prevent atmospheric pollution
- Identifies the charcoal canister as the central hub of the system
- Ensures safety by highlighting high-pressure vapor line locations
- Simplifies the process of finding the source of P0442/P0455 codes
- Ideal for emissions testing prep and component replacement tasks
The Evaporative Emission Control (EVAP) system in a Ford Ranger is a critical but often misunderstood network of components designed to prevent gasoline vapors from escaping into the atmosphere. For DIY enthusiasts, understanding the Ford Ranger EVAP system diagram is essential for passing emissions tests, maintaining fuel efficiency, and extinguishing that persistent “Check Engine” light. Gasoline is highly volatile, and without a functional EVAP system, the hydrocarbon vapors produced in your fuel tank would contribute significantly to smog and environmental pollution. In a Ford Ranger—particularly the popular models spanning from 1998 to 2011—the system relies on a combination of vacuum lines, electrical solenoids, and a charcoal reservoir to manage these fumes effectively.
When you look at a Ford Ranger EVAP system diagram, you are looking at a closed-loop system. It begins at the fuel tank and ends at the engine’s intake manifold. Understanding the physical layout and the flow of vapors is the first step in diagnosing leaks or component failures. Whether you are dealing with a P0455 (large leak) or a P0442 (small leak) code, this guide will provide the technical details, locations, and wire colors necessary to navigate your truck’s emissions system with confidence.
Main Components and Their Features
The Ford Ranger EVAP system consists of several key components distributed from the rear of the vehicle to the front. Knowing where these are located is half the battle when performing repairs.
- The Charcoal Canister (Vapor Canister): On most Ford Rangers (especially the 1998–2011 models), the canister is located mid-ship, mounted to the driver’s side frame rail or tucked above the spare tire area. It is a black plastic box filled with activated carbon that “traps” fuel vapors when the engine is off.
- Canister Purge Valve (Solenoid): Usually located in the engine compartment, often near the driver’s side firewall or mounted on the upper intake manifold. It regulates when the engine “sucks” the stored vapors out of the canister to be burned in the combustion chamber.
- Wire Colors: Typically features a Grey/Red wire (12V power from the PCM relay) and a specific signal wire like Green/Black or Violet/White depending on the year.
- Canister Vent Solenoid: This is located near the charcoal canister under the truck. Its job is to allow fresh air into the system so the purge valve can create a vacuum. It is “Normally Open.”
- Fuel Tank Pressure (FTP) Sensor: This sensor is generally located on top of the fuel tank, often integrated into the fuel pump assembly or the vapor line leading from the tank. it measures the pressure/vacuum levels within the tank to tell the computer if there is a leak.
- Measurements: It typically operates on a 5-volt reference signal.
- The Gas Cap: While simple, the gas cap is a mechanical seal. If the gasket is cracked, the system cannot hold a vacuum, triggering a leak code.
How to Use and Read the EVAP System Diagram

Reading a Ford Ranger EVAP diagram requires understanding the flow of both air and electricity. The diagram is usually divided into two distinct circuits: the Vapor Flow Path and the Electrical Control Circuit.
1. Following the Vapor Flow:
In a standard diagram, you will see a line leading from the Fuel Tank to the Charcoal Canister. This is the “Vapor Line.” When the vehicle is sitting, vapors migrate here. Another line leaves the canister and runs the length of the frame rail up to the Purge Valve in the engine bay. Finally, a line goes from the Purge Valve into the Intake Manifold. To use the diagram for troubleshooting, you should trace these lines physically. On a Ranger, these are often made of nylon or reinforced rubber. Look for “elbow” connectors near the canister, as these are the most common points for dry-rot and cracking.
2. Understanding the Electrical Connections:
The diagram will show the Powertrain Control Module (PCM) controlling the solenoids. The PCM does not usually send 12V to the solenoids to turn them on; instead, it provides a “Ground.” This means the Purge Valve and Vent Solenoid usually have constant power when the key is in the “ON” position (look for the Grey/Red wire shared across many Ford sensors). The PCM then toggles the ground wire to open or close the valves. When reading the diagram, if you see a wire labeled “VPWR,” that is your 12V source.
3. Measuring Resistance:
If you are using a multimeter to test components shown on the diagram, the resistance (Ohms) is your primary metric. A healthy Ford Ranger Purge Solenoid should typically measure between 30 and 70 Ohms. If your multimeter shows “OL” (Open Line) or 0 Ohms, the internal coil has failed, and the part must be replaced regardless of what the hoses look like.
Maintenance and DIY Tips

Maintaining the EVAP system is largely about preventing physical damage and ensuring clean connections. Here are some practical tips for Ranger owners:
- Don’t “Top Off” Your Gas: When the pump clicks off, stop. Forcing more gas into the tank can send liquid fuel into the vapor lines and saturate the charcoal canister. Once the charcoal is wet with liquid gas, it can no longer trap vapors, and it will often lead to charcoal particles being sucked into the lines, clogging the Purge Valve.
- Inspect the “Chassis Harness”: Because the vent solenoid and canister are exposed to the elements under the truck, the wiring connectors often corrode. Every oil change, take a moment to look at the plug on the vent solenoid (near the spare tire or mid-frame). If you see green crust (copper oxidation), clean it with electronic cleaner and apply dielectric grease.
- Check the Elbows: Ford used soft rubber elbows to connect the hard nylon EVAP lines to the canister and the purge valve. These elbows are notorious for cracking as they age. Replacing a $5 rubber elbow can often save you from a $200 “smoke test” at a professional shop.
Troubleshooting Common EVAP Issues
If your “Check Engine” light is on with an EVAP-related code, follow this logical troubleshooting sequence based on the system diagram.
Step 1: The Gas Cap Test
Before diving under the truck, inspect the gas cap. Check the rubber O-ring for cracks. A common trick is to apply a very thin layer of Vaseline to the gas cap gasket to help it seal. Clear the code and see if it returns. If you have a P0457 code, this is specifically the “Check Fuel Cap” code.
Step 2: Testing the Purge Valve (P0443, P0455)
Locate the purge valve under the hood. Disconnect the vacuum line that leads to the charcoal canister (the one not going to the engine). With the engine running, place your finger over the port on the valve. You should feel NO vacuum at idle. If you feel suction, the valve is stuck open and is the cause of your leak and potential rough idle. If you have a P0443 code, use your multimeter to check for 12V at the Grey/Red wire with the key on.
Step 3: The Smoke Test
For small leaks (P0442), finding the hole visually is nearly impossible. Professional mechanics use a smoke machine to pressurize the system with thick white smoke. For a DIY version, you can build a “paint can” smoke machine (many tutorials exist online) or use a cigar to blow smoke into the EVAP service port (the green cap under the hood). Watch for smoke escaping from the lines, the canister, or the top of the fuel tank.
Step 4: The Vent Solenoid (P0446)
A P0446 code usually indicates a restricted flow. This often means the Vent Solenoid is stuck closed or the vent filter is clogged with spider webs or dirt. Since this component is under the truck, it is highly susceptible to road salt and debris. Remove the solenoid and try to blow air through it; it should be open when unpowered. If it’s blocked, replace it.
– P0455: Large Leak (Check gas cap or disconnected hose).
– P0442: Small Leak (Check rubber elbows/connectors).
– P0446: Vent Control Circuit (Check Vent Solenoid near canister).
– P0443: Purge Control Circuit (Check Purge Valve wiring/solenoid).
By understanding the layout and the specific roles of each component in your Ford Ranger’s EVAP system, you turn a complex emissions problem into a series of simple checks. Always start with the cheapest and most accessible parts—the gas cap and rubber elbows—before moving on to expensive sensors or dropping the fuel tank. With a basic multimeter and a clear understanding of the diagram, most EVAP issues can be solved in a driveway over a weekend.
Step-by-Step Guide to Understanding the Ford Ranger Evap System Diagram: Complete Layout Guide
Identify the charcoal canister mounted near the fuel tank frame.
Locate the EVAP purge valve situated within the engine bay.
Understand how the vapor lines connect the tank to the canister.
Apply the diagram to trace the specific hose routing and structure.
Verify that all electrical connectors and vacuum seals are tight.
Complete the repair by testing the system for any remaining leaks.
Frequently Asked Questions
Where is the charcoal canister located?
The EVAP charcoal canister is typically located underneath the vehicle, mounted to the frame rail near the fuel tank or spare tire. This central component is connected to the fuel tank via vapor lines and is accessible from beneath the truck for inspection or replacement of the vent solenoid.
What does the EVAP system diagram show?
This Ford Ranger EVAP system diagram shows the routing of fuel vapors throughout the vehicle’s emissions control structure. It details the connection between the fuel tank, charcoal canister, and engine intake, helping you visualize the configuration of hoses and electrical sensors that manage fuel tank pressure.
How many connections does the purge valve have?
Most Ford Ranger EVAP systems feature a 2-wire electrical connection for both the purge valve and the vent solenoid. These connections allow the PCM to command the valves open or closed, while the vacuum lines use quick-connect fittings or rubber hoses to maintain a sealed system layout.
What are the symptoms of a bad EVAP component?
Symptoms of a failing EVAP system include a glowing Check Engine Light with codes like P0442 or P0455, a strong smell of gasoline around the truck, and difficulty starting the engine after refueling. These issues often stem from a cracked hose or a stuck-open purge valve component.
Can I replace EVAP parts myself?
Replacing components like the purge valve or vent solenoid is a straightforward DIY task for most Ford Ranger owners. Using a diagram to understand the system configuration makes it easy to swap parts, though finding tiny vacuum leaks may require a specialized smoke machine for accurate diagnosis.
What tools do I need for EVAP repairs?
To work on your EVAP system, you will need a basic socket set, pliers for hose clamps, and a flat-head screwdriver. A diagnostic OBD-II scanner is essential for clearing codes, while a handheld vacuum pump can help test the integrity of individual lines and valves.


