Ford Ranger Brake Line Diagram: Step-by-Step Instructions
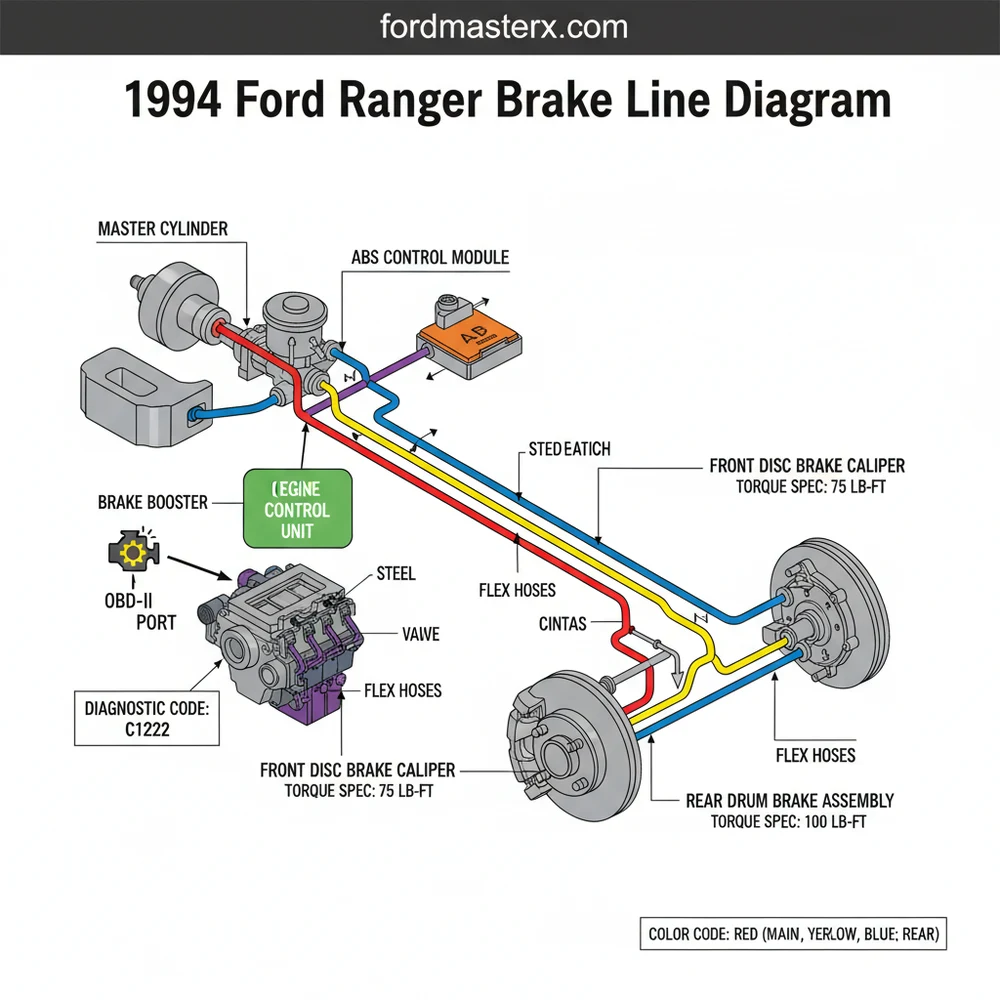
The 1994 Ford Ranger brake line diagram illustrates the hydraulic circuit from the master cylinder and RABS valve to the front calipers and rear drums. It identifies the routing of steel hard lines along the frame rail, the proportioning valve location, and the flexible rubber hoses at each wheel.
📌 Key Takeaways
- Visualizes the routing of hydraulic fluid from the master cylinder to each wheel.
- Identify the RABS valve and proportioning valve connections correctly.
- Always use double-flared steel lines and adhere to the specified torque spec.
- Bleeding the system is mandatory after any line replacement to remove trapped air.
- Use this diagram when diagnosing leaks, spongy pedals, or performing a restoration.
When you are maintaining or restoring a classic mid-size truck, having a clear and accurate 1994 ford ranger brake line diagram is essential for both safety and performance. The hydraulic system in this specific model year is a critical safety component that translates your foot’s pressure on the pedal into stopping power at the wheels. Over time, the original steel lines are highly susceptible to corrosion, especially in regions where road salt is used. By understanding the routing, junction points, and component locations shown in a proper schematic, you can effectively diagnose leaks, replace brittle lines, and ensure your truck remains reliable. This guide will walk you through the entire layout, from the master cylinder to the rear wheel cylinders, while providing the technical insights needed for a professional-grade repair.
Understanding the 1994 Ford Ranger Hydraulic Layout
The braking system on a 1994 Ford Ranger is typically a split-diagonal or front-to-rear system depending on the specific trim and wheelbase. Most models from this year feature a vacuum-assisted power brake booster mounted to the firewall, which holds the master cylinder. The master cylinder is the “heart” of the diagram, featuring two distinct reservoirs. The reservoir closest to the firewall usually services the front brakes, while the front reservoir handles the rear.
In 1994, the Ford Ranger utilized a Rear Antilock Brake System (RABS). This means the brake line routing includes a specific RABS valve located on the frame rail, usually below the driver’s feet, which is a common point for leaks or electrical failures.
The diagram identifies several key segments. First, two primary hard lines exit the master cylinder and travel toward the proportioning valve or the RABS valve. The front lines branch out to the left and right front wheels, transitioning from rigid steel tubing to flexible rubber hoses near the calipers to allow for steering and suspension movement. The rear line is a single long run that follows the driver-side frame rail back to a T-junction (or “union”) located on the rear axle. From this junction, two separate lines branch out to the left and right rear drum brake wheel cylinders.
While looking at the diagram, you will notice the distinction between the “hard lines” (steel or nickel-copper) and “soft lines” (rubber or braided stainless). The 1994 model year is unique because it sits on the cusp of modern electronic integration. While it doesn’t utilize a full modern ECU for four-wheel ABS, the RABS system does have a dedicated module that monitors wheel speed. If this system fails, you might see a dashboard light similar to a check engine light, but specifically for the ABS.
Step-by-Step Guide to Reading and Implementing the Diagram

Interpreting an automotive plumbing schematic requires a methodical approach. Follow these steps to translate the 1994 ford ranger brake line diagram into a physical repair on your vehicle.
- ✓ Identify the Master Cylinder Ports: Start at the top of the diagram. The master cylinder has two ports. Identify which one leads to the front brakes and which leads to the RABS valve for the rear.
- ✓ Locate the RABS Valve: Trace the line from the master cylinder to the RABS valve located on the inner frame rail. This component is critical for preventing rear-wheel lockup during heavy braking.
- ✓ Follow the Front Branches: Note how the front lines are routed around the engine crossmember. This routing is designed to keep lines away from heat sources like the exhaust manifold and moving parts like the accessory belt.
- ✓ Trace the Long Rear Run: The longest single line in the 1994 ford ranger brake line diagram runs from the RABS valve all the way to the rear axle. On extended cab models, this line is longer and often has more frame clips that can trap moisture and cause rust.
- ✓ Identify Junction Points: Look for the “T” symbols. These are brass or steel blocks where one line splits into two. The most important one is the rear axle junction, which often doubles as a vent for the differential.
To perform a replacement based on the diagram, you will need specific tools. A set of flare nut wrenches (also known as line wrenches) is mandatory to avoid stripping the soft brass fittings. You will also need a high-quality double-flaring tool if you are making your own lines, or you can purchase pre-flared lengths. Always ensure you are using the correct 3/16″ tubing for most of the runs on the Ranger.
Never use compression fittings on brake lines. They are not designed to handle the high hydraulic pressures (up to 2,000 PSI) generated during an emergency stop. Only use double-flared or ISO bubble-flared connections as specified by the manufacturer.
When installing new lines, refer to the diagram for the exact placement of frame clips. These clips prevent the lines from vibrating. Constant vibration can lead to “work hardening” of the metal, eventually causing the line to crack and leak.
Common Issues and Troubleshooting with Ranger Brake Lines

The 1994 Ford Ranger is a workhorse, but its age means the braking system is prone to specific failures. The most common issue is “spongy” pedal feel, which usually indicates air in the lines or a failing master cylinder. If you notice a drop in the fluid level but no visible puddles, inspect the area where the master cylinder meets the brake booster; fluid can leak internally into the booster.
Another frequent problem is a hard pedal accompanied by poor stopping distance. This can sometimes be traced back to a clogged RABS valve or a collapsed internal lining in one of the flexible rubber hoses. By using the diagram, you can perform a “sectional test” to see where the fluid pressure is being blocked.
If your ABS light is on, you can often pull a diagnostic code even without a high-end scanner. On many 1994 Rangers, you can ground a specific diagnostic wire under the hood to make the ABS light flash a code, helping you determine if the issue is a wheel sensor or the RABS valve itself.
Rust is the primary enemy of the 1994 Ford Ranger brake lines. Pay close attention to the areas where the lines run over the fuel tank or along the rear frame arch. These “blind spots” are notorious for hiding pinhole leaks that can lead to total brake failure if left unchecked.
Maintenance Tips and Best Practices
Maintaining your braking system involves more than just replacing pads. To ensure the longevity of your new lines and the overall health of your vehicle, adopt a holistic maintenance approach. While you are underneath the truck inspecting brake lines, it is the perfect time to check other vital systems. Ensure your coolant flow is unobstructed and that your radiator hoses are not soft. Check the condition of the timing chain (on the 2.3L and 4.0L engines) and the accessory belt for any signs of fraying or cracking.
For the brake lines specifically, consider using Nickel-Copper (NiCopp) tubing instead of standard zinc-coated steel. NiCopp is much easier to bend by hand, flares more reliably, and is virtually impervious to rust. This is a significant upgrade for a truck intended for long-term use.
When tightening fittings, pay attention to the torque spec. Over-tightening can crush the flare and cause a leak just as easily as under-tightening. Most flare nuts on a 1994 Ranger require approximately 10-14 lb-ft of torque. Always perform a final “leak test” by having an assistant press the brake pedal firmly while you inspect every junction identified in your 1994 ford ranger brake line diagram.
Finally, remember that brake fluid is hygroscopic, meaning it absorbs moisture from the air. This moisture leads to internal corrosion of the lines and the ECU-controlled ABS components. Flush your brake system with fresh DOT 3 fluid every two years to keep the internal passages clean and ensure your 1994 Ford Ranger stops as reliably as the day it left the factory. By following this comprehensive guide and referring to the provided diagram, you can master the complexities of your truck’s hydraulic system with confidence.
Frequently Asked Questions
Where is the brake proportioning valve located?
On the 1994 Ford Ranger, the proportioning valve is typically located on the driver-side frame rail, just below the master cylinder. It balances fluid pressure between the front disc brakes and rear drum brakes to prevent rear-wheel lockup during heavy braking or varying load conditions.
What does the brake line diagram show?
The 1994 Ford Ranger brake line diagram provides a schematic of the hydraulic circuit. It shows the routing of hard lines, location of the RABS (Rear Anti-lock Brake System) valve, and connections for the front brake hoses and rear wheel cylinders, ensuring proper fluid delivery.
What are the connections for the master cylinder?
The master cylinder features two main ports for primary and secondary circuits. The front port usually services the front brakes, while the rear port services the rear axle. Each fitting must be tightened to the specific torque spec to prevent leaks and maintain hydraulic integrity.
What are the symptoms of a bad brake line?
Symptoms include a spongy brake pedal, fluid puddles under the truck, or an illuminated check engine light or ABS light. While the ECU and OBD-II system primarily monitor electronic sensors, a significant pressure drop from a leak can trigger a diagnostic code for the RABS system.
Can I replace these brake lines myself?
Yes, brake line replacement is a common DIY task. You must be comfortable flaring steel lines and bleeding the brakes. Since a 1994 model lacks complex modern electronics, you won’t need an OBD-II scanner for basic plumbing, but attention to detail is critical for safety.
What tools do I need for brake line repair?
You will need a flare nut wrench set to avoid stripping fittings, a tubing cutter, and a double-flaring tool kit. Additionally, keep a torque wrench handy for fittings and a vacuum pump or assistant to help bleed the system once the new lines are installed.


