Ford Ka Engine Layout Diagram: Identification Guide
A Ford Ka engine layout diagram identifies critical components like the alternator, air filter housing, and battery placement. It helps owners locate sensors connected to the ECU and navigate the engine bay for maintenance. Understanding this layout is essential for performing fluid checks, belt replacements, and general engine bay troubleshooting.
📌 Key Takeaways
- Visual mapping of the engine bay for faster maintenance
- Identification of the drive belt and fluid reservoir locations
- Safety priority: ensure the engine is cool before handling components
- Practical use for locating the OBD-II port and sensor connectors
- Essential reference when diagnosing a check engine light
Finding an accurate ford ka engine layout diagram is the first step toward successful DIY maintenance or troubleshooting for this iconic compact car. Whether you are performing a simple oil change or investigating a complex electrical fault, understanding the spatial arrangement of components under the hood is essential. A clear diagram identifies the location of critical systems, from the cooling circuit to the fuel delivery components. This guide provides a comprehensive breakdown of the engine bay, helping you navigate the various sensors and mechanical parts to ensure your vehicle remains in peak operating condition.
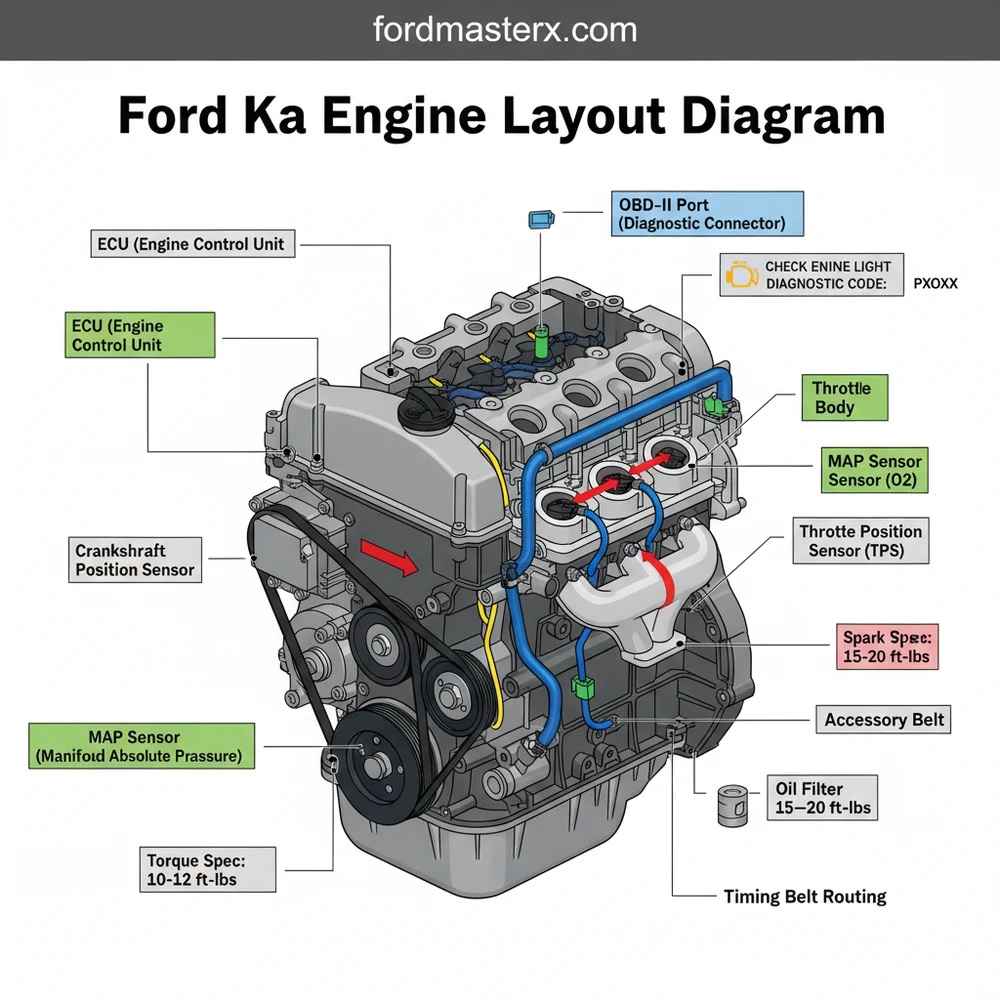
The engine bay of a Ford Ka is famously compact, requiring a strategic layout to fit all necessary components into a small footprint. When viewing a ford ka engine layout diagram, you will typically see the engine mounted transversally. For older models featuring the Endura-E engine, the layout is quite different from the later Duratec or Ti-VCT versions. In most diagrams, the most prominent feature is the engine block itself, topped by the rocker cover. To the left (passenger side on right-hand drive models), you will usually find the coolant expansion tank and the windshield washer reservoir. The right side typically houses the battery, the integrated air filter box, and the fuse box which contains the relays for the ECU.
Most Ford Ka engines utilize a timing chain rather than a belt for the camshaft drive, which reduces long-term maintenance costs. However, the accessory belt—also known as the serpentine belt—remains a wearable item that must be inspected regularly via the diagram’s specified path.
The visual breakdown of the engine also highlights the accessory belt path, which drives the alternator and, if equipped, the air conditioning compressor. The cooling system follows a specific coolant flow path, starting from the radiator at the front, through the thermostat housing, into the engine block, and back through the expansion tank. Identifying these paths on a diagram prevents common mistakes, such as overfilling reservoirs or misidentifying sensors. Color-coding in professional diagrams often helps distinguish between high-voltage electrical paths, fluid lines, and vacuum hoses. Modern Ka layouts also place significant emphasis on the air intake system, which sits prominently at the top or side to maximize airflow in the cramped engine compartment.
To effectively use a ford ka engine layout diagram for repairs or inspections, you must follow a systematic approach to identify and access components. Follow these steps to master your engine bay:
- ✓ Step 1: Secure the vehicle and open the hood. Ensure the engine is cool to the touch to avoid burns from the exhaust manifold or cooling system.
- ✓ Step 2: Orient yourself with the diagram. Identify the “front” of the engine, which is the side where the accessory belt and pulleys are located.
- ✓ Step 3: Locate the ECU and fuse box. The ECU serves as the brain of the car, and its location is vital if you are dealing with electrical issues or sensor failures.
- ✓ Step 4: Trace the coolant flow. Follow the hoses from the radiator to the engine block to check for leaks or brittle rubber that may require replacement.
- ✓ Step 5: Check the accessory belt tension. Using the diagram as a guide, locate the tensioner pulley and ensure the belt is not frayed or slipping.
- ✓ Step 6: Identify the oil dipstick and filler cap. These are usually marked with distinct icons or colors for quick identification during routine maintenance.
- ✓ Step 7: Locate the OBD-II port. While usually found inside the cabin under the dashboard, the engine layout diagram shows which sensors send data to this port.
- ✓ Step 8: Reference the specific torque spec for any fasteners you remove. Using a torque wrench ensures that components like spark plugs or valve covers are tightened to the exact manufacturer requirements.
When performing these steps, you will need a basic set of tools including a socket set (mostly metric for Ford vehicles), a torque wrench, a multimeter for electrical testing, and a flashlight. Always wear safety glasses and gloves when working near battery acid or hot fluids.
Never attempt to open the coolant expansion tank while the engine is hot. The system is under high pressure, and escaping steam can cause severe burns. Wait at least 30 minutes for the system to depressurize naturally.
Even with a robust engine like those found in the Ford Ka, issues inevitably arise. The most frequent problem owners encounter is the illumination of the check engine light. This warning is often triggered by a sensor sending an out-of-range signal to the ECU. Using the engine layout diagram, you can locate common culprits like the Oxygen (O2) sensor or the Mass Air Flow (MAF) sensor. By connecting an OBD-II scanner, you can retrieve a specific diagnostic code that points you toward the failing component.
Another common issue is localized overheating caused by a blockage in the coolant flow. If the diagram indicates the thermostat is located at the housing near the upper radiator hose, and that hose remains cold while the engine is hot, you have likely identified a stuck thermostat. Additionally, keep an ear out for squealing noises from the accessory belt, which often suggests a worn tensioner or a glazed belt. If you find persistent oil leaks, refer to the diagram to distinguish between a simple valve cover gasket leak and a more serious head gasket failure. If the diagnostic code indicates a “Misfire,” use the diagram to check the ignition coil pack and spark plug wires for signs of carbon tracking or moisture.
If you are struggling to find a diagnostic code, ensure your OBD-II scanner is fully seated in the port. On many Ford Ka models, the pins can become slightly recessed over time, leading to connection errors with the ECU.
Maintaining a Ford Ka is significantly easier when you adhere to best practices and manufacturer recommendations. One of the best ways to save money is to perform preventative maintenance rather than reactive repairs. Use your ford ka engine layout diagram to create a visual inspection checklist. Every month, check the tension of the accessory belt and look for any “sweating” around the timing chain cover. While the timing chain is designed to last the life of the engine, poor oil quality can cause the tensioners to fail prematurely.
Always adhere to the specific torque spec listed in your service manual for every bolt you touch. Over-tightening a bolt in the aluminum engine block can strip the threads, leading to a very expensive repair. When replacing parts, opt for high-quality or Original Equipment Manufacturer (OEM) components. Cheap aftermarket sensors often have different internal resistance levels, which can confuse the ECU and lead to a persistent check engine light even after the part is replaced.
Regularly flushing the cooling system ensures that the coolant flow remains unobstructed by scale or rust. This is particularly important for the Ford Ka, as the small radiator can easily become clogged. Finally, keep your engine bay clean. A clean engine makes it much easier to spot fresh leaks and prevents dirt from entering the air intake or sensitive electrical connectors. By combining the knowledge from a ford ka engine layout diagram with consistent maintenance habits, you will ensure your vehicle remains reliable for years to come.
Step-by-Step Guide to Understanding the Ford Ka Engine Layout Diagram: Identification Guide
Identify the main engine block and auxiliary components using the diagram.
Locate the air filter housing and battery for initial orientation.
Understand how the ECU integrates with various sensors across the engine.
Apply the diagram to find specific fluid reservoirs like oil and coolant.
Verify that all wiring connections and hoses match the layout provided.
Complete the inspection by checking for any signs of wear or leaks.
Frequently Asked Questions
Where is the ECU located?
In most Ford Ka models, the ECU is found behind the battery or near the firewall area. It acts as the brain of the vehicle, managing fuel injection and timing. If you experience performance issues, check this area for secure connections or signs of moisture damage that might affect electronics.
What does the Ford Ka engine layout diagram show?
The diagram illustrates the arrangement of the internal combustion engine, including the air intake, cooling system, and electrical harness. It serves as a visual map for locating specific parts like spark plugs or the oil filter, making it easier for owners to perform routine vehicle inspections and fluid top-ups.
How many connections does the OBD-II port have?
The OBD-II port features a standard 16-pin connector, typically located under the dashboard near the steering column or fuse box. This port allows you to plug in a scanner to read a diagnostic code when the check engine light appears, providing vital information about the engine’s sensor data.
What are the symptoms of a bad sensor?
Common symptoms include rough idling, reduced fuel economy, or a persistent check engine light on the dashboard. Using the engine layout diagram to locate sensors allows you to inspect for frayed wires or loose connectors, which often trigger a specific diagnostic code that identifies the exact malfunctioning engine part.
Can I replace the spark plugs myself?
Yes, replacing spark plugs on a Ford Ka is a common DIY task. Use the engine layout diagram to find the spark plug wires atop the engine block. You will need a spark plug socket and a torque wrench to ensure they meet the specific torque spec required by Ford.
What tools do I need for engine layout maintenance?
You will typically need a basic socket set, screwdrivers, and pliers for most tasks. For more advanced troubleshooting, an OBD-II scanner is essential for reading codes, and a torque wrench is necessary to tighten bolts to the manufacturer’s recommended torque spec to prevent any mechanical failure or fluid leaks.


