Ford Focus Door Lock Diagram: Complete Layout Guide
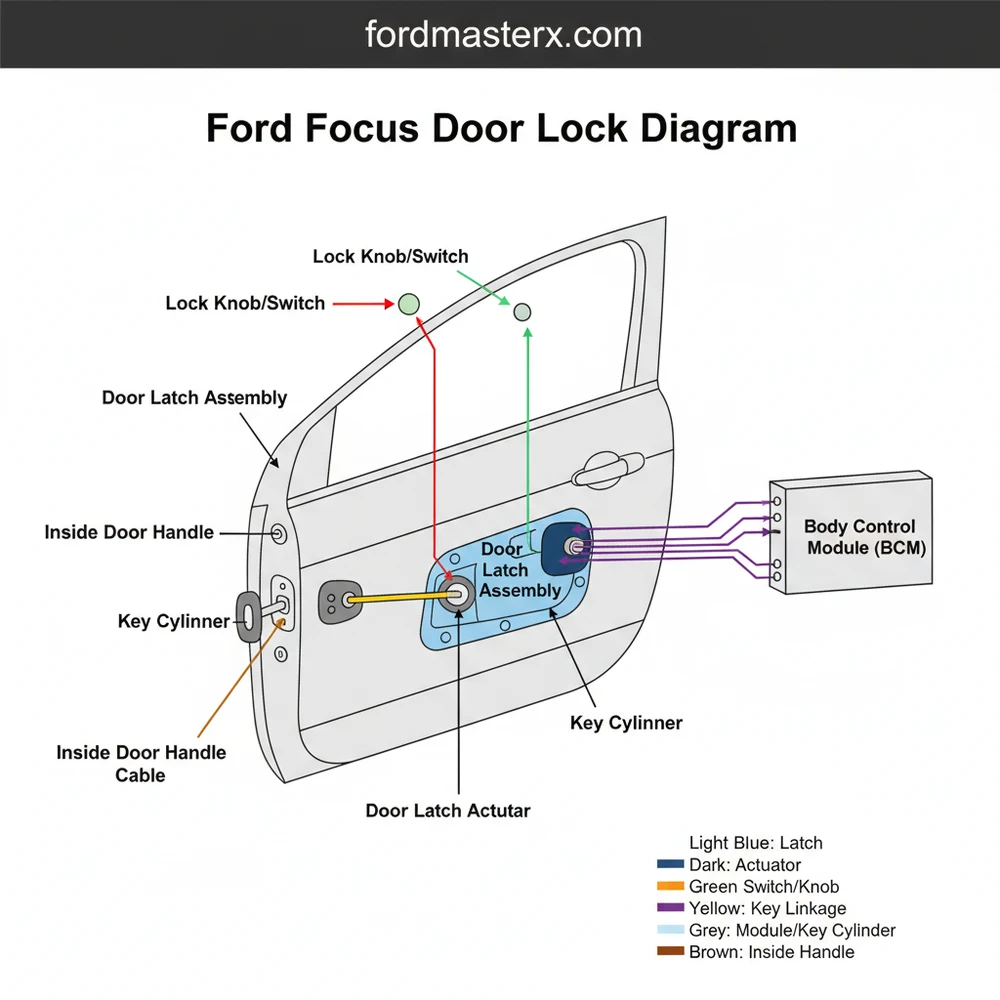
A Ford Focus door lock diagram illustrates the internal structure of the door latch assembly, including the actuator, linkage rods, and electrical connectors. It helps owners understand the system layout to identify broken components or faulty wiring configurations within the central locking system and interior handle mechanism.
📌 Key Takeaways
- Visualizes the connection between the door latch and electronic actuator.
- The door latch assembly is the most important component to identify.
- Always disconnect the battery before servicing electronic lock actuators.
- Use the diagram to trace wiring for intermittent locking failures.
- Reference this diagram when the door fails to lock or unlock via remote.
Dealing with a malfunctioning vehicle entry system can be both a safety risk and a significant daily inconvenience. Whether you are facing a door that refuses to stay latched, a central locking system that has gone silent, or a handle that feels disconnected, understanding the ford focus door lock diagram is the primary step toward a successful DIY repair. This comprehensive overview provides a detailed schematic of the internal locking mechanism, helping you identify every component from the electronic actuator to the mechanical latch. By the end of this guide, you will be equipped to diagnose, disassemble, and repair your locking system using a professional-grade blueprint of your vehicle’s hardware.
Understanding the Ford Focus Door Lock Structure and Layout
The door locking system in a Ford Focus is a hybrid of mechanical linkages and electronic controls. To accurately read a ford focus door lock diagram, one must first understand the spatial configuration of the components hidden behind the interior door panel. The system is generally divided into three main zones: the latch assembly (the “business end”), the handle interfaces, and the electronic control loop.
At the core of the system is the integrated latch and actuator assembly. In modern Ford Focus models, the mechanical latch—which physically grabs the striker on the car frame—and the electronic actuator—which pulls the locking pin—are often housed in a single plastic and metal unit. The schematic for this unit shows multiple points of entry for cables and electrical pins. You will notice two distinct Bowden cables: one leading to the interior door handle and another connecting to the exterior handle.
The layout also includes the door lock cylinder, typically found only on the driver’s side door. This cylinder is connected to the latch via a small metal rod or a plastic paddle. When you turn the key, this rod physically moves the tumbler within the latch. From an electrical perspective, the wiring harness provides a multi-pin connection to the actuator, sending signals to the Body Control Module (BCM) to indicate whether the door is “ajar” or “locked.”
| |
| (A) Inner Handle (B) Glass Track |
| | | |
| [====#=====================| |
| | Cable A | |
| | | (C) |
| | | Latch |
| | | |/Actu |
| || [X] |/ator |
| Cable B |_|\ |
| | \ |
| (D) Lock Cylinder | (E) |
| || Harness|
||
Figure 1: Conceptual Overview of the Ford Focus Door Lock System Layout
Most Ford Focus models utilize a “cable-driven” system rather than the solid metal rods found in older vehicles. These cables are prone to stretching or snapping at the plastic eyelets, which is often the cause of handle failure.
Step-by-Step Guide: Interpreting and Applying the Diagram

Successfully using a ford focus door lock diagram requires a methodical approach to disassembly and inspection. Follow these steps to navigate the system configuration safely and effectively.
Step 1: Preparation and Tool Gathering
Before touching the door, ensure you have the necessary tools. For a Ford Focus, you will typically need a set of Torx drivers (T20, T25, and T30), a plastic trim removal kit, and a flat-head screwdriver.
Always disconnect the negative battery terminal before working on the door locks. Many Focus models are equipped with side-impact airbags inside the door or seat; accidental deployment can cause serious injury.
Step 2: Removing the Interior Door Panel
Consult your diagram to locate the hidden screws. Common locations include behind the interior handle cover, inside the grab-handle pocket, and along the bottom edge of the door card. Use the plastic trim tool to pop the perimeter clips. Avoid using a metal screwdriver, as this will mar the paint and plastic.
Step 3: Peeling the Vapor Barrier
Behind the door card is a foam or plastic moisture barrier. Use a sharp blade to carefully cut through the black butyl adhesive. Do not tear the barrier, as it prevents water from entering the cabin and protects the electrical configuration of the lock system.
Step 4: Identifying Components via the Blueprint
Compare the physical components to your schematic. Locate the actuator assembly toward the rear edge of the door. Identify the two cables. The upper cable usually connects to the interior release, while the lower cable or rod connects to the exterior handle. Check for loose connections or broken plastic clips.
Step 5: Disconnecting the Actuator
To remove the unit, you must usually unscrew the three large Torx bolts found on the outer edge of the door frame (the jamb). Once loose, you will need to reach inside the door cavity to depress the tab on the electrical harness. Using the diagram as a guide, unhook the handle cables by rotating the plastic “Z-hooks” out of their sockets.
Step 6: Testing and Reinstallation
Before fully reassembling the door, connect the electrical harness to the new actuator and reconnect the battery briefly to test the “lock/unlock” function using the key fob. Ensure the mechanical latch clicks into place when manually pushed with a screwdriver.
- ✓ Verify all cable paths are clear of the window glass track.
- ✓ Ensure the wiring harness is clipped back into its factory routing to avoid rattles.
- ✓ Replace any broken plastic trim clips to ensure a tight fit of the door panel.
Common Issues and Troubleshooting

Even with a high-quality ford focus door lock diagram, some issues can be tricky to pin down. Here are the most frequent problems and how the diagram helps you solve them:
The “Machine Gun” Sound: If your lock makes a rapid clicking noise when you press the button, the internal plastic gears of the actuator are stripped. The schematic will show you that the actuator is a sealed unit; therefore, the entire latch/actuator assembly must be replaced.
Door Ajar Warning Stays On: This is a classic Ford issue where the microswitch inside the latch fails. Looking at the wiring configuration, you can identify which pins on the harness are responsible for the door-close signal. Often, a liberal application of electrical contact cleaner into the latch mechanism can fix this without disassembly.
Handle Moves but Door Won’t Open: This indicates a snapped Bowden cable. By referencing the blueprint, you can determine if it is the interior or exterior cable that has failed and order the specific part length for your Focus model (sedan vs. hatchback cables sometimes differ).
If the lock is stuck in the “locked” position and the door won’t open, you may need to apply rhythmic pressure to the outside of the door skin near the latch while hitting the unlock button. This can sometimes “shock” a failing motor into turning one last time.
Maintenance Tips and Best Practices
To ensure the longevity of your door lock system, regular maintenance is essential. While the ford focus door lock diagram is your map for repairs, these best practices will help you avoid needing it in the first place.
1. Lubrication is Key: Every six months, apply a small amount of dry graphite lubricant to the key cylinders. For the internal latch mechanism, use a spray-on white lithium grease. Avoid thick oils that attract dust and grit, which can eventually grind down the plastic gears identified in your component overview.
2. Check the Wiring Bellows: The bundle of wires that passes from the car body to the door is housed in a rubber bellows. Over years of opening and closing the door, these wires can fatigue and snap. If you experience intermittent lock failure, peel back the rubber boot and inspect the wires for cracks in the insulation.
3. Choose Quality Components: When replacing an actuator, it is often tempting to buy the cheapest aftermarket version available. However, because the labor involved in accessing the lock is significant, it is highly recommended to use OEM (Original Equipment Manufacturer) parts or high-quality certified replacements. Poorly made actuators often have incorrect pin configurations, which can lead to BCM errors.
4. Cost-Saving Strategy: If you are on a budget, many “failed” locks are simply the result of dirt buildup. Before buying a new part, use the diagram to locate the mechanical pivot points and clean them with a degreaser, then re-lubricate. This simple step can save you upwards of $200 in parts and labor.
In summary, a clear ford focus door lock diagram is an indispensable tool for any owner looking to maintain their vehicle’s security and functionality. By understanding the relationship between the actuator, the cables, and the electronic control system, you can turn a complex repair into a manageable afternoon project. Keep your components clean, follow the blueprint carefully, and your Ford Focus doors will operate smoothly for years to come.
Frequently Asked Questions
Where is the door lock actuator located?
The door lock actuator is integrated into the door latch assembly inside the door panel. You must remove the interior door trim and weather barrier to access this component. It is typically secured by three Torx bolts on the side of the door frame near the door striker plate.
What does the door lock diagram show?
This diagram shows the complete mechanical and electrical structure of the locking system. It details how the actuator interacts with the interior handle cable, exterior handle rod, and the central locking control module. This visual layout is essential for identifying specific failure points within the Ford Focus system.
How many wires does the Ford Focus lock actuator have?
Most Ford Focus door lock actuators feature a 4-pin or 6-pin electrical connector depending on the configuration. These wires handle the lock/unlock signals, door ajar sensing, and ground connections. Checking this configuration against the diagram helps diagnose whether a failure is mechanical or electrical in nature.
What are the symptoms of a bad door lock actuator?
Symptoms include doors failing to lock or unlock, unusual grinding noises from inside the door, or the car alarm triggering randomly. If the door lock diagram shows a specific linkage and the latch isn’t moving despite hearing the motor, the internal plastic gears or rods are likely damaged.
Can I replace the door lock assembly myself?
Yes, replacing the Ford Focus door lock is a common DIY task. It requires removing the door panel and window track in some models. While the system configuration is complex, following a detailed diagram makes the process manageable for those with basic tools and intermediate mechanical skills.
What tools do I need for door lock repair?
To service the door lock system, you will need a set of Torx bits (T20, T25, T30), a flathead screwdriver or trim removal tool, and needle-nose pliers. These tools allow you to remove the interior panels and disconnect the various linkage rods shown in the diagram layout.