Ford F150 Rear Suspension Diagram: Identification Guide
The Ford F150 rear suspension diagram illustrates a leaf spring system featuring shock absorbers, leaf packs, shackles, and U-bolts. It details how the rear axle connects to the frame, highlighting the load-bearing components and mounting points essential for maintaining vehicle stability, ride height, and towing capacity.
📌 Key Takeaways
- Identifies the relationship between leaf springs and the rear axle
- The shock absorber is the most critical component for dampening
- Always adhere to the manufacturer torque spec for U-bolts
- Inspect bushings for cracks to prevent clunking noises
- Use this diagram during lift kit installations or shock replacement
When you are working on a heavy-duty pickup, clarity is the difference between a successful repair and a costly mistake. Understanding the intricacies of a ford f150 rear suspension diagram is essential for any truck owner looking to maintain vehicle stability, towing capacity, and ride quality. This guide serves as a technical walkthrough for DIY enthusiasts and professionals alike, providing a clear visual and conceptual roadmap of the components that support your truck’s rear end. By the end of this article, you will be able to identify every major component, understand the mechanical physics at play, and execute repairs with the precision required for high-stress automotive systems.
The Anatomy of the Rear Suspension System
The rear suspension of the Ford F-150 is a masterclass in functional simplicity and durability. While front-wheel-drive cars often use complex multi-link setups, the F-150 traditionally utilizes a “Hotchkiss” style live-axle system. When examining a ford f150 rear suspension diagram, you will notice three primary functional groups: the springing medium, the dampening system, and the locating hardware.
Most F-150 models utilize a leaf spring configuration, but performance variants or those with specialized packages may include electronic damping sensors that interface with the vehicle’s onboard computer systems.
At the heart of the diagram are the leaf springs. These are long, curved strips of spring steel layered together to form a “pack.” The longest leaf, known as the main leaf, features “eyes” at either end where it attaches to the frame. The diagram will typically highlight the forward hanger (a rigid bracket) and the rear shackle (a pivoting link). This shackle is critical because as the leaf spring flattens under a load, it physically grows in length; the shackle allows for this movement.
The shock absorbers are positioned diagonally, often in a staggered formation (one facing forward, one facing rearward). This design helps counteract “axle wrap,” which is the tendency of the rear axle to rotate during heavy acceleration. The ford f150 rear suspension diagram also details the U-bolts, which wrap around the axle housing and sandwich the leaf spring pack against the spring perch. These are high-tension items that require a specific torque spec to ensure the axle does not shift during operation.
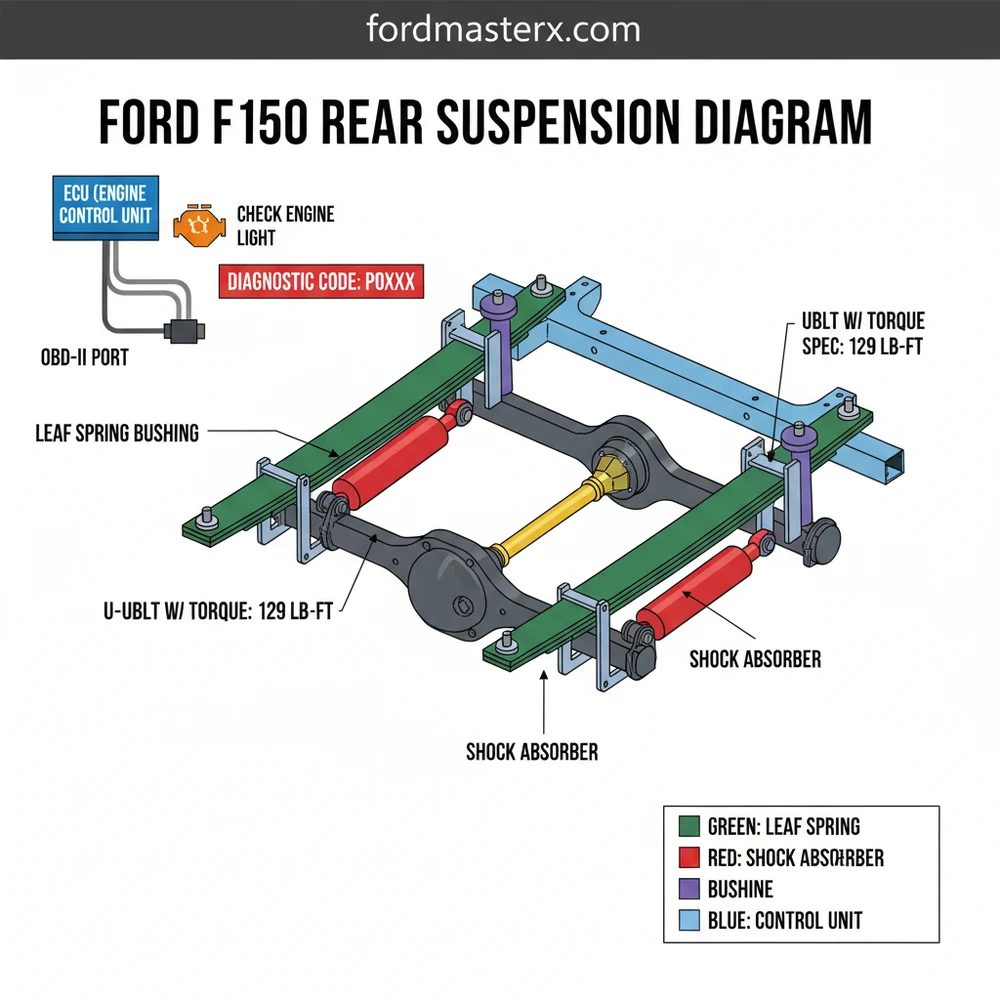
[DIAGRAM_PLACEHOLDER – A detailed exploded view showing the Ford F-150 Rear Suspension: Leaf Spring Pack, Rear Shackle, Front Hanger, Shock Absorber, U-Bolts, Axle Housing, and Bump Stop.]
How to Read and Apply the Diagram for Maintenance

Interpreting a technical diagram requires more than just looking at pictures; it requires understanding the assembly sequence. When using a ford f150 rear suspension diagram to perform a repair or upgrade, such as installing a leveling kit or replacing worn bushings, follow these structured steps to ensure accuracy and safety.
- ✓ 1. Identify the Assembly Perspective: Determine if the diagram is a “plan view” (from above) or an “exploded view” (individual parts separated). Most F-150 suspension diagrams are exploded views to show the order of nuts, washers, and bolts.
- ✓ 2. Cross-Reference Parts Numbers: Use the callout numbers on the diagram to match the components in your parts kit. This prevents installing a passenger-side shock on the driver-side mount if they are valved differently.
- ✓ 3. Establish a Safety Perimeter: Before touching any bolt, ensure the truck is on level ground. Use a heavy-duty floor jack and high-weight-capacity jack stands. Never rely on the jack alone when working under the leaf springs.
- ✓ 4. Release Tension Gradually: The rear suspension is under immense stored energy. When following the diagram to remove the shackle bolts, ensure the axle is supported so the springs do not “snap” upward once released.
- ✓ 5. Apply Correct Fastener Tension: Refer to the technical notes on the diagram for the specific torque spec. Suspension bolts are often “torque-to-yield” or require high foot-pound ratings to prevent loosening from road vibration.
- ✓ 6. Final Inspection and Alignment: Once the components are installed according to the diagram, lower the vehicle to its own weight before doing the final tightening. This prevents the rubber bushings from being “pre-twisted” or pre-loaded.
U-bolts are generally considered one-time-use items. Once they are torqued and stretched to secure the leaf springs, their structural integrity is compromised if removed and reused. Always purchase new U-bolts when replacing leaf springs.
Common Issues and Troubleshooting with the Diagram

The ford f150 rear suspension diagram is an invaluable tool when troubleshooting common “truck noises” or handling issues. One of the most frequent complaints is a squeaking or groaning sound from the rear. By referencing the diagram, you can pinpoint the friction points: the leaf spring bushings, the shackle pivots, or the plastic “isclator pads” between the individual leaves.
Another common issue is “rear-end sag.” If your truck leans to one side or sits lower than it used to, use the diagram to inspect the leaf pack for a cracked or broken leaf. If the truck feels bouncy or “floaty” after hitting a bump, the diagram will point you to the shock absorbers; look for oil leaking down the side of the shock body as a sign of internal seal failure.
In modern F-150s equipped with electronic ride control or towing assists, the rear suspension may interface with the vehicle’s ECU. If a sensor arm (attached to the suspension) is bent or disconnected, the OBD-II system may trigger a check engine light or a “Service Suspension” message. You can use a scanner to pull a diagnostic code, which will often direct you to a specific corner of the vehicle illustrated in your diagram.
Pro-Tips for Suspension Longevity and Performance
Maintaining your suspension is about more than just replacing broken parts; it is about preventative care. While you are under the truck referencing your ford f150 rear suspension diagram, take a moment to inspect the entire chassis. A holistic approach to maintenance ensures that your truck remains reliable from the engine to the tailgate.
Whenever you perform a seasonal suspension check, extend your inspection to the front of the vehicle. Check your accessory belt for cracking, ensure proper coolant flow through the radiator hoses, and listen for any unusual noise from the timing chain area. A well-maintained suspension is only useful if the engine is equally healthy.
When installing new components, always choose high-quality polyurethane bushings if you want a firmer, more controlled ride, or stay with OEM rubber if you prefer maximum vibration dampening. If you live in a “salt belt” state where roads are treated in winter, apply a lanolin-based or oil-based rust inhibitor to the areas shown on the diagram—specifically the leaf spring hangers and the U-bolt threads. Corrosion in these areas is the leading cause of “frozen” bolts that require a torch to remove.
Finally, keep a printed copy of the ford f150 rear suspension diagram in your glove box or digital workshop manual. Having this visual reference allows you to communicate more effectively with mechanics or parts counter professionals. Understanding the relationship between the axle, the springs, and the frame ensures that your Ford F-150 continues to provide the legendary “Built Ford Tough” performance for hundreds of thousands of miles. Whether you are hauling a trailer or commuting to work, a well-understood and properly maintained rear suspension is the foundation of your truck’s capability.
Step-by-Step Guide to Understanding the Ford F150 Rear Suspension Diagram: Identification Guide
Identify the main leaf spring pack and shock absorbers on the diagram to understand the layout.
Locate the U-bolts and mounting plates that sandwich the springs to the rear axle tubes.
Understand how the rear shackle moves to allow the leaf spring to flatten under heavy loads.
Apply the correct torque spec to the U-bolt nuts in a cross-pattern to ensure even clamping.
Verify that the shock absorbers are not leaking fluid and the bushings are centered in their mounts.
Complete the inspection by checking for any diagnostic code errors if your F150 uses electronic damping.
Frequently Asked Questions
Where is the rear shock absorber located?
The rear shocks are located between the frame and the axle, mounted at an angle. They are typically secured by a single bolt at the top frame mount and another at the bottom axle bracket, serving to dampen spring oscillation and provide a controlled ride.
What does the rear suspension diagram show?
The diagram shows the assembly of the leaf spring pack, the shackle that allows for spring expansion, the U-bolts securing the axle, and the shock absorbers. It provides a visual map of how the rear end supports weight and manages road impact.
How many connections does the leaf spring have?
Each leaf spring has three primary connection points: the front eyelet bolt attached to the frame, the rear shackle assembly that connects to the frame hanger, and the center mounting point where U-bolts clamp the spring pack securely to the rear axle housing.
What are the symptoms of a bad rear suspension?
Common symptoms include sagging, bouncy ride, or clunking. On modern trims with electronic leveling, a fault may trigger a check engine light or stability warning. Use an OBD-II scanner to check the ECU for a specific diagnostic code related to ride height sensors.
Can I replace Ford F150 leaf springs myself?
Yes, leaf spring replacement is a feasible DIY project for those with heavy-duty floor jacks and jack stands. However, because these components are under significant tension and hold the weight of the truck, extreme caution and proper support of the frame are required during the process.
What tools do I need for suspension repair?
You will need a high-capacity floor jack, jack stands, a deep socket set, a breaker bar, and a torque wrench. Using a torque wrench is vital to ensure all fasteners meet the required torque spec, preventing the hardware from loosening under heavy towing loads.


