Ford E350 Fuse Box Diagram: Quick Identification Guide
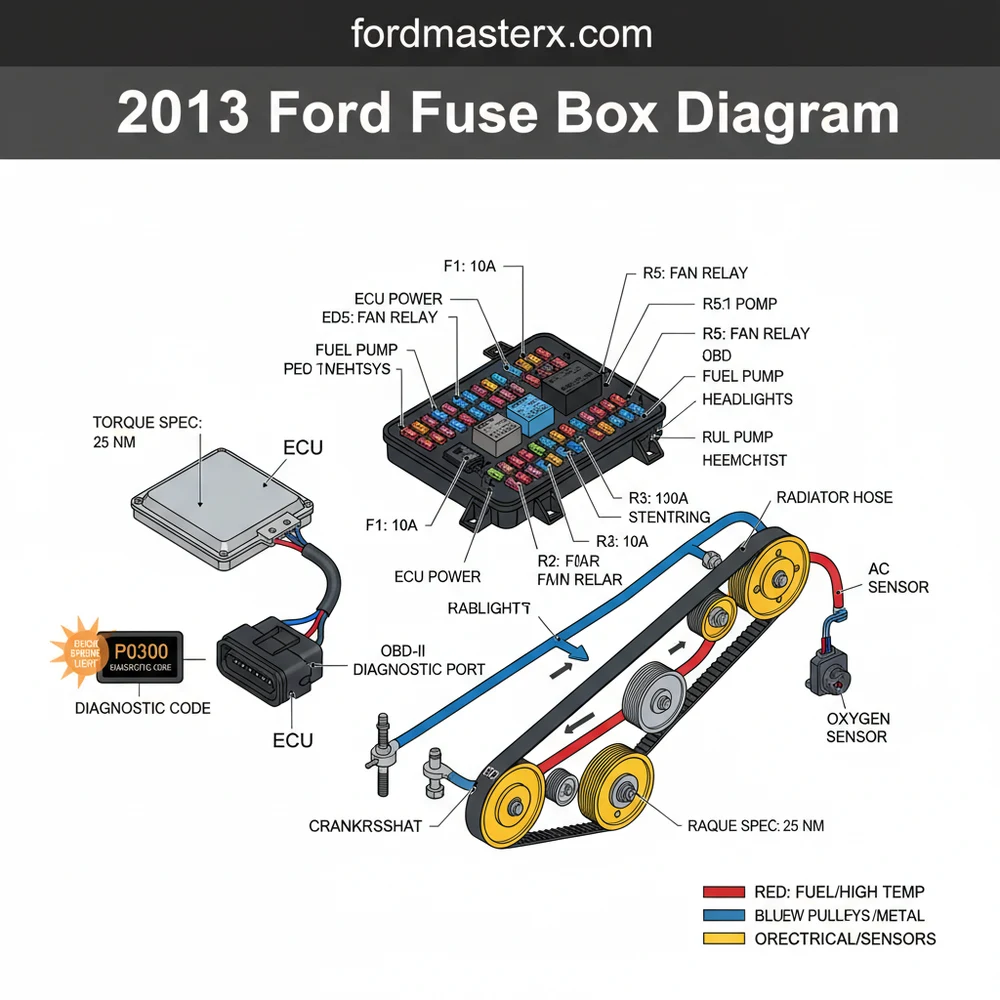
The 2013 Ford E350 fuse box diagram identifies two main panels: the passenger compartment fuse panel located under the dashboard to the left of the steering wheel, and the power distribution box found in the engine compartment. These charts map critical circuits like the ECU, fuel pump, and OBD-II port for fast troubleshooting.
📌 Key Takeaways
- Primary resource for locating interior and engine bay electrical protection
- Essential for identifying fuses linked to the ECU and powertrain controls
- Always match amperage ratings exactly to prevent electrical fires
- Use the diagram to isolate circuits when a check engine light appears
- Critical tool for diagnosing dead power outlets or lighting failures
Finding an accurate 2013 ford e350 fuse box diagram is the first step toward resolving a wide range of electrical issues, from a malfunctioning radio to a complex engine stall. For owners of this heavy-duty van, the fuse box serves as the central nervous system for the vehicle’s electrical distribution. Understanding where these panels are located and how to interpret their layouts allows you to diagnose problems without expensive shop visits. This guide provides a comprehensive breakdown of both the passenger compartment and engine bay fuse panels, ensuring you have the knowledge to maintain your vehicle’s electrical integrity.
Understanding the 2013 Ford E350 Fuse Box Layout
The 2013 Ford E350 utilizes two primary fuse locations to manage its extensive electrical system. The first is the Passenger Compartment Fuse Panel, and the second is the Power Distribution Box located under the hood. Each serves a distinct
The diagram for these boxes acts as a map. On the underside of the plastic covers, you will typically find a basic legend, but a detailed 2013 ford e350 fuse box diagram provides specific amperage ratings and the exact circuit names. These diagrams use a grid-based numbering system. For instance, in the interior panel, fuses are numbered 1 through 48. In the Power Distribution Box, you will find a mix of mini-fuses, maxi-fuses, and relays. Relays are larger, square components that act as electrically operated switches for high-draw items like the starter motor or the A/C compressor.
Most 2013 E350 models share a common fuse architecture, but variations exist between the Cutaway chassis and the standard Cargo/Passenger vans. Always verify the amperage listed on the fuse itself against the diagram before replacement.
Step-By-Step Guide to Reading and Navigating the Fuse System

Navigating the electrical system of a full-size van can be daunting, but following a structured approach makes the task manageable. Whether you are dealing with a dead OBD-II port or a flicker in your dashboard, use these steps to identify and fix the issue.
- Locate the Fuse Panels: The interior fuse box is situated to the left of the steering wheel, near the brake pedal. You will need to remove a plastic trim cover to access it. The Power Distribution Box is located in the engine compartment on the driver’s side, near the battery.
- Identify the Problem Circuit: Before pulling fuses at random, identify which component is failing. If your scanner cannot link to the vehicle, you likely have a blown fuse for the OBD-II port (often shared with the cigar lighter). If the van won’t start, focus on the ECU or fuel pump relays in the engine bay box.
- Consult the Diagram: Match the fuse number from the 2013 ford e350 fuse box diagram to the physical location in the box. The diagram will tell you if it should be a 10A (red), 15A (blue), 20A (yellow), or 25A (clear) fuse.
- Inspect the Fuse: Use a fuse puller tool (often found inside the fuse box cover) to remove the suspected fuse. Look at the metal wire inside the plastic housing. If the wire is broken or the plastic is charred, the fuse is blown.
- Check for Continuity: For a more accurate test, use a multimeter set to the “ohms” or “continuity” setting. Touch the probes to the two small metal tabs on the top of the fuse. A “beep” or a reading of 0 ohms indicates the fuse is good.
- Replace with Correct Amperage: Never replace a blown fuse with one of a higher amperage. Doing so can cause the wires to overheat, potentially leading to a fire. If the diagram calls for a 15A fuse, only use a 15A fuse.
Always turn off the ignition and disconnect the negative battery terminal if you are working on high-current relays or the main power distribution feeds to avoid accidental shorts or shocks.
For those performing more advanced maintenance, remember that the electrical system is interconnected with mechanical components. For example, while the timing chain is a mechanical link, the sensors that monitor its position send data to the ECU, which is protected by specific fuses in the engine bay. Similarly, the coolant flow is managed by a mechanical pump, but the cooling fans that pull air through the radiator are triggered by relays in the Power Distribution Box.
Common Issues and Troubleshooting

One of the most frequent issues E350 owners face is a check engine light that appears after a battery jump-start. This can occur if a voltage spike blows a sensitive fuse related to the emissions system or the ECU. By using your diagnostic tool to read the specific diagnostic code, you can often trace the fault back to a single fuse rather than a failed sensor.
Another common problem is the loss of power to the OBD-II port. In the 2013 E350, the cigar lighter and the diagnostic port often share a circuit (usually Fuse #20 in the interior panel). If you plug a heavy-draw accessory into the lighter socket, it may blow the fuse, preventing you from performing emissions testing or reading engine data.
If you find that a fuse blows immediately after replacement, do not keep replacing it. This indicates a “hard short” in the wiring. Common areas for shorts in these vans include the wiring harnesses near the accessory belt, where vibration can cause the insulation to rub off against the engine block, or near the rear tail light housings where moisture can enter.
Keep a small “emergency kit” in your glovebox containing a copy of the fuse diagram, a fuse puller, and a variety pack of ATM mini-fuses and J-Case fuses. It can save you from a tow truck bill in the middle of a trip.
Maintenance Best Practices and Professional Tips
To keep your 2013 Ford E350 running reliably, you should treat the fuse box as part of your regular maintenance schedule. Every time you change your oil or check your accessory belt, take a moment to ensure the fuse box covers are securely latched. Moisture and road salt are the enemies of electrical connections; if the covers are loose, corrosion can build up on the fuse terminals, leading to intermittent power loss.
When cleaning the engine bay, avoid spraying high-pressure water directly at the Power Distribution Box. While they are designed to be weather-resistant, they are not waterproof. If you do notice green or white crusty deposits on the fuses, remove them and clean the contacts with a dedicated electrical contact cleaner and a small nylon brush.
- ✓ Battery Terminals: Ensure battery cables are tight. The proper torque spec for the terminal nut is usually around 80-100 inch-pounds. Loose terminals can cause voltage drops that mimic blown fuses.
- ✓ Relay Health: If a component like the A/C compressor isn’t engaging, try swapping the relay with an identical one from a non-essential system (like the horn) to see if the function returns.
- ✓ Ground Wires: Check the ground straps near the engine block. A rusty ground can cause a diagnostic code that suggests a component failure when the fuse is actually fine.
In conclusion, mastering the 2013 ford e350 fuse box diagram is an essential skill for any owner or fleet manager. By knowing the locations of the ECU and OBD-II fuses, and understanding how they interact with the broader mechanical systems like coolant flow and charging, you can troubleshoot issues quickly and accurately. Whether you are clearing a check engine light or restoring power to your interior accessories, the fuse box is your first line of defense in maintaining the longevity and performance of your Ford E-Series van. Always prioritize safety, use the correct replacement parts, and consult your owner’s manual for model-specific variations.
Step-by-Step Guide to Understanding the Ford E350 Fuse Box Diagram: Quick Identification Guide
Identify the electrical symptom and consult the diagram to find the corresponding circuit.
Locate the fuse panel in either the engine compartment or under the driver-side dashboard.
Understand the amperage rating required for the specific slot by checking the diagram legend.
Connect a diagnostic tool to the OBD-II port if you need to clear a stored diagnostic code.
Verify that the replacement fuse is seated firmly and the circuit functionality is restored.
Complete the repair by replacing the fuse box cover securely to protect the terminals.
Frequently Asked Questions
Where is the interior fuse box located?
The interior fuse box is situated under the instrument panel on the driver’s side, to the left of the brake pedal. You may need to remove a plastic trim cover to access the fuses. This panel controls cabin features like the radio, dome lights, and the OBD-II diagnostic port connection.
What does the E350 fuse diagram show?
The diagram provides a visual map of every fuse and relay. It lists the numerical slot, the amperage rating, and the specific component it protects, such as the fuel pump or headlights. This prevents confusion when a specific system fails and requires a quick visual inspection of the circuit.
How many relays does the engine fuse box have?
The power distribution box typically contains over a dozen high-current relays and several large J-case fuses. These handle high-load components like the cooling fan, starter motor, and ECU power. The diagram on the underside of the box lid identifies the orientation and function of each relay for easy replacement.
What are the symptoms of a bad ECU fuse?
If the ECU fuse blows, your vehicle may crank but fail to start, or stall unexpectedly. Often, this will trigger a check engine light and prevent a scanner from retrieving a diagnostic code because the module lacks power. Checking this fuse first can save hours of unnecessary engine diagnostic work.
Can I replace Ford E350 fuses myself?
Yes, replacing a fuse is a simple DIY task. However, if you are disconnecting the battery or replacing high-power distribution blocks, ensure you follow the manufacturer’s torque spec for terminal nuts. Always ensure the ignition is off before pulling any fuses to avoid creating an accidental electrical short or surge.
What tools do I need for fuse replacement?
You primarily need a small fuse puller tool, which is often located inside one of the fuse box covers. A multimeter or a simple test light is also highly recommended to check for continuity across the fuse without removing it, which speeds up the troubleshooting process significantly during repairs.


