Ford 6.0 Oil Filter Housing Diagram: Component Guide
The Ford 6.0 oil filter housing diagram illustrates the assembly located in the top-center engine valley. This configuration includes the filter cap, standpipe, and drain-back valve. Understanding this system layout is essential for identifying components like the oil pressure and temperature sensors while ensuring a leak-free filtration process.
📌 Key Takeaways
- Visualizes the top-mounted filtration system layout
- Identifies the critical standpipe and drain-back valve
- Stresses the importance of using OEM-style tall caps
- Useful for diagnosing low oil pressure or leaks
- Ideal for DIY maintenance and component replacement
Understanding the layout of your Ford 6.0 oil filter housing is critical for maintaining engine health and preventing catastrophic oil starvation. Whether you are performing a routine oil change or diagnosing a complex pressure issue, a clear ford 6.0 oil filter housing diagram provides a visual blueprint of this unique top-mounted cartridge system. This guide will walk you through the internal configuration of the housing, identify every critical component, and provide a schematic overview of how oil flows through the filtration system. By the end of this article, you will be able to identify common failure points and service your Powerstroke with confidence.
Comprehensive Ford 6.0 Oil Filter Housing Diagram Description
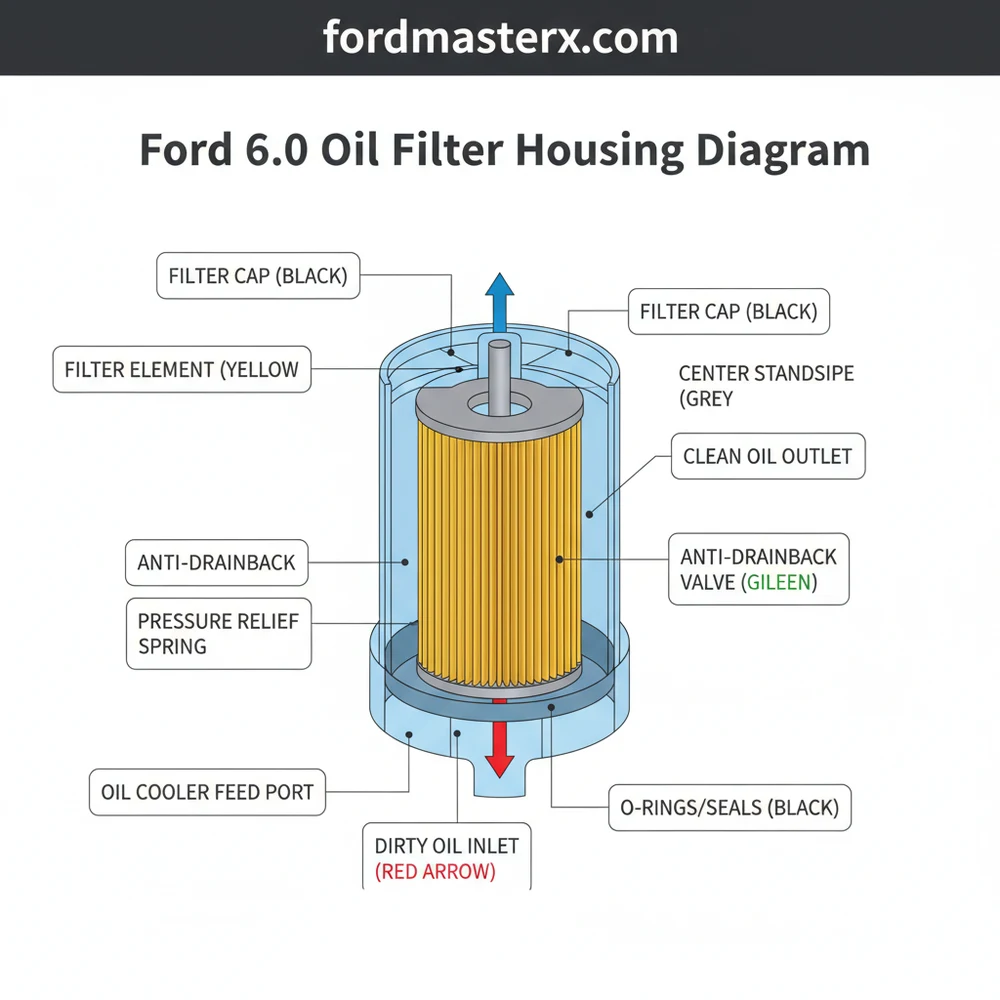
The ford 6.0 oil filter housing diagram illustrates a sophisticated top-load cartridge system that differs significantly from traditional spin-on filters found on older diesel engines. Located at the front of the engine valley, the housing is integrated into a larger assembly that includes the fuel filter housing and the oil cooler. The system is designed to allow for easy access from the top of the engine bay, but its complexity means that understanding the internal structure is vital for proper maintenance.
At the core of the layout is the housing base, which is secured to the oil cooler cover. Inside this base, the most prominent feature is the center standpipe. This vertical pipe serves as the primary conduit for filtered oil to return to the engine’s high-pressure system. Surrounding the standpipe is the filter cartridge itself, which is held in place by the filter cap. The diagram also highlights several critical valves that manage oil flow. The anti-drainback valve, located at the bottom of the housing, ensures that oil remains in the housing when the engine is off, facilitating faster oil pressure buildup during startup.
Another key component in the schematic is the oil bypass valve. This safety feature is designed to open if the filter becomes completely clogged, allowing unfiltered oil to circulate to prevent the engine from seizing. Furthermore, the housing configuration includes a drain-back port that opens when the filter cap is loosened, allowing old oil to drain into the crankcase before the filter is removed. This prevents a mess during servicing but requires the filter to be properly seated to close the valve during operation.
[DIAGRAM_PLACEHOLDER: A detailed technical schematic showing the Ford 6.0 oil filter housing assembly, including the cap, O-ring, filter cartridge, center standpipe, anti-drainback valve, and bypass valve assembly.]
Step-by-Step Guide to Interpreting and Servicing the Housing

Reading a technical blueprint or diagram can be intimidating, but breaking the system down into its functional steps makes it much more manageable. Following the correct procedure is essential to ensure that the internal valves are functioning and that the seals are air-tight.
The Ford 6.0 Powerstroke uses a specific 36mm socket for the oil filter cap. Using adjustable wrenches or pliers can crack the plastic cap, leading to leaks or air intrusion into the oil system.
Tools and Materials Needed
- ✓ 36mm Low-profile socket
- ✓ Torque wrench (capable of 19 lb-ft)
- ✓ OEM Replacement Filter (Motorcraft FL-2016)
- ✓ New rubber O-ring (usually included with the filter)
- ✓ Clean, lint-free shop rags
Installation and Inspection Procedure
1. Cap Loosening and Drainage: Use your 36mm socket to slowly loosen the oil filter cap. As you unscrew the cap, the internal drain-back valve (visible in the diagram at the base of the standpipe) will open. Wait approximately two minutes before fully removing the cap to allow all the oil within the housing to drain back into the pan.
2. Visual Component Identification: Once the cap and filter are removed, consult your diagram to identify the standpipe. Inspect the plastic standpipe for any cracks or signs of heat stress. If the standpipe is broken, the filter will not seat properly, and unfiltered oil may bypass the system.
3. Filter and Cap Separation: Pull the old filter out of the cap. Note how the filter snaps into the cap. This is a critical part of the configuration; if the filter is not snapped in, it may not align with the standpipe correctly during reinstallation.
4. Cleaning and O-Ring Replacement: Clean the threads of the housing and the cap thoroughly. Remove the old rubber O-ring from the cap and replace it with the new one provided in your filter kit. Lightly lubricate the new O-ring with fresh engine oil to ensure a proper seal.
5. Anti-Drainback Valve Check: Look down into the bottom of the housing. You should see a small plastic plunger or tab. This is the anti-drainback valve. Ensure it is clear of debris. If this valve is stuck open, you may experience “dry starts” where the engine lacks oil pressure for several seconds after ignition.
6. Filter Seating: Snap the new filter into the cap before inserting it into the housing. This ensures the filter is centered. Carefully lower the assembly onto the standpipe. You should feel a slight resistance as the filter slides over the standpipe seals.
7. Final Torquing: Hand-thread the cap to avoid cross-threading the plastic threads. Once hand-tight, use your torque wrench to tighten the cap to 19 lb-ft (25 Nm). Do not overtighten, as the housing or cap can crack easily under excessive pressure.
Common Issues & Troubleshooting Using the Diagram
The ford 6.0 oil filter housing diagram is an invaluable tool when troubleshooting performance issues. One of the most common problems is the use of aftermarket “tall” caps. Many aftermarket filters are slightly taller than the OEM Motorcraft version and come with a taller cap to accommodate them. If you use an OEM filter with an aftermarket tall cap, the filter will not be pressed down far enough to close the drain-back valve. This results in oil constantly draining back to the pan while the engine is running, causing low oil pressure and potential engine damage.
Another frequent issue is a cracked standpipe. In the system layout, the standpipe is responsible for guiding the filtered oil. If the plastic becomes brittle and breaks, the oil can bypass the filtration media entirely. Symptoms include rapidly darkening oil or increased engine wear. By referring to the schematic, you can identify where the standpipe should sit and verify its structural integrity during every oil change.
Never operate the engine if the oil filter cap is leaking. Even a small mist of oil can indicate that the high-pressure system is drawing air, which can lead to fuel injector failure in the 6.0 Powerstroke engine.
Tips & Best Practices for Maintenance
To ensure the longevity of your engine and the reliability of your oil filtration system, follow these professional recommendations based on the system configuration.
Always use Motorcraft FL-2016 filters. The 6.0 engine is notoriously sensitive to filtration quality and filter height. OEM filters are designed specifically to interact with the standpipe and drain-back valve in the housing.
Maintenance recommendations:
– Consistent Inspections: Every time you have the cap off, use a flashlight to inspect the bottom of the housing for metal shavings or debris. Because this is the primary filtration point, it is the best place to catch early signs of engine or high-pressure oil pump failure.
– Lubricate the Seal: Never install the cap O-ring dry. A dry O-ring can bunch up or tear as the cap is torqued down, leading to a massive oil leak.
– Check the Bypass Valve: If you find the filter is crushed or deformed upon removal, this is a sign that the oil bypass valve (shown in your overview diagram) may be sticking or the oil is too thick for the cold start conditions.
– Avoid Over-tightening: The 19 lb-ft specification is lower than many people realize. Over-tightening doesn’t create a better seal; it only stresses the plastic components.
In conclusion, having a firm grasp of the ford 6.0 oil filter housing diagram allows you to move beyond basic maintenance into advanced engine care. By understanding the relationship between the cap, the standpipe, and the various valves within the housing, you can ensure your Powerstroke remains properly lubricated and protected from contaminants. Always prioritize OEM components and follow the specific torque requirements to maintain the integrity of this vital engine system.
Frequently Asked Questions
Where is the Ford 6.0 oil filter housing located?
The Ford 6.0 oil filter housing is located on the top of the engine, specifically in the front section of the engine valley. It sits adjacent to the fuel filter housing, making it easily accessible for routine service without needing to crawl under the vehicle.
What does this diagram show?
The Ford 6.0 oil filter housing diagram shows the complete internal structure and external mounting configuration. It highlights the filter cap, the center standpipe, the drain-back valve assembly, and the ports for the engine oil temperature (EOT) and engine oil pressure (EOP) sensors.
How many connections does the oil filter housing have?
The housing features a main oil supply port, a return port to the engine, and a drain-back port. It also includes two threaded ports for the oil pressure and temperature sensors, integrated into the overall system configuration to monitor engine health in real-time.
What are the symptoms of a bad oil filter housing?
Symptoms include oil pooling in the engine valley, low oil pressure warnings, or a ‘no-start’ condition if the drain-back valve fails. Cracks in the housing structure or damaged threads on the cap can also lead to significant external oil leaks and pressure loss.
Can I replace the oil filter housing myself?
Yes, replacing the housing is a common DIY task. It involves removing the filter cap, disconnecting the oil sensors, and unbolting the unit from the engine block. Ensure you have new gaskets and follow torque specifications to maintain the integrity of the high-pressure oil system.
What tools do I need for this task?
You will need a 36mm socket for the filter cap, a set of metric sockets for the housing bolts, and a torque wrench. Using a 36mm socket prevents rounding off the plastic cap, which is a common issue during maintenance of this specific component.


