F150 Fuse Box Diagram: Quick Identification Guide
The 2012 Ford F150 features two primary fuse panels. The interior fuse box is located behind the passenger-side kick panel, while the power distribution box is found under the hood above the radiator. These diagrams are essential for identifying circuits related to the ECU, fuel pump, and OBD-II diagnostic system.
📌 Key Takeaways
- Locate the interior and engine bay fuse boxes easily
- Identify fuses for the ECU, fuel pump, and headlights
- Always replace fuses with the exact amperage rating specified
- Use the diagram to troubleshoot a non-responsive OBD-II port
- Consult the diagram before replacing expensive electrical components
When you are stranded on the side of the road or facing a mysterious electrical glitch in your truck, the 2012 f150 fuse box diagram becomes your most valuable piece of technical literature. Identifying the correct fuse or relay is the first step in DIY diagnostics, allowing you to bypass expensive shop fees for simple fixes like a dead power outlet or a malfunctioning fuel pump. This guide provides a deep dive into the 2012 Ford F-150 electrical layout, covering both the interior and engine bay panels. By the end of this article, you will understand how to locate specific components, interpret the diagram’s numbering system, and troubleshoot common electrical failures effectively.
Understanding the Layout: Power Distribution vs. Passenger Compartment
The electrical architecture of the 2012 F-150 is divided into two primary zones. The first is the Power Distribution Box, located under the hood, and the second is the Passenger Compartment Fuse Panel, tucked away in the interior. Understanding the distinction between these two is critical for efficient troubleshooting. The engine bay box typically houses high-amperage fuses and relays that manage heavy-duty systems like the cooling fans, starter motor, and the ECU (Engine Control Unit). Conversely, the interior panel manages lower-amperage circuits related to comfort and convenience, such as the radio, interior lighting, and the OBD-II port.
The 2012 F-150 uses a mix of Mini fuses, Cartridge (J-Case) fuses, and high-power relays. Always ensure you are looking at the correct diagram for your specific engine variant, as the 3.5L EcoBoost, 5.0L V8, and 6.2L V8 may have slight variations in high-amperage relay assignments.
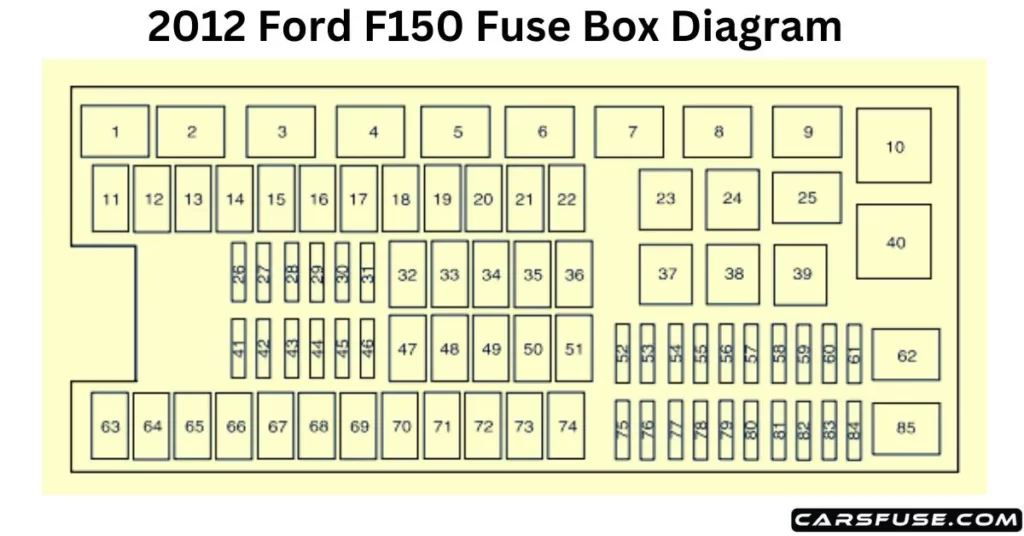
The 2012 f150 fuse box diagram utilizes a grid-based numbering system. In the engine bay box, the fuses are numbered 1 through 80, while the interior panel uses a separate sequence. Visualizing these components requires looking at the embossed diagram usually found on the underside of the plastic fuse box covers. If these covers are missing or the text has faded, referring to a high-resolution digital diagram is necessary to ensure you don’t pull the wrong circuit, which could inadvertently reset the ECU or trigger a check engine light.
Step-by-Step Guide to Reading and Navigating the Diagram

Interpreting an automotive circuit map requires a methodical approach. Follow these steps to master the 2012 f150 fuse box diagram and apply it to your vehicle maintenance routine.
1. Identify the Symptom and Map the Circuit: Before opening the hood, determine which system is failing. If the truck won’t start but the battery is strong, you should look for the fuel pump relay or the ECU power fuse. If your scan tool won’t connect to the vehicle, you likely have a blown fuse for the OBD-II data link connector.
2. Locate the Relevant Fuse Box: For engine performance issues, head to the front of the engine bay. The power distribution box is a long rectangular black box located near the radiator. For interior issues like power windows or the SYNC system, look at the passenger-side kick panel, located just to the right of the passenger’s feet.
3. Open the Housing Safely: Ensure the ignition is completely off. For the engine bay box, squeeze the tabs on the side of the cover to lift it. For the interior panel, pull the plastic trim cover toward you to reveal the fuse array.
4. Match the Diagram to the Hardware: Hold the diagram in the same orientation as the physical box. In the 2012 F-150, the fuses are often grouped by type. For example, the smaller Mini fuses handle 5A to 30A, while the larger square J-Case fuses handle 30A to 60A.
5. Inspect the Fuse: Use a fuse puller tool (usually found in the interior panel) to remove the suspected fuse. Hold it up to a light source. If the metal filament inside is broken or the plastic is charred, the fuse is blown.
6. Verify with a Multimeter: For a more accurate diagnosis, set your multimeter to the continuity setting. Touch the probes to the small metal test points on top of the fuse. If it beeps, the fuse is good. If there is no sound, the circuit is open.
7. Install the Replacement: Only replace a blown fuse with one of the exact same amperage rating. Installing a higher-amperage fuse can cause the wiring to overheat, potentially leading to a fire.
8. Reset and Test: Once replaced, turn the key to the ‘On’ position and test the component. If the fuse blows again immediately, you have a short circuit that requires deeper electrical investigation.
Never use a screwdriver or metal pliers to pull a fuse while the battery is connected. Doing so can cause a short circuit against the metal chassis, potentially damaging the ECU or sensitive electronic modules.
Common Issues and Troubleshooting with the 2012 F-150
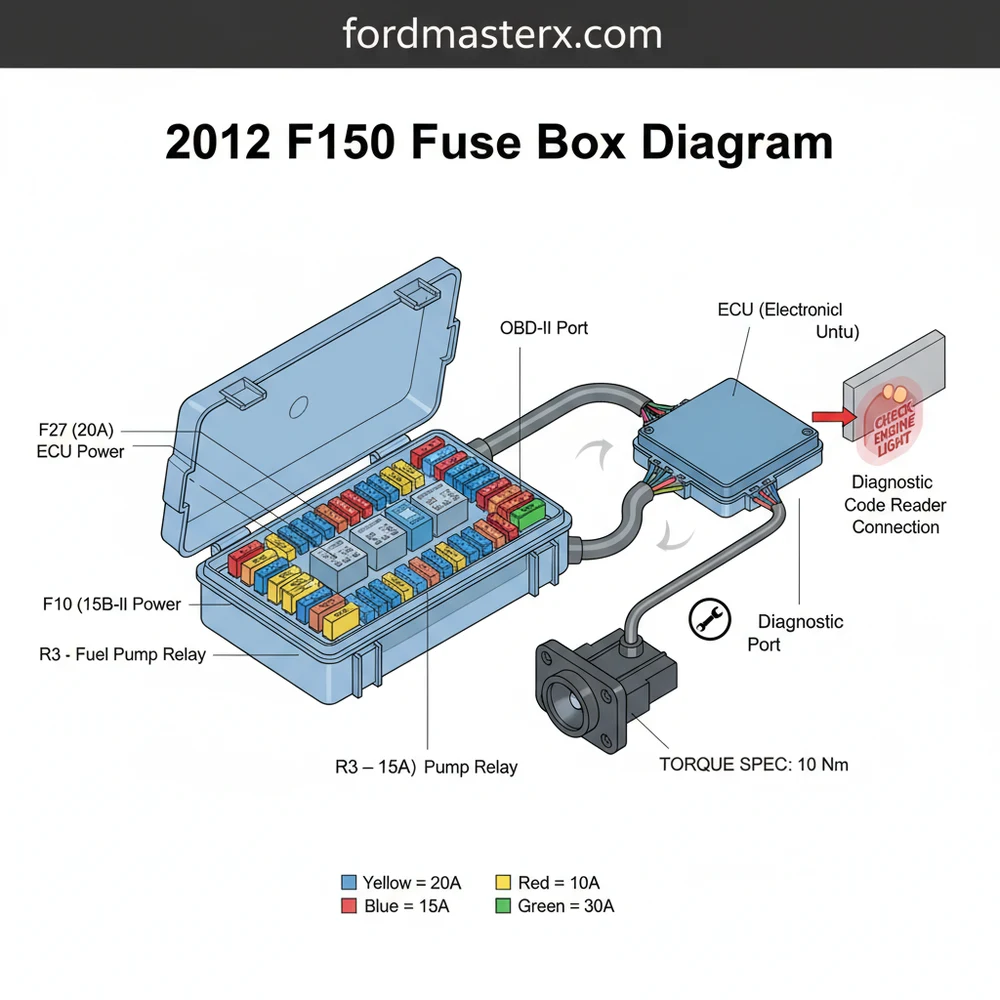
One of the most frequent issues reported by owners of the 2012 model is a sudden “crank but no start” condition. This is often traced back to Fuse 27 in the engine bay power distribution box. This 20-amp fuse controls the fuel pump relay power. Over time, the fuse terminal can overheat and melt the plastic housing, leading to intermittent contact. Checking the 2012 f150 fuse box diagram will help you locate this specific slot to check for signs of heat damage.
Another common troubleshooting scenario involves the check engine light. If you attempt to pull a diagnostic code but your OBD-II scanner won’t power up, check Fuse 43 in the interior panel. This fuse provides the 12V power to the diagnostic port. Furthermore, if you experience issues with the radiator fans not spinning—which directly affects coolant flow and can lead to overheating—verify Fuse 76 (40A) and Fuse 80 (40A) in the engine bay.
If you find a melted fuse 27, Ford offers a “Fuse 27 Relocation Kit.” This kit moves the fuel pump circuit to a larger, more robust terminal in the fuse box to prevent future melting issues and road-side breakdowns.
Tips and Best Practices for Electrical Maintenance
Maintaining the electrical health of your F-150 goes beyond just swapping fuses. Follow these best practices to ensure long-term reliability:
- ✓ Keep Spare Fuses: Always carry an assortment of Mini and J-Case fuses in your glove box.
- ✓ Check Battery Terminals: Ensure your battery terminals are clean and tightened to the correct torque spec. Loose terminals cause voltage spikes that can blow sensitive fuses.
- ✓ Inspect the Accessory Belt: A worn accessory belt can cause the alternator to slip, leading to inconsistent voltage that might mimic a fuse issue.
- ✓ Monitor Engine Timing: If your truck displays a diagnostic code related to cam sensors, check the fuses for the VCT (Variable Cam Timing) solenoids before assuming the timing chain has stretched.
When working on your truck, always prioritize quality. Use OEM-spec fuses rather than cheap, unbranded alternatives that may not blow at the rated amperage. If you are troubleshooting a complex issue like a parasitic drain, utilize the 2012 f150 fuse box diagram to pull fuses one by one while monitoring the battery draw with an ammeter. This systematic approach allows you to isolate exactly which circuit is staying “awake” and draining your battery overnight.
Lastly, remember that a fuse is a safety device. It is designed to be the weakest link in the circuit to protect expensive components like the ECU or the wiring harness. If a fuse blows repeatedly, do not simply keep replacing it. This is a clear sign of an underlying problem, such as a pinched wire, a failing motor, or a grounded circuit. By using the 2012 f150 fuse box diagram correctly, you empower yourself to diagnose these issues with the same precision as a professional technician, keeping your Ford F-150 on the road and running strong.
Frequently Asked Questions
Where is the F150 fuse box located?
The 2012 F150 has two fuse boxes. The passenger compartment fuse panel is located behind a trim cover on the right-hand side kick panel. The high-current power distribution box is located in the engine compartment, situated centrally above the radiator for easy access during roadside electrical troubleshooting.
What does the fuse box diagram show?
The diagram provides a visual map of every fuse and relay. It identifies which circuit each component protects, such as the ECU, trailer lights, or radio. It also lists the required amperage for each slot, preventing you from using the wrong fuse and potentially damaging your vehicle’s wiring.
How many fuses does the F150 have?
The F150 contains dozens of fuses and relays split between the interior and engine bay panels. The interior panel typically manages lower-amperage cabin features, while the engine bay box handles high-current components like the cooling fans and starter motor, ensuring the entire electrical system remains protected from surges.
What are the symptoms of a bad ECU fuse?
A blown ECU fuse will typically cause the engine to crank but not start. You may also see a check engine light or find that your scanner cannot pull a diagnostic code because the OBD-II port has lost power. Checking this fuse first can save you hours of unnecessary mechanical diagnosis.
Can I replace a fuse myself?
Yes, replacing a fuse is a simple DIY task. After identifying the correct fuse using the diagram, use a fuse puller tool to remove the suspect component. If the metal link inside is broken, insert a new fuse of the same color and amperage to restore power to the circuit.
What tools do I need for fuse replacement?
You only need a few basic tools: a plastic fuse puller (often found inside the fuse box lid), a flashlight, and a multimeter to test for continuity. If you are cleaning ground connections or battery terminals while working, ensure you follow the correct torque spec for any tightened bolts.


