Econoline Van Ford E150 Fuse Box Diagram: Easy Setup Guide
The Econoline van Ford E150 fuse box diagram typically identifies two main panels: the passenger compartment fuse panel located under the dashboard to the left of the steering column and the power distribution box found in the engine compartment. These charts label every fuse and relay responsible for circuits like lights, fuel pumps, and wipers.
📌 Key Takeaways
- The diagram serves as a map for protecting the van’s electrical circuits.
- Identifying the specific fuse for the ECU or fuel pump is critical for starting issues.
- Always disconnect or turn off the ignition to prevent shorts during inspection.
- Keep a spare set of fuses and a puller tool inside the glove box for emergencies.
- Use the diagram to troubleshoot non-responsive components before seeking professional repair.
Navigating the electrical architecture of a full-size vehicle can be a challenge for even seasoned DIY mechanics. When your power windows fail to roll up or your instrument cluster goes dark, the first point of inspection should always be the electrical protection system. Understanding the econoline van ford e150 fuse box diagram is essential for pinpointing the exact circuit responsible for your vehicle’s malfunction. This comprehensive guide will walk you through the locations, layouts, and technical specifications of the Ford E-150 fuse blocks. You will learn how to identify blown fuses, troubleshoot power loss to the ECU, and resolve common electrical gremlins that often result in a check engine light or a non-responsive OBD-II port. By the end of this article, you will have the confidence to manage your van’s electrical health without a trip to the dealership.
Most Ford E-150 models utilize a dual-box system: a Passenger Compartment Fuse Panel located under the dash and a Power Distribution Box located in the engine compartment near the battery.

Understanding the Econoline Van Ford E150 Fuse Box Diagram
The electrical system in an Econoline van is divided into two distinct zones. The interior panel, often located behind a plastic cover near the driver’s left knee, primarily protects low-amperage accessories. This includes the radio, interior lights, power mirrors, and the OBD-II diagnostic port. If you are unable to pull a diagnostic code because your scanner won’t power up, the culprit is almost always a blown fuse in this interior block.
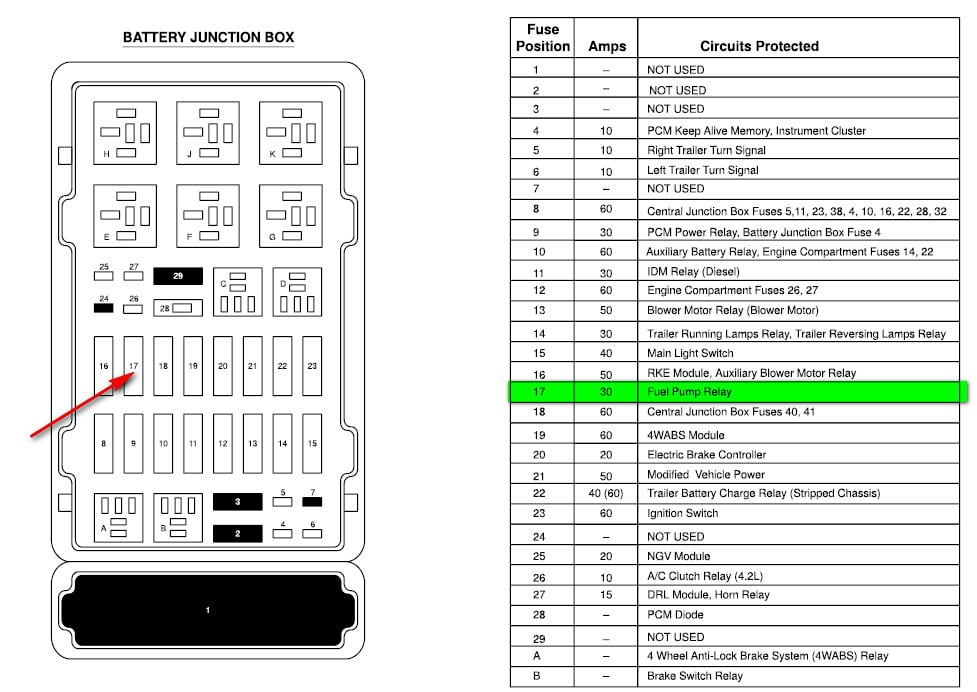
The under-hood Power Distribution Box is the “heavy lifter” of the system. This box contains high-amperage Maxi-fuses and various relays. These components protect vital powertrain systems like the ECU (Engine Control Unit), the fuel pump, and the anti-lock brake system. This box is also where you will find the relays that control the cooling fans, which are critical for maintaining proper coolant flow through the radiator. The diagram for this box is usually embossed on the underside of the plastic cover, providing a grid-style map that correlates numbers to specific vehicle functions.
Visually, the diagram uses a numbering system (e.g., 1 through 50) and a color-coding scheme. Standard mini-fuses follow an industry-standard color code: 10-amp fuses are red, 15-amp are blue, 20-amp are yellow, and 30-amp are green. Relays are typically depicted as larger square blocks. Understanding this visual language is the key to quickly identifying which fuse corresponds to a specific failure, such as a dead horn or flickering headlights.
[DIAGRAM_PLACEHOLDER: Interior Fuse Panel Layout]
| Fuse # | Amperage | Protected Component |
|---|---|---|
| 1 | 20A | Cigarette Lighter / OBD-II Power |
| 5 | 15A | Turn Signals / Back-up Lamps |
| 13 | 5A | Instrument Cluster / ECU Keep Alive Power |
Step-by-Step Guide to Using Your Fuse Box Diagram

Interpreting an econoline van ford e150 fuse box diagram and performing a replacement is a straightforward process, but it requires precision to avoid damaging the delicate electrical terminals. Follow these steps to safely diagnose and repair your van’s electrical circuits.
1. Location and Access
Start by locating the interior panel. It is usually found under the instrument panel to the left of the steering column. You may need to remove a plastic trim piece or a pull-down cover. For the engine compartment box, pop the hood and look for a black rectangular box near the driver-side fender or battery tray. Ensure the area is clear of debris or oil before opening the cover.
2. Map the Faulty Component
Identify the symptom. If your van’s check engine light is on but your scanner won’t link, look at the diagram for the fuse labeled “Cigarette Lighter” or “Data Link Connector.” In many Ford vehicles, the OBD-II port shares a circuit with the 12V power outlets. Consult your econoline van ford e150 fuse box diagram to find the specific slot number for that component.
3. Visual and Physical Inspection
Before pulling the fuse, turn the ignition to the “Off” position. Use a plastic fuse puller tool (often found inside the fuse box cover) to remove the suspected fuse. Hold it up to a light source. If the metal filament inside the translucent plastic is broken or if the plastic is charred, the fuse is blown.
Never replace a blown fuse with one of a higher amperage rating. Doing so can cause the wiring to overheat, potentially leading to an electrical fire or permanent damage to the ECU.
4. Testing with a Multimeter
Sometimes a fuse looks intact but has a hairline fracture. Set your digital multimeter to the “Continuity” or “Ohms” setting. Touch the probes to the two small metal test points on the top of the fuse while it is still seated in the box. A continuous beep or a reading near 0 ohms indicates the fuse is good. No beep indicates an open circuit.
5. Verify Related Systems
While you have the hood open to access the distribution box, perform a quick visual inspection of the surrounding mechanical components. Ensure that wires are routed away from the accessory belt and that there is no rubbing against the timing chain cover. Vibrations from the engine can sometimes chafe wires, leading to intermittent shorts that blow fuses.
6. Replacement and Testing
Insert a new fuse of the exact same amperage and color. Turn the ignition to the “On” position and test the component. If the fuse blows again immediately, you have a direct short to ground in the wiring harness or a failing component (like a seized blower motor) that must be addressed before further testing.
- ✓ Multimeter or Test Light
- ✓ Plastic Fuse Puller
- ✓ Replacement Mini and Maxi Fuses
- ✓ Flashlight for dark footwells
Common Issues & Troubleshooting
The Ford E-150 is a robust platform, but certain electrical issues recur frequently. One of the most common complaints is the failure of the fuel pump relay, located in the engine bay box. If the engine cranks but will not start, and you cannot hear the faint “hum” of the fuel pump when you turn the key, the relay or its fuse may be faulty.
Another frequent issue involves the OBD-II port. When a check engine light appears, owners often find that their diagnostic tool cannot communicate with the vehicle. This is almost always caused by a blown fuse in the interior panel that serves the cigarette lighter. Because these ports are often used for heavy-duty chargers, they are prone to overloading.
If you encounter a diagnostic code related to the transmission or engine sensors, check the ECU power fuse. A corroded or loose fuse can cause “phantom” codes that suggest mechanical failure when the issue is actually inconsistent voltage. Always check your battery terminals as well; ensure they are tight and clean. While there isn’t a specific torque spec for fuse box bolts, the battery terminals should generally be tightened to about 10-15 lb-ft to ensure a solid connection to the distribution system.
If you are experiencing multiple electrical failures simultaneously, check the main “Mega-Fuse” located near the starter solenoid. This fuse protects the entire alternator charging circuit.
Tips & Best Practices for Electrical Maintenance
To keep your Econoline van running smoothly, proactive maintenance of the electrical system is just as important as changing the oil. Moisture is the enemy of the fuse box. Periodically inspect the seals on the under-hood distribution box cover. If the seal is cracked, road salt and water can enter, causing terminal corrosion that leads to high resistance and heat.
When performing engine work, such as replacing an accessory belt or checking the timing chain for slack, take a moment to ensure all wiring harnesses are secured in their factory clips. A harness that falls against the hot exhaust manifold will melt, blowing fuses and potentially frying the ECU.
Additionally, if you have recently performed a coolant flush, ensure that the coolant flow sensors and electric fan connectors are dry. Spilled coolant can conduct electricity and cause a short in the fan relay circuit, which you would then have to trace back to the engine bay fuse box.
Finally, always keep a small assortment of spare fuses and a copy of the econoline van ford e150 fuse box diagram in your glovebox. Electrical issues rarely happen at convenient times, and being prepared can turn a potential breakdown into a five-minute fix. Using high-quality, OEM-spec fuses ensures that the circuit will break exactly when it is supposed to, protecting your van’s expensive electronic modules from damage. By following these guidelines and regularly referencing your diagram, you ensure your Ford E-150 remains a reliable workhorse for years to come.
Frequently Asked Questions
Where is the Ford E150 fuse box located?
There are usually two locations: the interior fuse panel is situated under the driver’s side dashboard, often hidden by a plastic cover. The high-current power distribution box is located in the engine bay, typically near the battery or driver’s side fender, containing larger fuses and critical relays.
What does the Econoline fuse box diagram show?
The diagram provides a numbered layout of every fuse and relay slot within the panels. It specifies the amperage rating for each fuse and describes which electrical component it protects, such as the radio, power windows, headlights, or the power supply to the OBD-II diagnostic port.
How many fuses does the E150 van have?
The total number of fuses varies by year, but most Econoline vans feature between 30 to 45 fuses in the interior panel and approximately 15 to 25 high-power fuses and relays in the engine compartment. Refer to your specific diagram to confirm the exact count for your model.
What are the symptoms of a bad fuse in an E150?
The most common symptom is the sudden failure of a specific electrical component, like the horn or wipers, while others work fine. If your OBD-II scanner won’t power up or the check engine light fails to come on during the bulb test, a blown fuse is often the culprit.
Can I replace an E150 fuse myself?
Yes, replacing a fuse is a simple DIY task. Once you locate the blown fuse using the diagram, use a fuse puller to remove it and insert a new one with the exact same amperage. This often resolves minor electrical failures without needing a mechanic or complex tools.
What tools do I need for fuse box maintenance?
You primarily need a plastic fuse puller (often found inside the fuse box cover), a set of replacement fuses of varying amperages, and a basic test light or multimeter. For larger relay changes or battery terminal cleaning, a small socket set to meet the proper torque spec is helpful.


