Dashboard F150 Interior Parts Diagram: Complete Guide
The dashboard F150 interior parts diagram illustrates the internal structure of the cabin, including the instrument panel, center console, and glove box configuration. It maps out how each component and trim piece fits into the overall system, helping you identify fastener locations and wiring routes for efficient repairs or custom interior upgrades.
📌 Key Takeaways
- Visual map of the Ford F150 dashboard configuration
- Identify the instrument cluster and airbag housing mounting points
- Always disconnect the battery before working near dash airbags
- Use plastic pry tools to protect the interior trim structure
- Reference this diagram when troubleshooting electrical system shorts
Navigating the interior of a Ford F-150 can be a daunting task, especially when you need to access specific components buried deep within the dash. Whether you are a DIY enthusiast or a professional mechanic, having a reliable dashboard f150 interior parts diagram is vital for accurate repairs and upgrades. This comprehensive guide explores the intricate layout and system configuration of the F-150 cabin. You will learn to identify key internal structures, interpret complex schematics, and gain the confidence to handle everything from minor trim repairs to major electronic troubleshooting.
The dashboard of the F-150 is a modular assembly. Most components are held in place by a combination of 7mm or 8mm bolts and high-tension plastic clips that require specific force to disengage without causing damage.
Understanding the Dashboard F150 Interior Parts Diagram
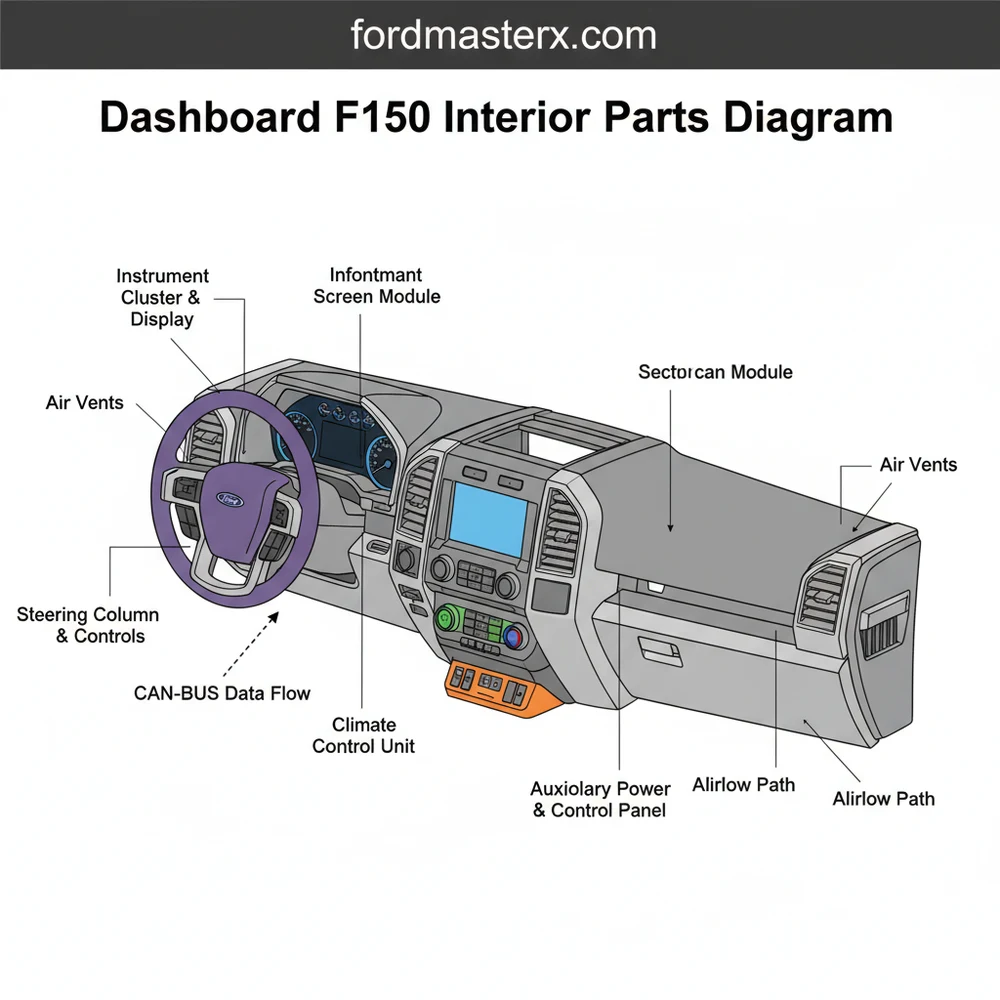
The dashboard f150 interior parts diagram serves as a master blueprint for the vehicle’s primary control center. It provides a visual breakdown of how individual components integrate into the larger structure. In a standard schematic, the dashboard is typically divided into three main zones: the driver’s side (instrumentation), the center stack (infotainment and climate), and the passenger side (safety and storage).
At the heart of the system is the instrument panel carrier, a rigid frame that provides the necessary support for all other components. The layout includes the instrument cluster housing, the steering column shroud, and the HVAC ducting system which weaves through the interior structure. The diagram uses a system of callouts and reference numbers to identify specific parts such as the glovebox assembly, the knee bolsters, and the various trim panels that snap onto the main frame.
Most technical schematics utilize a “blow-out” or “exploded” view. This means the components are shown slightly separated from one another to reveal hidden fasteners and sub-assemblies. For example, the center stack configuration will show the touchscreen unit, the radio bezel, and the climate control module as distinct layers. Color-coding is often used in modern digital diagrams to differentiate between electrical wiring, mechanical fasteners, and structural plastic components. It is important to note that while the general overview remains consistent, specific part numbers and configurations may vary slightly based on the truck’s trim level—such as the differences between a base XL and a luxury-oriented Platinum model.
[DIAGRAM_PLACEHOLDER: A detailed exploded-view schematic of a Ford F-150 dashboard showing the instrument cluster, center stack, glovebox, and HVAC ducting with numerical labels and part callouts.]
Step-by-Step Guide to Interpreting and Using the Diagram

Reading a complex dashboard f150 interior parts diagram requires a methodical approach. To successfully use these blueprints for a repair or installation, follow these detailed steps:
- 1. Match the Diagram to Your Specific Trim: Start by verifying that your diagram matches your vehicle’s trim level and seating configuration (e.g., center console vs. jump seat). The layout of the center stack varies significantly between models equipped with an 8-inch screen versus a 12-inch screen.
- 2. Identify the Fastener Symbolism: Look for specific symbols in the schematic that indicate screw types. Often, a small circle with a cross represents a Phillips screw, while a hexagonal shape indicates a bolt. Understanding these symbols helps you select the correct tools before you start.
- 3. Locate the “Hidden” Clips: One of the most important aspects of the diagram is the location of tension clips. The blueprint will show these as small rectangular tabs. Knowing exactly where these are located allows you to apply pressure with a pry tool in the correct spot, preventing the plastic from cracking.
- 4. Trace the Electrical Routing: If you are performing electrical work, use the schematic to find the wiring harness paths. The diagram will show how the harness is anchored to the interior structure, helping you avoid pinching wires during reassembly.
- 5. Determine the Removal Sequence: Dashboards are built like a puzzle; you often cannot remove “Part B” until “Part A” is out of the way. The diagram provides the visual cues necessary to determine this order. Usually, you start from the outermost trim pieces and work your way toward the center structure.
- 6. Cross-Reference Part Numbers: Use the callout numbers on the diagram to find the official Ford part numbers. This ensures that when you order a replacement component, it will be an exact match for your specific system configuration.
Always disconnect the vehicle battery and wait at least 15 minutes before working near the passenger or driver-side airbag modules. The diagram will highlight these high-risk areas with specific warning icons.
Common Issues and Troubleshooting with the Dashboard

F-150 owners often face specific interior challenges that can be resolved more easily with a parts diagram. One of the most frequent issues is a failing HVAC blend door actuator, which can lead to improper cabin temperatures. The dashboard f150 interior parts diagram shows exactly where these actuators are located behind the dash, saving hours of blind searching.
Another common problem involves “rattles and squeaks” coming from the interior. By studying the blueprint, you can identify the junction points where different plastic panels meet. Often, these noises are caused by a loose clip or a missing rubber isolator identified in the diagram. Furthermore, if you experience electrical glitches—such as a flickering instrument cluster or unresponsive buttons—the schematic allows you to trace the grounding points and connector locations that may have shaken loose over time.
If you are troubleshooting a rattle, look at the diagram for the “cowl top” fasteners. These are often the culprits for noises that sound like they are coming from the dash but are actually located just outside under the windshield wipers.
Best Practices for Dashboard Maintenance and Repair
When working with your F-150’s interior, following industry best practices will ensure a professional result and preserve the value of your truck. First, always invest in a high-quality set of nylon trim removal tools. Metal screwdrivers will easily mar the soft-touch plastics used in modern dashboards. The dashboard f150 interior parts diagram is your guide, but these tools are what allow you to follow that guide safely.
Organization is critical when dealing with dozens of small fasteners. Use a labeled organizer or a magnetic tray to group screws based on the section of the dashboard they came from (e.g., “Instrument Cluster” or “Glovebox”). When you refer back to your schematic during reassembly, you will know exactly which screw goes where.
For long-term maintenance, keep the dashboard clean using specialized UV-protectant cleaners. Harsh chemicals can degrade the structural integrity of the plastic clips over time, making them brittle and more likely to snap during future repairs. If you find yourself needing to replace parts, always prioritize OEM (Original Equipment Manufacturer) components. While aftermarket parts may be cheaper, the fitment tolerances on an F-150 dashboard are extremely tight; even a millimeter of difference can lead to unsightly gaps or persistent rattles.
Finally, document your progress. Taking photos of the wiring and clip locations as you disassemble the dash—and comparing them to your dashboard f150 interior parts diagram—provides a “safety net” for when it is time to put everything back together. By combining the technical accuracy of a professional blueprint with these practical tips, you can maintain a pristine, functional interior for the life of your vehicle.
Frequently Asked Questions
Where is the OBD-II port located?
The OBD-II port is located on the driver side, typically underneath the lower dashboard panel near the steering column. In the F150 interior parts diagram, this port is part of the lower dash structure and is easily accessible without removing any plastic trim pieces for diagnostics.
What does this dashboard diagram show?
This dashboard F150 interior parts diagram shows the comprehensive layout of the front cabin assembly. It includes the instrument panel, air vents, radio bezel, glove compartment, and the internal support structure. It highlights how each component is secured to the firewall and main dash frame for assembly.
How many fasteners does the center bezel have?
Depending on the model year, the center radio bezel usually features four main 7mm screws located behind the top tray or bottom storage pocket. The diagram identifies these connection points alongside several retaining clips that hold the bezel component into the main dashboard system configuration for a secure fit.
What are the symptoms of a bad dashboard backlight?
Common symptoms include flickering gauges, dark spots on the instrument cluster, or a complete loss of illumination during night driving. Referencing the dashboard diagram can help you locate the specific bulb types or LED modules within the cluster structure that require replacement or electrical repair.
Can I replace the dashboard trim myself?
Yes, replacing dashboard trim is a common DIY task. By following the interior parts diagram, you can locate the hidden clips and screws. Using the correct tools ensures you don’t damage the dashboard structure or the sensitive electronic components housed within the F150 interior layout.
What tools do I need for dashboard removal?
You will typically need a 7mm and 10mm socket set, a Phillips screwdriver, and a set of plastic trim removal tools. These tools allow you to safely disassemble the dashboard configuration without scratching the plastic or snapping the internal clips identified in the detailed assembly diagram.


