7.3 Powerstroke Serpentine Belt Diagram: Routing Guide
The 7.3 powerstroke serpentine belt diagram illustrates the specific path the drive belt takes around the crankshaft, alternator, and water pump pulleys. To install, use a 1/2-inch breaker bar on the tensioner to release pressure. Ensure the belt is seated in all grooves to maintain proper charging and cooling performance.
📌 Key Takeaways
- Provides the exact routing path for single and dual alternator setups
- The automatic tensioner is the most critical component for belt installation
- Proper alignment prevents premature belt wear and pulley damage
- Incorrect routing can cause the water pump to rotate backward
- Essential for routine maintenance and emergency roadside repairs
Understanding your 7.3 Powerstroke serpentine belt diagram is more than just a convenience; it is a vital skill for maintaining one of the most durable diesel engines ever produced. Whether you are performing a routine replacement or facing an emergency roadside repair, knowing exactly how the accessory belt winds through the various pulleys is essential for restoring functionality. This guide provides a comprehensive breakdown of the routing system, identifying every component from the tensioner to the alternator. By the end of this article, you will have the confidence to inspect, remove, and install a new belt, ensuring your engine remains reliable and efficient.
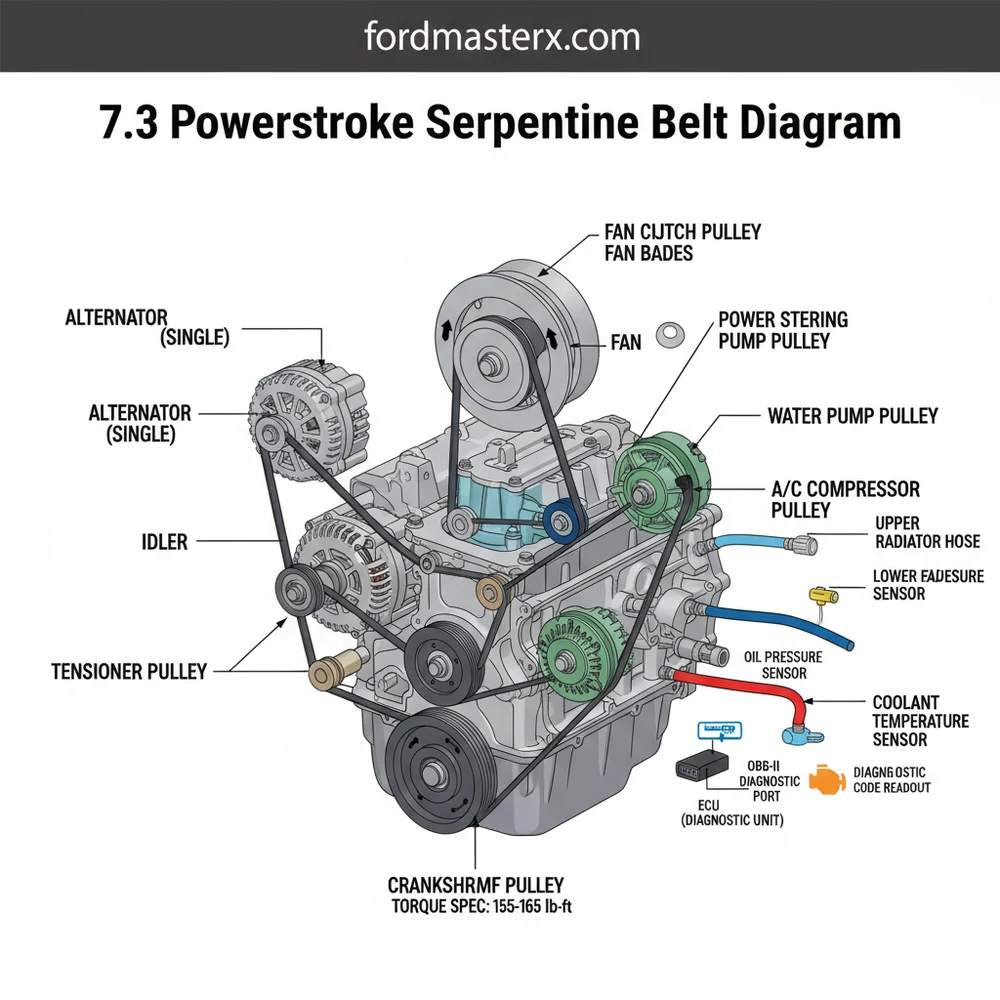
The 7.3 Powerstroke serpentine belt diagram is a visual map of the engine’s front-end accessory drive. Unlike older multi-belt systems, this single, heavy-duty accessory belt drives all critical peripheral components. The diagram highlights the interaction between the ribbed side of the belt and the grooved pulleys, as well as the smooth side of the belt and the flat idler pulleys. On a standard 7.3L diesel engine, the belt originates at the large crankshaft pulley, which provides the rotational force necessary to power the rest of the system.
From the crankshaft, the belt typically travels upward to the water pump pulley, which is central to maintaining consistent coolant flow throughout the engine block. Depending on your specific truck configuration—such as whether you have a single or dual alternator setup—the routing may vary slightly. In a single alternator configuration, the belt moves toward the passenger side to loop over the alternator and the air conditioning compressor. It then navigates through a series of idler pulleys and the spring-loaded tensioner. The tensioner is a critical element shown in the diagram; it maintains the specific pressure required to prevent slippage while allowing for the natural stretching of the belt over time.
| |
| |
( TENSIONER ) ( WATER PUMP )
| |
| |
[ P/S ]——————–[ CRANKSHAFT ]
Legend: [ ] = Grooved Pulley | ( ) = Smooth Pulley
Simplified 7.3L Powerstroke Accessory Belt Routing Representation
While many modern gasoline engines utilize a timing chain to sync internal components, the 7.3 Powerstroke uses a gear-driven timing system. This means the serpentine belt is strictly responsible for external accessories like the alternator, power steering, and water pump, rather than internal engine timing.
Interpreting the 7.3 Powerstroke serpentine belt diagram requires a systematic approach. Follow these steps to ensure a successful installation:
- ✓ Step 1: Preparation and Safety. Ensure the engine is completely cool. Disconnect the negative battery cables to prevent any accidental starts. Locate the routing diagram sticker usually found on the radiator shroud; if it is missing, refer to the visual guide provided in this article.
- ✓ Step 2: Tool Selection. You will need a 1/2-inch drive breaker bar or a long-handled ratchet. The 7.3L tensioner features a square 1/2-inch female insert. Insert the tool into the tensioner arm.
- ✓ Step 3: Relieving Tension. Rotate the breaker bar counter-clockwise (toward the driver’s side). This moves the tensioner pulley away from the belt. While holding the tensioner back, carefully slide the belt off the uppermost pulley, which is usually the alternator.
- ✓ Step 4: Inspection. With the belt removed, spin each pulley by hand. They should spin freely without wobbling or grinding noises. Check the water pump pulley specifically; any play here could indicate an imminent failure that would disrupt coolant flow and lead to overheating.
- ✓ Step 5: Routing the New Belt. Begin at the bottom with the crankshaft pulley. Loop the belt around the power steering pump and then the A/C compressor. Follow the path designated by the diagram, ensuring the ribbed side of the belt seats perfectly into the grooves of the pulleys.
- ✓ Step 6: Final Seating. The last pulley to be wrapped is typically the alternator or a smooth idler. Rotate the tensioner again to create the necessary slack, slip the belt over the final pulley, and slowly release the tensioner.
- ✓ Step 7: Verify Alignment. Double-check every pulley. A belt that is even one groove off can shred within minutes of starting the engine. Ensure the belt is centered on all smooth idlers.
Never place your fingers between the belt and a pulley while the tensioner is engaged. If the tool slips, the tensioner can snap back with enough force to cause serious injury.
Common issues involving the 7.3 Powerstroke serpentine belt often manifest as audible cues or electrical gremlins. Squealing or chirping is the most frequent complaint, usually caused by a stretched belt or a failing tensioner spring. If the belt snaps entirely, you will lose power steering and the alternator will stop charging the batteries. This lack of voltage can confuse the ECU (Engine Control Unit), potentially triggering a check engine light. If you connect an OBD-II scanner, you might find a diagnostic code related to low system voltage, such as P0620 or P0562.
The diagram is your first line of defense in troubleshooting. By comparing the physical belt path to the diagram, you can identify if a previous owner bypassed a component, such as a seized A/C compressor. Furthermore, look for “glazing” (a shiny appearance) on the underside of the belt or “chunking” where pieces of the ribs have fallen out. If the belt frequently jumps off the pulleys, the diagram helps you verify that the tensioner is correctly aligned and hasn’t become bent over years of high-torque operation.
If you are experiencing a mystery squeal, spray a tiny amount of water on the ribbed side of the belt while the engine is idling. If the noise disappears briefly, the belt is the culprit. If the noise persists or gets louder, a pulley bearing is likely failing.
Maintaining the 7.3 Powerstroke serpentine belt system involves more than just swapping rubber. For the best results, always opt for high-quality EPDM (Ethylene Propylene Diene Monomer) belts, such as those from Motorcraft or Gates. These materials resist heat and cracking much better than older neoprene versions. When installing a new tensioner, always adhere to the proper torque spec for the mounting bolt to prevent it from vibrating loose under the heavy load of a diesel engine.
Regular maintenance should include a visual inspection every 10,000 miles. Look for signs of oil or coolant leaks dripping onto the belt; fluids like these can degrade the rubber and cause premature failure. If you notice a drop in coolant flow or a rise in engine temperature, check the water pump pulley for slippage. Keeping a spare belt and a 1/2-inch breaker bar in your truck’s toolbox is highly recommended, as a broken belt will leave a 7.3 Powerstroke stranded, regardless of how well the rest of the engine is running. By following the 7.3 Powerstroke serpentine belt diagram and these best practices, you ensure that your “Million Mile Engine” continues to run smoothly for years to come.
Step-by-Step Guide to Understanding the 7.3 Powerstroke Serpentine Belt Diagram: Routing Guide
Identify the belt routing using the 7.3 powerstroke serpentine belt diagram to visualize the path.
Locate the automatic tensioner pulley and insert a 1/2-inch breaker bar into the adjustment slot.
Understand how the belt wraps around the crankshaft, ensuring the ribbed side faces the grooved pulleys.
Apply pressure to the tensioner to slacken the old belt and slide it off the topmost pulley.
Verify that the new belt is seated perfectly in all pulley grooves before slowly releasing the tensioner.
Complete the installation by starting the engine and checking for any abnormal noises or belt slippage.
Frequently Asked Questions
Where is the belt tensioner located?
The 7.3 Powerstroke belt tensioner is located on the upper passenger side of the engine block. It features a spring-loaded arm and a pulley that applies constant pressure to the belt. To release tension, insert a 1/2-inch drive breaker bar into the square hole and rotate it counter-clockwise.
What does this serpentine belt diagram show?
This diagram provides a visual map of how the belt weaves through the crankshaft, idler pulleys, alternator, power steering pump, and water pump. It distinguishes between single and dual alternator configurations, ensuring every accessory receives power from the engine’s rotation without slipping or causing mechanical interference.
How many pulleys are on a 7.3 Powerstroke?
Most 7.3 Powerstroke engines feature seven to eight pulleys depending on the configuration. These include the crankshaft balancer, water pump, alternator, A/C compressor, power steering pump, tensioner pulley, and idler pulleys. Dual alternator setups include an additional pulley for the secondary charging unit used in heavy-duty applications.
What are the symptoms of a bad serpentine belt?
Common symptoms include loud squealing noises, visible cracks, or fraying on the belt. If the belt snaps, your check engine light may trigger. A faulty belt can affect the alternator, causing the ECU to store a low-voltage diagnostic code accessible via an OBD-II scanner during troubleshooting.
Can I replace the 7.3 serpentine belt myself?
Yes, replacing the belt is a straightforward DIY task that requires basic hand tools. Most owners can complete the job in under 30 minutes. It is essential to follow the routing diagram exactly; otherwise, the water pump might spin backward, leading to immediate engine overheating and cooling system failure.
What tools do I need for belt replacement?
You primarily need a 1/2-inch drive breaker bar or a dedicated long-reach serpentine belt tool to rotate the tensioner. A flashlight helps inspect pulley grooves, and a socket set may be necessary if you need to replace a worn idler pulley or tighten a mounting bolt to torque spec.


