6.0 Powerstroke Dual Alternator Belt Diagram: How-To Guide
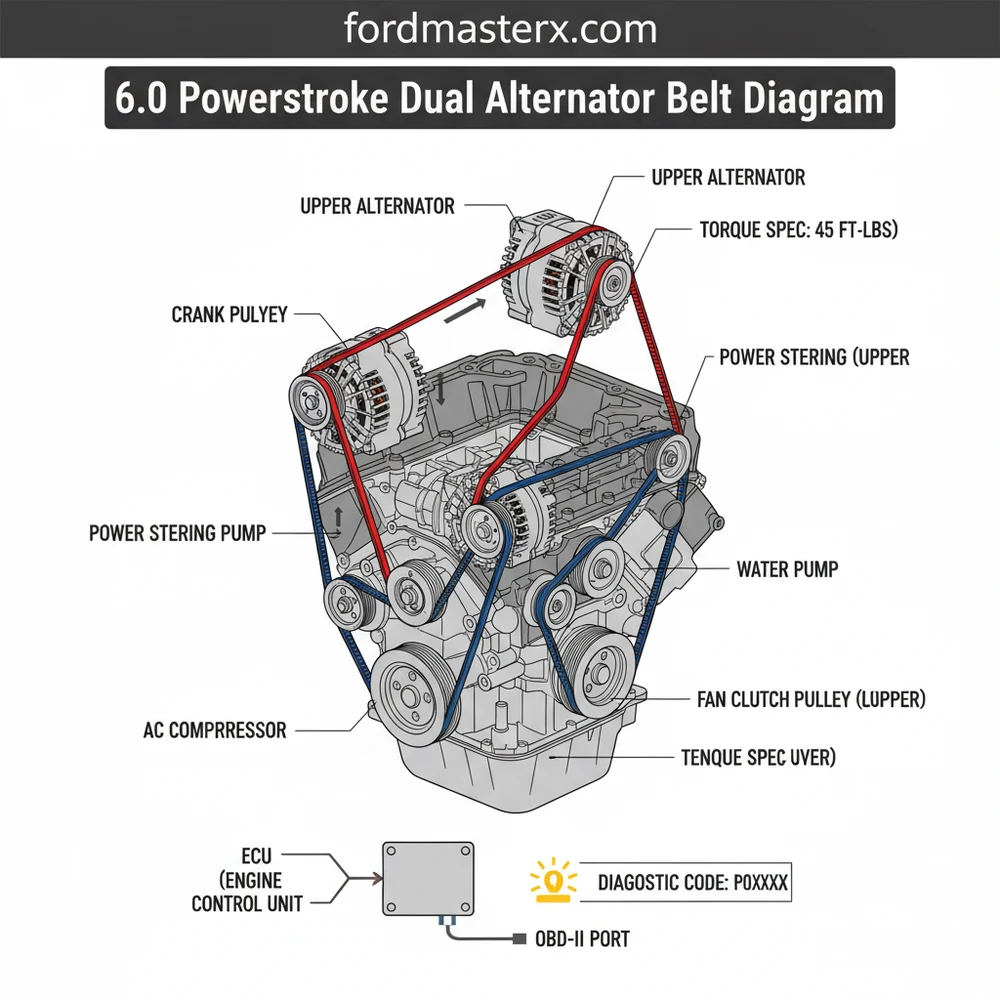
The 6.0 Powerstroke dual alternator belt diagram illustrates the routing between the primary and secondary alternators, tensioner, and pulleys. To install, route the belt starting from the crankshaft, ensuring it wraps around both alternators. Correct tensioning prevents a check engine light or diagnostic code related to low system voltage.
📌 Key Takeaways
- Visualizes routing for both primary and secondary alternators
- The tensioner position is the most critical component to identify
- Ensure the belt is properly seated in all pulley grooves
- Use this diagram when replacing worn belts or upgrading alternators
- Always disconnect batteries before starting any belt or alternator work
Navigating the engine bay of a Ford Super Duty can be a daunting task, especially when dealing with the complex serpentine system found on the 6.0L engine. Finding a reliable 6.0 powerstroke dual alternator belt diagram is essential for any owner or technician looking to maintain the vehicle’s electrical integrity. This specific configuration, often found in heavy-duty or emergency response vehicles, requires precise routing to ensure all components receive adequate power. In this guide, you will learn the exact path of the accessory belt, component identification, and professional tips for a successful installation.
Understanding the Dual Alternator Serpentine System
The dual alternator setup on a 6.0L Powerstroke is significantly more complex than the single alternator configuration. While a standard system uses a single belt to drive the primary alternator, water pump, and A/C compressor, the dual system utilizes a much longer serpentine belt to incorporate a secondary alternator. This secondary unit is typically mounted lower on the passenger side of the engine block. The primary goal of this system is to provide additional amperage for high-draw electrical components, which is managed by the vehicle’s ECU (Engine Control Unit) to balance the load.
In a 6.0 powerstroke dual alternator belt diagram, you will notice the belt must traverse several idler pulleys that are not present on the single alternator version. The routing is designed to maximize “belt wrap” around the pulleys. Belt wrap refers to the amount of surface area the belt contacts on each pulley; higher wrap prevents slippage under heavy electrical loads. The diagram illustrates the belt leaving the large crankshaft pulley at the bottom, traveling upward to the water pump, and then branching out to the primary and secondary alternators. Unlike the timing chain, which is internal and lubricated by oil, this external accessory belt is exposed to the elements and requires regular inspection.
The diagram identifies several critical components:
- ✓ Crankshaft Pulley: The primary drive source for the entire system.
- ✓ Primary Alternator: Located at the top center of the engine.
- ✓ Secondary Alternator: Positioned on the lower right (passenger) side.
- ✓ Water Pump Pulley: Essential for maintaining coolant flow and preventing overheating.
- ✓ A/C Compressor: Driven by the same belt, usually located on the upper left.
- ✓ Tensioner Pulley: A spring-loaded arm that maintains the correct pressure on the belt.
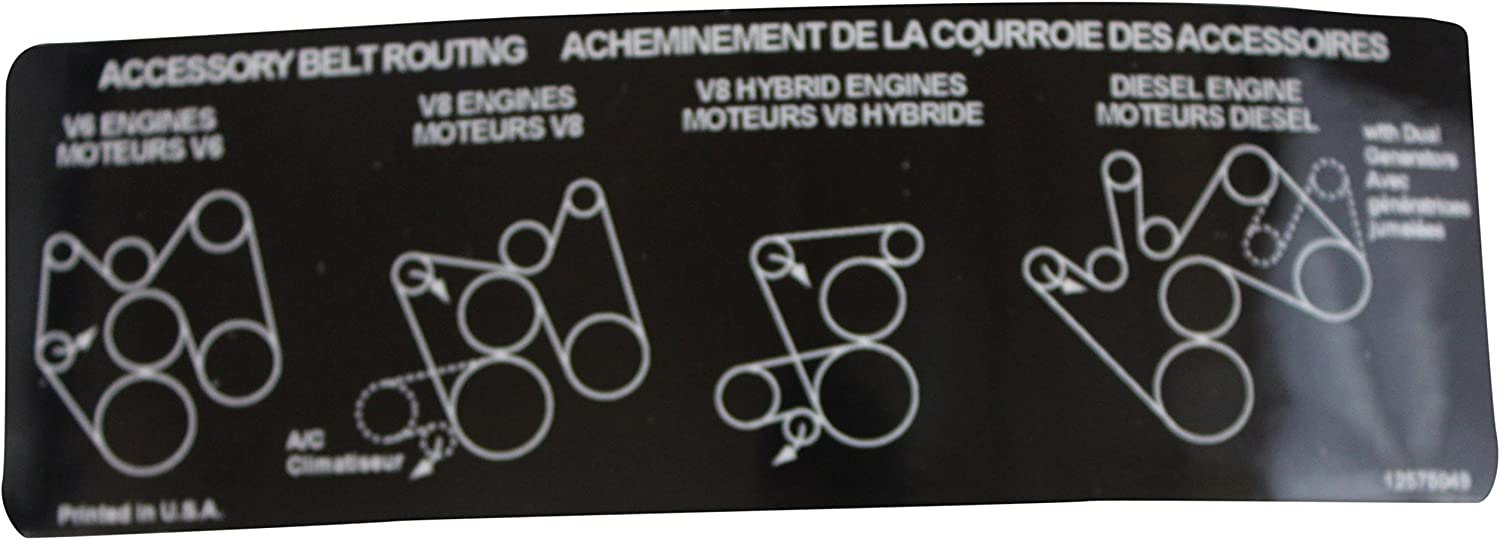
[DIAGRAM_PLACEHOLDER: 6.0 Powerstroke Dual Alternator Belt Routing Path – Visualizing the “S” curves around the dual alternators, idlers, and the central water pump pulley.]
The belt for the dual alternator system is significantly longer than the single alternator belt. Ensure you purchase the correct part number (often ending in a different suffix) to avoid fitment issues during installation.
Step-By-Step Installation and Routing Guide
Interpreting a 6.0 powerstroke dual alternator belt diagram requires a methodical approach. Because the belt is long and the engine bay is tight, following a specific sequence is the only way to avoid frustration. Before starting, ensure the engine is cool to the touch, as you will be working near the radiator and fan shroud.
Step 1: Preparation and Safety
Disconnect the batteries. Since you are working near alternators that are directly connected to the battery’s positive terminal, a slip of a wrench could cause a major short. Use a 1/2-inch drive breaker bar or a dedicated serpentine belt tool. Locate the tensioner pulley on the driver’s side of the engine.
Step 2: Relieving Tension
Insert your tool into the square hole on the tensioner arm. Rotate the tensioner clockwise (toward the passenger side) to compress the spring. While holding the tensioner, carefully slide the belt off the uppermost pulley, which is usually the primary alternator. Slowly release the tensioner arm.
Step 3: Removing the Old Belt
The most difficult part of the 6.0 Powerstroke belt removal is navigating the belt around the large cooling fan. You must “thread” the belt between the fan blades and the fan shroud. Take your time here to avoid damaging the plastic blades or the radiator fins. Once the belt is clear of the fan, pull it out of the engine bay.
Step 4: Inspecting the Pulleys
Before installing the new belt, spin every pulley by hand (except the crankshaft). Listen for grinding noises and feel for “play” or wobbling. Specifically, check the water pump pulley to ensure it turns smoothly; a seized water pump will stop coolant flow and lead to catastrophic engine failure. Check the idler pulleys for surface wear or glazing.
Step 5: Routing the New Belt
Refer closely to your 6.0 powerstroke dual alternator belt diagram. Start by looping the belt over the fan and around the crankshaft pulley at the very bottom. Work your way upward. The belt must go under the water pump pulley (the smooth side of the belt usually touches the smooth water pump pulley) and over the top of the secondary alternator on the passenger side.
Step 6: Finishing the Path
Route the belt around the A/C compressor and the power steering pump. The final loop should be positioned near the tensioner and the primary alternator. Double-check that the ribs of the belt are perfectly seated in the grooves of the ribbed pulleys.
Step 7: Applying Tension
Once the belt is routed according to the diagram, use your breaker bar to rotate the tensioner again. Slide the final loop of the belt over the primary alternator pulley. Ensure the belt is centered.
Step 8: Final Inspection
Before starting the truck, perform a visual check. Ensure the belt isn’t “half-on” any pulley. Check the torque spec on any alternator bolts if you had to loosen them for access; typically, alternator mounting bolts require 35-45 lb-ft of torque. Reconnect the batteries.
Never attempt to route the belt while the engine is running or with the keys in the ignition. The 6.0 Powerstroke cooling fan can engage unexpectedly, posing a severe injury risk.
Common Issues and Troubleshooting

Even with a perfect 6.0 powerstroke dual alternator belt diagram, issues can arise. One of the most common problems is a “chirp” or squeal during startup or under heavy acceleration. This often indicates a failing tensioner or a belt that has stretched beyond its effective limit. If the belt slips, the primary alternator may not provide enough voltage, causing the ECU to trigger a check engine light.
When troubleshooting electrical issues, use an OBD-II scanner to check for a specific diagnostic code. Codes such as P0620 (Generator Control Circuit) or P0562 (System Voltage Low) are common when the dual alternator system is failing. If the belt snaps, you will lose power steering and the water pump will stop, leading to a rapid rise in engine temperature. The OBD-II system is your best friend in determining if the issue is a mechanical belt failure or an internal regulator problem within one of the two alternators.
Tips and Best Practices for Maintenance
To ensure the longevity of your accessory belt system, follow these professional recommendations:
Always keep a spare belt and the 1/2-inch breaker bar in your truck’s tool kit. Because the dual alternator belt is a specialized part, local auto shops may not have it in stock when you’re stranded on the side of the road.
1. Quality Matters: Use high-quality EPDM belts (like Motorcraft or Gates). Cheaper belts tend to stretch faster and are more prone to cracking under the high heat of the 6.0L engine bay.
2. Monitor Coolant Flow: Since the belt drives the water pump, any sign of belt wear is a threat to your cooling system. If you notice the belt is “walking” or vibrating excessively, replace the tensioner immediately to maintain consistent coolant flow.
3. Clean the Pulleys: Before installing a new belt, use a wire brush and some brake cleaner to remove rubber deposits from the pulley grooves. This ensures the new belt grips properly and reduces the chance of annoying squeaks.
4. Check the ECU Readings: Modern monitors (like the Edge Insight or Scangage) allow you to view real-time battery voltage. If you see voltage dropping below 13.2V while driving, your dual alternator system is struggling, even if the belt looks intact.
5. Regular Inspections: Every 15,000 miles, inspect the belt for “chunking” (where pieces of the ribs fall off) or glazing (a shiny appearance on the flat side). If you see more than three cracks in a one-inch span, it is time for a replacement.
By following this 6.0 powerstroke dual alternator belt diagram and guide, you ensure that your heavy-duty Ford stays on the road and maintains the electrical output necessary for its demanding tasks. Proper routing is more than just a maintenance task; it is the lifeline for your engine’s cooling and charging systems.
Step-by-Step Guide to Understanding the 6.0 Powerstroke Dual Alternator Belt Diagram: How-To Guide
Identify the belt routing using the 6.0 Powerstroke dual alternator belt diagram.
Locate the belt tensioner and use a breaker bar to release the spring tension.
Understand how the belt wraps around the primary and secondary alternator pulleys.
Apply the new belt by following the diagram, starting with the crankshaft and water pump.
Verify that the belt is seated in all grooves and scan for any diagnostic code.
Complete the job by verifying the torque spec of any loosened bolts and restarting the engine.
Frequently Asked Questions
Where is the secondary alternator located?
The secondary alternator on a 6.0 Powerstroke is typically mounted lower on the passenger side of the engine block. It is driven by the main serpentine belt system in a dual setup. Accessing it often requires removing the air intake components to clearly see the lower pulleys and mounting bolts.
What does the dual alternator belt diagram show?
This diagram provides a visual map of how the serpentine belt interacts with the crankshaft, fan clutch, water pump, and both alternators. It ensures that the belt rotates each component in the correct direction. Proper routing prevents overheating and ensures the ECU receives consistent voltage from both units.
How many pulleys does the dual setup have?
The dual alternator configuration features several pulleys including the crank, water pump, power steering, A/C compressor, and two alternators, plus tensioners and idlers. It uses a longer belt than single setups. Ensuring every pulley aligns with the belt ribs is essential for preventing premature wear and vibration issues.
What are the symptoms of a bad dual alternator belt?
Symptoms include squealing noises, visible fraying, or a flickering check engine light due to slipping. If the belt fails, the OBD-II system may trigger a diagnostic code like P0620. Reduced charging capacity can lead to battery drain and engine stalls if the ECU loses stable power during operation.
Can I replace this belt myself?
Yes, replacing the belt is a feasible DIY project if you have a long-reach tensioner tool. While the dual setup is more cramped than a single alternator layout, following the diagram allows for a straightforward installation. Always check the torque spec for alternator mounting bolts if you are replacing units.
What tools do I need for this task?
You will need a 1/2-inch drive breaker bar or a specific serpentine belt tool to release the tensioner. A socket set is necessary if you need to remove the fan shroud or intake pipes for better access. Having a printed copy of the belt diagram prevents routing errors during reassembly.


