5.4 Triton Serpentine Belt Diagram With AC: Routing Guide
The 5.4 Triton serpentine belt diagram with AC shows the belt path starting at the crankshaft, traveling over the water pump, around the AC compressor, and through the tensioner and idler pulleys. Proper routing ensures the alternator and power steering pump function correctly, preventing overheating or battery drainage issues.
📌 Key Takeaways
- Illustrates the precise path for the multi-ribbed belt
- Identifying the automatic tensioner pulley is critical for installation
- Always inspect pulleys for bearing wear before installing a new belt
- Draw or photograph the routing before removing the old belt
- Essential for maintaining AC, charging, and cooling systems
When you are working under the hood of a Ford truck or SUV equipped with the modular 5.4L V8 engine, having a clear 5.4 triton serpentine belt diagram with ac is the difference between a quick maintenance task and an afternoon of frustration. This engine, known for its workhorse capabilities, relies heavily on a single accessory belt to power everything from the alternator to the air conditioning compressor. Navigating the complex routing of this belt is essential for any DIY mechanic or vehicle owner looking to ensure their cooling system and electrical components remain functional. In this guide, we will break down the routing path, identify every pulley in the system, and provide a comprehensive walkthrough for a successful installation.
Understanding the 5.4 Triton Serpentine Belt Diagram with AC
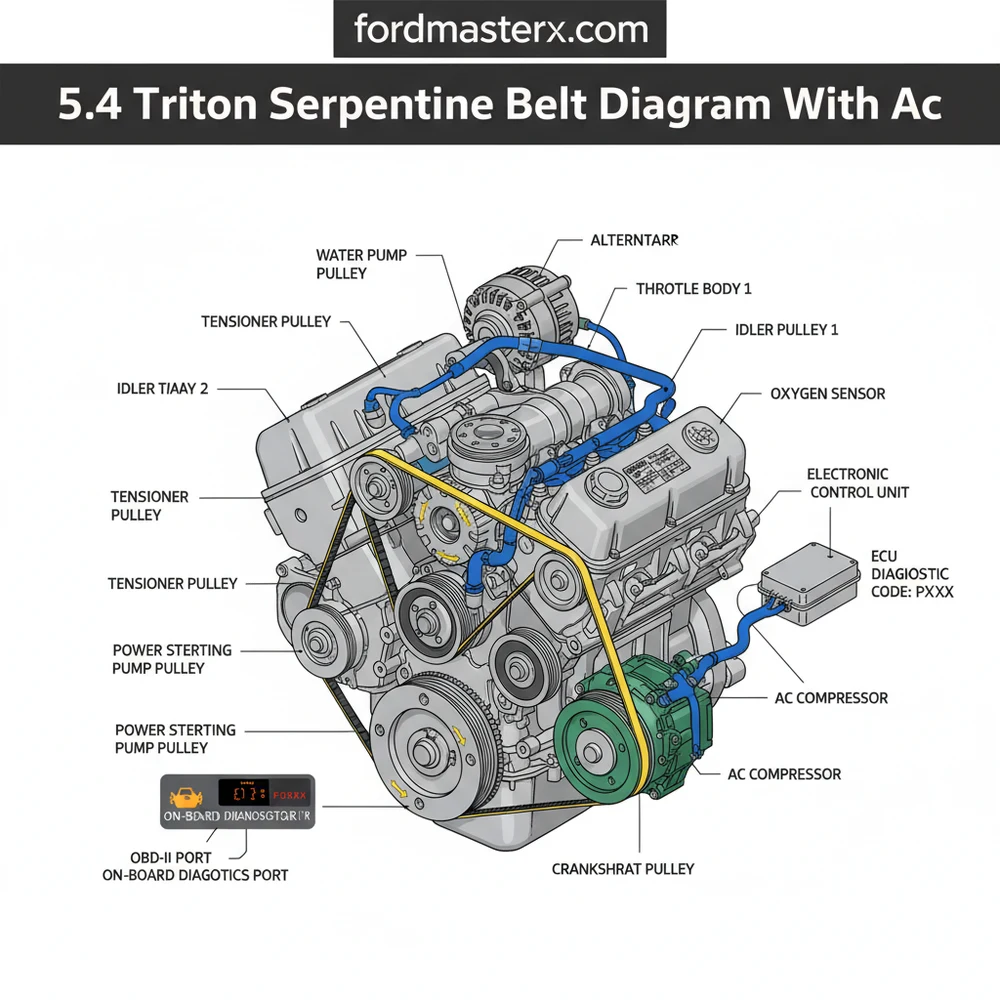
The serpentine system on the 5.4 Triton is a closed-loop configuration that transfers rotational energy from the crankshaft to several critical components. Unlike older engines that used multiple V-belts, this modern accessory belt setup uses a single, long multi-ribbed belt. The diagram for a 5.4 Triton with air conditioning typically features eight distinct points of contact. Understanding how the belt interacts with each pulley is vital because the belt has two sides: a grooved side and a smooth side. The grooved side must always sit within the grooves of the powered pulleys, while the smooth side typically rides against the idler and tensioner pulleys.
On the 5.4L Triton engine, the AC compressor is located at the bottom passenger side of the engine block. If your vehicle was “AC delete” (rare for this engine size), the routing would bypass this area entirely, requiring a significantly shorter belt.
In a standard configuration, the routing follows this general path: The belt starts at the large crankshaft pulley at the bottom center. It then moves upward toward the water pump, loops around the alternator at the very top, and snakes down through a series of idler pulleys and the power steering pump. The AC compressor sits low on the frame, and the automatic belt tensioner is usually positioned on the passenger side to maintain constant pressure.
Identifying these components correctly prevents common mistakes, such as routing the belt over the top of a pulley that it should actually go under. This can lead to reversed rotation of components like the water pump, which would immediately disrupt the coolant flow and lead to rapid engine overheating.
Step-by-Step Installation Using the 5.4 Triton Serpentine Belt Diagram with AC
Replacing the accessory belt on a 5.4 Triton is a straightforward process if you follow a logical sequence. Before starting, ensure the engine is completely cool to the touch. Working near the radiator and the timing chain cover of a hot engine can result in burns.
Always disconnect the negative battery terminal before working on the serpentine belt. Since you will be working near the alternator and various electrical sensors, this prevents accidental shorts or the engine cranking unexpectedly.
- ✓ Step 1: Locate the Tensioner – On the 5.4 Triton, the tensioner is an arm with a pulley attached, usually found on the passenger side of the engine front. It has a square hole designed to fit a 1/2-inch drive breaker bar or a specific serpentine belt tool.
- ✓ Step 2: Release Tension – Insert your tool into the tensioner. Rotate the tensioner arm (usually clockwise) to compress the internal spring. This will create slack in the belt, allowing you to slip it off the uppermost pulley, which is typically the alternator.
- ✓ Step 3: Remove the Old Belt – Once the belt is off the alternator, carefully unthread it from the remaining pulleys. Inspect the old belt for “glazing” (a shiny appearance) or deep cracks. If the belt has snapped, ensure you remove all rubber debris from the pulley grooves.
- ✓ Step 4: Inspect the Pulleys – Spin each pulley by hand (except the crankshaft). They should spin freely without wobbling or making a grinding noise. A seized AC compressor or idler pulley is often the root cause of belt failure.
- ✓ Step 5: Route the New Belt – Using the 5.4 triton serpentine belt diagram with ac as your guide, begin threading the new belt. It is best to start at the bottom with the crankshaft and AC compressor. Work your way up, leaving the smooth water pump pulley or the alternator for the final step.
- ✓ Step 6: Seat the Belt – Once the belt is routed around all but one pulley, rotate the tensioner again to create the necessary slack. Slide the belt over the final pulley. Slowly release the tensioner to apply pressure to the belt.
- ✓ Step 7: Final Check – Double-check that the ribs of the belt are perfectly centered in every grooved pulley. If the belt is even one rib off-center, it will shred within minutes of starting the engine.
If you are struggling to reach the lower pulleys, removing the plastic fan shroud or using a long-reach serpentine belt tool can provide the extra leverage and space needed to seat the belt correctly on the AC compressor.
Common Issues and Troubleshooting
Even with a perfect diagram, issues can arise. The most common problem is a “squealing” sound immediately after installation. This is usually caused by a contaminated pulley or a failing tensioner that can no longer provide the necessary torque spec to keep the belt tight. If the belt slips, the alternator may not charge the battery correctly, potentially triggering a check engine light or a battery warning on your dashboard.
In some cases, a snapped belt can cause collateral damage. Because the 5.4 Triton uses a sensitive timing chain system behind the front cover, a belt that shreds at high RPMs can occasionally whip against sensors. If your vehicle won’t start after a belt failure, you should use an OBD-II scanner to check for a diagnostic code related to the crankshaft position sensor or the ECU. These sensors are located near the front of the engine and can be damaged by a flailing belt.
Another sign of trouble is improper coolant flow. Since the serpentine belt drives the water pump, a loose or incorrectly routed belt will cause the engine temperature to spike rapidly. Always monitor your temp gauge for the first ten minutes after a belt change to ensure the cooling system is pressurized and circulating correctly.
Maintenance Tips and Best Practices
To get the most out of your 5.4 Triton, proactive maintenance is key. Most manufacturers recommend inspecting the accessory belt every 30,000 miles and replacing it every 60,000 to 100,000 miles. However, heat and towing stress can shorten this lifespan significantly.
- ✓ Buy Quality Parts: When replacing the belt, opt for EPDM (Ethylene Propylene Diene Monomer) belts from reputable brands like Gates or Continental. These resist heat and cracking much better than standard rubber belts.
- ✓ Clean the Pulleys: Before installing a new belt, use a wire brush and some brake cleaner to remove any old rubber buildup from the pulley grooves. This ensures maximum grip and prevents premature wear.
- ✓ Replace the Tensioner: If your vehicle has over 150,000 miles, consider replacing the tensioner assembly at the same time as the belt. The internal spring weakens over time, leading to vibrations that can wear out your alternator and AC compressor bearings.
In conclusion, maintaining your vehicle’s 5.4 triton serpentine belt diagram with ac is one of the most cost-effective ways to prevent a roadside breakdown. By understanding the routing, checking for mechanical wear on the pulleys, and following a systematic installation process, you ensure that your engine’s vital systems—from the electrical charging to the critical coolant flow—remain in peak condition. Always keep a copy of the routing diagram in your glovebox or taped to the radiator shroud for quick reference during future repairs. Through proper care and the right technical knowledge, your 5.4L Triton will continue to deliver the reliable performance it is known for.
Frequently Asked Questions
Where is the belt tensioner located?
The belt tensioner on the 5.4 Triton is located on the front of the engine block, usually to the passenger side of the water pump. Use a 1/2-inch drive breaker bar to rotate the spring-loaded arm, releasing tension so the belt can be slipped off the pulleys.
What does the serpentine belt diagram show?
This diagram illustrates the exact path the belt takes around every pulley, including the crankshaft, AC compressor, power steering pump, and alternator. It ensures the belt grooves align with the pulleys and that the smooth side only contacts idler pulleys, preventing premature wear and failure.
How many pulleys does the 5.4 Triton have?
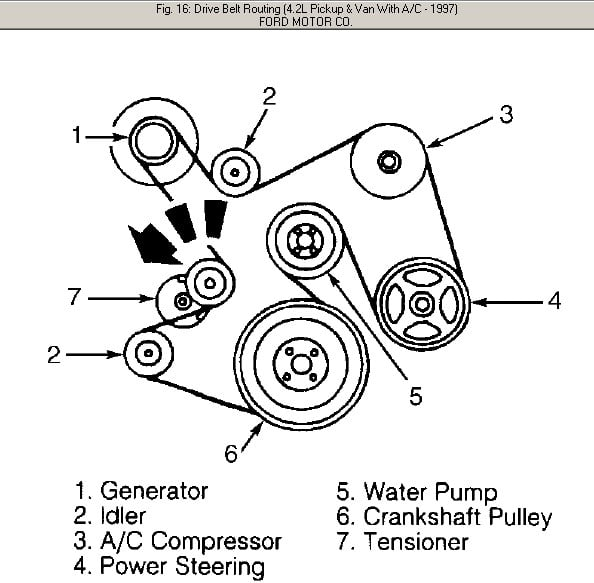
The 5.4 Triton engine typically features seven or eight pulleys depending on the specific vehicle configuration. These include the crankshaft balancer, alternator, water pump, power steering pump, AC compressor, at least one idler pulley, and the spring-loaded automatic tensioner pulley that maintains belt pressure.
What are the symptoms of a bad serpentine belt?
Common symptoms include loud squealing noises, visible cracks or fraying on the belt surface, and power steering loss. If the belt slips significantly, it may trigger a check engine light or diagnostic code in the ECU, as the alternator might fail to maintain proper system voltage.
Can I replace this belt myself?
Yes, replacing the belt is a straightforward DIY task that requires basic hand tools. Simply follow the 5.4 Triton serpentine belt diagram with AC to ensure correct routing. If you encounter a check engine light after, use an OBD-II scanner to verify if the alternator was affected.
What tools do I need for belt replacement?
You will primarily need a 1/2-inch drive breaker bar or a specific serpentine belt tool to rotate the tensioner. Additionally, have a socket set ready to check any mounting bolts for the proper torque spec and an OBD-II scanner if you need to clear any temporary electrical codes.


