The Comprehensive Technical and Strategic Report on Ford Fusion Trunk Access Systems: Engineering Architectures, Failure Modes, and Content Optimization Strategies
The Ford Fusion, a cornerstone of the American mid-size sedan market from its debut in the 2006 model year until its discontinuation in 2020, serves as a paradigmatic case study in the evolution of automotive body control systems. For the automotive content researcher, technician, or distressed owner, the seemingly simple query “how to open the trunk from the outside” unravels a complex tapestry of mechanical engineering, digital logic, and safety compliance.
Over its fourteen-year production run, spanning two distinct chassis generations (the CD3 and the CD4 platforms), the Fusion transitioned from traditional mechanical linkages to fully integrated, software-defined entry systems. This report provides an exhaustive analysis of these systems, designed to serve as the foundational text for high-level automotive content creation.
The relevance of this subject matter is driven by a specific, high-anxiety user intent: the “lockout” scenario. As vehicle systems have become more electrified, the dependency on a healthy 12-volt power supply has created a vulnerability known as the “Dead Battery Paradox.” In modern Fusion models, particularly the Hybrid and Energi variants, the battery required to actuate the trunk latch is often located inside the trunk itself. When this battery fails, the electronic release buttons become inert, and the absence of a visible external key cylinder on later models leaves owners stranded.
This report dissects this phenomenon, offering granular technical solutions ranging from under-hood power injection to mechanical key extraction, while also addressing common component failures such as the trunk lid wiring harness fatigue and actuator solenoid burnout.
By synthesizing data from owner’s manuals, service bulletins, community forums, and parts catalogs, this document establishes a definitive “source of truth.” It moves beyond superficial “tips and tricks” to explore the underlying engineering logic—why the SecuriCode™ keypad uses the 5-6 button combination , why the wiring harness at the hinge is prone to work-hardening, and how the Body Control Module (BCM) arbitrates access requests based on vehicle state.
Locked Out? Here’s How to Get In.
Opening the trunk of a Ford Fusion is usually effortless, but dead batteries, lost fobs, or mechanical failures can turn a simple task into a headache. This guide visualizes the primary access methods and provides a flowchart for emergency scenarios.
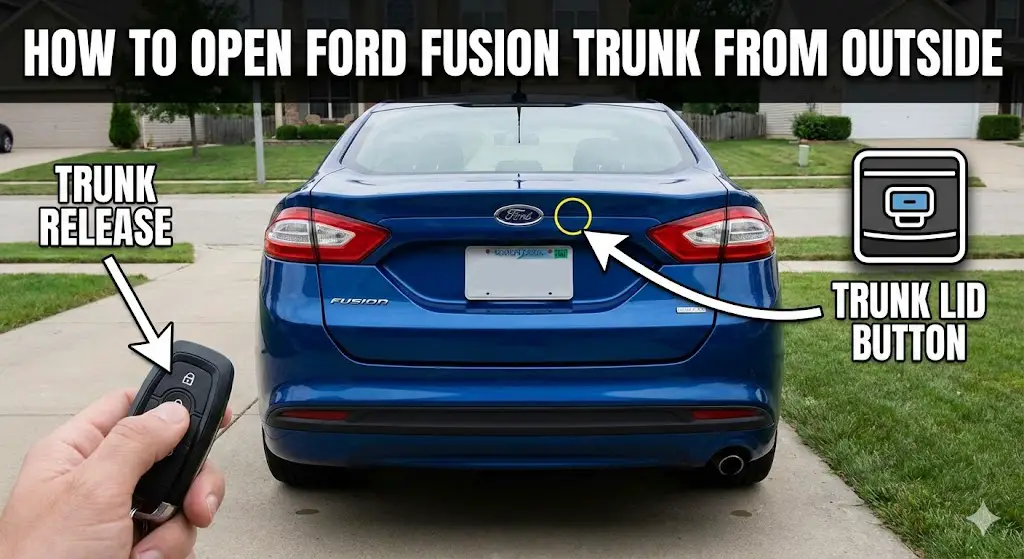
Key Fob
The standard method. Press the trunk release button twice rapidly within 3 seconds.
SecuriCode™ Keypad
Located on the B-pillar. Enter your 5-digit factory code, then press the 5-6 button to pop the trunk.
Interior Release
Located on the dashboard to the left of the steering wheel. Works only if the car has battery power.
Why Won’t It Open?
Understanding the root cause is the first step to solving the problem. Based on automotive service data, the majority of “stuck trunk” issues on the Fusion are power-related rather than mechanical failures.
- Dead Fob Battery: The most common and easiest fix.
- Dead Car Battery: Disables the electric latch.
- Mechanical/Other: Broken latch or blown fuse.
💡 Pro Tip:
If you hear a “click” but it doesn’t open, it’s likely a jammed latch. If you hear silence, it’s likely power or a fuse.
Distribution of Trunk Access Failures
The “Dead Battery” Dilemma
The Ford Fusion trunk release is 100% electronic. If your 12V battery dies, the trunk button will not work. Follow this decision flow to gain access.
Method Efficiency Comparison
Not all methods are created equal. While the Key Fob is the fastest, it relies entirely on battery power. The “Physical Key + Crawl” method is the most difficult but works with zero power.
Key Takeaway
Always keep your physical key blade (inside the fob) accessible. It is your only way into the cabin if the battery dies completely.
© 2026 FordMasterX Infographics. Data sourced from manufacturer owner manuals.
The Engineering of Access: Historical and Platform Context
To understand the specific mechanisms of trunk access, one must first understand the architectural philosophy of the vehicle’s platform. The Ford Fusion’s lifecycle is bisected into two eras, each with a radically different approach to security and body hardware.
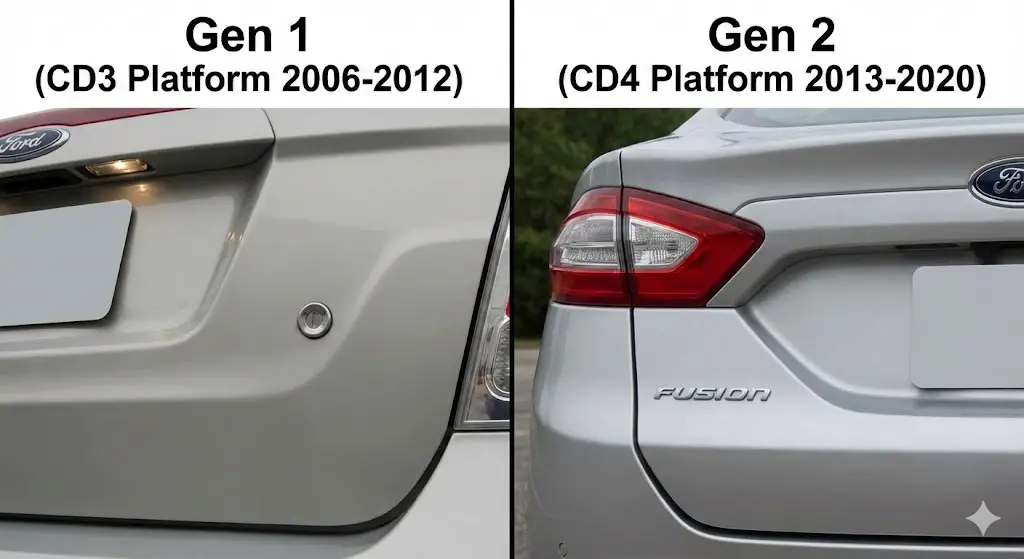
The CD3 Platform Era (2006–2012)
The first-generation Fusion was built on the CD3 platform, a Mazda-derived architecture that emphasized mechanical robustness and conventional design. In this era, the trunk access system was a hybrid of electrical convenience and mechanical redundancy.
- Mechanical Primacy: These vehicles featured a dedicated, visible key cylinder on the trunk lid.3 This mechanical override was directly linked via a steel rod to the latch assembly, ensuring that access was possible regardless of the electrical system’s status.
- Electrical Simplicity: The remote release (via the key fob or interior button) operated on a simple relay logic controlled by the Smart Junction Box (SJB). The signal was a straightforward 12V pulse sent to a solenoid.
- Design Implications: The presence of the keyhole broke the clean lines of the rear fascia but provided a fail-safe that reduced the complexity of lockout scenarios.
The CD4 Platform Era (2013–2020)
With the introduction of the 2013 model, the Fusion migrated to the global CD4 platform. This generation embraced the “One Ford” strategy, harmonizing designs with the European Ford Mondeo.
- Aesthetic Cleanliness: To achieve a sleeker, more premium aesthetic, engineers eliminated the external trunk key cylinder. This decision shifted the burden of redundancy from a simple lock core to complex backup systems involving hidden keyholes in door handles and remote battery terminals.
- System Integration: Trunk access became a function of the Body Control Module (BCM). The interior button and exterior pressure switch are no longer power switches but “request” switches. When pressed, they send a logic-level signal to the BCM, which then checks various parameters (vehicle speed, alarm state, door lock status) before energizing the latch output.
- The Hybrid Complication: The CD4 platform was designed to accommodate electrification. The Hybrid and Energi models placed the High Voltage (HV) traction battery and the 12V accessory battery in the trunk. This packaging decision, combined with the electric-only latch, created the critical “Dead Battery Paradox” that drives a significant portion of search traffic for this vehicle.
The Sociology of the Trunk
Understanding user intent requires analyzing how the trunk is used. It is a secure vault for valuables, a utility space for cargo, and, in Hybrids, a mechanical room for batteries. The “how to open” query arises in three distinct contexts:
- Convenience: Users wanting to use keyless features like the keypad or fob double-press.
- Maintenance: Users dealing with broken latches, severed wires, or dead batteries.
- Emergency: Users locked out with vital items inside, or facing a safety hazard.
Architectural Deep Dive: The CD3 Platform (2006–2012)
The first-generation Fusion (2006–2012) presents a distinct set of access protocols and failure modes rooted in its transitional technology status. While less complex than its successor, it possesses unique idiosyncrasies that content creators must address.
The Mechanical Override System
The defining feature of the Gen 1 Fusion is the external trunk lock cylinder. This lock cylinder is a tumbler-style mechanism located on the rear decklid, typically to the right of the license plate or integrated into the light bar assembly.
- Operational Mechanics: Inserting the key and rotating it clockwise physically pulls a cable or rod connected to the latch pawl. This action bypasses the electric solenoid entirely.
- Maintenance Issues: Because most users rely on the remote fob, this cylinder is rarely used. Over time, road grime, salt, and oxidation can seize the tumblers. A common “failure” is simply a dirty lock that requires graphite lubricant or penetrating oil to free up. Content addressing Gen 1 lockouts should always prioritize “lubricate and wiggle” as the first troubleshooting step.
Electrical Actuation and the Smart Junction Box (SJB)
In the 2006–2012 models, the electronic trunk release is managed by the Smart Junction Box (SJB), located in the driver’s side kick panel area.
- Fuse Logic: The circuit is protected by specific fuses in the interior fuse panel. For example, Fuse 25 and Fuse 9 are frequently cited in wiring diagrams as protecting the logic and power circuits for the trunk release and interior lighting.
- Solenoid Operation: When the interior release button (located on the instrument panel to the left of the steering wheel 11) is pressed, it closes a circuit that signals the SJB. The SJB then energizes the trunk latch actuator (Part Number AE5Z-5443200-A).
- The “Click” Diagnostic: A definitive diagnostic test for Gen 1 models involves listening for a “click” at the trunk latch when the button is pressed.
- Silence: Indicates an electrical fault (blown fuse, bad switch, or broken wire).
- Click but no opening: Indicates a mechanical failure of the latch assembly (stripped gears or broken plastic pawl).
The Interior Seat Release Protocol
A critical “hack” for accessing the trunk of a Gen 1 Fusion involves the rear seats. Unlike the later models, the release levers for the 60/40 split-folding rear seats are located inside the trunk.
- The Catch-22: To fold the seats, you must be in the trunk. To get in the trunk, you must fold the seats.
- The Bypass: However, savvy users have noted that if there is a slight gap in the seat or a “ski pass” through the center armrest, a long hook or stiff wire (like a straightened coat hanger) can be used to snag the release loops (often marked with a glowing icon) to drop the seats from the cabin side. This is a high-value “MacGyver” tip for users with a seized trunk lock and a dead electrical system.
Common Failure Points: Gen 1
- Latch Actuator Burnout: The AE5Z-5443200-A latch assembly utilizes plastic gears which are prone to stripping after years of usage.
- Wiring Fatigue: While less prevalent than in Gen 2, the wiring loom near the hinge can still fracture, disabling the electric release.
- Key Fob Desynchronization: Older IKT (Integrated Keyhead Transmitters) may lose sync or suffer from button contact wear, requiring a battery replacement (CR2032) or reprogramming.
Architectural Deep Dive: The CD4 Platform (2013–2020)
The Second Generation Fusion represents a quantum leap in complexity. The “clean” design philosophy necessitated the removal of the external key cylinder, making the system entirely dependent on the electrical architecture.
The Body Control Module (BCM) Paradigm
In the CD4 Fusion, the BCM is the brain of the operation. Located under the dashboard on the driver’s side, it communicates with the Remote Function Actuator (RFA) and the trunk latch via the vehicle’s CAN (Controller Area Network) and LIN (Local Interconnect Network) buses.
- Logic Gates: The BCM does not simply “power” the trunk. It evaluates a logic tree:
- Is the vehicle speed < 3 mph?
- Is the security system disarmed?
- Is the fob within range (for external button press)?
- Is the “Valet Mode” active?
- Implication: A failure to open is not always a broken part; it can be a “refusal” by the computer due to a perceived security condition. For example, if the vehicle detects a key inside the trunk, it may pop the trunk open automatically to prevent lockout—a feature known as “Smart Unlock”.
The Intelligent Access System
Models equipped with “Intelligent Access” (push-button start) utilize a sophisticated proximity system.
- LF/RF Communication: The vehicle has Low Frequency (LF) antennas in the rear bumper. These antennas broadcast a challenge signal. The key fob receives this and replies with a Radio Frequency (RF) response containing its digital signature.
- The External Button: The soft-touch button above the license plate (often integrated into the light assembly) is merely a trigger. It initiates the LF/RF handshake. If the BCM validates the key, it fires the latch solenoid.
- Key Fob Battery: The fob uses a CR2025 or CR2450 battery. A weak fob battery can prevent this handshake. However, the BCM is smart enough to display a “Key Battery Low” warning on the dash.
The Dead Battery Paradox: Hybrid/Energi Specifics
The most critical design element of the Gen 2 Fusion is the battery placement in Hybrid and Energi models.
- Location: The 12V battery is located in the trunk, behind a trim panel on the passenger side.
- The Trap: If this battery dies, the entire electrical system goes dark. The trunk latch (DS73-F43282-AD) cannot operate. The external button is dead. The fob is dead. The keypad is dead.
- The Physical Barrier: Unlike ICE models where you can fold the seats to crawl in, Hybrid models have a high-voltage battery pack cooling system and the battery stack itself blocking the pass-through. This makes crawling into the trunk to pull the emergency handle physically impossible for most adults.
- The Engineer’s Solution: To mitigate this, Ford installed remote jumper terminals under the hood. This is the only non-destructive entry method for a dead-battery Hybrid Fusion.
The SecuriCode™ Keypad Logic
The B-pillar keypad is a hallmark of Ford utility. It allows entry without a fob.
- The Trunk Code: To open the trunk, the user enters their 5-digit code to unlock the driver’s door. Within 5 seconds, they must press the 5-6 button.
- Why 5-6?: The system uses paired buttons (1-2, 3-4, etc.) to reduce the wiring complexity and button count while maintaining a 10-digit interface illusion. The 5-6 button is hard-coded in the BCM firmware as the “Trunk/Liftgate Release” command signal.
- Strategic Utility: This is the primary entry method for users who have locked their keys in the trunk but remember their code. It is also useful for “engine running” quick stops where the fob remains in the vehicle.
Diagnostic Protocols and Failure Modes
When the trunk fails to open, a systematic diagnostic approach is required to distinguish between user error, electrical faults, and mechanical breakage.
The Wiring Harness “Hinge of Death”
The most widespread failure in Gen 2 Fusions (2013–2020) is the fatigue fracture of the trunk lid wiring harness.
- Mechanism: The harness runs from the body to the trunk lid through a rubber accordion boot/tube on the driver’s side hinge. Every open/close cycle bends this wire bundle by nearly 90 degrees.
- The Failure: Over thousands of cycles, the copper strands inside the insulation work-harden and snap. Often, the insulation remains intact, hiding the break, or the insulation cracks, causing short circuits.
- Symptoms:
- Trunk will not open (signal wire severed).
- “Trunk Ajar” warning persists when closed (sensor return wire severed).
- Reverse lights or license plate lights fail (power wire severed).
- The trunk pops open randomly (short to ground or power).
- Diagnostic Visualization: A technician must peel back the rubber boot to inspect the wires. Pulling gently on individual wires often reveals the break as the wire stretches or comes apart.
Actuator Solenoid Physics
The trunk latch actuator is an electromechanical device.
- Components: It contains a small DC motor, a worm gear reduction drive, and a microswitch (for the ajar status).
- Failure Modes:
- Gear Stripping: The plastic gears wear out, resulting in a “whirring” or “grinding” noise without actuation.
- Motor Burnout: The motor windings open-circuit, resulting in silence.
- Microswitch Failure: The latch works mechanically, but the car thinks it is open, preventing the alarm from arming or the remote start from functioning.
- Part Numbers: The Gen 2 actuator is part number DS73-F43282-AD (also cross-referenced as DP5Z-54432A38-A for power-close models). It is shared with the Lincoln MKZ.
Switch Corrosion
The exterior release button is exposed to moisture, road salt, and car wash detergents.
- Ingress: Water wicks into the switch housing, corroding the copper contacts.
- Green Death: This results in high resistance (switch does nothing) or a conductive bridge (switch shorts, opening trunk randomly).
- Diagnosis: A multimeter continuity test across the switch pins. Infinite resistance when pressed = Open. Continuity when not pressed = Short.
BCM Logic Faults
Rarely, the BCM itself may “hang” or glitch. A “battery nap” (disconnecting the negative terminal for 10 minutes) can sometimes reset the logic modules, restoring trunk function if the issue was software-related. However, on Hybrids, this reset requires accessing the battery… in the trunk.
Emergency Entry Vectors: Protocols for Lockouts
This section details the specific, step-by-step procedures for gaining access during a total system failure. These protocols are categorized by vehicle generation and drivetrain.
The “Dead Battery” Jump Start Protocol (Gen 2 Hybrid/Energi)
This is the single most important procedure for Gen 2 owners.
- Prerequisite: The driver must gain entry to the cabin. If the car is locked, use the mechanical key blade (see Section 6.2).
- Step 1: Hood Release: Pull the hood release lever located in the driver’s footwell (left sidewall).
- Step 2: Terminal Identification:
- Open the hood.
- Locate the Power Distribution Box on the driver’s side (or passenger side for some Hybrid layouts).
- Identify the Positive (+) Jump Post. It is covered by a red plastic cap embossed with a “+”. Flip this cap open to reveal the metal stud.
- Identify the Ground (-) Point. This is an unpainted metal stud on the shock tower or engine block, often marked with a specialized ground sticker.
- Step 3: Connection:
- Connect the Red clamp of a jumper cable or booster pack to the Positive (+) post.
- Connect the Black clamp to the Ground (-) point.
- Step 4: Actuation:
- The vehicle’s electronics will wake up. The alarm may sound.
- Press the “Unlock” button on the key fob or the interior door switch to silence the alarm.
- Press the trunk release button (interior or exterior). The latch should fire immediately.
- Step 5: Recovery: Once the trunk is open, access the 12V battery in the trunk to replace or properly charge it.
The Mechanical Key Extraction and Door Breach
For Gen 2 models with “Intelligent Access,” there is no visible keyhole on the door.
- Extraction: Locate the release slide on the back of the key fob. Slide it to release the internal mechanical key blade.
- The Hidden Cylinder: Look at the driver’s door handle. On the rear cap piece (the small stationary part of the handle), there is a tiny slot on the underside.
- The Prying Maneuver: Insert the tip of the key blade into this slot. Apply upward and outward pressure to pop the plastic cap off. This reveals the standard lock cylinder.
- Entry: Insert the key blade into the cylinder, turn to unlock, and open the driver’s door. This allows access to the hood release.
The “Seat Fold” Hack (Gen 2 Gas Models)
If the electrical jump fails (e.g., blown BCM fuse), and the car is not a Hybrid, physical entry via the back seat is possible.
- Mechanism: The seat release mechanisms are located on the top outer shoulders of the rear seats.
- The Lockout: Check the rear deck (parcel shelf). Some models have a key lock that disables these seat buttons (Valet security). If this is locked, you cannot fold the seats from the cabin.
- Execution: Press the button or pull the lever. Push the seatback forward. Crawl into the trunk.
- The Glow Handle: Locate the T-shaped, glow-in-the-dark emergency release handle on the trunk lid liner. Pull it to mechanically disengage the latch.
Destructive Entry (The Nuclear Option)
If the mechanical key is lost, the battery is dead, and the lock is picked-proof:
- Drilling: Locksmiths may drill the lock cylinder on Gen 1 models. On Gen 2 models, drilling is complex as there is no trunk cylinder.
- Air Wedging: A locksmith will use an air wedge to pry the top of the driver’s door frame, insert a long reach tool, and attempt to pull the interior door handle or press the unlock button (though the button may be disabled by the BCM in a theft-prevention logic state).
Repair and Maintenance Guide
For the DIY enthusiast, maintaining and repairing these systems is a viable alternative to dealership service.
Wiring Harness Repair Tutorial
- Diagnosis: Confirm broken wires in the rubber boot at the trunk hinge.
- Tools: Wire strippers, soldering iron, 60/40 rosin core solder, adhesive-lined heat shrink tubing, high-strand count automotive wire (16-18 gauge), Tessa tape (cloth).
- Procedure:
- Disconnect the negative battery terminal.
- Peel back the rubber boot to expose the break.
- Do not just twist the broken ends together; the wire is too short and will break again.
- Cut a 2-3 inch section of new wire.
- Strip the ends of the vehicle wire and the new wire.
- Splice the new section in using a “Lineman’s Splice” or mesh splice.
- Solder the connections for a permanent bond.
- Cover with heat shrink tubing and heat until the adhesive sealant flows.
- Wrap the bundle in Tessa tape to prevent abrasion.
- Slide the boot back in place.
Latch Actuator Replacement
- Tools: Plastic trim tool, 10mm socket, ratchet, T20 Torx.
- Procedure:
- Open the trunk.
- Remove the plastic “Christmas tree” fasteners holding the felt liner to the trunk lid.
- Remove the plastic trim around the emergency handle (if present).
- Peel back the liner to expose the latch.
- Disconnect the electrical connector (press tab and pull).
- Disconnect the mechanical cable for the emergency handle.
- Remove the two 10mm bolts holding the latch to the decklid.
- Remove the old latch (Part # DS73-F43282-AD for Gen 2).
- Install the new latch, hand-tighten bolts.
- Alignment: Close the trunk gently to center the latch on the striker. Then open and torque the bolts to 8-10 ft-lbs.
- Reassemble liner.
Fuse Replacement
- Gen 2 Location: Passenger compartment fuse box (under dash, left of steering wheel).
- Target Fuse: Fuse F65 (10A) – Liftgate Release.
- Check Also: Fuse F62 (5A), Fuse F24 (30A).
- Gen 1 Location: SJB (Driver Kick Panel).
- Target Fuse: Fuse 25 (10A), Fuse 9.
- Tool: Needle-nose pliers or fuse puller. Use a multimeter to check continuity if the visual break is not obvious.
Conclusion
The evolution of the Ford Fusion’s trunk access system reflects the broader automotive industry’s shift from mechanical isolation to digital integration. What was once a simple rod-and-tumbler mechanism in the CD3 generation became a sophisticated, software-mediated request system in the CD4 generation. While this transition improved aesthetics and security, it introduced significant vulnerabilities—most notably the dependency on the 12V rail and the susceptibility of the hinge wiring to fatigue.
For the automotive researcher or content creator, the key takeaway is that “opening the trunk” is no longer a singular mechanical act. It is a diagnostic process. It requires understanding the state of the vehicle’s power grid, the integrity of its nervous system (the LIN bus and wiring harness), and the logic of its brain (the BCM). By mastering the nuances of the Dead Battery Paradox, the Hidden Keyhole, and the Hinge Wiring Fault, one can provide definitive, expert-level assistance to the millions of Fusion owners navigating these technical challenges.
Data Tables and Quick Reference
Table 1: Generation Feature Comparison
| Feature | Generation 1 (2006–2012) | Generation 2 (2013–2020) |
| Platform | CD3 (Mazda-derived) | CD4 (Global One Ford) |
| Trunk Key Cylinder | Present (Visible on Trunk Lid) | Absent (Electronic Only) |
| Emergency Key Slot | Standard Door Cylinder | Hidden under Driver Handle Cap |
| 12V Battery Location | Engine Bay (All Models) | Engine Bay (Gas) / Trunk (Hybrid) |
| Seat Release Location | Inside Trunk (Pull Levers) | Top of Seatback (Cabin Buttons) |
| Common Failure | Seized Lock Core / Latch Gears | Broken Harness at Hinge / Latch |
| Latch Part Number | AE5Z-5443200-A | DS73-F43282-AD |
Table 2: Diagnostic Matrix for Gen 2 Fusion
| Symptom | Probable Cause | Verification Step | Solution |
| Dead Silence | Dead Battery | Check dome lights / horn | Jump Start (Under Hood) |
| Dead Silence | Blown Fuse | Check Fuse F65 (10A) | Replace Fuse |
| “Trunk Ajar” Light | Broken Harness | Inspect rubber boot at hinge | Squeeze boot / Repair Wire |
| Clicking / Grinding | Stripped Actuator | Listen near license plate | Replace Actuator (DS73…) |
| Random Opening | Shorted Switch | Disconnect Switch Connector | Replace Exterior Switch |
| Keypad Fail | Wrong Code/Timing | Unlock driver door first | Press 5-6 within 5 sec |
Table 3: Fuse Identification Chart (Gen 2 Passenger Compartment)
| Fuse | Amperage | Circuit Description | Context |
| F65 | 10A | Liftgate / Trunk Release | Primary logic power for latch |
| F62 | 5A | Body Control Module | Logic control |
| F24 | 30A | Central Lock/Unlock | Power for locking mechanisms |
| F1 | 10A | Interior/Trunk Lighting | Trunk illumination |
Table 4: SecuriCode™ Keypad Commands
| Function | Button Sequence | Requirement |
| Unlock Driver Door | 5-Digit Code | Factory or Personal Code |
| Unlock All Doors | Press 3-4 | Within 5 sec of unlock |
| Open Trunk | Press 5-6 | Within 5 sec of unlock |
| Lock All Doors | Press 7-8 + 9-0 | Simultaneous press (no code needed) |