Ford F150 5.0 Serpentine Belt Diagram: Step-by-Step Guide
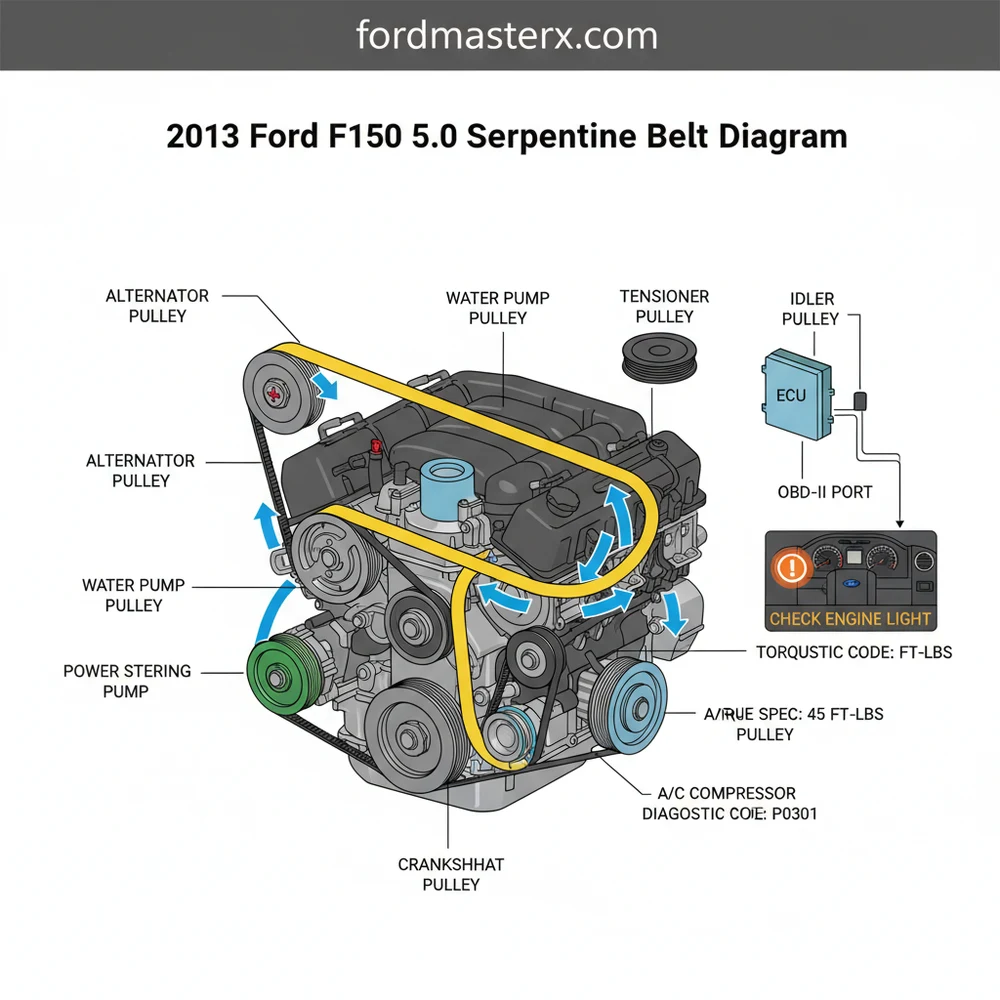
To use the Ford F150 5.0 serpentine belt diagram, locate the tensioner pulley and rotate it counter-clockwise using a 1/2-inch drive. Route the belt around the alternator, AC compressor, water pump, and crank pulley as shown in the layout, ensuring the ribs align perfectly before releasing the tensioner arm to secure.
📌 Key Takeaways
- Visualizing the precise pulley routing for correct belt installation
- Identifying the automatic belt tensioner as the primary adjustment point
- Ensuring the belt ribs align with the pulley grooves to prevent premature wear
- Using the diagram to verify the path of the AC compressor and water pump
- Essential for maintenance when the belt shows cracks or starts squealing
Maintaining the heart of your truck requires more than just regular oil changes; it demands an understanding of the intricate systems that keep your engine running smoothly. When you search for a 2013 ford f150 5.0 serpentine belt diagram, you are likely facing a maintenance milestone or an emergency repair. The serpentine belt, also known as the accessory belt, is a single, continuous loop that powers vital components including the alternator, air conditioning compressor, and water pump. This comprehensive guide will walk you through the routing specifications, pulley identifications, and professional installation techniques needed to ensure your 5.0L Coyote engine remains reliable. You will learn how to interpret the routing path, identify worn components, and utilize the correct tools to complete the job safely.
The 2013 Ford F-150 with the 5.0L V8 engine features a sophisticated front-end accessory drive (FEAD) system. Unlike older vehicle architectures that utilized multiple V-belts, this modern setup uses one long, heavy-duty ribbed belt. Understanding the diagram is essential because the routing is not always intuitive. The belt must weave over and under specific pulleys to ensure the correct rotational direction for each component. For instance, the water pump must spin in a specific direction to maintain proper coolant flow through the engine block and radiator. If routed incorrectly, the engine will overheat almost immediately, potentially causing catastrophic internal damage.
The 2013 Ford F-150 5.0L does not have a power steering pump pulley on the serpentine belt. This model year utilizes Electric Power Assisted Steering (EPAS), which is powered by the battery and alternator rather than a hydraulic pump. This simplifies the belt routing significantly compared to older F-150 models.
The diagram consists of six primary contact points. At the bottom center is the Crankshaft Pulley (the drive pulley), which provides the rotational force for the entire system. To the upper left (driver side) is the Alternator, responsible for maintaining battery charge and powering the ECU and other electronics. Below the alternator is the Tensioner Pulley, which is a spring-loaded arm designed to maintain constant pressure on the belt. In the center is the Water Pump Pulley, which is often a smooth-surface pulley because the backside of the belt typically runs against it. To the right (passenger side) sits the A/C Compressor Pulley and an Idler Pulley, which helps guide the belt and provides maximum “wrap” around the other pulleys to prevent slipping.
[DIAGRAM_PLACEHOLDER: 2013 FORD F150 5.0L SERPENTINE BELT ROUTING – A schematic showing the belt starting at the Crankshaft, going up to the Alternator, over the Tensioner, across to the Water Pump, around the A/C Compressor, and under the Idler Pulley back to the Crankshaft.]
Before beginning the installation, it is important to distinguish the accessory belt from the timing chain. While the serpentine belt is visible at the front of the engine and relatively easy to replace, the timing chain is located behind the timing cover and synchronizes the camshafts with the crankshaft. If your engine is making a rattling noise from deep within, it may be a timing issue rather than a belt issue. However, most “chirping” or “squealing” sounds are directly related to the serpentine belt or its associated pulleys.
To successfully interpret and apply the 2013 ford f150 5.0 serpentine belt diagram, follow these structured steps for a professional-grade replacement:
- ✓ Step 1: Preparation and Safety. Ensure the engine is completely cool to the touch. Disconnect the negative battery terminal to prevent accidental engine starts. Gather a 1/2-inch drive breaker bar or a dedicated long-reach serpentine belt tool.
- ✓ Step 2: Locate the Tensioner. On the 5.0L engine, the tensioner is located on the lower driver’s side of the accessory drive. Look for a pulley attached to a spring-loaded arm with a square 1/2-inch inset or a bolt head in the center.
- ✓ Step 3: Relieve Tension. Insert your tool into the tensioner. Rotate the tool clockwise (towards the passenger side) to compress the spring. This will create slack in the belt.
- ✓ Step 4: Remove the Old Belt. While holding the tensioner in the compressed position, slide the belt off the easiest-to-reach pulley, usually the alternator or the upper idler. Slowly release the tensioner arm. Remove the belt from the rest of the pulleys and pull it out of the engine bay.
- ✓ Step 5: Inspect Pulleys. Spin each pulley by hand. They should spin smoothly without any grinding noise or wobbling. If a pulley feels “gritty,” the bearing is failing and the component (like the idler or water pump) should be replaced.
- ✓ Step 6: Route the New Belt. Use the diagram to thread the new belt. Start at the bottom with the Crankshaft pulley, then work your way up to the A/C compressor and water pump. Leave the alternator pulley for last, as it is the easiest to slide the belt onto while tensioning.
- ✓ Step 7: Final Seat and Check. Once the belt is on, double-check that the “ribs” of the belt are perfectly seated in the grooves of the pulleys. If the belt is even one rib off-center, it will shred within minutes of starting the engine.
Never place your fingers between the belt and a pulley while the tensioner is compressed. If the tool slips, the tensioner will snap back with enough force to cause severe injury. Always handle the belt from a safe distance or use a second person to help guide the belt onto the final pulley.
Even with a perfect installation, issues can arise over time. Common problems include belt “squeal,” which is often caused by a loss of tension or a glazed belt surface. If your battery is not charging correctly, you may see a check engine light on your dashboard. When you use an OBD-II scanner to pull a diagnostic code, you might find codes like P0562 (System Voltage Low). While this could indicate a failing alternator, it is often simply a loose or slipping belt that isn’t spinning the alternator fast enough to meet the ECU demand.
Another frequent issue involves the water pump. Since the 5.0L serpentine belt manages coolant flow, a broken belt will lead to a rapid spike in engine temperature. If you see the temperature needle climb or notice steam, pull over immediately. Driving even a few miles without a functional belt can warp the cylinder heads. Inspect the belt for “chunking”—where pieces of the ribs have fallen off—or “glazing,” where the flat side of the belt looks shiny and hard. Both are signs that the belt has reached the end of its service life.
If you are replacing the belt, it is highly recommended to replace the tensioner assembly at the same time. The internal spring in the tensioner loses its strength over 100,000 miles. A new belt on an old tensioner is a recipe for premature wear and annoying belt noise.
When purchasing replacement parts, always opt for EPDM (Ethylene Propylene Diene Monomer) belts. These are far superior to older neoprene belts as they do not crack with age; instead, they wear down slowly like a tire tread. You can use a belt wear gauge to check the depth of the grooves. For the 2013 Ford F-150, the torque spec for the tensioner mounting bolt is typically around 35-40 lb-ft, though you should verify this in your specific service manual if you are replacing the entire tensioner unit.
Maintenance best practices suggest inspecting the belt every 30,000 miles and replacing it every 100,000 miles as a preventative measure. This is a small price to pay compared to the cost of a tow truck or engine repair. Keeping a spare belt in the storage compartment under your rear seat is a classic “truck owner” move that can save you from being stranded in remote areas.
In summary, the 2013 ford f150 5.0 serpentine belt diagram is an essential tool for any DIY mechanic. By understanding the routing path, ensuring the belt is seated correctly in the pulley grooves, and monitoring for signs of wear like squealing or OBD-II voltage codes, you can maintain your F-150’s performance for years to come. Whether you are performing a routine check or an emergency replacement, following this guide ensures your Coyote V8 continues to roar without interruption.
Frequently Asked Questions
Where is the serpentine belt located?
The serpentine belt is located at the very front of the Ford 5.0L engine. It is accessible once the hood is open, situated behind the radiator fans, and wraps around various accessory pulleys including the crankshaft, alternator, water pump, and air conditioning compressor.
What does this belt diagram show?
This diagram illustrates the specific path the belt must follow to provide power to all engine accessories. It shows which pulleys require the ribbed side of the belt and which use the smooth backside, ensuring the water pump and alternator rotate in the correct direction.
How many pulleys does the 5.0 engine have?
The 5.0L Coyote engine typically features several pulleys including the crank, alternator, water pump, AC compressor, and tensioner. While the belt is mechanical, the alternator it drives communicates directly with the ECU to manage the vehicle’s electrical load and battery charging efficiency.
What are the symptoms of a bad serpentine belt?
Common symptoms include loud squealing noises, heavy steering, or an overheating engine. A slipping belt can also trigger a check engine light if the alternator fails to maintain voltage, resulting in a diagnostic code stored in the vehicle’s computer system during an inspection.
Can I replace this belt myself?
Yes, replacing a serpentine belt on a Ford F150 5.0 is a common DIY task. It requires minimal tools and usually takes less than 30 minutes. Having a copy of the routing diagram is the most critical part of ensuring the job is done correctly.
What tools do I need for this task?
You will primarily need a 1/2-inch drive breaker bar or a dedicated serpentine belt tool to rotate the tensioner. It is also helpful to have an OBD-II scanner nearby to clear any low-voltage codes that may have been triggered by a failing or snapped belt.