Ford Expedition Fuse Box Diagram: Diagnosis & Fix Guide
The 1998 Ford Expedition fuse box diagram identifies the passenger compartment panel located under the dashboard and the power distribution box in the engine bay. These diagrams pinpoint fuses for the ECU, OBD-II port, and lighting, allowing you to resolve electrical failures and clear a check engine light effectively.
📌 Key Takeaways
- Identifies circuit protection for critical electronics like the fuel pump.
- Crucial for powering the OBD-II port for vehicle diagnostics.
- Always match amperage ratings to prevent electrical fires.
- Used to troubleshoot no-start conditions involving the ECU relay.
- Essential reference when the instrument cluster or lights fail.
Finding yourself stranded with a non-responsive window or a sudden loss of headlights in a classic SUV can be a frustrating experience. For owners of this vintage of full-size SUVs, the 1998 Ford Expedition fuse box diagram is the single most important document you can have in your glovebox or workshop manual. Electrical issues in these vehicles are often simple to fix, provided you know which circuit protects which component. This guide provides a comprehensive overview of the electrical protection systems, explaining how to identify specific fuses, what they control, and how to safely replace them to get your vehicle back on the road without expensive shop fees.
Understanding Your 1998 Ford Expedition Fuse Box Layout
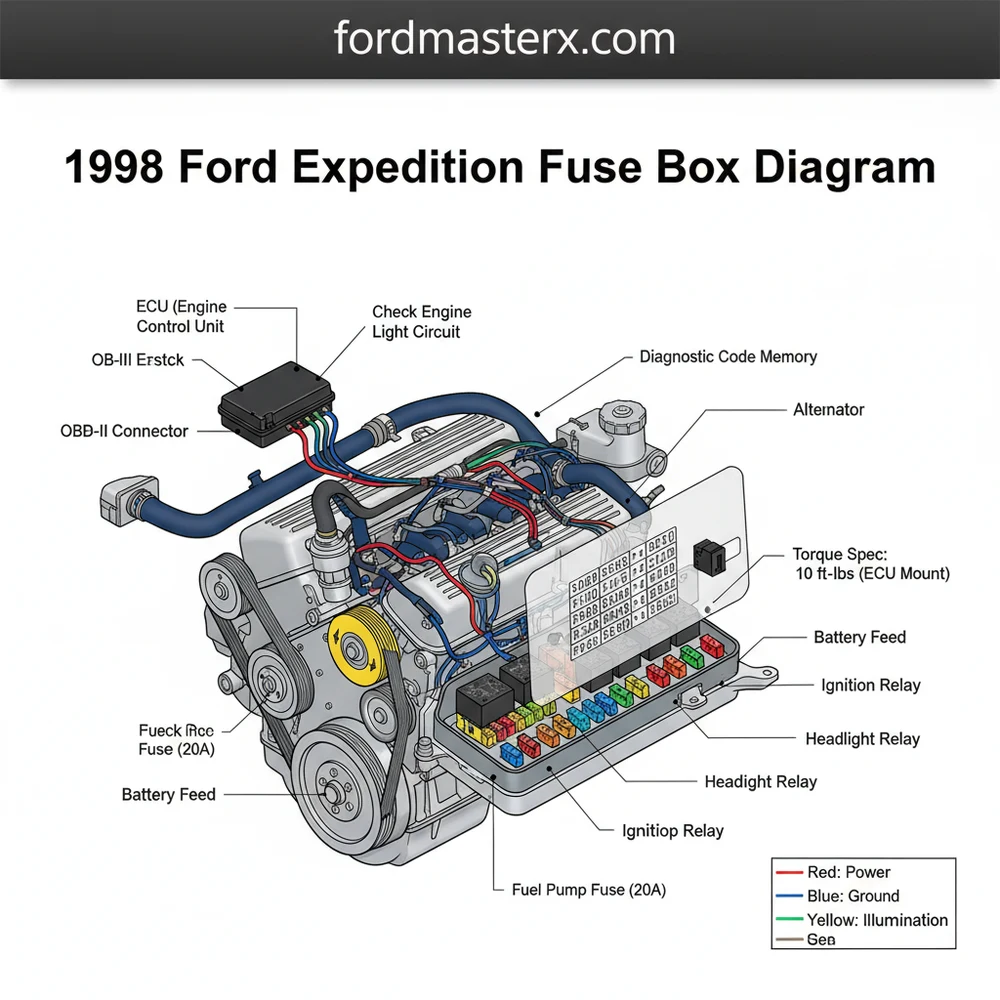
The 1998 Ford Expedition utilizes a dual-location fuse system designed to separate high-current engine functions from lower-current interior electronics. To effectively use a 1998 Ford Expedition fuse box diagram, you must first recognize that the electrical architecture is split between the Passenger Compartment Fuse Panel and the Power Distribution Box located under the hood.
The interior panel, located to the left of the steering column near the brake pedal, houses smaller “mini” fuses. These primarily manage the cabin comfort features, such as the radio, interior lighting, and the power to your OBD-II diagnostic port. If your check engine light is on and your scanner won’t power up, this is the first place to look.
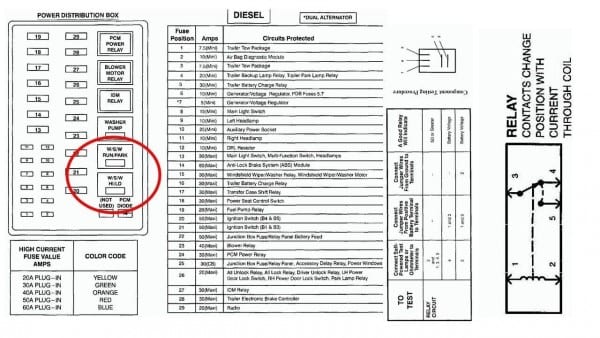
Conversely, the Power Distribution Box is located in the engine compartment on the driver’s side. This box contains high-current “Maxi” fuses and relays. These are responsible for the heavy lifters of the vehicle, including the ECU (Engine Control Unit), the fuel pump, and the anti-lock brake system. The diagram for this box is usually embossed on the underside of the plastic cover, though it can become illegible over time due to engine heat and coolant flow vapor.
[DIAGRAM_PLACEHOLDER – 1998 Ford Expedition Fuse Box Mapping: Highlighting the Passenger Panel (Fuses 1-30) and Engine Bay Distribution Box (Fuses 1-100 and Relays)]
The visual breakdown of the diagram typically uses a grid coordinate system. For example, in the passenger compartment, fuses are numbered sequentially. In the engine bay, you will see a mix of large rectangular blocks (relays) and colored plastic squares (Maxi fuses). The color-coding is standardized: blue is generally 20A, yellow is 20A (mini) or 60A (maxi), and green is 30A. Always verify the amperage stamped on the top of the fuse against the 1998 Ford Expedition fuse box diagram to ensure a previous owner hasn’t installed an incorrect, potentially dangerous rating.
Step-By-Step Guide to Reading and Replacing Fuses
Interpreting an automotive electrical diagram might seem daunting, but it follows a logical flow. Follow these steps to diagnose and repair your electrical circuits accurately.
Never replace a fuse with one of a higher amperage rating. This can lead to overheating wires, melted harnesses, or even a vehicle fire. If a 15A fuse blows, only replace it with another 15A fuse.
- Locate the Correct Panel: Determine if the failing component is an interior accessory (use the dash panel) or a major mechanical system (use the engine bay panel). For example, if the ECU is not communicating, start under the hood.
- Access the Box: For the interior panel, pull the cover downward. For the engine bay box, unlatch the plastic clips on the side of the black box. Be careful not to snap these clips if the plastic is brittle from age.
- Reference the Diagram: Match the physical location of the fuse to the numbered slot on your 1998 Ford Expedition fuse box diagram. Pay close attention to the orientation of the box; diagrams are usually drawn as if you are looking directly down at the pins.
- Visual Inspection: Use a fuse puller tool (often found inside the engine bay fuse box cover) to remove the suspect fuse. Look at the metal filament inside the transparent plastic. If the bridge is broken or the plastic is charred, the fuse is blown.
- Test with a Multimeter: If the fuse looks intact but the circuit is dead, set your multimeter to the continuity setting. Touch the probes to the two small metal test points on top of the fuse. A “beep” indicates the fuse is good.
- Identify the Root Cause: If a fuse blows immediately after replacement, you have a short circuit. Check for frayed wires near moving parts like the accessory belt or areas prone to high heat.
- Install the New Fuse: Firmly press the replacement fuse into the slot. You should feel it “click” or seat securely.
- Verify the Repair: Turn the ignition to the “On” position and test the component. If you were clearing a diagnostic code, use your OBD-II scanner to reset the system.
Always turn off the engine and remove the key from the ignition before pulling fuses related to the powertrain or fuel system to prevent accidental spikes to the sensitive electronic modules.
Common Issues and Troubleshooting

The 1998 Ford Expedition is known for a few specific electrical quirks that can be solved using the fuse box diagram. One frequent issue involves the “GEM” (Generic Electronic Module). If your wipers, interior lights, and power windows all start acting erratically at the same time, it is often due to water leaking from the windshield onto the interior fuse box, causing corrosion.
Another common problem is a “no-crank” condition. While many suspect the timing chain or starter motor, it is often just a blown 20A fuse in the engine compartment that powers the starter solenoid relay. Similarly, if your check engine light is flickering or the engine stumbles, check the Maxi fuses associated with the fuel pump and ignition coils.
If you find that your OBD-II port has no power, preventing you from reading a diagnostic code, check Fuse #3 (15A) in the passenger compartment. This fuse is shared with the cigar lighter, and a coin dropped into the lighter socket is a notorious cause for blowing this fuse and disabling your diagnostics.
Tips and Best Practices for Maintenance
Maintaining the electrical health of your 1998 Ford Expedition requires more than just knowing how to swap a fuse. Since this vehicle is over two decades old, the wiring is susceptible to environmental degradation.
- ✓ Clean the Terminals: Periodically check the battery terminals and the main power feed to the under-hood fuse box. Ensure the torque spec for the battery terminals is tight (usually around 10-12 lb-ft) to prevent arcing.
- ✓ Inspect Wire Looms: Check the wiring near the accessory belt and the coolant flow hoses. Heat and vibration can chafe the protective loom, leading to intermittent shorts that blow fuses.
- ✓ Dielectric Grease: Use a small dab of dielectric grease on the pins of your relays. This prevents moisture from causing corrosion, which is vital for the ECU and fuel pump relays.
- ✓ Keep Spares: Always keep a variety pack of mini and maxi fuses in your glovebox.
If you are experiencing strange electrical gremlins that aren’t solved by a fuse, check the vehicle’s main ground straps. A loose ground near the engine block or frame can mimic multiple blown fuses by preventing the circuit from completing.
In conclusion, mastering the 1998 Ford Expedition fuse box diagram is the key to maintaining this classic SUV. Whether you are troubleshooting a check engine light or simply trying to get your radio working for a road trip, the fuse box is your first line of defense. By following the proper safety protocols, using the right tools, and understanding the layout of both the interior and engine bay panels, you can handle most electrical repairs with confidence. Remember that fuses are safety devices; they blow to protect expensive components like the ECU. Respect the diagram, and your Expedition will continue to provide reliable service for years to come.
Step-by-Step Guide to Understanding the Ford Expedition Fuse Box Diagram: Diagnosis & Fix Guide
Identify the electrical failure, such as a check engine light or dead power outlet.
Locate the relevant fuse panel in the cabin or engine bay using the diagram.
Understand how the diagram’s numerical grid corresponds to the physical fuse slots.
Apply a fuse puller tool to carefully remove the fuse assigned to the failing component.
Verify that the internal metal filament is broken or if the casing is charred.
Complete the repair by inserting a new fuse that matches the original amperage rating.
Frequently Asked Questions
Where is the fuse box located?
The vehicle features two main locations: the passenger compartment fuse panel is positioned under the steering wheel dashboard on the left side, while the power distribution box is located in the engine compartment near the driver-side fender. Accessing both is necessary for comprehensive electrical troubleshooting.
What does the fuse box diagram show?
The 1998 Ford Expedition fuse box diagram illustrates the physical layout, identification numbers, and amperage ratings for every fuse and relay. It maps which circuits protect specific components such as the ECU and headlights, making it simple to find a blown fuse during a diagnostic check.
How many fuses does the Expedition have?
The Expedition contains dozens of fuses and high-power relays divided between the interior panel and the engine bay box. The interior handles low-amperage electronics like the OBD-II port, whereas the engine bay manages heavy-duty systems. Check your specific diagram to confirm the total count for your trim.
What are the symptoms of a bad fuse?
Common symptoms include specific electrical components failing to work, such as a radio losing power or a check engine light appearing. If your scanner cannot retrieve a diagnostic code because the OBD-II port is dead, a blown fuse in the auxiliary power circuit is the most likely cause.
Can I replace these fuses myself?
Yes, replacing fuses is a basic DIY task that requires a plastic fuse puller and a replacement fuse of identical amperage. Ensure the vehicle ignition is completely off, locate the specific fuse using the diagram, and swap the damaged part to restore functionality to the affected circuit.
What tools do I need for this task?
You typically only need a fuse puller and a multimeter to test for continuity. If you are replacing the entire distribution box, you may need a socket set. Always ensure any mounting bolts meet the manufacturer torque spec to prevent loose connections caused by engine vibrations.