2008 Ford Fusion Belt Diagram: 2026 Routing & Maintenance

The 2008 Ford Fusion serpentine belt routing path typically winds clockwise around the crankshaft pulley, looping over the water pump, around the alternator, and under the idler pulley. Ensure the grooved side of the belt contacts the pulleys correctly, with the belt tensioner providing the necessary force to secure the assembly.
📌 Key Takeaways
- Standard serpentine belt lengths vary by engine (2.3L I4 vs 3.0L V6) and accessory options.
- The belt tensioner is spring-loaded and requires a 3/8-inch or 1/2-inch drive ratchet to release.
- Always verify the belt’s rib alignment on every pulley before starting the engine to prevent immediate shredding.
- A glazed or cracked belt surface often indicates an aging component requiring immediate replacement to prevent total failure.
- Professional assistance is recommended if the belt tensioner pulley assembly exhibits excessive wobble or internal spring binding.
The 2008 Ford Fusion utilizes a complex serpentine accessory drive system that requires precise alignment to ensure optimal component longevity. Whether you are operating the 2.3L Duratec I4 or the 3.0L Duratec V6 engine, the accessory drive belt facilitates the operation of the alternator, water pump, power steering pump, and A/C compressor. Misalignment or improper tensioning of this belt can lead to rapid accessory bearing failure or thermal degradation of the belt material itself. This guide provides the technical specifications, routing paths, and procedural requirements necessary to maintain the integrity of your vehicle’s serpentine drive system, ensuring you avoid common pitfalls associated with incorrect pulley engagement.

Prime for Young Adults — 6 Months Free
Students and 18–24s get six months of Prime free, then half price.
Start 6 Months Free As an Amazon Associate I earn from qualifying purchases.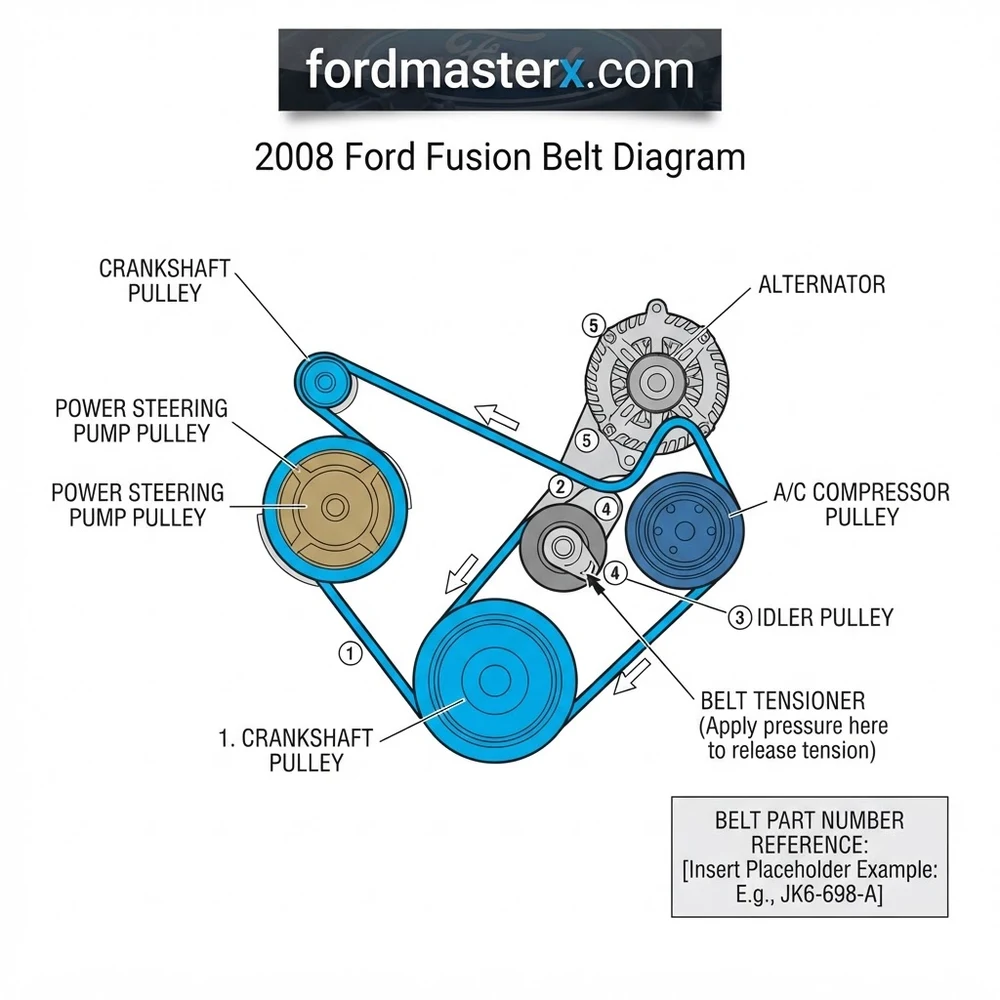
Identifying Your 2008 Ford Fusion Belt Diagram by Engine Type
Recommended Best Deal Products


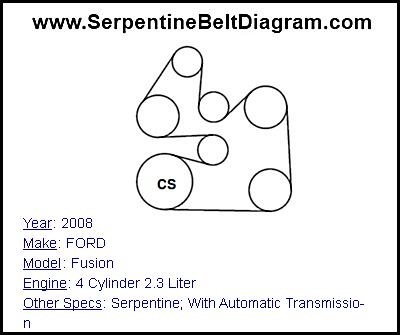
The serpentine belt routing path varies significantly based on the engine configuration. It is imperative to identify your specific powertrain before attempting a replacement to ensure the belt size and tensioner load are correct.
2.3L I4 Engine Configuration

The 2.3L Duratec engine utilizes a single serpentine belt to drive the entire accessory array. The belt routing path starts at the crankshaft pulley, which acts as the harmonic balancer, and proceeds to the A/C compressor pulley. From there, it interfaces with the idler pulley before looping over the alternator. The belt tensioner for this engine is positioned specifically to maintain constant tension against the belt span between the crankshaft and the alternator. Note that the 2.3L routing is distinct in its engagement with the water pump, which is internally driven on some specific manufacturing variants of the 2008 model year.
3.0L V6 Engine Configuration
The 3.0L Duratec V6 features a more complex routing path due to the increased number of accessories and the physical dimensions of the engine block. In this configuration, the belt routing path must navigate around two idler pulleys to maintain appropriate wrap angles on the water pump and the power steering pump. The crankshaft pulley remains the primary drive point, but the interaction with the A/C compressor pulley requires a specific under-pulley route to ensure the belt does not interfere with the frame rail or cooling fan shroud.
Crankshaft and A/C Compressor Pulley Alignment
Regardless of the engine, the crankshaft pulley (harmonic balancer) serves as the primary reference point for the 2008 Ford Fusion belt diagram. Ensure that every rib of the belt is seated firmly within the grooves of the A/C compressor pulley. Any debris—such as sand, rust, or remnants of a degraded belt—trapped in these grooves will lead to immediate slippage and premature wear, commonly manifesting as a high-pitched chirping noise during cold starts.
On the 3.0L V6, verify the alignment of the belt relative to the water pump pulley. If the belt rides even one groove off-center, the lateral stress can destroy the water pump bearing in under 500 miles.
Recommended 2008 Ford Fusion Serpentine Belt Part Numbers
Selecting the correct OEM belt or a high-quality aftermarket equivalent is critical. The belt size is calibrated to the specific tensioner spring constant provided by the manufacturer. Using a belt that is even 5mm too long can result in insufficient tension, causing the belt to “flap” at high RPMs.
| Engine | Part Category | Standard OEM Spec |
|---|---|---|
| 2.3L I4 | Serpentine Belt | 6K715 (or equivalent) |
| 3.0L V6 | Serpentine Belt | 6K825 (or equivalent) |
| All Engines | Tensioner Assembly | Ford OEM Part # 8G1Z-6B209-A |
When sourcing replacement parts, prioritize EPDM (Ethylene Propylene Diene Monomer) rubber construction. EPDM belts offer superior heat resistance compared to traditional neoprene, which is essential for the high-temperature environment of the 2008 Fusion engine bay. Always verify the belt part number against the specific build date of your vehicle, as mid-year production changes occasionally altered pulley diameters.
How to Properly Execute the 2008 Ford Fusion Belt Routing
Recommended Best Deal Products


Installing the drive belt requires the use of a professional-grade serpentine belt tensioner tool. Avoid using standard socket wrenches, as they often lack the necessary reach and clearance to safely depress the tensioner spring without slipping.
1. Positioning: Place the vehicle on a flat, level surface and disconnect the negative battery terminal. Removing the front passenger-side wheel and the plastic inner fender splash guard provides significantly improved access to the crankshaft pulley and the lower tensioner assembly.
2. Relieving Tension: Attach the tensioner tool to the bolt head on the belt tensioner. Rotate the tool in the direction indicated by the arrow stamped on the tensioner housing (typically clockwise). This will compress the internal spring and create slack in the belt.
3. Belt Removal: Once sufficient slack is achieved, slide the belt off the most accessible smooth idler pulley. Gently release the tensioner tool; do not allow it to snap back rapidly, as this can damage the internal dampening mechanism.
4. Routing the New Belt: Following the 2008 Ford Fusion belt diagram, loop the new belt around all pulleys except for the final, most accessible one (often the tensioner or an idler pulley). Ensure the grooved side of the belt matches the grooved pulleys and the smooth side of the belt contacts the idler pulleys.
5. Final Engagement: Once the belt is routed, engage the tensioner tool again to compress the spring. Slip the final section of the belt over the remaining pulley. Double-check every rib to ensure the belt is properly seated in the grooves of the alternator pulley, crankshaft, and water pump.
6. Verification: Remove the tensioner tool. Rotate the engine manually by the crankshaft bolt for two full revolutions. Visually inspect the belt to ensure it has not shifted and remains centered on all pulleys.

Audible — Listen Free for 30 Days
One free credit a month and thousands of titles included.
Listen Free for 30 Days As an Amazon Associate I earn from qualifying purchases.Failure to confirm proper seating on the power steering pump pulley can lead to the belt jumping off during high-load maneuvers, resulting in a total loss of power-assisted steering.
Managing Belt Tension and Accessory Drive System Health
The longevity of your accessory drive system depends on your ability to monitor wear indicators and mechanical fatigue. A serpentine belt should be inspected every 30,000 miles for signs of cracking, fraying, or rib separation.
Belt Tensioner Inspection: The tensioner is a wear component. If you observe the tensioner pulley vibrating excessively while the engine is idling, the internal spring has likely lost its tension constant. This causes belt slippage, which in turn glazes the belt material, rendering it brittle.
Serpentine Belt Wear Indicator: Many aftermarket belts include a wear indicator mark. Alternatively, use a belt wear gauge to measure the depth of the grooves. If the grooves have worn down to the point where the belt “bottoms out” on the pulley, power transfer efficiency drops, and the belt is prone to slipping under wet conditions.
Idler Pulley Bearing Health: While the belt is off, spin each idler pulley by hand. A healthy pulley should spin silently with zero lateral play. If you feel grinding, resistance, or “notchiness,” the bearings are failing and will inevitably lead to a belt shredding incident.
Power Steering Pump Pulley Stability: Inspect the power steering pump pulley for signs of runout or wobbling. Even a slightly bent pulley flange will cause the belt to oscillate, leading to harmonic vibration that travels through the entire accessory drive system.
For the 2008 Fusion, the tensioner mounting bolts should be torqued to 35 lb-ft (47 Nm) if replacement of the entire assembly is required.
2008 Ford Fusion Belt Diagram Questions Answered
Recommended Best Deal Products


How can I verify the belt is fully seated according to the diagram?
You should perform a “rib count” check. Use a small mirror to inspect the underside of the pulleys. Each rib of the belt must be perfectly aligned within the corresponding groove of the pulleys. If any rib is protruding over the edge, the belt will fail prematurely.
Does the 2008 Ford Fusion belt diagram differ for AWD models?
No, the accessory drive system on the 3.0L V6 remains identical regardless of whether the vehicle is FWD or AWD. The routing path is dictated by the accessory layout, which does not change based on the drivetrain configuration.
What are the symptoms of a failing belt tensioner?
Symptoms include a distinct “squeal” during acceleration, a rhythmic chirping at idle, or the belt showing signs of lateral movement. If you notice the belt material fraying on one side, it is an indicator that the tensioner is misaligned, forcing the belt to track improperly against the pulley flanges.
Can I use a belt dressing spray to stop the noise?
It is highly recommended to avoid belt dressing sprays. These products are temporary fixes that attract dust and debris, causing the belt to degrade faster. If your belt is noisy, it is a mechanical signal that the belt, tensioner, or idler pulley requires immediate physical replacement.
How often should the idler pulleys be replaced?
While not always specified in the manual, it is considered best practice to replace the idler pulley every time the serpentine belt is replaced. Given the similar lifecycle of the bearing grease and the belt material, replacing them together prevents you from having to repeat the labor-intensive removal process shortly after installing a new belt.
Step-by-Step Guide to Understanding the 2008 Ford Fusion Belt Diagram
Identify – Locate the belt routing sticker on the hood or radiator shroud.
Audible Premium Plus — Annual Membership
12 audiobook credits up front, plus the full Audible catalogue.
See Annual Plans As an Amazon Associate I earn from qualifying purchases.Locate – Position your 3/8-inch drive tool on the belt tensioner arm.
Reference – Consult the belt routing path diagram to visualize the pulley sequence.
Connect/Route – Thread the new belt around all fixed pulleys, saving the tensioner for last.
Verify – Rotate the tensioner, slip the belt over the final pulley, and ensure rib alignment.
Troubleshoot – Start the engine briefly and listen for squeals indicating improper seating or pulley misalignment.