2004 Ford Explorer 4.0 Serpentine Belt Diagram: Routing Guide 2026

The 2004 Ford Explorer 4.0L V6 utilizes a single serpentine belt routing path. The belt weaves around the crankshaft, water pump, power steering pump, alternator, and A/C compressor. Proper tension is maintained by a spring-loaded belt tensioner located on the passenger side front of the engine block near the idler pulley.
📌 Key Takeaways
- Use OEM-equivalent belts like Motorcraft JK6-940 or aftermarket K060940 (effective length approx. 94 inches).
- Ensure the smooth side of the belt contacts idler pulleys, while the grooved side matches the accessory pulleys.
- The automatic tensioner requires a 3/8-inch drive breaker bar or specialized tensioner tool to rotate clockwise for release.
- Check for misalignment if the belt shows excessive edge fraying, often caused by a worn idler pulley bearing.
- Always replace the belt if cracks exceed 1/8 inch or if the rubber shows signs of glazing/hardening.
Maintaining the 4.0L SOHC V6 engine requires precise knowledge of the serpentine belt drive system to prevent accessory failure and engine overheating. The 2004 Ford Explorer 4.0 serpentine belt diagram serves as the definitive reference for ensuring proper belt tension and routing path accuracy. Because this engine configuration utilizes a single-belt drive system to power the alternator, water pump, A/C compressor, and power steering pump, any deviation from the factory-specified path can lead to improper accessory rotation or premature bearing failure. This guide provides the technical specifications, OEM-equivalent part data, and mechanical procedures required for professional-grade maintenance on your vehicle’s drive assembly.

Prime for Young Adults — 6 Months Free
Students and 18–24s get six months of Prime free, then half price.
Start 6 Months Free As an Amazon Associate I earn from qualifying purchases.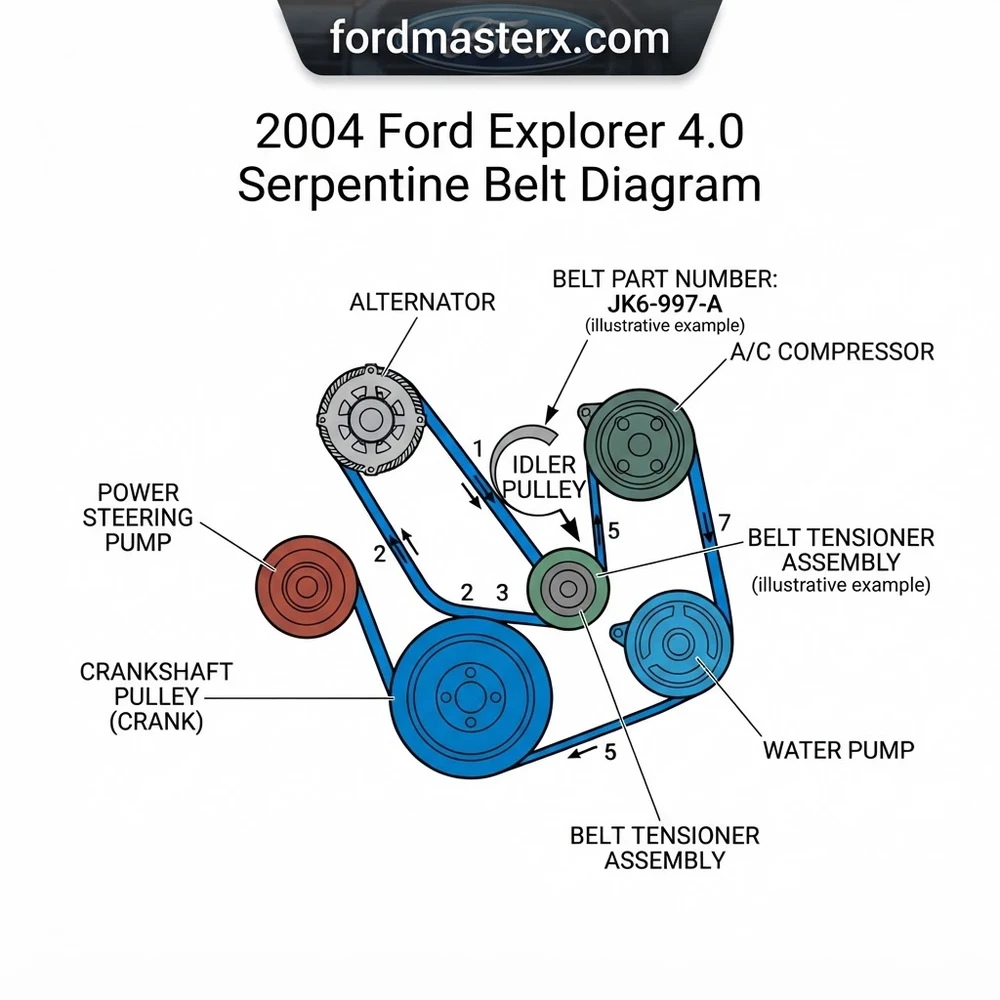
2004 Ford Explorer 4.0 Serpentine Belt Diagram: Component Layout
Recommended Best Deal Products




Understanding the architecture of the 4.0L SOHC V6 front-end accessory drive (FEAD) is essential for successful maintenance. The 2004 Ford Explorer 4.0 serpentine belt diagram illustrates a complex routing path designed to maximize the deck engagement—the surface area contact—on each pulley. This design ensures that high-load components like the A/C compressor and alternator receive sufficient friction to operate without slippage, even under peak electrical or thermal loads.
Accessory Pulley Relationships

The belt path begins at the crankshaft pulley, which acts as the drive source. From the crankshaft, the belt travels to the A/C compressor, which is typically mounted low on the passenger side. Maintaining tension on this section is critical, as the A/C clutch places high torque demands on the drive system. From the compressor, the belt routes upward toward the water pump and the power steering pump. The power steering pump pulley utilizes a smooth, non-grooved idler surface if the back of the belt is utilized for contact; otherwise, the internal grooved side of the belt must align perfectly with the ribbed pulleys of the alternator and crankshaft.
Idler Pulley and Tensioner Geometry
The idler pulley, situated centrally, is designed to divert the belt path to accommodate the alternator’s high-mount position. The automatic belt tensioner features a spring-loaded swing arm that provides the constant pressure necessary for long-term belt health. Failure to account for the pivot arc of the tensioner during installation often leads to “belt squeal” caused by insufficient tension. When analyzing the 2004 Ford Explorer 4.0 serpentine belt diagram, ensure that the belt ribs are fully seated within the grooves of the fixed pulleys, as even a one-groove misalignment on the crankshaft or alternator will cause catastrophic edge fraying and immediate belt shedding.
For 2004 models, the 4.0L SOHC engine uses a 6-rib belt configuration. Always verify that your replacement belt is designated for the 6-groove profile, as standard 5-rib or 7-rib belts will cause pulley damage and immediate accessory misalignment.
Recommended 2004 Ford Explorer 4.0 Serpentine Belt Part Numbers
When selecting a replacement belt, sourcing an OEM-grade component is critical for durability. Automotive engineers design these belts with specific ethylene propylene diene monomer (EPDM) rubber compounds to withstand the high-heat environment of the 4.0L engine bay. The following table provides the cross-reference data for high-quality replacement parts suitable for this application.
| Manufacturer | Part Number | Notes |
|---|---|---|
| Motorcraft | JK6-895 | OEM Specification |
| Gates | K060895 | Micro-V Belts |
| Continental | 4060895 | Elite Series |
| Dayco | 5060895 | Poly Rib |
Step-by-Step 2004 Ford Explorer 4.0 Serpentine Belt Routing
Recommended Best Deal Products


Proper installation requires an systematic approach to ensure the belt follows the 2004 Ford Explorer 4.0 serpentine belt diagram accurately. Using a dedicated serpentine belt tool is non-negotiable for safety and efficiency. Attempting this with a standard long-handled wrench often results in insufficient tensioner travel and potential injury if the wrench slips under load.
Pre-Installation Inspection
Before installing the new belt, inspect the alternator and power steering pump pulley bearings for axial play. If the idler pulley shows signs of rust or bearing “grumble” when rotated by hand, replace it immediately. Operating a new belt against a failing pulley will lead to early belt fatigue and possible engine compartment damage.
Routing Procedure
- Engage the Tensioner: Attach the 3/8-inch square drive of your serpentine belt tool to the tensioner arm. Rotate the tensioner clockwise against the internal spring pressure until the belt can be fully removed from the idler pulley.
- Follow the Diagram: Starting at the crankshaft harmonic balancer, route the belt according to the 2004 Ford Explorer 4.0 serpentine belt diagram. Ensure the grooved side of the belt matches the grooved face of the crank and A/C compressor.
- Ensure Deck Engagement: Route the smooth side of the belt over the water pump and the idler pulley. Check that the belt is centered within the tracks of every accessory pulley. A misaligned belt on the water pump will lead to instant overheating.
- Final Tensioning: Ensure the belt is routed over all fixed pulleys first. The very last step is to slip the belt over the final idler pulley while the tensioner is fully retracted. Release the tensioner slowly to ensure the belt seats correctly into the pulley grooves.
- Verification: Once the tool is removed, perform a visual check of every pulley. Verify that no portion of the belt is “hanging off” the edge of any pulley. Start the engine and observe the belt for five minutes at idle to ensure it remains centered.
Do not attempt to roll the belt onto the pulleys while the engine is running or by manually forcing it with a screwdriver. This causes permanent structural damage to the belt’s tensile cords and significantly increases the risk of immediate failure.
Tensioner Mechanics and 2004 Ford Explorer 4.0 Belt Adjustment
The 4.0L SOHC V6 engine utilizes a self-adjusting hydraulic or spring-loaded tensioner. Unlike older vehicles that required manual bolt-tightening to reach the correct belt tension, this system maintains constant force automatically. The health of your drive system depends entirely on the tensioner’s ability to maintain this “swing arc” without sticking or binding.

Audible — Listen Free for 30 Days
One free credit a month and thousands of titles included.
Listen Free for 30 Days As an Amazon Associate I earn from qualifying purchases.Assessing Tensioner Health
If your belt shows signs of slipping—typically identified by a high-pitched chirping sound under electrical load—the tensioner spring may have lost its temper or the bushing may be worn. To test this, observe the tensioner mark while the engine is running. If the indicator arm is oscillating violently or if it rests outside the “Operating Range” indicator mark (usually stamped on the housing), the tensioner must be replaced. A sluggish tensioner fails to absorb the torque spikes caused by the A/C compressor engaging, which directly leads to belt “deck engagement” slippage.
Torque Specifications and Hardware
When replacing the tensioner, always use the factory-specified torque settings. The tensioner mounting bolt for the 2004 Ford Explorer 4.0 typically requires 35–40 lb-ft. Using an impact wrench for tightening is discouraged, as it can damage the aluminum threads of the front engine cover. Ensure that the tensioner mounting surface is clean of debris or old gasket material before bolting the new unit into place to guarantee the correct alignment of the pulley relative to the belt path.
Tensioner bolt torque: 37 lb-ft. Belt deflection is not applicable as this system uses automatic tensioning. Always verify that the belt tracking indicator remains between the factory marks on the tensioner housing.
2004 Ford Explorer 4.0 Serpentine Belt Diagram Questions Answered
Recommended Best Deal Products


Is it necessary to replace the idler pulley when replacing the serpentine belt?
It is best practice to replace the idler pulley simultaneously. Bearings in the idler pulley are subject to constant rotational stress and often exhibit failures within the same mileage interval as the belt itself. Replacing both ensures you do not have to perform the service twice.
Why does the belt squeal immediately after installation?
Squealing post-installation is almost always caused by improper seating. Even a single rib displaced off the pulley groove will cause a whine. Check the 2004 Ford Explorer 4.0 serpentine belt diagram again to ensure the belt is perfectly aligned in all grooves.
Can I use a belt with a different length if the shop is out of stock?
No. The 4.0L SOHC engine belt length is strictly engineered for the specific path shown in the diagram. A belt that is too long will fail to achieve the necessary tension, while one too short will put excessive pressure on the water pump and alternator bearings, leading to early failure.
How often should the serpentine belt be inspected on this engine?
Inspect the belt every 15,000 miles for cracking, fraying, or missing ribs. Because the 4.0L V6 is an interference-adjacent design regarding cooling, an unexpected belt failure can lead to rapid engine overheating. Professional standards suggest replacement every 60,000 to 90,000 miles regardless of visual condition due to rubber oxidation.
Does the A/C compressor bypass require a different belt?
While “bypass” belts exist for scenarios where the A/C compressor is seized, they are not recommended for long-term use. Using a non-standard length belt changes the geometry of the routing path and can interfere with the tensioner’s optimal operating range.